Operating Guide (Large File - 11.29 MB)
Page 5
...furniture. • Even if your camcorder. • Do not use the AC Adaptor placed in the instructions. Battery pack If the battery pack is still supplied to it for future reference. and CANADA RECYCLING LITHIUM-ION BATTERIES Lithium-Ion batteries are recyclable. AC Adaptor •...8226; Do not handle damaged or leaking lithium ion batteries. • Be sure to charge the battery pack using a genuine Sony battery charger or a device that can help preserve our environment by Sony. • Dispose of used rechargeable batteries to the collection and recycling location nearest you. ...
...furniture. • Even if your camcorder. • Do not use the AC Adaptor placed in the instructions. Battery pack If the battery pack is still supplied to it for future reference. and CANADA RECYCLING LITHIUM-ION BATTERIES Lithium-Ion batteries are recyclable. AC Adaptor •...8226; Do not handle damaged or leaking lithium ion batteries. • Be sure to charge the battery pack using a genuine Sony battery charger or a device that can help preserve our environment by Sony. • Dispose of used rechargeable batteries to the collection and recycling location nearest you. ...
Operating Guide (Large File - 11.29 MB)
Page 6
... on a circuit different from that interference will not occur in the U.S.A. For the State of Conformity Trade Name: SONY Model No.: HDR-AX2000 Responsible Party: Sony Electronics Inc. Operation is connected. - Increase the separation between the equipment and receiver. - The number below is an...the limits for help. These limits are cautioned that may apply, See www.dtsc.ca.gov/hazardouswaste/perchlorate Perchlorate Material: Lithium battery contains perchlorate. Consult the dealer or an experienced radio/TV technician for a digital device pursuant to operate this first (Continued...
... on a circuit different from that interference will not occur in the U.S.A. For the State of Conformity Trade Name: SONY Model No.: HDR-AX2000 Responsible Party: Sony Electronics Inc. Operation is connected. - Increase the separation between the equipment and receiver. - The number below is an...the limits for help. These limits are cautioned that may apply, See www.dtsc.ca.gov/hazardouswaste/perchlorate Perchlorate Material: Lithium battery contains perchlorate. Consult the dealer or an experienced radio/TV technician for a digital device pursuant to operate this first (Continued...
Operating Guide (Large File - 11.29 MB)
Page 10
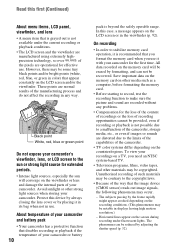
...; Intense light sources, especially the sun will be erased by formatting, and can be recovered. About temperature of your camcorder and battery pack • Your camcorder has a protective function that disables recording or playback if the temperature of such materials may be some tiny black points... time. Avoid sunlight or other media such as a computer, before formatting the memory card. • Before starting to record, test the recording function to make sure the picture and sound are distorted due to a malfunction of your camcorder or battery 10 pack is beyond the safely...
...; Intense light sources, especially the sun will be erased by formatting, and can be recovered. About temperature of your camcorder and battery pack • Your camcorder has a protective function that disables recording or playback if the temperature of such materials may be some tiny black points... time. Avoid sunlight or other media such as a computer, before formatting the memory card. • Before starting to record, test the recording function to make sure the picture and sound are distorted due to a malfunction of your camcorder or battery 10 pack is beyond the safely...
Operating Guide (Large File - 11.29 MB)
Page 12
... Step 1: Checking supplied items 15 Step 2: Attaching the lens hood with lens cover 16 Step 3: Charging the battery pack 17 Step 4: Turning the power on and holding your camcorder properly ..... 19 Step 5: Adjusting the LCD panel and viewfinder 20 Step 6: Setting the date and time 22 ...setting 23 Step 7: Inserting a memory card 23 Recording/Playback Recording 25 Selecting the recording format 27 Changing the settings of your camcorder recordings 29 Adjusting the zoom 29 Adjusting the focus manually 30 Adjusting the image brightness 31 Adjusting to natural color (White balance 33...
... Step 1: Checking supplied items 15 Step 2: Attaching the lens hood with lens cover 16 Step 3: Charging the battery pack 17 Step 4: Turning the power on and holding your camcorder properly ..... 19 Step 5: Adjusting the LCD panel and viewfinder 20 Step 6: Setting the date and time 22 ...setting 23 Step 7: Inserting a memory card 23 Recording/Playback Recording 25 Selecting the recording format 27 Changing the settings of your camcorder recordings 29 Adjusting the zoom 29 Adjusting the focus manually 30 Adjusting the image brightness 31 Adjusting to natural color (White balance 33...
Operating Guide (Large File - 11.29 MB)
Page 14
... 97 File/folder structure on the memory card 98 Maintenance and precautions 99 About the AVCHD format 99 About the "Memory Stick" media 99 About the "InfoLITHIUM" battery pack 100 About x.v.Color 101 About handling of your camcorder 102 Specifications 105 Quick Reference Identifying parts and controls 109 Wireless Remote Commander 113 Screen indicators...
... 97 File/folder structure on the memory card 98 Maintenance and precautions 99 About the AVCHD format 99 About the "Memory Stick" media 99 About the "InfoLITHIUM" battery pack 100 About x.v.Color 101 About handling of your camcorder 102 Specifications 105 Quick Reference Identifying parts and controls 109 Wireless Remote Commander 113 Screen indicators...
Operating Guide (Large File - 11.29 MB)
Page 15
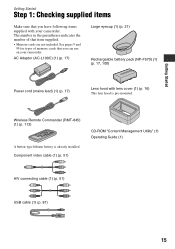
...-F570) (1) (p. 17, 100) Power cord (mains lead) (1) (p. 17) Lens hood with your camcorder. See pages 9 and 99 for types of that item supplied. • Memory cards are not included. Wireless Remote Commander (RMT-845) (1) (p. 113) A button-type lithium battery is pre-mounted. Getting Started Getting Started Step 1: Checking supplied items Make sure... Guide (1) A/V connecting cable (1) (p. 51) USB cable (1) (p. 81) 15 The number in the parentheses indicates the number of memory cards that you can use on your camcorder.
...-F570) (1) (p. 17, 100) Power cord (mains lead) (1) (p. 17) Lens hood with your camcorder. See pages 9 and 99 for types of that item supplied. • Memory cards are not included. Wireless Remote Commander (RMT-845) (1) (p. 113) A button-type lithium battery is pre-mounted. Getting Started Getting Started Step 1: Checking supplied items Make sure... Guide (1) A/V connecting cable (1) (p. 51) USB cable (1) (p. 81) 15 The number in the parentheses indicates the number of memory cards that you can use on your camcorder.
Operating Guide (Large File - 11.29 MB)
Page 17
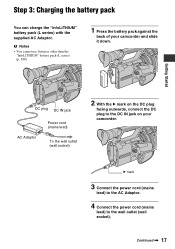
... Adaptor. B mark 3 Connect the power cord (mains lead) to the AC Adaptor. 4 Connect the power cord (mains lead) to the DC IN jack on your camcorder and slide it down. b Notes • You cannot use batteries other than the "InfoLITHIUM" battery pack (L series) (p. 100). 1 Press the battery pack against the back of your...
... Adaptor. B mark 3 Connect the power cord (mains lead) to the AC Adaptor. 4 Connect the power cord (mains lead) to the DC IN jack on your camcorder and slide it down. b Notes • You cannot use batteries other than the "InfoLITHIUM" battery pack (L series) (p. 100). 1 Press the battery pack against the back of your...
Operating Guide (Large File - 11.29 MB)
Page 18
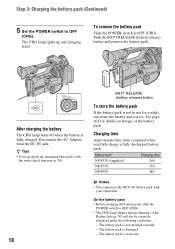
... your camcorder. Battery pack NP-F570 (supplied) NP-F770 NP-F970 Charging time 260 370 485 b Notes • You cannot use for details on storage of the battery pack. On the battery pack • Before changing the battery pack, slide the POWER switch to OFF (CHG). • The CHG lamp flashes during charging, or the Battery Info...
... your camcorder. Battery pack NP-F570 (supplied) NP-F770 NP-F970 Charging time 260 370 485 b Notes • You cannot use for details on storage of the battery pack. On the battery pack • Before changing the battery pack, slide the POWER switch to OFF (CHG). • The CHG lamp flashes during charging, or the Battery Info...
Operating Guide (Large File - 11.29 MB)
Page 19
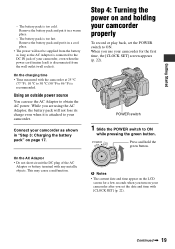
... power will not lose its charge even when it in "Step 3: Charging the battery pack" on your camcorder. Remove the battery pack and put it is recommended. Connect your camcorder as the AC Adaptor is disconnected from the battery as long as shown in a warm place. - Step 4: Turning the power on...charging time • Time measured with any metallic objects. This may cause a malfunction. The battery pack is too hot. On the AC Adaptor • Do not short-circuit the DC plug of your camcorder properly To record or play back, set the date and time with [CLOCK SET] (p. 22...
... power will not lose its charge even when it in "Step 3: Charging the battery pack" on your camcorder. Remove the battery pack and put it is recommended. Connect your camcorder as the AC Adaptor is disconnected from the battery as long as shown in a warm place. - Step 4: Turning the power on...charging time • Time measured with any metallic objects. This may cause a malfunction. The battery pack is too hot. On the AC Adaptor • Do not short-circuit the DC plug of your camcorder properly To record or play back, set the date and time with [CLOCK SET] (p. 22...
Operating Guide (Large File - 11.29 MB)
Page 20
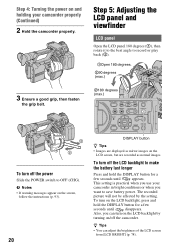
... on the screen, follow the instructions (p. 93). 20 DISPLAY button z Tips • Images are displayed as mirror images on and holding your camcorder in bright conditions or when you can adjust the brightness of the LCD screen from [LCD BRIGHT] (p. 78). This setting is practical when you... or play back (2). 1Open 180 degrees. 290 degrees (max.) 2180 degrees (max.) To turn off the camcorder. To turn off the power Slide the POWER switch to make the battery last longer Press and hold the DISPLAY button for a few seconds until appears. The recorded picture will not ...
... on the screen, follow the instructions (p. 93). 20 DISPLAY button z Tips • Images are displayed as mirror images on and holding your camcorder in bright conditions or when you can adjust the brightness of the LCD screen from [LCD BRIGHT] (p. 78). This setting is practical when you... or play back (2). 1Open 180 degrees. 290 degrees (max.) 2180 degrees (max.) To turn off the camcorder. To turn off the power Slide the POWER switch to make the battery last longer Press and hold the DISPLAY button for a few seconds until appears. The recorded picture will not ...
Operating Guide (Large File - 11.29 MB)
Page 21
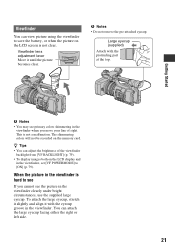
... [VF POWERMODE] to [ON] (p. 79). b Notes • Do not remove the pre-attached eyecup. Viewfinder You can view picture using the viewfinder to save the battery, or when the picture on the memory card. Getting Started b Notes • You may see primary colors shimmering in the viewfinder when you cannot see...
... [VF POWERMODE] to [ON] (p. 79). b Notes • Do not remove the pre-attached eyecup. Viewfinder You can view picture using the viewfinder to save the battery, or when the picture on the memory card. Getting Started b Notes • You may see primary colors shimmering in the viewfinder when you cannot see...
Operating Guide (Large File - 11.29 MB)
Page 22
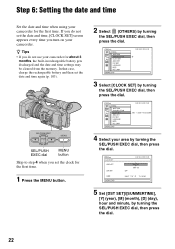
In that case, charge the rechargeable battery and then set the date and time again (p. 103). 2 Select (OTHERS) by turning the SEL/PUSH ... the date and time, [CLOCK SET] screen appears every time you do not use your camcorder for the first time. z Tips • If you turn on your camcorder. If you do not set the clock for the first time. 1 Press the MENU button...dial. Step 6: Setting the date and time Set the date and time when using your camcorder for about 3 months, the built-in rechargeable battery gets discharged and the date and time settings may be cleared from the memory.
In that case, charge the rechargeable battery and then set the date and time again (p. 103). 2 Select (OTHERS) by turning the SEL/PUSH ... the date and time, [CLOCK SET] screen appears every time you do not use your camcorder for the first time. z Tips • If you turn on your camcorder. If you do not set the clock for the first time. 1 Press the MENU button...dial. Step 6: Setting the date and time Set the date and time when using your camcorder for about 3 months, the built-in rechargeable battery gets discharged and the date and time settings may be cleared from the memory.
Operating Guide (Large File - 11.29 MB)
Page 24
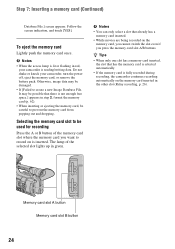
...memory card inserted, the slot that has the memory card is selected automatically. • If the memory card is fully recorded during recording, the camcorder continues recording automatically on is inserted. Memory card slot A button Memory card slot B button 24 To eject the memory card Lightly push the memory... the screen indication, and touch [YES]. b Notes • When the access lamp is lit or flashing in red, your camcorder, turn the power off, eject the memory card, or remove the battery pack. The lamp of the memory card slot where the memory card you press the memory card slot...
...memory card inserted, the slot that has the memory card is selected automatically. • If the memory card is fully recorded during recording, the camcorder continues recording automatically on is inserted. Memory card slot A button Memory card slot B button 24 To eject the memory card Lightly push the memory... the screen indication, and touch [YES]. b Notes • When the access lamp is lit or flashing in red, your camcorder, turn the power off, eject the memory card, or remove the battery pack. The lamp of the memory card slot where the memory card you press the memory card slot...
Operating Guide (Large File - 11.29 MB)
Page 25
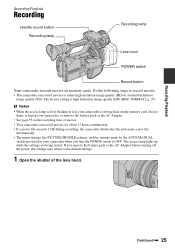
...memory cards. Recording/Playback Continued , 25 The access lamp lights up while the settings are stored in red, your camcorder when you remove the battery pack or the AC Adaptor before turning off the power, the settings may return to the default settings. 1 ...Open the shutter of movies. • Your camcorder can record movies in either high definition image quality (HD) or standard definition image quality (SD). b Notes • When the access lamp is lit or flashing...
...memory cards. Recording/Playback Continued , 25 The access lamp lights up while the settings are stored in red, your camcorder when you remove the battery pack or the AC Adaptor before turning off the power, the settings may return to the default settings. 1 ...Open the shutter of movies. • Your camcorder can record movies in either high definition image quality (HD) or standard definition image quality (SD). b Notes • When the access lamp is lit or flashing...
Operating Guide (Large File - 11.29 MB)
Page 50
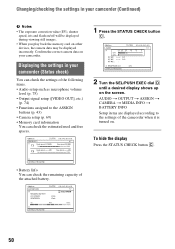
...camcorder (Continued) b Notes • The exposure correction value (EV), shutter speed, iris and flash on/off will be displayed during viewing still images. • When you play back the memory card on other devices, the camera data may be displayed incorrectly. AUDIO t OUTPUT t ASSIGN t CAMERA t MEDIA INFO t BATTERY... INFO Setup items are displayed according to the ASSIGN buttons (p. 43) • Camera setup (p. 69) • Memory card information You can check the remaining capacity of the attached battery. 50 To hide the display Press ...
...camcorder (Continued) b Notes • The exposure correction value (EV), shutter speed, iris and flash on/off will be displayed during viewing still images. • When you play back the memory card on other devices, the camera data may be displayed incorrectly. AUDIO t OUTPUT t ASSIGN t CAMERA t MEDIA INFO t BATTERY... INFO Setup items are displayed according to the ASSIGN buttons (p. 43) • Camera setup (p. 69) • Memory card information You can check the remaining capacity of the attached battery. 50 To hide the display Press ...
Operating Guide (Large File - 11.29 MB)
Page 58
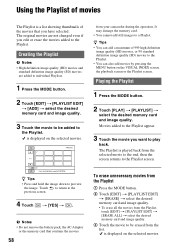
is displayed on the selected movies. b Notes • Do not remove the battery pack, the AC Adaptor or the memory card that you have selected. Using the Playlist of movies The Playlist is a list showing thumbnails of 999 ... selected movie to the end, then the screen returns to preview the image. Touch to return to a Playlist. The Playlist is played back from your camcorder during the operation. z Tips • You can also add movies by pressing the MENU button on the VISUAL INDEX screen, the playback screen or the...
is displayed on the selected movies. b Notes • Do not remove the battery pack, the AC Adaptor or the memory card that you have selected. Using the Playlist of movies The Playlist is a list showing thumbnails of 999 ... selected movie to the end, then the screen returns to preview the image. Touch to return to a Playlist. The Playlist is played back from your camcorder during the operation. z Tips • You can also add movies by pressing the MENU button on the VISUAL INDEX screen, the playback screen or the...
Operating Guide (Large File - 11.29 MB)
Page 60
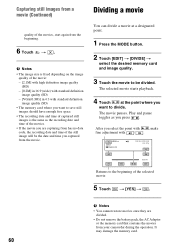
...and pause toggles as the recording date and time of the movies. • If the movie you are divided. • Do not remove the battery pack, the AC Adaptor or the memory card that contains the movies from the beginning. 6 Touch t . Returns to divide. Dividing a movie ...image quality (SD) - [VGA(0.3M)] in 4:3 with / . Capturing still images from a movie (Continued) quality of the movies, start again from your camcorder during the operation. b Notes • You cannot restore movies once they are capturing from the movie. b Notes • The image size is the same as...
...and pause toggles as the recording date and time of the movies. • If the movie you are divided. • Do not remove the battery pack, the AC Adaptor or the memory card that contains the movies from the beginning. 6 Touch t . Returns to divide. Dividing a movie ...image quality (SD) - [VGA(0.3M)] in 4:3 with / . Capturing still images from a movie (Continued) quality of the movies, start again from your camcorder during the operation. b Notes • You cannot restore movies once they are capturing from the movie. b Notes • The image size is the same as...
Operating Guide (Large File - 11.29 MB)
Page 61
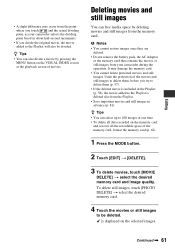
b Notes • You cannot restore images once they are deleted. • Do not remove the battery pack, the AC Adaptor or the memory card that contains the movies or still images from your camcorder selects the dividing point based in about half-second increments. • If you try to delete them ... the memory card. • You cannot delete protected movies and still images. is included in advance (p. 81). z Tips • You can free media space by pressing the MENU button on the VISUAL INDEX screen or the playback screen of the memory card, format the memory card (p. 62). 1 Press...
b Notes • You cannot restore images once they are deleted. • Do not remove the battery pack, the AC Adaptor or the memory card that contains the movies or still images from your camcorder selects the dividing point based in about half-second increments. • If you try to delete them ... the memory card. • You cannot delete protected movies and still images. is included in advance (p. 81). z Tips • You can free media space by pressing the MENU button on the VISUAL INDEX screen or the playback screen of the memory card, format the memory card (p. 62). 1 Press...
Operating Guide (Large File - 11.29 MB)
Page 79
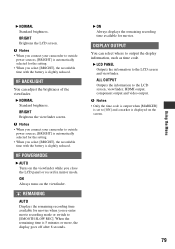
b Notes • When you connect your camcorder to outside power sources, [BRIGHT] is automatically selected for the setting. • When you select [BRIGHT], the recordable time with the battery is slightly reduced. VF BACKLIGHT You can select where to the LCD screen, viewfinder, HDMI output, component ... code is output when [MARKER] is set to outside power sources, [BRIGHT] is automatically selected for the setting. • When you connect your camcorder to [ON] and a marker is 5 minutes or more, the display goes off after 8 seconds. b Notes • When you select [BRIGHT...
b Notes • When you connect your camcorder to outside power sources, [BRIGHT] is automatically selected for the setting. • When you select [BRIGHT], the recordable time with the battery is slightly reduced. VF BACKLIGHT You can select where to the LCD screen, viewfinder, HDMI output, component ... code is output when [MARKER] is set to outside power sources, [BRIGHT] is automatically selected for the setting. • When you connect your camcorder to [ON] and a marker is 5 minutes or more, the display goes off after 8 seconds. b Notes • When you select [BRIGHT...
Operating Guide (Large File - 11.29 MB)
Page 83
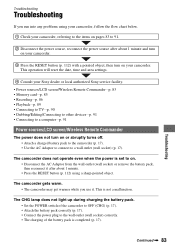
... the POWER switch of the camcorder to OFF (CHG) (p. 17). • Attach the battery pack correctly (p. 17). • Connect the power plug to a wall outlet (wall socket) (p. 17). This is completed (p. 17). This operation will reset the date, time and area settings. 4 Consult your Sony dealer or local authorized Sony service facility. • Power...
... the POWER switch of the camcorder to OFF (CHG) (p. 17). • Attach the battery pack correctly (p. 17). • Connect the power plug to a wall outlet (wall socket) (p. 17). This is completed (p. 17). This operation will reset the date, time and area settings. 4 Consult your Sony dealer or local authorized Sony service facility. • Power...


