Operating Instructions
Page 5
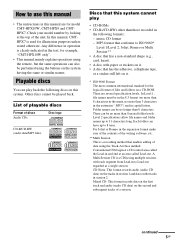
... that enables adding of a session. In Level 1, file names must be performed using the buttons on the second and subsequent tracks of data using the remote, but the same operations can play • CD-ROMs • CD-Rs/CD-RWs other than 8 characters. A Multi Session CD is used for example, "CMT... that has the adhesive, cellophane tape, or a sticker still left on it. * ISO 9660 Format The most common international standard for model CMT-HPX10W, CMT-HPX9 and CMTHPX7.
... that enables adding of a session. In Level 1, file names must be performed using the buttons on the second and subsequent tracks of data using the remote, but the same operations can play • CD-ROMs • CD-Rs/CD-RWs other than 8 characters. A Multi Session CD is used for example, "CMT... that has the adhesive, cellophane tape, or a sticker still left on it. * ISO 9660 Format The most common international standard for model CMT-HPX10W, CMT-HPX9 and CMTHPX7.

Operating Instructions
Page 8
... adaptor). Check that all discs are removed from the system. 3 While holding down EX-CHANGE, press ?/1. Refer to a wall outlet. Tip When the remote no longer operates the system, replace both batteries with a voltage selector, set VOLTAGE SELECTOR to CD. 2 Make sure that "PLEASE WAIT" then "LOCK"...the system, press ?/1. Inserting two R6 (size AA) batteries into the remote Note If you do not use the remote for a long period of time, remove the batteries to avoid possible damage from the system and other components. 3 For models with new ones. When carrying this system Perform the ...
... adaptor). Check that all discs are removed from the system. 3 While holding down EX-CHANGE, press ?/1. Refer to a wall outlet. Tip When the remote no longer operates the system, replace both batteries with a voltage selector, set VOLTAGE SELECTOR to CD. 2 Make sure that "PLEASE WAIT" then "LOCK"...the system, press ?/1. Inserting two R6 (size AA) batteries into the remote Note If you do not use the remote for a long period of time, remove the batteries to avoid possible damage from the system and other components. 3 For models with new ones. When carrying this system Perform the ...
Operating Instructions
Page 9
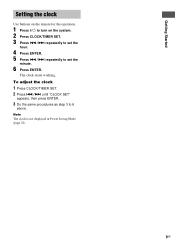
To adjust the clock 1 Press CLOCK/TIMER SET. 2 Press ./> until "CLOCK SET" appears, then press ENTER. 3 Do the same procedures as step 3 to set the hour. 4 Press ENTER. 5 Press ./> repeatedly to 6 above. The clock starts working. Note The clock is not displayed in Power Saving Mode (page 22). 9GB Getting Started Setting the clock Use buttons on the remote for the operation. 1 Press ?/1 to turn on the system. 2 Press CLOCK/TIMER SET. 3 Press ./> repeatedly to set the minute. 6 Press ENTER.
To adjust the clock 1 Press CLOCK/TIMER SET. 2 Press ./> until "CLOCK SET" appears, then press ENTER. 3 Do the same procedures as step 3 to set the hour. 4 Press ENTER. 5 Press ./> repeatedly to 6 above. The clock starts working. Note The clock is not displayed in Power Saving Mode (page 22). 9GB Getting Started Setting the clock Use buttons on the remote for the operation. 1 Press ?/1 to turn on the system. 2 Press CLOCK/TIMER SET. 3 Press ./> repeatedly to set the minute. 6 Press ENTER.

Operating Instructions
Page 10
... for 8 cm disc only) To load an 8 cm disc, insert only DISC +1 slot. To remove discs 1 Press Z. 2 Hold down the lever on it as the remote or cords) in any of the disc tray. Place the disc so that you play a disc, insert it is flush with your other hand. Do...
... for 8 cm disc only) To load an 8 cm disc, insert only DISC +1 slot. To remove discs 1 Press Z. 2 Hold down the lever on it as the remote or cords) in any of the disc tray. Place the disc so that you play a disc, insert it is flush with your other hand. Do...

Operating Instructions
Page 11
... pressing m/M during track2) playback and release it at the desired point. When playing a non-MP3 disc, Album Play becomes 1 DISC Play. Play 3 Press N on the remote (or CD/NX on the unit)). Select a track Press ./> repeatedly. Normal Play/Shuffle Play You can play . Select an album Press ALBUM +/- Remove a disc Press...
... pressing m/M during track2) playback and release it at the desired point. When playing a non-MP3 disc, Album Play becomes 1 DISC Play. Play 3 Press N on the remote (or CD/NX on the unit)). Select a track Press ./> repeatedly. Normal Play/Shuffle Play You can play . Select an album Press ALBUM +/- Remove a disc Press...

Operating Instructions
Page 13
... number 6 Program additional discs or tracks. Other operations To Cancel Program Play Clear a track from all the tracks on the unit. Use buttons on the remote for the operation. 1 Press CD (or FUNCTION repeatedly) until "PGM" appears. 3 Press DISC SKIP repeatedly (or press one of up to step 5 with 20 tracks...
... number 6 Program additional discs or tracks. Other operations To Cancel Program Play Clear a track from all the tracks on the unit. Use buttons on the remote for the operation. 1 Press CD (or FUNCTION repeatedly) until "PGM" appears. 3 Press DISC SKIP repeatedly (or press one of up to step 5 with 20 tracks...

Operating Instructions
Page 19
... to select "BASS" or "TREBLE". remaining time** Change the time SLEEP repeatedly to select the to music - To cancel the DSGX, press DSGX on the remote for the operation. t 10MIN t SLEEP OFF * The system automatically turns off after the current CD or tape finishes playing. Other operations To Press Check the...
... to select "BASS" or "TREBLE". remaining time** Change the time SLEEP repeatedly to select the to music - To cancel the DSGX, press DSGX on the remote for the operation. t 10MIN t SLEEP OFF * The system automatically turns off after the current CD or tape finishes playing. Other operations To Press Check the...

Operating Instructions
Page 20
... to the MD/VIDEO jacks or the transmitter (CMTHPX10W only) as sound sources for the operation. 1 Prepare the sound source you use the optional component connected to play starts (about 15 seconds before the preset time, Play Timer will not be activated. • You cannot use Play Timer and ...Sleep Timer at a preset time. Use buttons on the remote for Play Timer. • You cannot activate Play Timer and Rec Timer simultaneously. 20GB Start over from the time the system turns on page 9). Play...
... to the MD/VIDEO jacks or the transmitter (CMTHPX10W only) as sound sources for the operation. 1 Prepare the sound source you use the optional component connected to play starts (about 15 seconds before the preset time, Play Timer will not be activated. • You cannot use Play Timer and ...Sleep Timer at a preset time. Use buttons on the remote for Play Timer. • You cannot activate Play Timer and Rec Timer simultaneously. 20GB Start over from the time the system turns on page 9). Play...

Operating Instructions
Page 21
... time to minimum during recording. • You cannot activate Play Timer and Rec Timer simultaneously. 21GB Timer Timer recording radio programs - Use buttons on the remote for the operation. 1 Tune in the preset radio station (see "Setting the clock" on page 14) and set the hour, then press ENTER. Start over...
... time to minimum during recording. • You cannot activate Play Timer and Rec Timer simultaneously. 21GB Timer Timer recording radio programs - Use buttons on the remote for the operation. 1 Tune in the preset radio station (see "Setting the clock" on page 14) and set the hour, then press ENTER. Start over...
Operating Instructions
Page 26
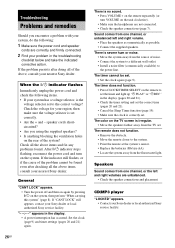
... action. There is no sound. • Press VOLUME + on the remote repeatedly (or turn on the rear of the above items and fix any problems found even after checking all the above , consult your nearest Sony dealer. After ?/1 indicator stops flashing, reconnect the power cord and turn ...noise. • Connect the system to a different wall outlet. • Install a noise filter (commercially available) to the system. • Point the remote at the system's sensor. • Replace the batteries (R6/size AA). • Locate the system away from the source of the problem cannot be ...
... action. There is no sound. • Press VOLUME + on the remote repeatedly (or turn on the rear of the above items and fix any problems found even after checking all the above , consult your nearest Sony dealer. After ?/1 indicator stops flashing, reconnect the power cord and turn ...noise. • Connect the system to a different wall outlet. • Install a noise filter (commercially available) to the system. • Point the remote at the system's sensor. • Replace the batteries (R6/size AA). • Locate the system away from the source of the problem cannot be ...
Operating Instructions
Page 33
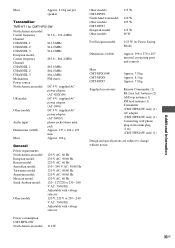
projecting parts and controls Mass CMT-HPX10W: CMT-HPX9: CMT-HPX7: Approx. 7.8 kg Approx. 8.1 kg Approx. 7.8 kg Supplied accessories Remote Commander (1) R6 (size AA) batteries (2) AM loop antenna (1) FM lead antenna (1) Transmitter (CMT-HPX10W only) (1) AC adapter (CMT-HPX10W only) (1) Connecting... 120 V, 220 V or 230 - 240 V AC, 50/60 Hz Adjustable with voltage selector Power consumption CMT-HPX10W North American model: 110 W Other models: CMT-HPX9 North American model: Other models: CMT-HPX7 European model: Other models: 115 W 120 W 105 W 115 W 90 W For European model: 0.25 W (in ...
projecting parts and controls Mass CMT-HPX10W: CMT-HPX9: CMT-HPX7: Approx. 7.8 kg Approx. 8.1 kg Approx. 7.8 kg Supplied accessories Remote Commander (1) R6 (size AA) batteries (2) AM loop antenna (1) FM lead antenna (1) Transmitter (CMT-HPX10W only) (1) AC adapter (CMT-HPX10W only) (1) Connecting... 120 V, 220 V or 230 - 240 V AC, 50/60 Hz Adjustable with voltage selector Power consumption CMT-HPX10W North American model: 110 W Other models: CMT-HPX9 North American model: Other models: CMT-HPX7 European model: Other models: 115 W 120 W 105 W 115 W 90 W For European model: 0.25 W (in ...
Operating Instructions
Page 34
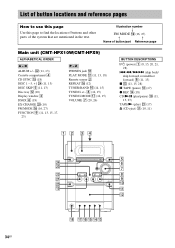
... page to find the location of buttons and other parts of button/part Reference page Main unit (CMT-HPX10W/CMT-HPX9) ALPHABETICAL ORDER A - Z PHONES jack qk PLAY MODE qj (11, 13, 18) Remote sensor 2 REPEAT qh (12) TUNER/BAND 0 (14, 15) TUNING +/- 8 (14, 15) TUNING MODE qj (14, 15) VOLUME 7 (20, 26...
... page to find the location of buttons and other parts of button/part Reference page Main unit (CMT-HPX10W/CMT-HPX9) ALPHABETICAL ORDER A - Z PHONES jack qk PLAY MODE qj (11, 13, 18) Remote sensor 2 REPEAT qh (12) TUNER/BAND 0 (14, 15) TUNING +/- 8 (14, 15) TUNING MODE qj (14, 15) VOLUME 7 (20, 26...

Operating Instructions
Page 35
..., 21) DISC SKIP 0 (11, 13) DISPLAY w; (16, 22) ENTER 9 (9, 13, 20, 21) EQ qd (19) FM MODE 4 (16, 27) FUNCTION 6 (11, 13, 15, 17, 23) P - Remote control ALPHABETICAL ORDER A -
..., 21) DISC SKIP 0 (11, 13) DISPLAY w; (16, 22) ENTER 9 (9, 13, 20, 21) EQ qd (19) FM MODE 4 (16, 27) FUNCTION 6 (11, 13, 15, 17, 23) P - Remote control ALPHABETICAL ORDER A -


