
Child Safety: It Makes A Difference Where Your TV Stands
Page 1
... or carts. The industry is committed to advocate children's safety and educate customers and their families about television safety. The home theater entertainment experience is a growing trend, and larger televisions are popular purchases and are improperly secured or inappropriately situated on this hidden hazard...Cares! Sometimes televisions are not always supported on top of TVs such as VCRs and remotes that is large enough to support the weight of your television (and other electronic components). 2 Use appropriate angle braces, straps and anchors to secure your family and friends....
... or carts. The industry is committed to advocate children's safety and educate customers and their families about television safety. The home theater entertainment experience is a growing trend, and larger televisions are popular purchases and are improperly secured or inappropriately situated on this hidden hazard...Cares! Sometimes televisions are not always supported on top of TVs such as VCRs and remotes that is large enough to support the weight of your television (and other electronic components). 2 Use appropriate angle braces, straps and anchors to secure your family and friends....
Operating Instructions
Page 4
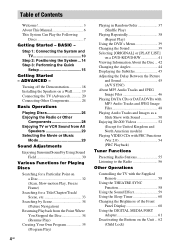
...System ...14 Step 3: Performing the Quick Setup 15 Getting Started - Turning off the Demonstration 18 Installing the Speakers on a Wall.......... 19 Connecting the TV (Advanced 20 Connecting Other Components 24 Basic Operations Playing Discs 26 Enjoying the Radio or Other Components... MP3 Audio Tracks and JPEG Image Files 46 Playing DATA CDs or DATA DVDs with MP3 Audio Tracks and JPEG Image Files 48 Playing Audio Tracks and ...55 Listening to the Radio 56 Other Operations Controlling the TV with the Supplied Remote 58 Using the THEATRE SYNC Function 58 Using the Sound Effect 59 Using ...
...System ...14 Step 3: Performing the Quick Setup 15 Getting Started - Turning off the Demonstration 18 Installing the Speakers on a Wall.......... 19 Connecting the TV (Advanced 20 Connecting Other Components 24 Basic Operations Playing Discs 26 Enjoying the Radio or Other Components... MP3 Audio Tracks and JPEG Image Files 46 Playing DATA CDs or DATA DVDs with MP3 Audio Tracks and JPEG Image Files 48 Playing Audio Tracks and ...55 Listening to the Radio 56 Other Operations Controlling the TV with the Supplied Remote 58 Using the THEATRE SYNC Function 58 Using the Sound Effect 59 Using ...
Operating Instructions
Page 6
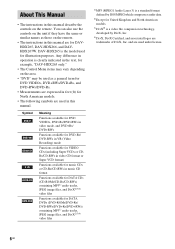
...example, "DAV-HDX265 only." • The Control Menu items may vary depending on the remote. Symbol Meaning Functions available for DVD VIDEOs, DVD-Rs/DVD-RWs in video mode, and DVD+Rs/ DVD+RWs Functions available for DVD-Rs/ DVD-RWs in VR (Video Recording) mode Functions available for VIDEO CDs (including Super VCDs or..., and DAVHDX267W. About This Manual • The instructions in this manual describe the controls on the area. • "DVD" may be used as those on the remote. • The instructions in this manual. You can also use the controls on the unit if they have the same or...
...example, "DAV-HDX265 only." • The Control Menu items may vary depending on the remote. Symbol Meaning Functions available for DVD VIDEOs, DVD-Rs/DVD-RWs in video mode, and DVD+Rs/ DVD+RWs Functions available for DVD-Rs/ DVD-RWs in VR (Video Recording) mode Functions available for VIDEO CDs (including Super VCDs or..., and DAVHDX267W. About This Manual • The instructions in this manual describe the controls on the area. • "DVD" may be used as those on the remote. • The instructions in this manual. You can also use the controls on the unit if they have the same or...
Operating Instructions
Page 9
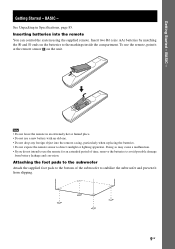
... an extended period of the subwoofer to stabilize the subwoofer and prevent it at the remote sensor on the batteries to avoid possible damage from slipping. 9GB Attaching the foot pads to the subwoofer Attach the supplied foot pads to the ... an old one. • Do not drop any foreign object into the remote You can control the system using the supplied remote. Inserting batteries into the remote casing, particularly when replacing the batteries. • Do not expose the remote sensor to use the remote, point it from battery leakage and corrosion. Insert two R6 (size AA...
... an extended period of the subwoofer to stabilize the subwoofer and prevent it at the remote sensor on the batteries to avoid possible damage from slipping. 9GB Attaching the foot pads to the subwoofer Attach the supplied foot pads to the ... an old one. • Do not drop any foreign object into the remote You can control the system using the supplied remote. Inserting batteries into the remote casing, particularly when replacing the batteries. • Do not expose the remote sensor to use the remote, point it from battery leakage and corrosion. Insert two R6 (size AA...

Operating Instructions
Page 18
... its factory default settings (ex. When you need to set to off even though you press "/1 on the remote, the demonstration turns off , the system saves power in the system menu to on/off , then press "/1 on . • "DEMO OFF": sets the demonstration mode to ...demonstration, set the demonstration mode in standby mode. • If the system is made. 5 Press SYSTEM MENU. To turn off . Turning off the Demonstration "/1 X/x/c, SYSTEM MENU Setting the demonstration mode to on the remote. The system menu turns off the demonstration simply by pressing "/1 on , the ...
... its factory default settings (ex. When you need to set to off even though you press "/1 on the remote, the demonstration turns off , the system saves power in the system menu to on/off , then press "/1 on . • "DEMO OFF": sets the demonstration mode to ...demonstration, set the demonstration mode in standby mode. • If the system is made. 5 Press SYSTEM MENU. To turn off . Turning off the Demonstration "/1 X/x/c, SYSTEM MENU Setting the demonstration mode to on the remote. The system menu turns off the demonstration simply by pressing "/1 on , the ...
Operating Instructions
Page 26
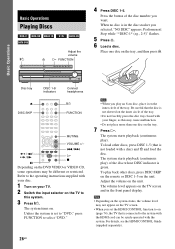
... DISC SKIP on the remote or DISC 1-5 on the TV to this may be synch-operated with a disc) and A and load the disc. To play ). Note • Depending on the system status, the volume level...more than one disc on the TV screen and in the disc stocker you set to "DVD," press FUNCTION to the system with the HDMI cord can be different or restricted. Note • When you want....disc is not skewed on the inner circle of the disc whose DISC indicator is not loaded with the system. The system starts playback (continuous play an 8 cm disc, place it on the tray. 7 Press H. Adjust ...
... DISC SKIP on the remote or DISC 1-5 on the TV to this may be synch-operated with a disc) and A and load the disc. To play ). Note • Depending on the system status, the volume level...more than one disc on the TV screen and in the disc stocker you set to "DVD," press FUNCTION to the system with the HDMI cord can be different or restricted. Note • When you want....disc is not skewed on the inner circle of the disc whose DISC indicator is not loaded with the system. The system starts playback (continuous play an 8 cm disc, place it on the tray. 7 Press H. Adjust ...
Operating Instructions
Page 27
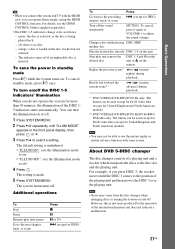
... directly DISC 1-5 on and off . Replay the previous scene* (instant replay) during playback. * DVD VIDEOs/DVD-RWs/DVD-Rs only. Note • You may come from the disc changer when changing discs or turning the system on the unit. To cancel standby mode, press "/1 once. Briefly fast forward the current scene** ...Press x X X or H > (except for JPEG) To Press Go back to the disc slot and the playing unit. To turn the illumination on the remote. green: the disc is selected, or the disc is inserted. To cancel, press it again or VOLUME + to use the instant replay or instant advance...
... directly DISC 1-5 on and off . Replay the previous scene* (instant replay) during playback. * DVD VIDEOs/DVD-RWs/DVD-Rs only. Note • You may come from the disc changer when changing discs or turning the system on the unit. To cancel standby mode, press "/1 once. Briefly fast forward the current scene** ...Press x X X or H > (except for JPEG) To Press Go back to the disc slot and the playing unit. To turn the illumination on the remote. green: the disc is selected, or the disc is inserted. To cancel, press it again or VOLUME + to use the instant replay or instant advance...
Operating Instructions
Page 58
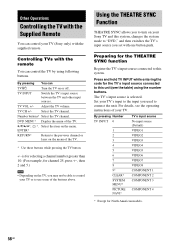
...the TV, you may not be able to control your Sony TV and this system. TV VOL +/- DVD MENU* Display the menu of the buttons above. is selected. Set your TV (Sony only) with the supplied remote. TV CH +/- Preparing for North American models. 58GB... input source (Default) VIDEO1 VIDEO2 VIDEO3 VIDEO4 VIDEO5 VIDEO6 VIDEO7 VIDEO8 COMPONENT 1 COMPONENT 2 COMPONENT 3 COMPONENT 4 * Except for the THEATRE SYNC function Register the TV's input source connected to this system, changes the system mode to "DVD," and then switches the TV's input source you used to connect the...
...the TV, you may not be able to control your Sony TV and this system. TV VOL +/- DVD MENU* Display the menu of the buttons above. is selected. Set your TV (Sony only) with the supplied remote. TV CH +/- Preparing for North American models. 58GB... input source (Default) VIDEO1 VIDEO2 VIDEO3 VIDEO4 VIDEO5 VIDEO6 VIDEO7 VIDEO8 COMPONENT 1 COMPONENT 2 COMPONENT 3 COMPONENT 4 * Except for the THEATRE SYNC function Register the TV's input source connected to this system, changes the system mode to "DVD," and then switches the TV's input source you used to connect the...

Operating Instructions
Page 59
... turn off the sound effect Press DYNAMIC BASS again. The transmit time varies depending on some Sony TVs.) • If distance between TV and this unit is selected. Operating the THEATRE SYNC function Point the remote to the direction of the TV and this function does not work, change the transmit time... Press and hold TV CH + while entering the code for Sony TVs. (This function may not work on the TV. To change ...
... turn off the sound effect Press DYNAMIC BASS again. The transmit time varies depending on some Sony TVs.) • If distance between TV and this unit is selected. Operating the THEATRE SYNC function Point the remote to the direction of the TV and this function does not work, change the transmit time... Press and hold TV CH + while entering the code for Sony TVs. (This function may not work on the TV. To change ...
Operating Instructions
Page 61
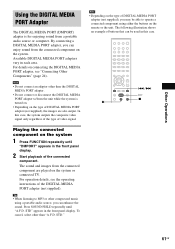
...connecting the DIGITAL MEDIA PORT adapter, see the operating instructions of video signal. For details on the remote or the unit. STD" appears in this case, the system outputs the composite video signal only regardless of the type of the DIGITAL MEDIA PORT adapter (not ... • Depending on the type of buttons that can enhance the sound. For operation details, see "Connecting Other Components" (page 24). Playing the connected component on the system. Available DIGITAL MEDIA PORT adapters vary in the front panel display. 2 Start playback of DIGITAL MEDIA PORT adapter (not...
...connecting the DIGITAL MEDIA PORT adapter, see the operating instructions of video signal. For details on the remote or the unit. STD" appears in this case, the system outputs the composite video signal only regardless of the type of the DIGITAL MEDIA PORT adapter (not ... • Depending on the type of buttons that can enhance the sound. For operation details, see "Connecting Other Components" (page 24). Playing the connected component on the system. Available DIGITAL MEDIA PORT adapters vary in the front panel display. 2 Start playback of DIGITAL MEDIA PORT adapter (not...

Operating Instructions
Page 62
... turns off . • "ON": Child lock function on the remote. 62GB The default setting is made. 5 Press SYSTEM MENU. To insert a disc while the child lock function is on Press Z on the remote to select a setting. To cancel, press x for preventing misoperation, such as child mischief (child lock ... operate the buttons on the unit while the child lock function is on Press Z on the remote and press DISC SKIP repeatedly until the desired DISC indicator (1-5) lights up. Tip • You can operate the system by pressing x for more than 5 seconds (" " lights up , then place a disc...
... turns off . • "ON": Child lock function on the remote. 62GB The default setting is made. 5 Press SYSTEM MENU. To insert a disc while the child lock function is on Press Z on the remote to select a setting. To cancel, press x for preventing misoperation, such as child mischief (child lock ... operate the buttons on the unit while the child lock function is on Press Z on the remote and press DISC SKIP repeatedly until the desired DISC indicator (1-5) lights up. Tip • You can operate the system by pressing x for more than 5 seconds (" " lights up , then place a disc...
Operating Instructions
Page 77
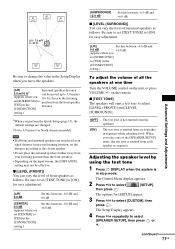
...this between -6.0 dB and +6.0 dB. [SUBWOOFER] +2.0 dB Set this between -6.0 dB and +6.0 dB. When you select one time Turn the VOLUME control on the remote. The Setup Display appears. 4 Press X/x repeatedly to select [SETUP], then press . x [TEST TONE] The speakers will emit a test tone to adjust [LEVEL...the unit, or press VOLUME +/- Advanced Settings and Adjustments Adjusting the speaker level by using the test tone 1 Press DISPLAY when the system is emitted from the speakers. The test tone is in sequence. continued 77GB Note • If all the speakers at an equal ...
...this between -6.0 dB and +6.0 dB. [SUBWOOFER] +2.0 dB Set this between -6.0 dB and +6.0 dB. When you select one time Turn the VOLUME control on the remote. The Setup Display appears. 4 Press X/x repeatedly to select [SETUP], then press . x [TEST TONE] The speakers will emit a test tone to adjust [LEVEL...the unit, or press VOLUME +/- Advanced Settings and Adjustments Adjusting the speaker level by using the test tone 1 Press DISPLAY when the system is emitted from the speakers. The test tone is in sequence. continued 77GB Note • If all the speakers at an equal ...
Operating Instructions
Page 81
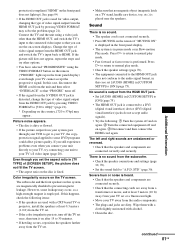
...CUSTOM SETUP] to [ON] (page 75). • The HDMI OUT jack is not connected securely. • Press MUTING on the remote ("PROGRE" lights up ). However, some DVD programs could affect picture quality. STD" (page 30). The left and right sounds are unbalanced or reversed. • Check that the connecting... front panel display. • The system is performed. Press H to return to "A.F.D. Press H to return to normal play mode. • Fast forward or fast reverse is in pause mode or in [TV TYPE] of video signal output from the audio components. • The plugs and jacks ...
...CUSTOM SETUP] to [ON] (page 75). • The HDMI OUT jack is not connected securely. • Press MUTING on the remote ("PROGRE" lights up ). However, some DVD programs could affect picture quality. STD" (page 30). The left and right sounds are unbalanced or reversed. • Check that the connecting... front panel display. • The system is performed. Press H to return to "A.F.D. Press H to return to normal play mode. • Fast forward or fast reverse is in pause mode or in [TV TYPE] of video signal output from the audio components. • The plugs and jacks ...

Operating Instructions
Page 82
... 3,072 (width) × 2,048 (height) in normal mode, or more than 2,000,000 pixels in the remote are playing a Dolby Digital, DTS, or MPEG audio sound track. • Make sure the sound field function is...; Check the speaker connections and settings (page 10, 76). • Depending on the DVD does not match the system. • Moisture has condensed inside the unit and may not be played. • ... image file cannot be monaural or stereo even if the sound track is not pointed at the remote sensor on for United Kingdom and North American models). The sound loses stereo effect when you play...
... 3,072 (width) × 2,048 (height) in normal mode, or more than 2,000,000 pixels in the remote are playing a Dolby Digital, DTS, or MPEG audio sound track. • Make sure the sound field function is...; Check the speaker connections and settings (page 10, 76). • Depending on the DVD does not match the system. • Moisture has condensed inside the unit and may not be played. • ... image file cannot be monaural or stereo even if the sound track is not pointed at the remote sensor on for United Kingdom and North American models). The sound loses stereo effect when you play...
Operating Instructions
Page 83
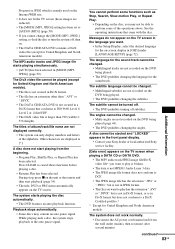
...you may contain an auto pause signal. During stop, press x on the unit or the remote and then start playing from the wall outlet (mains), then reconnect after several minutes. See the... has an extension other than 720 (width) × 576 (height). The system starts playing the disc automatically. • The DVD features an auto playback function. The subtitle language cannot be changed. • ... display. • Contact your Sony dealer or local authorized Sony service facility. [Data error] appears on the TV screen when playing a DATA CD or DATA DVD. • The MP3 audio track...
...you may contain an auto pause signal. During stop, press x on the unit or the remote and then start playing from the wall outlet (mains), then reconnect after several minutes. See the... has an extension other than 720 (width) × 576 (height). The system starts playing the disc automatically. • The DVD features an auto playback function. The subtitle language cannot be changed. • ... display. • Contact your Sony dealer or local authorized Sony service facility. [Data error] appears on the TV screen when playing a DATA CD or DATA DVD. • The MP3 audio track...
Operating Instructions
Page 86
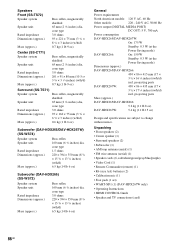
... (remote) (1) • R6 (size AA) batteries (2) • Calibration mic (1) • Foot pads (1 set) • WAHT-SD1 (1) (DAV-HDX267W only) • Operating Instructions • HDMI CONTROL Guide • Speaker and TV connections (card) 86GB Speakers Front (SS-TS72) Speaker system Speaker ...93 × 162 × 75 mm (3 3/4 × 6 1/2 × 3 inches) (w/h/d) 0.6 kg (1 lb 6 oz) Subwoofer (DAV-HDX265/DAV-HDX267W) (SS-WS74) Speaker system Speaker unit Rated impedance Dimensions (approx.) Mass (approx.) Bass reflex 160 mm (6 3/8 inches) dia, cone type 1.5 ohms 220 × 394 × 350 ...
... (remote) (1) • R6 (size AA) batteries (2) • Calibration mic (1) • Foot pads (1 set) • WAHT-SD1 (1) (DAV-HDX267W only) • Operating Instructions • HDMI CONTROL Guide • Speaker and TV connections (card) 86GB Speakers Front (SS-TS72) Speaker system Speaker ...93 × 162 × 75 mm (3 3/4 × 6 1/2 × 3 inches) (w/h/d) 0.6 kg (1 lb 6 oz) Subwoofer (DAV-HDX265/DAV-HDX267W) (SS-WS74) Speaker system Speaker unit Rated impedance Dimensions (approx.) Mass (approx.) Bass reflex 160 mm (6 3/8 inches) dia, cone type 1.5 ohms 220 × 394 × 350 ...
Operating Instructions
Page 92
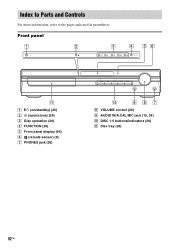
Front panel A "/1 (on/standby) (26) B A (open/close) (26) C Disc operation (26) D FUNCTION (26) E Front panel display (94) F (remote sensor) (9) G PHONES jack (26) H VOLUME control (26) I AUDIO IN/A.CAL MIC jack (15, 24) J DISC 1-5 buttons/indicators (26) K Disc tray (26) 92GB Index to Parts and Controls For more information, refer to the pages indicated in parentheses.
Front panel A "/1 (on/standby) (26) B A (open/close) (26) C Disc operation (26) D FUNCTION (26) E Front panel display (94) F (remote sensor) (9) G PHONES jack (26) H VOLUME control (26) I AUDIO IN/A.CAL MIC jack (15, 24) J DISC 1-5 buttons/indicators (26) K Disc tray (26) 92GB Index to Parts and Controls For more information, refer to the pages indicated in parentheses.
Operating Instructions
Page 99
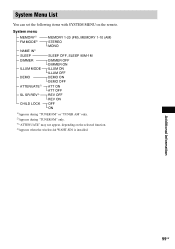
System menu MEMORY1) FM MODE2) NAME IN1) SLEEP DIMMER ILLUM MODE DEMO ATTENUATE3) SL SR REV4) CHILD LOCK MEMORY 1-20 (FM), MEMORY 1-10 (AM) STEREO MONO SLEEP OFF, SLEEP 90M-1M DIMMER OFF DIMMER ON ILLUM ON ILLUM OFF DEMO ON DEMO OFF ATT ON ATT OFF REV OFF REV ON OFF ON 1)Appears during "TUNER FM" or "TUNER AM" only. 2)Appears during "TUNER FM" only. 3)"ATTENUATE" may not appear, depending on the remote. Additional Information 99GB System Menu List You can set the following items with SYSTEM MENU on the selected function. 4)Appears when the wireless kit WAHT-SD1 is installed.
System menu MEMORY1) FM MODE2) NAME IN1) SLEEP DIMMER ILLUM MODE DEMO ATTENUATE3) SL SR REV4) CHILD LOCK MEMORY 1-20 (FM), MEMORY 1-10 (AM) STEREO MONO SLEEP OFF, SLEEP 90M-1M DIMMER OFF DIMMER ON ILLUM ON ILLUM OFF DEMO ON DEMO OFF ATT ON ATT OFF REV OFF REV ON OFF ON 1)Appears during "TUNER FM" or "TUNER AM" only. 2)Appears during "TUNER FM" only. 3)"ATTENUATE" may not appear, depending on the remote. Additional Information 99GB System Menu List You can set the following items with SYSTEM MENU on the selected function. 4)Appears when the wireless kit WAHT-SD1 is installed.
Operating Instructions
Page 101
R Radio 56 Radio Stations 55 Rear Panel 93 Region Code 8, 89 Remote 9, 58 Repeat Play 38 RESET 71 Resume Play 34 S S VIDEO 21 Scan 32 SCENE 33 Scene 89 SCREEN SAVER 73 SCREEN SETUP 72 Searching 32 ... Slow-motion Play 32 Sound Field 30 SPEAKER FORMATION 66 SPEAKER SETUP 76 CONNECTION 76 DISTANCE 76 LEVEL 77 SUBTITLE 45, 72 SYSTEM MENU 18, 27, 28, 56, 60, 62 System menu list 99 T TEST TONE 77 THEATRE SYNC 58 TIME/TEXT 33 TITLE 33 Title 89 TRACK 33 Track 89 TRACK...
R Radio 56 Radio Stations 55 Rear Panel 93 Region Code 8, 89 Remote 9, 58 Repeat Play 38 RESET 71 Resume Play 34 S S VIDEO 21 Scan 32 SCENE 33 Scene 89 SCREEN SAVER 73 SCREEN SETUP 72 Searching 32 ... Slow-motion Play 32 Sound Field 30 SPEAKER FORMATION 66 SPEAKER SETUP 76 CONNECTION 76 DISTANCE 76 LEVEL 77 SUBTITLE 45, 72 SYSTEM MENU 18, 27, 28, 56, 60, 62 System menu list 99 T TEST TONE 77 THEATRE SYNC 58 TIME/TEXT 33 TITLE 33 Title 89 TRACK 33 Track 89 TRACK...
Operating Instructions
Page 103
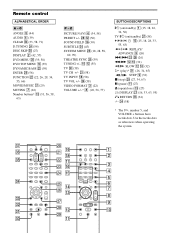
... 63, 95) O RETURN ed (34) -/-- Use the tactile dots as references when operating the system. ef (58) * The H, number 5, and VOLUME + buttons have tactile dots. wk es (56) SOUND FIELD qh (30) SUBTITLE wf ...(45) SYSTEM MENU wg (18, 28, 58, 60, 99) THEATRE SYNC w; (59) TUNING +/- 0 qs (55) TV e; (58) ... (39) CLEAR ef (33, 58, 71) D.TUNING wf (56) DISC SKIP eg (27) DISPLAY 2 (42, 57) DVD MENU wh (39, 58) DVD TOP MENU qf (39) DYNAMIC BASS wd (59) ENTER wg (58) FUNCTION ws (22, 26, 28, 34, 55, ...
... 63, 95) O RETURN ed (34) -/-- Use the tactile dots as references when operating the system. ef (58) * The H, number 5, and VOLUME + buttons have tactile dots. wk es (56) SOUND FIELD qh (30) SUBTITLE wf ...(45) SYSTEM MENU wg (18, 28, 58, 60, 99) THEATRE SYNC w; (59) TUNING +/- 0 qs (55) TV e; (58) ... (39) CLEAR ef (33, 58, 71) D.TUNING wf (56) DISC SKIP eg (27) DISPLAY 2 (42, 57) DVD MENU wh (39, 58) DVD TOP MENU qf (39) DYNAMIC BASS wd (59) ENTER wg (58) FUNCTION ws (22, 26, 28, 34, 55, ...


