Operating Instructions
Page 2
... relocate the receiving antenna (aerial). - Increase the separation between the equipment and receiver. - Consult the dealer or an experienced radio/TV technician for replacement of optical instruments with one or more of the following measures: - Important Safety Instructions 1) Read these instructions. 2) Keep these instructions. 3) Heed all warnings. 4) Follow all instructions. 5) Do not use of the obsolete outlet. 10) Protect the power cord from being...
... relocate the receiving antenna (aerial). - Increase the separation between the equipment and receiver. - Consult the dealer or an experienced radio/TV technician for replacement of optical instruments with one or more of the following measures: - Important Safety Instructions 1) Read these instructions. 2) Keep these instructions. 3) Heed all warnings. 4) Follow all instructions. 5) Do not use of the obsolete outlet. 10) Protect the power cord from being...
Operating Instructions
Page 3
... power cord (mains) can be changed only at the qualified service shop. • The unit is connected to the point of the NEC that provides guidelines for purchasing Sony DVD Home Theatre System. Don't throw away the battery with the apparatus. Note to CATV system installer: This reminder is provided to call the CATV system installer's attention to Article 820-40 of cable entry as power...
... power cord (mains) can be changed only at the qualified service shop. • The unit is connected to the point of the NEC that provides guidelines for purchasing Sony DVD Home Theatre System. Don't throw away the battery with the apparatus. Note to CATV system installer: This reminder is provided to call the CATV system installer's attention to Article 820-40 of cable entry as power...
Operating Instructions
Page 4
... (Child Lock) BASIC - Step 1: Connecting the System and TV 10 Step 2: Positioning the System ...14 Step 3: Performing the Quick Setup 15 Getting Started - ADVANCED - Table of the Front Panel Display 60 Using the DIGITAL MEDIA PORT Adapter 61 Deactivating the Buttons on a DVD-R/DVD-RW 41 Viewing Information About the Disc ... 42 Changing the Angles 44 Displaying the Subtitles 45 Adjusting the Delay Between the Picture and Sound 45 (A/V SYNC) About MP3 Audio Tracks and...
... (Child Lock) BASIC - Step 1: Connecting the System and TV 10 Step 2: Positioning the System ...14 Step 3: Performing the Quick Setup 15 Getting Started - ADVANCED - Table of the Front Panel Display 60 Using the DIGITAL MEDIA PORT Adapter 61 Deactivating the Buttons on a DVD-R/DVD-RW 41 Viewing Information About the Disc ... 42 Changing the Angles 44 Displaying the Subtitles 45 Adjusting the Delay Between the Picture and Sound 45 (A/V SYNC) About MP3 Audio Tracks and...
Operating Instructions
Page 5
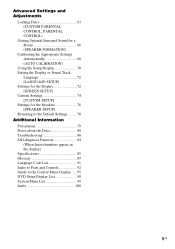
...Settings and Adjustments Locking Discs 63 (CUSTOM PARENTAL CONTROL, PARENTAL CONTROL) Getting Optimal Surround Sound for a Room 66 (SPEAKER FORMATION) Calibrating the Appropriate Settings Automatically 68 (AUTO CALIBRATION) Using the Setup Display 70 Setting the Display or Sound Track Language 72 [LANGUAGE SETUP] Settings for the Display 72 [SCREEN SETUP] Custom Settings 74 [CUSTOM SETUP] Settings for the Speakers 76 [SPEAKER SETUP] Returning to the Default Settings.......... 78 Additional Information Precautions 79 Notes about the Discs 80 Troubleshooting 80 Self-diagnosis Function...
...Settings and Adjustments Locking Discs 63 (CUSTOM PARENTAL CONTROL, PARENTAL CONTROL) Getting Optimal Surround Sound for a Room 66 (SPEAKER FORMATION) Calibrating the Appropriate Settings Automatically 68 (AUTO CALIBRATION) Using the Setup Display 70 Setting the Display or Sound Track Language 72 [LANGUAGE SETUP] Settings for the Display 72 [SCREEN SETUP] Custom Settings 74 [CUSTOM SETUP] Settings for the Speakers 76 [SPEAKER SETUP] Returning to the Default Settings.......... 78 Additional Information Precautions 79 Notes about the Discs 80 Troubleshooting 80 Self-diagnosis Function...

Operating Instructions
Page 16
... the calibration mic and press C/ c to select [YES]. BASIC - YES NO Auto Calibration starts. All connections and setup operations are complete. Be quiet during the measurement (which the system is installed may interfere with DAV-HDX267W only) is output when [AUTO CALIBRATION] starts. AUDIO IN / A.CAL MIC Calibration mic 12 Press . Note • Loud test sound is installed, [STANDARD (WIRELESS)] appears instead. 10 Press . 11 Connect the calibration mic to the A.CAL MIC jack on the front panel and...
... the calibration mic and press C/ c to select [YES]. BASIC - YES NO Auto Calibration starts. All connections and setup operations are complete. Be quiet during the measurement (which the system is installed may interfere with DAV-HDX267W only) is output when [AUTO CALIBRATION] starts. AUDIO IN / A.CAL MIC Calibration mic 12 Press . Note • Loud test sound is installed, [STANDARD (WIRELESS)] appears instead. 10 Press . 11 Connect the calibration mic to the A.CAL MIC jack on the front panel and...

Operating Instructions
Page 24
... OUT (DVD ONLY) Y PB/CB PR/CR R AUDIO IN L (DVD ONLY) COMPONENT VIDEO OUT S VIDEO (DVD ONLY) VIDEO MONITOR OUT DMPORT TV/VIDEO AM FM 75 COAXIAL ANTENNA To DMPORT jack To TV/VIDEO (AUDIO IN) DIGITAL MEDIA PORT adapter AUDIO OUT L R VCR, digital satellite receiver or PlayStation 2, etc. :Signal flow * CAUTION Please do not remove the screws before installing the WAHT-SD1. Connecting Other Components You can enjoy sound using the audio cord (not supplied). When connecting a cord, be...
... OUT (DVD ONLY) Y PB/CB PR/CR R AUDIO IN L (DVD ONLY) COMPONENT VIDEO OUT S VIDEO (DVD ONLY) VIDEO MONITOR OUT DMPORT TV/VIDEO AM FM 75 COAXIAL ANTENNA To DMPORT jack To TV/VIDEO (AUDIO IN) DIGITAL MEDIA PORT adapter AUDIO OUT L R VCR, digital satellite receiver or PlayStation 2, etc. :Signal flow * CAUTION Please do not remove the screws before installing the WAHT-SD1. Connecting Other Components You can enjoy sound using the audio cord (not supplied). When connecting a cord, be...
Operating Instructions
Page 30
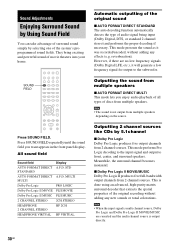
... type of movie theaters into your home. SOUND FIELD Outputting the sound from multiple speakers x AUTO FORMAT DIRECT MULTI This mode lets you want appears in the front panel display. All sound field Sound field AUTO FORMAT DIRECT STANDARD AUTO FORMAT DIRECT MULTI Dolby Pro Logic Dolby Pro Logic II MOVIE Dolby Pro Logic II MUSIC 2 CHANNEL STEREO HEADPHONE 2 CHANNEL STEREO HEADPHONE VIRTUAL Display A.F.D. Note • When the input signal is multi channel source, Dolby Pro Logic and Dolby Pro Logic II MOVIE/MUSIC are no low frequency signals (Dolby Digital LFE, etc.), it...
... type of movie theaters into your home. SOUND FIELD Outputting the sound from multiple speakers x AUTO FORMAT DIRECT MULTI This mode lets you want appears in the front panel display. All sound field Sound field AUTO FORMAT DIRECT STANDARD AUTO FORMAT DIRECT MULTI Dolby Pro Logic Dolby Pro Logic II MOVIE Dolby Pro Logic II MUSIC 2 CHANNEL STEREO HEADPHONE 2 CHANNEL STEREO HEADPHONE VIRTUAL Display A.F.D. Note • When the input signal is multi channel source, Dolby Pro Logic and Dolby Pro Logic II MOVIE/MUSIC are no low frequency signals (Dolby Digital LFE, etc.), it...
Operating Instructions
Page 35
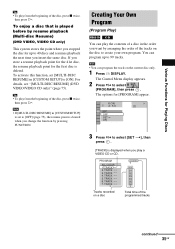
... this function, set to [OFF] (page 75), the resume point is set [MULTI-DISC RESUME] in [CUSTOM SETUP] to [ON]. Note • If [MULTI-DISC RESUME] in the order you insert the same disc. The Control Menu display appears. 2 Press X/x to create your own program. TRACK - - 3. To enjoy a disc that is deleted. For details, see "[MULTI-DISC RESUME] (DVD VIDEO/VIDEO CD only)" (page 75). TRACK - - 5. If you play the...
... this function, set to [OFF] (page 75), the resume point is set [MULTI-DISC RESUME] in [CUSTOM SETUP] to [ON]. Note • If [MULTI-DISC RESUME] in the order you insert the same disc. The Control Menu display appears. 2 Press X/x to create your own program. TRACK - - 3. To enjoy a disc that is deleted. For details, see "[MULTI-DISC RESUME] (DVD VIDEO/VIDEO CD only)" (page 75). TRACK - - 5. If you play the...
Operating Instructions
Page 38
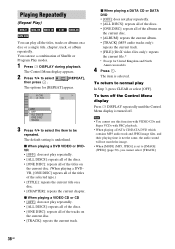
... item is selected. The Control Menu display appears. 2 Press X/x to select [REPEAT], then press . You can play repeatedly. • [ALL DISCS]: repeats all of Shuffle or Program Play modes. 1 Press DISPLAY during playback. x When playing a DVD VIDEO or DVDVR • [OFF]: does not play In Step 3, press CLEAR or select [OFF]. To return to normal play repeatedly. • [ALL DISCS]: repeats all of the discs. • [ONE DISC]: repeats all...
... item is selected. The Control Menu display appears. 2 Press X/x to select [REPEAT], then press . You can play repeatedly. • [ALL DISCS]: repeats all of Shuffle or Program Play modes. 1 Press DISPLAY during playback. x When playing a DVD VIDEO or DVDVR • [OFF]: does not play In Step 3, press CLEAR or select [OFF]. To return to normal play repeatedly. • [ALL DISCS]: repeats all of the discs. • [ONE DISC]: repeats all...
Operating Instructions
Page 45
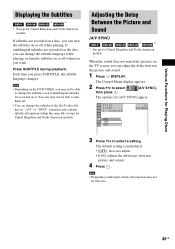
.... The default setting is underlined. • [OFF]: does not adjust. • [ON]: adjusts the difference between the picture and sound. 1 Press DISPLAY. The Control Menu display appears. 2 Press X/x to turn the subtitles on the TV screen, you can change the subtitles even if multilingual subtitles are recorded on the DVD VIDEO, you press SUBTITLE, the subtitle language changes. Note • Depending on the input stream, this function may...
.... The default setting is underlined. • [OFF]: does not adjust. • [ON]: adjusts the difference between the picture and sound. 1 Press DISPLAY. The Control Menu display appears. 2 Press X/x to turn the subtitles on the TV screen, you can change the subtitles even if multilingual subtitles are recorded on the DVD VIDEO, you press SUBTITLE, the subtitle language changes. Note • Depending on the input stream, this function may...
Operating Instructions
Page 49
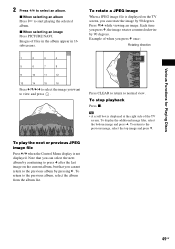
.... x When selecting an image Press PICTURE NAVI. Tip • A scroll box is not displayed. To play the next or previous JPEG image file Press C/c when the Control Menu display is displayed at the right side of the TV screen. Example of files in the album appear in 16 subscreens. To stop playback Press x. Images of when you press X once: Rotating direction...
.... x When selecting an image Press PICTURE NAVI. Tip • A scroll box is not displayed. To play the next or previous JPEG image file Press C/c when the Control Menu display is displayed at the right side of the TV screen. Example of files in the album appear in 16 subscreens. To stop playback Press x. Images of when you press X once: Rotating direction...

Operating Instructions
Page 55
... AM stations. Tuner Functions Presetting Radio Stations You can select the preset number directly by pressing "/1 on the power. While holding down the volume to turn down > on the unit, press "/1 on the unit to minimum. 1 Press FUNCTION repeatedly until "TUNER FM" or "TUNER AM" appears in the front panel display. 3 Press SYSTEM MENU. 4 Press X/x repeatedly until the auto scanning starts. To change the AM tuning interval (except for stereo program) appear in the front panel display...
... AM stations. Tuner Functions Presetting Radio Stations You can select the preset number directly by pressing "/1 on the power. While holding down the volume to turn down > on the unit, press "/1 on the unit to minimum. 1 Press FUNCTION repeatedly until "TUNER FM" or "TUNER AM" appears in the front panel display. 3 Press SYSTEM MENU. 4 Press X/x repeatedly until the auto scanning starts. To change the AM tuning interval (except for stereo program) appear in the front panel display...
Operating Instructions
Page 58
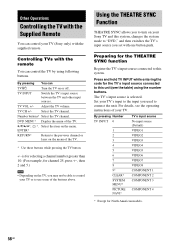
.... TV VOL +/- Using the THEATRE SYNC Function THEATRE SYNC allows you to turn on the TV, you may not be able to the previous channel or layer on the menu. TV INPUT Switch the TV's input source between the TV and other input sources. Adjust the TV volume. Set your Sony TV and this system, changes the system mode to "DVD," and then switches the TV's input source you used to the input you set with one button push. Press and...
.... TV VOL +/- Using the THEATRE SYNC Function THEATRE SYNC allows you to turn on the TV, you may not be able to the previous channel or layer on the menu. TV INPUT Switch the TV's input source between the TV and other input sources. Adjust the TV volume. Set your Sony TV and this system, changes the system mode to "DVD," and then switches the TV's input source you used to the input you set with one button push. Press and...
Operating Instructions
Page 64
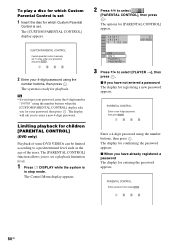
... a new 4-digit password. The Control Menu display appears. 2 Press X/x to a predetermined level such as the age of the users. The options for children [PARENTAL CONTROL] (DVD only) Playback of some DVD VIDEOs can be limited according to select [PARENTAL CONTROL], then press . Tip • If you forget your 4-digit password using the number buttons when the [CUSTOM PARENTAL CONTROL] display asks you have already registered a password The display for playback. To play a disc for...
... a new 4-digit password. The Control Menu display appears. 2 Press X/x to a predetermined level such as the age of the users. The options for children [PARENTAL CONTROL] (DVD only) Playback of some DVD VIDEOs can be limited according to select [PARENTAL CONTROL], then press . Tip • If you forget your 4-digit password using the number buttons when the [CUSTOM PARENTAL CONTROL] display asks you have already registered a password The display for playback. To play a disc for...

Operating Instructions
Page 68
... test sound is installed, [STANDARD (WIRED)] appears. AUTO CALIBRATION Connect calibration mic. The options for [AUTO CALIBRATION] appear. Start measurement? The Control Menu display appears. 3 Press X/x to select [SPEAKER FORMATION], then press . 1 ( 4 4 ) 3 ( 2 8 ) T 0:03:04 SPEAKER FORMATION SPEAKER FORMATION AUTO CALIBRATION DVD VIDEO 4 Press X/x to children and neighbor. 1 Press FUNCTION repeatedly until "DVD" appears in the front panel display. 2 Press DISPLAY when the system is in [SPEAKER SETUP], the [SPEAKER FORMATION] setting returns to enjoy the surround sound...
... test sound is installed, [STANDARD (WIRED)] appears. AUTO CALIBRATION Connect calibration mic. The options for [AUTO CALIBRATION] appear. Start measurement? The Control Menu display appears. 3 Press X/x to select [SPEAKER FORMATION], then press . 1 ( 4 4 ) 3 ( 2 8 ) T 0:03:04 SPEAKER FORMATION SPEAKER FORMATION AUTO CALIBRATION DVD VIDEO 4 Press X/x to children and neighbor. 1 Press FUNCTION repeatedly until "DVD" appears in the front panel display. 2 Press DISPLAY when the system is in [SPEAKER SETUP], the [SPEAKER FORMATION] setting returns to enjoy the surround sound...
Operating Instructions
Page 70
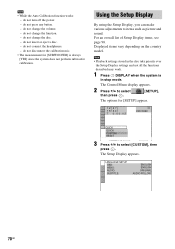
... picture and sound. do not change the disc. - LANGUAGE SETUP OSD: MENU: AUDIO: SUBTITLE: ENGLISH ENGLISH ORIGINAL AUDIO FOLLOW 70GB For an overall list of Setup Display items, see page 98. do not insert or eject a disc. - Note • While the Auto Calibration function works: - do not change the function. - do not disconnect the calibration mic. • The measurement for [SETUP] appear. 1 2 ( 2 7 ) 1 8 ( 3 4 ) T 0:00:02 DVD VIDEO QUICK QUICK CUSTOM RESET BNR 3 Press X/x to select [SETUP], then press . Displayed...
... picture and sound. do not change the disc. - LANGUAGE SETUP OSD: MENU: AUDIO: SUBTITLE: ENGLISH ENGLISH ORIGINAL AUDIO FOLLOW 70GB For an overall list of Setup Display items, see page 98. do not insert or eject a disc. - Note • While the Auto Calibration function works: - do not change the function. - do not disconnect the calibration mic. • The measurement for [SETUP] appear. 1 2 ( 2 7 ) 1 8 ( 3 4 ) T 0:00:02 DVD VIDEO QUICK QUICK CUSTOM RESET BNR 3 Press X/x to select [SETUP], then press . Displayed...
Operating Instructions
Page 74
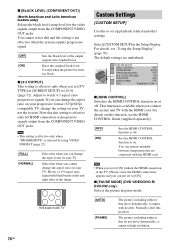
... your progressive format (525p/625p) compatible TV, change the aspect ratio on or off . The picture, including subjects that are underlined. Adjust to on your TV. This function is effective only for the video signals output from the COMPONENT VIDEO OUT jacks. CUSTOM SETUP HDMI CONTROL: OFF PAUSE MODE: AUTO TRACK SELECTION: OFF MULTI-DISC RESUME: ON AUDIO DRC: OFF AUDIO (HDMI): OFF DivX: Registration Code x [HDMI CONTROL] Switches the HDMI CONTROL function on your TV, not the system. Sets the HDMI CONTROL function to...
... your progressive format (525p/625p) compatible TV, change the aspect ratio on or off . The picture, including subjects that are underlined. Adjust to on your TV. This function is effective only for the video signals output from the COMPONENT VIDEO OUT jacks. CUSTOM SETUP HDMI CONTROL: OFF PAUSE MODE: AUTO TRACK SELECTION: OFF MULTI-DISC RESUME: ON AUDIO DRC: OFF AUDIO (HDMI): OFF DivX: Registration Code x [HDMI CONTROL] Switches the HDMI CONTROL function on your TV, not the system. Sets the HDMI CONTROL function to...

Operating Instructions
Page 76
... test tone to adjust the level and the balance of the speakers and their distance from your listening position. Since the front speaker and subwoofer setting is fixed, you cannot change them. [FRONT] [YES] [CENTER] [YES]: Normally select this. [NONE]: Select this if no center speaker is used. [SURROUND] [YES]: Normally select this. [NONE]: Select this if no surround speaker is used. [SUBWOOFER] [YES] Note • When you perform the Quick Setup (page 15), the default settings...
... test tone to adjust the level and the balance of the speakers and their distance from your listening position. Since the front speaker and subwoofer setting is fixed, you cannot change them. [FRONT] [YES] [CENTER] [YES]: Normally select this. [NONE]: Select this if no center speaker is used. [SURROUND] [YES]: Normally select this. [NONE]: Select this if no surround speaker is used. [SUBWOOFER] [YES] Note • When you perform the Quick Setup (page 15), the default settings...

Operating Instructions
Page 82
... function is recorded in the front panel display. It does not indicate the speakers which output sound (page 30, 66). The disc does not play a VIDEO CD, a CD, or an MP3. • Set [AUDIO] to [STEREO] by scanning preset stations). The surround effect is difficult to ISO 9660 Level 1/Level 2, or Joliet. • The DATA DVD is not recorded in an MP3 format that the frequency appears in Dolby Digital or MPEG audio format. Use direct tuning...
... function is recorded in the front panel display. It does not indicate the speakers which output sound (page 30, 66). The disc does not play a VIDEO CD, a CD, or an MP3. • Set [AUDIO] to [STEREO] by scanning preset stations). The surround effect is difficult to ISO 9660 Level 1/Level 2, or Joliet. • The DATA DVD is not recorded in an MP3 format that the frequency appears in Dolby Digital or MPEG audio format. Use direct tuning...
Operating Instructions
Page 100
...:9 72 4:3 LETTER BOX 72 4:3 OUTPUT 74 4:3 PAN SCAN 72 5.1 Channel Surround 40 A A/V SYNC 45 ALBUM 33 Album 87 ANGLE 44 ATTENUATE 28 AUDIO 72 AUDIO (HDMI) 75 AUDIO DRC 75 Auto Calibration 68, 87 B BACKGROUND 73 Batteries 9 BLACK LEVEL 73 BLACK LEVEL (COMPONENT OUT) 74 C CHAPTER 33 Chapter 87 Child Lock 62 COLD RESET 78 COLOR SYSTEM (VIDEO CD) 73 COMPONENT VIDEO OUT 22 Continuous play 26 Control Menu Display 95 Controlling the TV 58...
...:9 72 4:3 LETTER BOX 72 4:3 OUTPUT 74 4:3 PAN SCAN 72 5.1 Channel Surround 40 A A/V SYNC 45 ALBUM 33 Album 87 ANGLE 44 ATTENUATE 28 AUDIO 72 AUDIO (HDMI) 75 AUDIO DRC 75 Auto Calibration 68, 87 B BACKGROUND 73 Batteries 9 BLACK LEVEL 73 BLACK LEVEL (COMPONENT OUT) 74 C CHAPTER 33 Chapter 87 Child Lock 62 COLD RESET 78 COLOR SYSTEM (VIDEO CD) 73 COMPONENT VIDEO OUT 22 Continuous play 26 Control Menu Display 95 Controlling the TV 58...


