Operating Instructions
Page 50
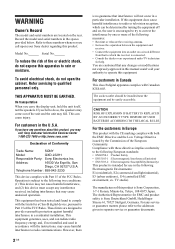
... in a particular installation. However, there 2 GB is intended for EMC and product safety is Sony Corporation, 1-7-1 Konan, Minato-ku, Tokyo, 108-0075 Japan. If this product, you carry the display unit, hold the unit itself, not the speakers. You are designed to comply with Part 15 of fire or electric shock, do not...
... in a particular installation. However, there 2 GB is intended for EMC and product safety is Sony Corporation, 1-7-1 Konan, Minato-ku, Tokyo, 108-0075 Japan. If this product, you carry the display unit, hold the unit itself, not the speakers. You are designed to comply with Part 15 of fire or electric shock, do not...

Operating Instructions
Page 51
... Remote Control 14 Using the Wide Mode...14 Using the PAP Setting 15 Using the ID MODE button 16 Optional Adaptors ...17 Connections Connecting the Speakers...18 Connecting the AC Power Cord 18 Cable Management...19 Using the Settings Overview of the Menus ...20 Picture/Sound Settings...21 Screen Settings...25...
... Remote Control 14 Using the Wide Mode...14 Using the PAP Setting 15 Using the ID MODE button 16 Optional Adaptors ...17 Connections Connecting the Speakers...18 Connecting the AC Power Cord 18 Cable Management...19 Using the Settings Overview of the Menus ...20 Picture/Sound Settings...21 Screen Settings...25...
Operating Instructions
Page 55
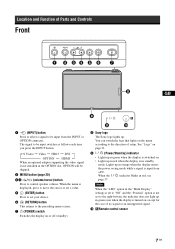
... Front GB 1 (INPUT) button Press to select a signal to be input switches as follows each time you press the INPUT button. The signal to control speaker volume. You can switch the logo that lights on . • Lights up in the OPTION slot, OPTION will be skipped. 2 MENU button (page 20) 34... not set to "Off" and the "Position" option is turned on or off (standby). 8 Sony logo The Sony logo lights up in green when the display is input from the INPUT or OPTION connector. When the menu is displayed, press to move the cursor or set a value. 5 (ENTER) button Press to set your choice...
... Front GB 1 (INPUT) button Press to select a signal to be input switches as follows each time you press the INPUT button. The signal to control speaker volume. You can switch the logo that lights on . • Lights up in the OPTION slot, OPTION will be skipped. 2 MENU button (page 20) 34... not set to "Off" and the "Position" option is turned on or off (standby). 8 Sony logo The Sony logo lights up in green when the display is input from the INPUT or OPTION connector. When the menu is displayed, press to move the cursor or set a value. 5 (ENTER) button Press to set your choice...
Operating Instructions
Page 57
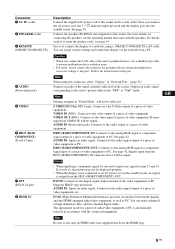
...supplied AC power cord to this port. Connect the speakers SS-SPG01 (not supplied) to a network, using this connector, select "Display" in "Sound Mode" will be reflected. For details on connecting the speakers, see page 19. Serves to connect the display to this port. Note When using a 10BASE-T/100BASE...8226; For safety, do so, the picture may not be displayed properly. • When the display is not connected to an AC power or is in the standby mode, no signal is automatically selected in accordance with the speakers. Note Be sure to use a shielded-type cable to ...
...supplied AC power cord to this port. Connect the speakers SS-SPG01 (not supplied) to a network, using this connector, select "Display" in "Sound Mode" will be reflected. For details on connecting the speakers, see page 19. Serves to connect the display to this port. Note When using a 10BASE-T/100BASE...8226; For safety, do so, the picture may not be displayed properly. • When the display is not connected to an AC power or is in the standby mode, no signal is automatically selected in accordance with the speakers. Note Be sure to use a shielded-type cable to ...
Operating Instructions
Page 59
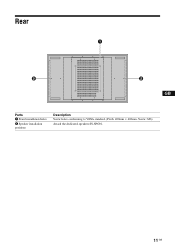
Rear GB Parts 1 Stand installation holes 2 Speaker installation positions Description Screw holes conforming to VESA standard. (Pitch: 400mm × 400mm, Screw: M6) Attach the dedicated speakers SS-SPG01. 11 GB
Rear GB Parts 1 Stand installation holes 2 Speaker installation positions Description Screw holes conforming to VESA standard. (Pitch: 400mm × 400mm, Screw: M6) Attach the dedicated speakers SS-SPG01. 11 GB
Operating Instructions
Page 66
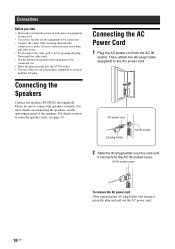
... the AC Power Cord 1 Plug the AC power cord into the AC IN socket. • Use one of the equipment to route the speaker cords, see the operating manual of equipment is turned off. • Use cables suitable for the equipment to connect the... speakers correctly. Connecting the Speakers Connect the speakers SS-SPG01 (not supplied). Connections Before you start • First make sure that the power of each piece of the speakers. For details on connecting the speakers, see page 19.
... the AC Power Cord 1 Plug the AC power cord into the AC IN socket. • Use one of the equipment to route the speaker cords, see the operating manual of equipment is turned off. • Use cables suitable for the equipment to connect the... speakers correctly. Connecting the Speakers Connect the speakers SS-SPG01 (not supplied). Connections Before you start • First make sure that the power of each piece of the speakers. For details on connecting the speakers, see page 19.
Operating Instructions
Page 68
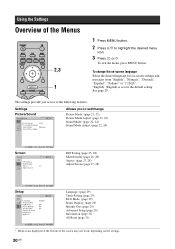
... Mode Adjust. (page 21, 23) Sound Mode: (page 22, 24) Sound Mode Adjust. (page 22, 24) Screen PAP Setting (page 25, 28) DVI Multi Display (page 26, 28) Aspect: (page 27, 28) Adjust Screen (page 27, 28) Setup Language: (page 29) DVI Timer Setting (page 29) ECO Mode: (...page 29) Status Display: (page 29) Speaker Out: (page 29) Advanced Setup (page 29) Information (page 31) All Reset (page 31) * Menu icons displayed at the bottom of the Menus 2,3 1 1 Press MENU button. 2 Press F/f to highlight the desired ...
... Mode Adjust. (page 21, 23) Sound Mode: (page 22, 24) Sound Mode Adjust. (page 22, 24) Screen PAP Setting (page 25, 28) DVI Multi Display (page 26, 28) Aspect: (page 27, 28) Adjust Screen (page 27, 28) Setup Language: (page 29) DVI Timer Setting (page 29) ECO Mode: (...page 29) Status Display: (page 29) Speaker Out: (page 29) Advanced Setup (page 29) Information (page 31) All Reset (page 31) * Menu icons displayed at the bottom of the Menus 2,3 1 1 Press MENU button. 2 Press F/f to highlight the desired ...
Operating Instructions
Page 70
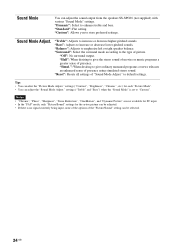
... When desiring to adjust, and you cannot select this option may not be applied in the image. to emphasize left or right speaker balance. "Standard": Flat setting. "Off": No surround output. to increase or decrease lower-pitched sounds. Sound Mode You can adjust the "Sound Mode Adjust... Sound Mode Adjust. settings ("Contrast", "Brightness", "Chroma ", etc.) for each "Picture Mode". • You can adjust the sound output from the speakers SS-SPG01 (not supplied) with various "Sound Mode" settings. settings ("Treble" and "Bass") when the "Sound Mode" is no signal currently being...
... When desiring to adjust, and you cannot select this option may not be applied in the image. to emphasize left or right speaker balance. "Standard": Flat setting. "Off": No surround output. to increase or decrease lower-pitched sounds. Sound Mode You can adjust the "Sound Mode Adjust... Sound Mode Adjust. settings ("Contrast", "Brightness", "Chroma ", etc.) for each "Picture Mode". • You can adjust the sound output from the speakers SS-SPG01 (not supplied) with various "Sound Mode" settings. settings ("Treble" and "Bass") when the "Sound Mode" is no signal currently being...
Operating Instructions
Page 72
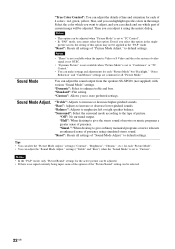
...and "Bass") when the "Sound Mode" is no signal currently being input, none of the options of presence. "Treble": Adjusts to "Custom". "Standard": Flat setting. "Simul.": When desiring to emphasize left or right speaker balance. "Reset": Resets all settings of picture. Tips • You can adjust the sound output from the... speakers SS-SPG01 (not supplied) with various "Sound Mode" settings. settings ("Contrast", "Brightness", "Chroma ", etc.) for the active picture can be selected. 24 GB ...
...and "Bass") when the "Sound Mode" is no signal currently being input, none of the options of presence. "Treble": Adjusts to "Custom". "Standard": Flat setting. "Simul.": When desiring to emphasize left or right speaker balance. "Reset": Resets all settings of picture. Tips • You can adjust the sound output from the... speakers SS-SPG01 (not supplied) with various "Sound Mode" settings. settings ("Contrast", "Brightness", "Chroma ", etc.) for the active picture can be selected. 24 GB ...
Operating Instructions
Page 77
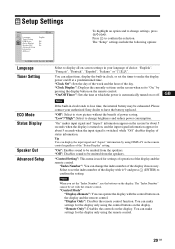
...Disables the remote control function. The "Setup" settings include the following options: Language Timer Setting ECO Mode Status Display Speaker Out Advanced Setup Select to display all on-screen settings in clock tends to lose time, the internal battery may be set the timer to have...Note If the built-in your authorized Sony dealer to make settings for settings of operation of the display with the control buttons on the display. "Control Mode" "Display+Remote": You can display the input signal and "Aspect" information by pressing the display button on /off . You can change...
...Disables the remote control function. The "Setup" settings include the following options: Language Timer Setting ECO Mode Status Display Speaker Out Advanced Setup Select to display all on-screen settings in clock tends to lose time, the internal battery may be set the timer to have...Note If the built-in your authorized Sony dealer to make settings for settings of operation of the display with the control buttons on the display. "Control Mode" "Display+Remote": You can display the input signal and "Aspect" information by pressing the display button on /off . You can change...
Operating Instructions
Page 85
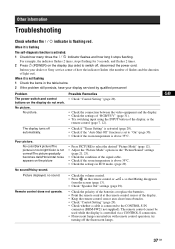
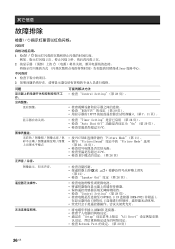
... items in the "Picture/Sound" settings (page 21, 23). • Check the condition of the display. • Keep the remote control sensor area clear from the screen (page 13). • Check "Speaker Out" settings (page 29). When it stops flashing. No picture. try turning off the fluorescent lamps.... Mode" options in the table below. 2 If the problem still persists, have your dealer or Sony service center of how the indicator flashes (the number of flashes and the duration of the display, or the remote control (page 7, 12). When it is flashing The self-diagnosis function is ...
... items in the "Picture/Sound" settings (page 21, 23). • Check the condition of the display. • Keep the remote control sensor area clear from the screen (page 13). • Check "Speaker Out" settings (page 29). When it stops flashing. No picture. try turning off the fluorescent lamps.... Mode" options in the table below. 2 If the problem still persists, have your dealer or Sony service center of how the indicator flashes (the number of flashes and the duration of the display, or the remote control (page 7, 12). When it is flashing The self-diagnosis function is ...
Operating Instructions
Page 89
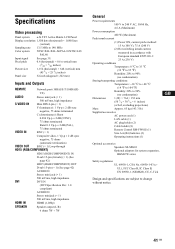
... × 648 (vertical) mm (45 1/2 × 25 5/8 inches) 52-inch (diagonal 1,322 mm) Inputs and Outputs REMOTE Network port (10BASE-T/100BASE- Specifications Video processing Panel system a-Si TFT Active Matrix LCD Panel Display resolution 1,920 dots (horizontal) × 1,080 lines (vertical) Sampling rate ... plug holder (2) Cable holder (8) Remote Control RM-FW002 (1) Size AA (R6) batteries (2) Operating instructions (1) GB Optional accessories Speakers SS-SPG01 Optional adaptors for system expansion, BKM-FW series Safety regulations UL 60950-1, CSA No. 60950-1-03 (cUL), FCC Class...
... × 648 (vertical) mm (45 1/2 × 25 5/8 inches) 52-inch (diagonal 1,322 mm) Inputs and Outputs REMOTE Network port (10BASE-T/100BASE- Specifications Video processing Panel system a-Si TFT Active Matrix LCD Panel Display resolution 1,920 dots (horizontal) × 1,080 lines (vertical) Sampling rate ... plug holder (2) Cable holder (8) Remote Control RM-FW002 (1) Size AA (R6) batteries (2) Operating instructions (1) GB Optional accessories Speakers SS-SPG01 Optional adaptors for system expansion, BKM-FW series Safety regulations UL 60950-1, CSA No. 60950-1-03 (cUL), FCC Class...
Operating Instructions
Page 91
...30 B Backlight 21, 23 BBBaarilsgashn2tcn2ee,s2s23421, 23 C Cable holder 19 Chroma 21 CineMotion 21 Clock Display 29 Clock Set 29 Color Matrix 30 CCCooonlloofrrerSTeyensmcteepm.2213,11,2323 CCoonnftrigasutre21sc,re2e3n 34 Contrast button 13 ...S S VIDEO button 12 SScVreIeDnESOetItNingcson2n0e,ct2o5r 9 Setup Setup Sscertetienngs3520, 29 Sharpness 21 SSSSSoopoNunueManynkddPleoMMrg3Oo6oodud7ete,2A2300d1,,ju22s92t.,2204, 22, 24 SPEAKER socket 9 SStpaeneddaSrdet2u1p,3212, 23, 24 SStTaAtuNs DDBisYplabyut2to0n, 13 29 SSutartruosuRndep2o2r,t 35 24 Swap 25 Sync Mode 30 T TC...
...30 B Backlight 21, 23 BBBaarilsgashn2tcn2ee,s2s23421, 23 C Cable holder 19 Chroma 21 CineMotion 21 Clock Display 29 Clock Set 29 Color Matrix 30 CCCooonlloofrrerSTeyensmcteepm.2213,11,2323 CCoonnftrigasutre21sc,re2e3n 34 Contrast button 13 ...S S VIDEO button 12 SScVreIeDnESOetItNingcson2n0e,ct2o5r 9 Setup Setup Sscertetienngs3520, 29 Sharpness 21 SSSSSoopoNunueManynkddPleoMMrg3Oo6oodud7ete,2A2300d1,,ju22s92t.,2204, 22, 24 SPEAKER socket 9 SStpaeneddaSrdet2u1p,3212, 23, 24 SStTaAtuNs DDBisYplabyut2to0n, 13 29 SSutartruosuRndep2o2r,t 35 24 Swap 25 Sync Mode 30 T TC...
Operating Instructions
Page 275
连接器 1 AC IN 插座 2 SPEAKER 插座 3 REMOTE (10BASE-T/100BASE-TX) 17 页。 SS-SPG01 18 页。 10BASE-T/100BASE-TX LAN 注意 LAN 注 4 AUDIO Network Port"中选择 "Display"。(第 30 页) P&P"或 "PinP 注 5 VIDEO 6 HD15 (RGB/COMPONENT) (D-sub 15...
连接器 1 AC IN 插座 2 SPEAKER 插座 3 REMOTE (10BASE-T/100BASE-TX) 17 页。 SS-SPG01 18 页。 10BASE-T/100BASE-TX LAN 注意 LAN 注 4 AUDIO Network Port"中选择 "Display"。(第 30 页) P&P"或 "PinP 注 5 VIDEO 6 HD15 (RGB/COMPONENT) (D-sub 15...
Operating Instructions
Page 294
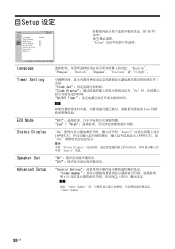
Setup 设定 F/f/ G/g。 Setup Language Timer Setting ECO Mode Status Display Speaker Out Advanced Setup English"、 "Français"、"Deutsch"、"Español"、"Italiano"或 " "。 Clock Set Clock Display On On/Off Timer 注 Sony "Off Low"/ "High "On Aspect 5 5 Off Status Display DISPLAY Aspect"信息。 "On Off "Control Setting Index Number F/f 注 设定 "Index Number Index Number"。 28 CS
Setup 设定 F/f/ G/g。 Setup Language Timer Setting ECO Mode Status Display Speaker Out Advanced Setup English"、 "Français"、"Deutsch"、"Español"、"Italiano"或 " "。 Clock Set Clock Display On On/Off Timer 注 Sony "Off Low"/ "High "On Aspect 5 5 Off Status Display DISPLAY Aspect"信息。 "On Off "Control Setting Index Number F/f 注 设定 "Index Number Index Number"。 28 CS
Operating Instructions
Page 302
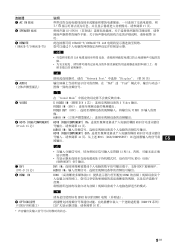
...24687; 故障排除 闪烁时 1 检查 2 3 2 次。 2 1 Sony 1 2 Control Setting"(第 28 页)。 RGB/YUV 30 INPUT 7、11 页)。...12289;22 页)。 35°C ECO 28 页) (第 12)。 • 检查 "Speaker Out 28 页)。 Control Setting"(第 28 CONTROL S IN 连接器 (BKM-FW21 CONTROL S REMOTE Setup ...
...24687; 故障排除 闪烁时 1 检查 2 3 2 次。 2 1 Sony 1 2 Control Setting"(第 28 页)。 RGB/YUV 30 INPUT 7、11 页)。...12289;22 页)。 35°C ECO 28 页) (第 12)。 • 检查 "Speaker Out 28 页)。 Control Setting"(第 28 CONTROL S IN 连接器 (BKM-FW21 CONTROL S REMOTE Setup ...
Operating Instructions
Page 308
...29 Color Temp. 20, 22 Conference 20, 22 Contrast 20, 22 Control Mode 29 Control Setting 28 Custom 20, 22 D 电缆夹 18 7 7 DISPLAY 按钮 12 12 DVI IN 连接器 9 DVI 按钮 11 DDVyIna连mi接c 器21,923 Dynamic Picture 20 E ECO Mode...Sharpness 20 34 19, 28 7 38 SNMP 35 Sony 标识 7, 30 Sound Mode Adjust. 19, 21, 23 Sound Mode 19, 21, 23 Speaker Out 19, 28 SPEAKER 插座 9 Speed Setup 30 Standard 20, 21, 22, 23 STANDBY 按钮 12 Status Display 19, 28 Status Report 34 Surround 21, 23 Swap...
...29 Color Temp. 20, 22 Conference 20, 22 Contrast 20, 22 Control Mode 29 Control Setting 28 Custom 20, 22 D 电缆夹 18 7 7 DISPLAY 按钮 12 12 DVI IN 连接器 9 DVI 按钮 11 DDVyIna连mi接c 器21,923 Dynamic Picture 20 E ECO Mode...Sharpness 20 34 19, 28 7 38 SNMP 35 Sony 标识 7, 30 Sound Mode Adjust. 19, 21, 23 Sound Mode 19, 21, 23 Speaker Out 19, 28 SPEAKER 插座 9 Speed Setup 30 Standard 20, 21, 22, 23 STANDBY 按钮 12 Status Display 19, 28 Status Report 34 Surround 21, 23 Swap...


