Operating Instructions
Page 1
3-096-489-11(1) DVD Recorder Operating Instructions RDR-GX355 © 2007 Sony Corporation Operating Instructions US Manual de instrucciones ES
3-096-489-11(1) DVD Recorder Operating Instructions RDR-GX355 © 2007 Sony Corporation Operating Instructions US Manual de instrucciones ES

Operating Instructions
Page 2
... radio frequency energy and, if not installed and used in this manual could void your Sony dealer regarding this equipment. Precautions On safety Should any solid object or liquid fall into ...Record The model and serial numbers are cautioned that any further. Should this DVD recorder is connected to the wall outlet, even if the recorder itself ; In this case, remove the disc and leave the recorder... FOR STRÅLING. This symbol is located on the lenses inside the enclosure. RDR-GX355 Serial No CAUTION You are located at a qualified service shop. Consult the dealer or...
... radio frequency energy and, if not installed and used in this manual could void your Sony dealer regarding this equipment. Precautions On safety Should any solid object or liquid fall into ...Record The model and serial numbers are cautioned that any further. Should this DVD recorder is connected to the wall outlet, even if the recorder itself ; In this case, remove the disc and leave the recorder... FOR STRÅLING. This symbol is located on the lenses inside the enclosure. RDR-GX355 Serial No CAUTION You are located at a qualified service shop. Consult the dealer or...

Operating Instructions
Page 3
... third grounding prong. Servicing is damaged, liquid has been spilled or objects have any questions or problems concerning your recorder, please consult your nearest Sony dealer. Copyrights • Television programs, films, video tapes, discs, and other materials may not be copyrighted. ... protection technology must be compensated for long periods of time. 14) Refer all instructions. 5) Do not use of the recording cannot be authorized by Macrovision. Plasma display panels and projection televisions are provided for home and other intellectual property rights. The...
... third grounding prong. Servicing is damaged, liquid has been spilled or objects have any questions or problems concerning your recorder, please consult your nearest Sony dealer. Copyrights • Television programs, films, video tapes, discs, and other materials may not be copyrighted. ... protection technology must be compensated for long periods of time. 14) Refer all instructions. 5) Do not use of the recording cannot be authorized by Macrovision. Plasma display panels and projection televisions are provided for home and other intellectual property rights. The...
Operating Instructions
Page 4
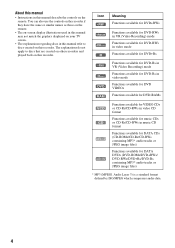
... • Instructions in this recorder. Icon +RW -RWVR -RWVideo +R Meaning Functions available for DVD+RWs Functions available for DVD-RWs in VR (Video Recording) mode Functions available for DVD-RWs in video mode Functions available for DVD+Rs -RVR -RVideo DVD RAM Functions available for DVD-Rs in VR (Video Recording) mode Functions available for DVD-Rs in video mode...
... • Instructions in this recorder. Icon +RW -RWVR -RWVideo +R Meaning Functions available for DVD+RWs Functions available for DVD-RWs in VR (Video Recording) mode Functions available for DVD-RWs in video mode Functions available for DVD+Rs -RVR -RVideo DVD RAM Functions available for DVD-Rs in VR (Video Recording) mode Functions available for DVD-Rs in video mode...

Operating Instructions
Page 6
Table of Contents WARNING 2 Precautions 2 Ways to Use Your DVD Recorder 8 How to Use the On-Screen Menus 10 Hookups and Settings 12 Hooking Up the Recorder 12 Step 1: Unpacking 12 Step 2: Connecting the Cable Box/Satellite Receiver (Tuner 12 Step 3: Connecting to Your TV 15 Step 4: Connecting to ...Cord 20 Step 6: Preparing the Remote 20 Step 7: Easy Setup 23 Connecting a VCR or Similar Device 27 Quick Guide to Disc Types 30 Recordable and Playable Discs 30 Playable Discs 33 Playback 35 Playing Discs 35 Playback Options 36 Playing a Title From the Title List 39 Searching for a...
Table of Contents WARNING 2 Precautions 2 Ways to Use Your DVD Recorder 8 How to Use the On-Screen Menus 10 Hookups and Settings 12 Hooking Up the Recorder 12 Step 1: Unpacking 12 Step 2: Connecting the Cable Box/Satellite Receiver (Tuner 12 Step 3: Connecting to Your TV 15 Step 4: Connecting to ...Cord 20 Step 6: Preparing the Remote 20 Step 7: Easy Setup 23 Connecting a VCR or Similar Device 27 Quick Guide to Disc Types 30 Recordable and Playable Discs 30 Playable Discs 33 Playback 35 Playing Discs 35 Playback Options 36 Playing a Title From the Title List 39 Searching for a...
Operating Instructions
Page 7
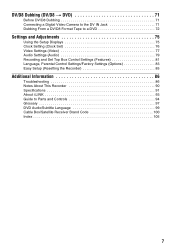
... Jack 71 Dubbing From a DV/D8 Format Tape to a DVD 72 Settings and Adjustments 75 Using the Setup Displays 75 Clock Setting (Clock Set 76 Video Settings (Video 77 Audio Settings (Audio 79 Recording and Set Top Box Control Settings (Features 81 Language, Parental ...Control Settings/Factory Settings (Options 83 Easy Setup (Resetting the Recorder 85 Additional Information 86 Troubleshooting 86 Notes About This Recorder 90 Specifications 91 About i.LINK 93 Guide to Parts and Controls 94 Glossary 97 DVD Audio/Subtitle Language 99 Cable Box/Satellite Receiver Brand Code 100 ...
... Jack 71 Dubbing From a DV/D8 Format Tape to a DVD 72 Settings and Adjustments 75 Using the Setup Displays 75 Clock Setting (Clock Set 76 Video Settings (Video 77 Audio Settings (Audio 79 Recording and Set Top Box Control Settings (Features 81 Language, Parental ...Control Settings/Factory Settings (Options 83 Easy Setup (Resetting the Recorder 85 Additional Information 86 Troubleshooting 86 Notes About This Recorder 90 Specifications 91 About i.LINK 93 Guide to Parts and Controls 94 Glossary 97 DVD Audio/Subtitle Language 99 Cable Box/Satellite Receiver Brand Code 100 ...
Operating Instructions
Page 8
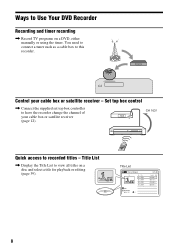
...tuner such as a cable box to view all titles on a DVD, either manually or using the timer. Set top box control , Connect the supplied set top box controller to recorded titles - CH 103! 103 Quick access to have the recorder change the channel of your cable box or satellite receiver - ...Title List Title List (Original) 1/4 No. Ways to Use Your DVD Recorder Recording and timer recording , Record TV programs on a disc and select a title for playback or editing (page 39). Title 01 LINE 1 02 LINE 1 03 LINE 1 04 LINE 1 T ...
...tuner such as a cable box to view all titles on a DVD, either manually or using the timer. Set top box control , Connect the supplied set top box controller to recorded titles - CH 103! 103 Quick access to have the recorder change the channel of your cable box or satellite receiver - ...Title List Title List (Original) 1/4 No. Ways to Use Your DVD Recorder Recording and timer recording , Record TV programs on a disc and select a title for playback or editing (page 39). Title 01 LINE 1 02 LINE 1 03 LINE 1 04 LINE 1 T ...

Operating Instructions
Page 9
... to dub a DV/D8 format tape over to a DATA CD (CD-RW/CD-R) or DATA DVD (DVD+RW/DVD-RW/ DVD+R/DVD-R) on this recorder (page 41). Shoot Save Play! A list of recordable and playable discs is on a DVD-RW (VR mode) or DVD-R (VR mode), then erase, move or add scenes as you like without changing the original...
... to dub a DV/D8 format tape over to a DATA CD (CD-RW/CD-R) or DATA DVD (DVD+RW/DVD-RW/ DVD+R/DVD-R) on this recorder (page 41). Shoot Save Play! A list of recordable and playable discs is on a DVD-RW (VR mode) or DVD-R (VR mode), then erase, move or add scenes as you like without changing the original...

Operating Instructions
Page 10
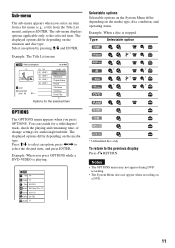
SYSTEM MENU 123 456 789 0 O RETURN M/m/ Once you become familiar with the basic operations, you will find the recorder easy to operate this recorder. How to Use the On-Screen Menus The following three displays are mainly used to use.
SYSTEM MENU 123 456 789 0 O RETURN M/m/ Once you become familiar with the basic operations, you will find the recorder easy to operate this recorder. How to Use the On-Screen Menus The following three displays are mainly used to use.
Operating Instructions
Page 11
Select an option by pressing M/m and ENTER. Example: The Title List menu Title List (Original) 1/4 No. Press M/m to the selected item. Sub-menu The sub-menu appears when you press OPTIONS. The displayed options differ depending on the media type. Title 01 LINE 1 02 LINE 1 03 LINE 1 04 LINE 1 T LINE 1 May/02/2007 08:00 PM 10:10 AM Length Edit Pla0y1:29:03 > Tit0le0:E3r1a:s2e3 > Ch0a1p:5te9r:0E0ras>e Pr0o0te:5ct8:56 > Title Name A·B Erase Divide Title Options for audio/angle/subtitle. The displayed options differ depending on the situation and disc type. You can ...
Select an option by pressing M/m and ENTER. Example: The Title List menu Title List (Original) 1/4 No. Press M/m to the selected item. Sub-menu The sub-menu appears when you press OPTIONS. The displayed options differ depending on the media type. Title 01 LINE 1 02 LINE 1 03 LINE 1 04 LINE 1 T LINE 1 May/02/2007 08:00 PM 10:10 AM Length Edit Pla0y1:29:03 > Tit0le0:E3r1a:s2e3 > Ch0a1p:5te9r:0E0ras>e Pr0o0te:5ct8:56 > Title Name A·B Erase Divide Title Options for audio/angle/subtitle. The displayed options differ depending on the situation and disc type. You can ...

Operating Instructions
Page 12
...8226; Be sure to disconnect the power cord of each component before connecting. Using the cable box/satellite receiver control function This function allows the recorder to control a cable box or satellite receiver via the supplied set top box controller (page 13). - After setting up and adjust the ...settings of your VCR using your VCR connected to an antenna, connect this recorder to a TV that is connected to : - If you with a compatible cable box or satellite receiver. In the cases above, contact your cable...
...8226; Be sure to disconnect the power cord of each component before connecting. Using the cable box/satellite receiver control function This function allows the recorder to control a cable box or satellite receiver via the supplied set top box controller (page 13). - After setting up and adjust the ...settings of your VCR using your VCR connected to an antenna, connect this recorder to a TV that is connected to : - If you with a compatible cable box or satellite receiver. In the cases above, contact your cable...

Operating Instructions
Page 13
... and your TV to the LINE OUT (VIDEO/AUDIO L/R) jacks (page 15), you need to match the input source on the TV even when the recorder is necessary to the cable box or satellite receiver (LINE 1 IN). Wall Set top box controller (supplied) Cable box/ satellite receiver AUDIO OUT R ... (not supplied) to antenna input TV Audio/video cord (not supplied) to SET TOP BOX CONTROL SETTOP BOX CONTROL LINE 1 IN VIDEO to LINE 1 IN DVD recorder SETTOP HDMI OUT BOX CONTROL AUDIO OUT COMPONENT VIDEO OUT S VIDEO OUT LINE 1 IN LINE OUT L Y VIDEO VIDEO R PB L PR OPTICAL COAXIAL DIGITAL...
... and your TV to the LINE OUT (VIDEO/AUDIO L/R) jacks (page 15), you need to match the input source on the TV even when the recorder is necessary to the cable box or satellite receiver (LINE 1 IN). Wall Set top box controller (supplied) Cable box/ satellite receiver AUDIO OUT R ... (not supplied) to antenna input TV Audio/video cord (not supplied) to SET TOP BOX CONTROL SETTOP BOX CONTROL LINE 1 IN VIDEO to LINE 1 IN DVD recorder SETTOP HDMI OUT BOX CONTROL AUDIO OUT COMPONENT VIDEO OUT S VIDEO OUT LINE 1 IN LINE OUT L Y VIDEO VIDEO R PB L PR OPTICAL COAXIAL DIGITAL...

Operating Instructions
Page 14
Output signals to S VIDEO OUT, COMPONENT VIDEO OUT, or HDMI OUT jacks. 14 Notes • Synchro-Recording does not work for: - For details, see the tuner's operating instructions. • AV path through function does not work with some tuners. Input signals from the LINE 2 IN jacks. -
Output signals to S VIDEO OUT, COMPONENT VIDEO OUT, or HDMI OUT jacks. 14 Notes • Synchro-Recording does not work for: - For details, see the tuner's operating instructions. • AV path through function does not work with some tuners. Input signals from the LINE 2 IN jacks. -
Operating Instructions
Page 15
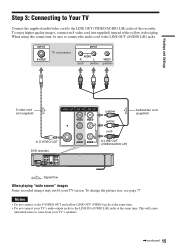
...be sure to connect the audio cord to LINE OUT (VIDEO/AUDIO L/R) Audio/video cord (supplied) : Signal flow When playing "wide screen" images Some recorded images may not fit your TV's speakers. ,continued 15 INPUT S VIDEO TV or projector INPUT AUDIO R L (red) (white) VIDEO (yellow) ...S video cord (not supplied) S VIDEO OUT LINE 1 IN LINE OUT VIDEO VIDEO L (yellow) (white) (red) to S VIDEO OUT DVD recorder SETTOP HDMI OUT BOX CONTROL AUDIO OUT COMPONENT VIDEO OUT S VIDEO OUT LINE 1 IN LINE OUT L Y VIDEO VIDEO R PB L PR OPTICAL COAXIAL DIGITAL AUDIO ...
...be sure to connect the audio cord to LINE OUT (VIDEO/AUDIO L/R) Audio/video cord (supplied) : Signal flow When playing "wide screen" images Some recorded images may not fit your TV's speakers. ,continued 15 INPUT S VIDEO TV or projector INPUT AUDIO R L (red) (white) VIDEO (yellow) ...S video cord (not supplied) S VIDEO OUT LINE 1 IN LINE OUT VIDEO VIDEO L (yellow) (white) (red) to S VIDEO OUT DVD recorder SETTOP HDMI OUT BOX CONTROL AUDIO OUT COMPONENT VIDEO OUT S VIDEO OUT LINE 1 IN LINE OUT L Y VIDEO VIDEO R PB L PR OPTICAL COAXIAL DIGITAL AUDIO ...
Operating Instructions
Page 16
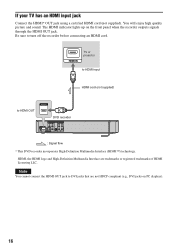
...trademarks or registered trademarks of HDMI Licensing LLC. HDMI IN TV or projector to HDMI input HDMI cord (not supplied) to turn off the recorder before connecting an HDMI cord. You will enjoy high quality picture and sound. HDMI, the HDMI logo and High-Definition Multimedia Interface are not... your TV has an HDMI input jack Connect the HDMI* OUT jack using a certified HDMI cord (not supplied). Be sure to HDMI OUT HDMI OUT DVD recorder SETTOP HDMI OUT BOX CONTROL AUDIO OUT COMPONENT VIDEO OUT S VIDEO OUT LINE 1 IN LINE OUT L Y VIDEO VIDEO R PB L PR OPTICAL COAXIAL DIGITAL...
...trademarks or registered trademarks of HDMI Licensing LLC. HDMI IN TV or projector to HDMI input HDMI cord (not supplied) to turn off the recorder before connecting an HDMI cord. You will enjoy high quality picture and sound. HDMI, the HDMI logo and High-Definition Multimedia Interface are not... your TV has an HDMI input jack Connect the HDMI* OUT jack using a certified HDMI cord (not supplied). Be sure to HDMI OUT HDMI OUT DVD recorder SETTOP HDMI OUT BOX CONTROL AUDIO OUT COMPONENT VIDEO OUT S VIDEO OUT LINE 1 IN LINE OUT L Y VIDEO VIDEO R PB L PR OPTICAL COAXIAL DIGITAL...

Operating Instructions
Page 17
You will enjoy accurate color reproduction and high quality images. The "PROGRESSIVE" indicator lights up when the recorder outputs progressive signals. COMPONENT VIDEO IN Y PB PR (green) (blue) (red) TV or projector INPUT L AUDIO R (white) (red) Component video cord (not... CONTROL AUDIO OUT COMPONENT VIDEO OUT S VIDEO OUT LINE 1 IN LINE OUT L Y VIDEO VIDEO R PB L PR OPTICAL COAXIAL DIGITAL AUDIO OUT R AUDIO AUDIO DVD recorder : Signal flow 17 When using a component video cord (not supplied) or three video cords (not supplied) of "Video" to "On" in the "Setup" ...
You will enjoy accurate color reproduction and high quality images. The "PROGRESSIVE" indicator lights up when the recorder outputs progressive signals. COMPONENT VIDEO IN Y PB PR (green) (blue) (red) TV or projector INPUT L AUDIO R (white) (red) Component video cord (not... CONTROL AUDIO OUT COMPONENT VIDEO OUT S VIDEO OUT LINE 1 IN LINE OUT L Y VIDEO VIDEO R PB L PR OPTICAL COAXIAL DIGITAL AUDIO OUT R AUDIO AUDIO DVD recorder : Signal flow 17 When using a component video cord (not supplied) or three video cords (not supplied) of "Video" to "On" in the "Setup" ...
Operating Instructions
Page 18
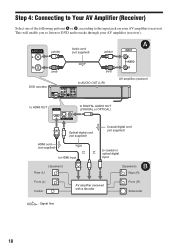
AUDIO OUT L (white) R (red) Audio cord (not supplied) (white) (red) DVD recorder to AUDIO OUT (L/R) SETTOP HDMI OUT BOX CONTROL AUDIO OUT COMPONENT VIDEO OUT S VIDEO OUT LINE 1 IN LINE OUT L Y VIDEO VIDEO R PB L PR OPTICAL COAXIAL ... or optical digital input [Speakers] B Rear (R) Front (L) Center AV amplifier (receiver) with a decoder Front (R) Subwoofer : Signal flow 18 This will enable you to listen to DVD audio tracks through your AV amplifier (receiver).
AUDIO OUT L (white) R (red) Audio cord (not supplied) (white) (red) DVD recorder to AUDIO OUT (L/R) SETTOP HDMI OUT BOX CONTROL AUDIO OUT COMPONENT VIDEO OUT S VIDEO OUT LINE 1 IN LINE OUT L Y VIDEO VIDEO R PB L PR OPTICAL COAXIAL ... or optical digital input [Speakers] B Rear (R) Front (L) Center AV amplifier (receiver) with a decoder Front (R) Subwoofer : Signal flow 18 This will enable you to listen to DVD audio tracks through your AV amplifier (receiver).

Operating Instructions
Page 19
... settings under license from the DIGITAL AUDIO OUT jacks, you cannot switch the bilingual sounds on a DVD-RW (VR mode) or DVD-R (VR mode) by pressing AUDIO. • When you connect the recorder to do one of the following: - Surround 2 Surround 3 Virtual speaker Note Make sure that... Setup" in "Surround" of Dolby Digital (5.1ch) or DTS (5.1ch). Connect the AV amplifier (receiver) to a digital audio input jack Use this recorder. • When outputting from Dolby Laboratories. Hookups and Settings A Connecting to the TV with a video cord other than HDMI cord (component video cord,...
... settings under license from the DIGITAL AUDIO OUT jacks, you cannot switch the bilingual sounds on a DVD-RW (VR mode) or DVD-R (VR mode) by pressing AUDIO. • When you connect the recorder to do one of the following: - Surround 2 Surround 3 Virtual speaker Note Make sure that... Setup" in "Surround" of Dolby Digital (5.1ch) or DTS (5.1ch). Connect the AV amplifier (receiver) to a digital audio input jack Use this recorder. • When outputting from Dolby Laboratories. Hookups and Settings A Connecting to the TV with a video cord other than HDMI cord (component video cord,...
Operating Instructions
Page 20
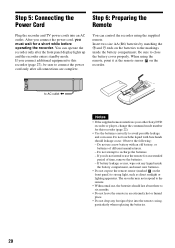
... the batteries. 20 LINE OUT VIDEO L R AUDIO to AC outlet < Notes • If the supplied remote interferes your other Sony DVD recorder or player, change the command mode number for this recorder (page 27), be sure to connect the power cord only after the front panel display lights up and the...the batteries to the markings inside the battery compartment, and insert new batteries. • Do not expose the remote sensor (marked on the recorder. The recorder may not respond to strong light, such as direct sunlight or lighting apparatus. Do not attempt to six months. • Do not ...
... the batteries. 20 LINE OUT VIDEO L R AUDIO to AC outlet < Notes • If the supplied remote interferes your other Sony DVD recorder or player, change the command mode number for this recorder (page 27), be sure to connect the power cord only after the front panel display lights up and the...the batteries to the markings inside the battery compartment, and insert new batteries. • Do not expose the remote sensor (marked on the recorder. The recorder may not respond to strong light, such as direct sunlight or lighting apparatus. Do not attempt to six months. • Do not ...

Operating Instructions
Page 22
..., 10, 11 03, 05, 18 08, 12 03, 08, 14 07, 18 03, 04, 12 12 14, 15 If you have a Sony DVD player or more than one Sony DVD recorder If the supplied remote interferes with your other Sony DVD recorder or player after you have completed "Step 7: Easy Setup." The default command mode setting for this...
..., 10, 11 03, 05, 18 08, 12 03, 08, 14 07, 18 03, 04, 12 12 14, 15 If you have a Sony DVD player or more than one Sony DVD recorder If the supplied remote interferes with your other Sony DVD recorder or player after you have completed "Step 7: Easy Setup." The default command mode setting for this...


