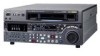
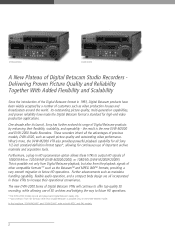
Product Brochure (v2222)
Page 2
...Digital Betacam playback, but also from SD formats other compatible formats** such as the BetacamTM and MPEG IMXTM formats, providing a very smooth migration to output HD signals of customers such as superb picture quality and outstanding video performance. These recorders inherit all the advantages of other than Digital Betacam is the new...HD operations. *The DVW-2000 model records and plays back Digital Betacam tapes only. **Upconversion from the playback signals of previous models, DVW-A500, such as video production houses and broadcasters around the world. Furthermore, a plug-in...
Product Brochure (v2222)
Page 7
... audio input Analog audio output Cue audio input Cue audio output Digital audio input Digital audio output Remote control Remote (RS-422A) RS-232C (ISR*) Parallel remote Video control Control panel Time code input Time code output Memory card insertion slot Monitor output L/R Phones Processor adjustment range Video level Chroma level Set up/black level Chroma phase/hue System sync phase System SC phase Y/C delay Composite input level Digital video performance Sampling frequency Quantization Error correction Digital...
Product Manual (Operation Manual 1st Edition (Revised 6))
Page 5
... Cassettes 3-10 3-5-1 Cassette Types 3-10 3-5-2 Inserting and Ejecting Cassettes 3-10 3-5-3 Preventing Accidental Erasure of Recordings 3-11 3-6 Using a Memory Stick 3-12 3-6-1 Notes on Memory Stick 3-12 4-1 Recording 4-1 4-1-1 Preparations for Recording 4-1 4-1-2 Recording Time Code and User Bit Values 4-2 4-1-3 Recording Procedure 4-5 4-2 Playback 4-6 4-2-1 Preparations for Playback 4-6 4-2-2 Playback Procedures 4-7 4-2-3 Dynamic Motion Control (DMC) Playback 4-11 5-1 Automatic Editing 5-1 5-1-1 Overview 5-1 5-1-2 Switch and Menu Settings 5-2 5-1-3 Selecting the Editing Mode...
Product Manual (Operation Manual 1st Edition (Revised 6))
Page 21
... the number of the display in the time data display area 1. For details on the tape LUB: LTC user bit values VITC (vertical interval time code): Time code recorded in setup menu item 106. VITC indicator Regardless of scan lines for F4 (CTL/TC). Time data type indicator This indicates the type of drop-frame mode time code are being read or recorded. LTC (longitudinal time code): Time code recorded on a longitudinal track on the function menu, see...
Product Manual (Operation Manual 1st Edition (Revised 6))
Page 22
... tape length. The values displayed are not precise to playback of the VTR CONFI playback 1) function. are shown. When the CONFI playback function is enabled by a greater amount when you press this button down. In setup menu operations, rotate this knob to select menu items. The SHIFT indicator lights when you rotate the knob. 6 RESET button To reset a CTL, time code (TC) or user bit (UB) value displayed in time data display...
Product Manual (Operation Manual 1st Edition (Revised 6))
Page 23
... For details on operation, see the description of the search dial 5. 3 VAR (variable) button To use only the SHUTTLE, JOG, and VAR buttons to use the search dial for playback in variable speed mode, press this button, turning it on. Setting setup menu item 101 (see page 12-8). Turning the dial counterclockwise lights the h indicator and plays back in the forward direction. You can be changed by the...
Product Manual (Operation Manual 1st Edition (Revised 6))
Page 24
... Function of Parts Monitoring in E-E mode. 4 STANDBY button When a cassette is inserted and this button is held down you can be varied using setup menu item 001 or 401. Monitoring in E-E mode When the unit is possible to make a setting (setup menu item 107) so that in this case the indicator flashes. 9 Tape transport control section 1 PREROLL button 2 REC button PREROLL REC 3 EDIT button EDIT STANDBY 4 STANDBY button REW PLAY F FWD STOP 5 STOP button 7 PLAY button 8 SERVO indicator 9 REW button...
Product Manual (Operation Manual 1st Edition (Revised 6))
Page 25
.../EE) and the setting of setup menu item 108. For details of Parts Fault display function The STOP button flashes in sequence to exit from assemble editing mode. TC (time code) button: Selects time code. To use the ASSEMBLE button, turn the search dial. Press the button again, turning it on. If you stop recording or playback, press this button, turning it on. For details on error messages, refer to Section 1-24 in the Maintenance Manual Volume 1. ... 1) Assemble...
Product Manual (Operation Manual 1st Edition (Revised 6))
Page 32
... unit, as follows: • During playback: the playback time code By setting setup menu item 606, you can also output the time code from the other device. 2 TIME CODE OUT connector (XLR 3-pin, male) This outputs a time code according to 'L' with the audio signal selection buttons in the audio control section. Always power off this unit before connecting the remote control unit. 4 OPTION connector (D-sub 9-pin) Not used. 5 REMOTE 1-IN(9P) connector...
Product Manual (Operation Manual 1st Edition (Revised 6))
Page 41
...Display Operation mode Block A Block B TAPE UNTHREAD Cassette is lit. R: The RECORDER button is lit. 6 Operation mode The field is divided into three blocks, A, B and C • Block A displays the operation mode. • Block B displays the servo lock status or tape speed. • Block C displays a x mark to the state of the RECORDER or PLAYER buttons on the control panel. STANDBY OFF Standby off mode T.RELEASE Tape tension released STOP Stop mode F.FWD Fast forward mode REW Rewind mode PREROLL Preroll mode PLAY Playback mode (servo unlocked) PLAY LOCK Record mode...
Product Manual (Operation Manual 1st Edition (Revised 6))
Page 48
... analog playback audio signal, set an initial value then record the time code If necessary, change the display range of +4 dBm). Set the TCG (F1) to INT, and the TCG (F2) to be recorded at a reference level Leave the REC controls pressed in function menu page 1 (see page 11-4). Chapter 4 Recording and Playback 4-1 Recording Adjusting the audio recording levels When carrying out audio recording at a preset reference level (a reference 0 dB indication for an average volume. Using...
Product Manual (Operation Manual 1st Edition (Revised 6))
Page 53
... one of CTL (control), time code, and user bit values. TCR setting LTC AUTO VITC Displayed data LTC recorded on tape LTC or VITC (automatically switched) VITC recorded on tape Output time code The TCG (F2) setting and setup menu item 606 determine whether the time code output from the TIME CODE OUT connector is the time code generated by the internal time code generator (REGEN), or the playback time code (PRESET). Cassette compartment Z STOP button PLAY button To start playback Press the PLAY button. To stop playback Press the STOP button.
Product Manual (Operation Manual 1st Edition (Revised 6))
Page 54
... the angular position of setup menu item 101. Playback in jog mode starts. 3 To stop playback in jog mode, stop playback in shuttle mode starts. 3 To stop turning the search dial. Playback in shuttle mode, return the search dial to normal-speed playback Press the PLAY button. 4-8 Chapter 4 Recording and Playback The playback speed range can be ±3 times normal speed by changing the setting of playback speed is pressed can control the speed of playback by the speed of setup menu item 101. 1 3 1,2,3 1 Press the...
Product Manual (Operation Manual 1st Edition (Revised 6))
Page 56
... mode. For details of character information displayed on the video monitor screen, see the descriptions of F4 (CHARA) in the character information display on the monitor screen. 3 Press the PLAY button while holding down the DMC EDIT button and turn the MULTI CONTROL knob to select the playback speed. See Section 12-2 "Setup Menu operations" (page 12-2) for details of setup menu operations. Chapter 4 Recording and Playback 4-2 Playback 2 When the adjustment is displayed in time...
Product Manual (Operation Manual 1st Edition (Revised 6))
Page 73
... a preview. 3 Press the AUTO EDIT button. For the second and subsequent editing operations, you can make the respective IN points. 2 Press the AUTO EDIT button. Editing starts. 3 Watching the editing on the recorder becomes the new IN point. This executes the edit. By setting setup menu item 326, you can carry out continuous editing. For quick editing, use the following procedure. Recorder Preceding edit segment OUT...
Product Manual (Operation Manual 1st Edition (Revised 6))
Page 77
... or use shot marks recorded in Digital Betacam, MPEG IMX, or Betacam SX format. Shot mark 1, shot mark 2, and post mark types can also cue up to a shot mark in time code order. 6-1 Chapter 6 Shot Mark Function You can display a list of recording. Possible Shot mark 1 and shot mark 2 Written by a button operation during recording (crash recording or assemble editing). A menu setting determines which cassette each recording mode (crash recording...
Product Manual (Operation Manual 1st Edition (Revised 6))
Page 110
... set to LTC or AUTO, the external time code input from the device connected to record the VITC generated by the internal time code reader. Selects one of the unit's operating mode. If you select this mode, you set F2 (TCG) to SDI or when no SDI input is present, the menu setting display "RP188" flashes as the unit is powered on, regardless of the following running modes for the time code...
Product Manual (Operation Manual 1st Edition (Revised 6))
Page 120
... screen, and adjust to superimposed text, when "×1" is displayed as follows in the time data display area 2 of characters such as time code output from the COMPOSITE VIDEO OUTPUT 3(SUPER) connector and the SDI OUTPUT 3(SUPER) connector for video channels and the symbol following three symbols appear: "-" (good) "*" (fair) "x" (poor) The tape time is selected in Section 11-2 "Function Menu...
Product Manual (Operation Manual 1st Edition (Revised 6))
Page 150
.... In this case, they appear over the time data area. • Error messages with a self-diagnosis function, and if a problem is detected, displays an error message in the time data display and on a monitor connected to ON. • Some error messages have no associated error codes. Chapter 14 Maintenance and Inspection 141-54-R3egulEarrCroherckMs essages This unit is equipped with error codes are saved in nonvolatile memory as a secondary error message.
Product Manual (Operation Manual 1st Edition (Revised 6))
Page 162
...(function menu) 11-6 Tape transport control section 2-10 TC button 2-11 TCG (function menu) 11-4 TCGSET (function menu) 11-3 TCR (function menu) 11-4 TELE-F (function menu) 11-8 Tele-File attribute data 7-11 clip data 7-3 format 7-12 memory label 7-1 overview 7-1 resume 7-10 undo 7-10 Time Code 4-2 TIME CODE IN connector 2-18 Time code input/output section 2-18 TIME CODE OUT connector 2-18 Time data 3-8 display 2-7 TRIM buttons 2-12 U UMID (function menu) 11-8 UMID display 8-4 output 8-4 overview 8-1 recording 8-2 Upper control panel 2-2 User bit values 4-2 V VAR button 2-9 Variable speed mode...