Operating Instructions
Page 1
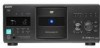
... the rear of Mind Warranty Replacement service. Record the serial number in the space provided below. 2-592-134-13(2) CD/DVD Player Operating Instructions For customers in the U.S.A Owner's Record The model and serial numbers are located at : Customer Information Service 115 Gordon Baker Road, Toronto, Ontario, M2H 3R6 DVP-CX995V © 2005 Sony Corporation
... the rear of Mind Warranty Replacement service. Record the serial number in the space provided below. 2-592-134-13(2) CD/DVD Player Operating Instructions For customers in the U.S.A Owner's Record The model and serial numbers are located at : Customer Information Service 115 Gordon Baker Road, Toronto, Ontario, M2H 3R6 DVP-CX995V © 2005 Sony Corporation
Operating Instructions
Page 4
... Play the Following Discs 6 Index to Parts and Controls 8 Guide to the Control Menu Display 12 Hookups Hooking Up the Player 15 Step 1: Unpacking 15 Step 2: Preparing the Remote 15 Step 3: Connecting the Video/HDMI Cords 17 Step 4: Connecting the Audio Cords 20 Step 5: Connecting the ... Discs 30 Playing Discs 32 Resuming Playback From the Point Where You Stopped the Disc (Multi-disc Resume 34 Using the DVD's Menu 35 Selecting "ORIGINAL" or "PLAY LIST" on a DVD-RW 36 Selecting a Playback Area for a Super Audio CD 37 Playing VIDEO CDs With PBC Functions (PBC Playback 38 Various Play...
... Play the Following Discs 6 Index to Parts and Controls 8 Guide to the Control Menu Display 12 Hookups Hooking Up the Player 15 Step 1: Unpacking 15 Step 2: Preparing the Remote 15 Step 3: Connecting the Video/HDMI Cords 17 Step 4: Connecting the Audio Cords 20 Step 5: Connecting the ... Discs 30 Playing Discs 32 Resuming Playback From the Point Where You Stopped the Disc (Multi-disc Resume 34 Using the DVD's Menu 35 Selecting "ORIGINAL" or "PLAY LIST" on a DVD-RW 36 Selecting a Playback Area for a Super Audio CD 37 Playing VIDEO CDs With PBC Functions (PBC Playback 38 Various Play...
Operating Instructions
Page 6
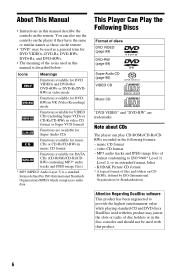
... used with this product may be used in this product. 6 Note about CDs The player can also use the controls on the player if they have the same or similar names as those on the remote. • "DVD" may jam in the slots or racks of disc holders or in the disc consoles... format * A logical format of format conforming to provide the highest entertainment value while playing standard CD and DVD discs. You can play CD-ROMs/CD-Rs/CDRWs recorded in the following formats: - This Player Can Play the Following Discs Format of the icons used with this manual is a standard format defined by...
... used with this product may be used in this product. 6 Note about CDs The player can also use the controls on the player if they have the same or similar names as those on the remote. • "DVD" may jam in the slots or racks of disc holders or in the disc consoles... format * A logical format of format conforming to provide the highest entertainment value while playing standard CD and DVD discs. You can play CD-ROMs/CD-Rs/CDRWs recorded in the following formats: - This Player Can Play the Following Discs Format of the icons used with this manual is a standard format defined by...

Operating Instructions
Page 7
...8226; A disc recorded in VR mode (Video Recording format) • Copy-Once programs recorded on this player. Region code Example of discs that the player cannot play The player cannot play DVD VIDEOs (playback only) labeled with paper or stickers on it may cause the disc to jam or the...viewing uses only unless otherwise authorized by software producers. Note on playback operations of DVDs and VIDEO CDs Some playback operations of CD-Extras • DVD-ROMs • DVD Audios Also, the player cannot play on CPRM* compatible DVD-Rs. • An 8 cm disc (The 12 cm disc adapter should...
...8226; A disc recorded in VR mode (Video Recording format) • Copy-Once programs recorded on this player. Region code Example of discs that the player cannot play The player cannot play DVD VIDEOs (playback only) labeled with paper or stickers on it may cause the disc to jam or the...viewing uses only unless otherwise authorized by software producers. Note on playback operations of DVDs and VIDEO CDs Some playback operations of CD-Extras • DVD-ROMs • DVD Audios Also, the player cannot play on CPRM* compatible DVD-Rs. • An 8 cm disc (The 12 cm disc adapter should...
Operating Instructions
Page 8
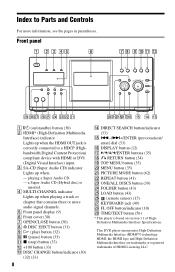
...) X FOLDER button (43) Y LOAD button (43) Z (remote sensor) (15) wj KEYBOARD jack (49) wk FL OFF button/indicator (10) wl TIME/TEXT button (56) * This player is inserted. playing a Super Audio CD. - bandwidth Digital Content Protection) compliant device with HDMI or DVI (Digital Visual Interface) input. HDMI, the HDMI logo and... correctly connected to Parts and Controls For more audio signal channels. Index to a HDCP (High- C SA-CD (Super Audio CD) indicator Lights up when: - This DVD player incorporates High-Definition Multimedia Interface (HDMI™) technology.
...) X FOLDER button (43) Y LOAD button (43) Z (remote sensor) (15) wj KEYBOARD jack (49) wk FL OFF button/indicator (10) wl TIME/TEXT button (56) * This player is inserted. playing a Super Audio CD. - bandwidth Digital Content Protection) compliant device with HDMI or DVI (Digital Visual Interface) input. HDMI, the HDMI logo and... correctly connected to Parts and Controls For more audio signal channels. Index to a HDCP (High- C SA-CD (Super Audio CD) indicator Lights up when: - This DVD player incorporates High-Definition Multimedia Interface (HDMI™) technology.
Operating Instructions
Page 9
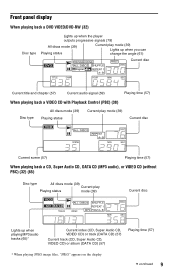
Front panel display When playing back a DVD VIDEO/DVD-RW (32) Disc type Lights up when the player outputs progressive signals (79) All discs mode (39) Playing status Current play mode (39) Lights up when you can change the angle (61) Current disc ...
Front panel display When playing back a DVD VIDEO/DVD-RW (32) Disc type Lights up when the player outputs progressive signals (79) All discs mode (39) Playing status Current play mode (39) Lights up when you can change the angle (61) Current disc ...
Operating Instructions
Page 11
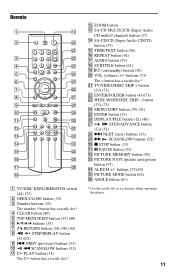
buttons (33)(65) eg PICTURE MODE button (62) eh ANGLE button (61) * Use the tactile dot as a reference when operating the player. 11 PREV (previous) buttons (33) J m SCAN/SLOW buttons (52) K H PLAY button (32) The H button has a tactile dot.* L ZOOM button M SA-CD MULTI/2CH ...) +/- x STOP button (33) ea X PAUSE button (33) es PICTURE MEMORY button (45) ed PICTURE NAVI (picture navigation) button (55) ef ALBUM +/- Remote A TV/DISC EXPLORER/DVD switch (44) (73) B OPEN/CLOSE button (33) C Number buttons (35) The number 5 button has a tactile dot.* D CLEAR button (40) E TOP MENU/EDIT button (35...
buttons (33)(65) eg PICTURE MODE button (62) eh ANGLE button (61) * Use the tactile dot as a reference when operating the player. 11 PREV (previous) buttons (33) J m SCAN/SLOW buttons (52) K H PLAY button (32) The H button has a tactile dot.* L ZOOM button M SA-CD MULTI/2CH ...) +/- x STOP button (33) ea X PAUSE button (33) es PICTURE MEMORY button (45) ed PICTURE NAVI (picture navigation) button (55) ef ALBUM +/- Remote A TV/DISC EXPLORER/DVD switch (44) (73) B OPEN/CLOSE button (33) C Number buttons (35) The number 5 button has a tactile dot.* D CLEAR button (40) E TOP MENU/EDIT button (35...
Operating Instructions
Page 13
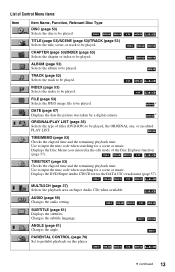
... or music. TIME/TEXT (page 53) Checks the elapsed time and the remaining playback time. MULTI/2CH (page 37) Selects the playback area on this player. c continued 13 TRACK (page 53) Selects the track to be played. FILE (page 53) Selects the JPEG image file to be played. * DATE (page 67...) Displays the date the picture was taken by a digital camera. * ORIGINAL/PLAY LIST (page 36) Selects the type of titles (DVD-RW) to be played. Displays the DVD/Super Audio CD/CD text or the DATA CD's track name (page 57). PARENTAL CONTROL (page 70) Set to prohibit playback on...
... or music. TIME/TEXT (page 53) Checks the elapsed time and the remaining playback time. MULTI/2CH (page 37) Selects the playback area on this player. c continued 13 TRACK (page 53) Selects the track to be played. FILE (page 53) Selects the JPEG image file to be played. * DATE (page 67...) Displays the date the picture was taken by a digital camera. * ORIGINAL/PLAY LIST (page 36) Selects the type of titles (DVD-RW) to be played. Displays the DVD/Super Audio CD/CD text or the DATA CD's track name (page 57). PARENTAL CONTROL (page 70) Set to prohibit playback on...
Operating Instructions
Page 16
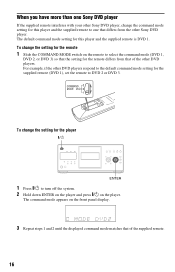
... for the supplied remote (DVD 1), set the remote to one Sony DVD player If the supplied remote interferes with your other Sony DVD player, change the command mode setting for this player and the supplied remote is DVD 1. The command mode appears on the player. When you have more ... the displayed command mode matches that of the other Sony DVD player. To change the setting for this player and the supplied remote to DVD 2 or DVD 3. To change the setting for the player [/1 ENTER 1 Press [/1 to select the command mode (DVD 1, DVD 2, or DVD 3) so that the setting for the remote differs ...
... for the supplied remote (DVD 1), set the remote to one Sony DVD player If the supplied remote interferes with your other Sony DVD player, change the command mode setting for this player and the supplied remote is DVD 1. The command mode appears on the player. When you have more ... the displayed command mode matches that of the other Sony DVD player. To change the setting for this player and the supplied remote to DVD 2 or DVD 3. To change the setting for the player [/1 ENTER 1 Press [/1 to select the command mode (DVD 1, DVD 2, or DVD 3) so that the setting for the remote differs ...
Operating Instructions
Page 17
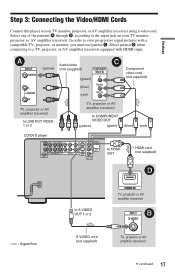
..., projector or AV amplifier (receiver) to LINE OUT VIDEO 1 or 2 TV, projector or AV amplifier (receiver) to COMPONENT VIDEO OUT (yellow) (green) (blue) (red) CD/DVD player to HDMI OUT HDMI cord (not supplied) l : Signal flow to view progressive signal pictures with HDMI input. In order to S VIDEO OUT 1 or 2 TV, projector..., projector, or AV amplifier (receiver) equipped with a compatible TV, projector, or monitor, you must use pattern C. Hookups Step 3: Connecting the Video/HDMI Cords Connect this player to your TV monitor, projector, or AV amplifier (receiver).
..., projector or AV amplifier (receiver) to LINE OUT VIDEO 1 or 2 TV, projector or AV amplifier (receiver) to COMPONENT VIDEO OUT (yellow) (green) (blue) (red) CD/DVD player to HDMI OUT HDMI cord (not supplied) l : Signal flow to view progressive signal pictures with HDMI input. In order to S VIDEO OUT 1 or 2 TV, projector..., projector, or AV amplifier (receiver) equipped with a compatible TV, projector, or monitor, you must use pattern C. Hookups Step 3: Connecting the Video/HDMI Cords Connect this player to your TV monitor, projector, or AV amplifier (receiver).
Operating Instructions
Page 19
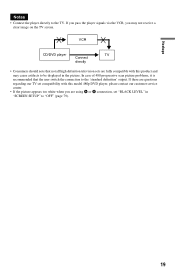
In case of 480 progressive scan picture problems, it is recommended that not all high definition television sets are fully compatible with this model 480p DVD player, please contact our customer service center. • If the picture appears too white when you may cause artifacts to "OFF" (page 79). 19...If there are using A or B connection, set compatibility with this product and may not receive a clear image on the TV screen. VCR CD/DVD player TV Connect directly • Consumers should note that the user switch the connection to the TV. Hookups Notes • Connect the...
In case of 480 progressive scan picture problems, it is recommended that not all high definition television sets are fully compatible with this model 480p DVD player, please contact our customer service center. • If the picture appears too white when you may cause artifacts to "OFF" (page 79). 19...If there are using A or B connection, set compatibility with this product and may not receive a clear image on the TV screen. VCR CD/DVD player TV Connect directly • Consumers should note that the user switch the connection to the TV. Hookups Notes • Connect the...
Operating Instructions
Page 21
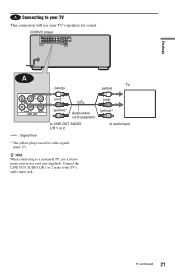
c continued 21 Hookups A Connecting to the TV's audio input jack. Connect the LINE OUT AUDIO L/R 1 or 2 jacks to your TV's speakers for video signals (page 17). z Hint When connecting to audio input l : Signal flow * The yellow plug is used for sound. CD/DVD player (white) TV (white) (red) (red) (yellow)* Audio/video cord (supplied) to LINE OUT AUDIO L/R 1 or 2 (yellow)* to a monaural TV, use your TV This connection will use a stereomono conversion cord (not supplied).
c continued 21 Hookups A Connecting to the TV's audio input jack. Connect the LINE OUT AUDIO L/R 1 or 2 jacks to your TV's speakers for video signals (page 17). z Hint When connecting to audio input l : Signal flow * The yellow plug is used for sound. CD/DVD player (white) TV (white) (red) (red) (yellow)* Audio/video cord (supplied) to LINE OUT AUDIO L/R 1 or 2 (yellow)* to a monaural TV, use your TV This connection will use a stereomono conversion cord (not supplied).
Operating Instructions
Page 22
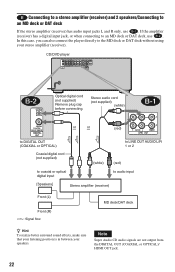
... signals are not output from the DIGITAL OUT (COAXIAL or OPTICAL)/ HDMI OUT jack. 22 CD/DVD player Optical digital cord (not supplied) Remove plug cap before connecting. In this case, you can also connect the player directly to the MD deck or DAT deck without using your speakers. Stereo audio cord (not...
... signals are not output from the DIGITAL OUT (COAXIAL or OPTICAL)/ HDMI OUT jack. 22 CD/DVD player Optical digital cord (not supplied) Remove plug cap before connecting. In this case, you can also connect the player directly to the MD deck or DAT deck without using your speakers. Stereo audio cord (not...
Operating Instructions
Page 23
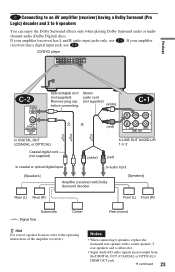
... are not output from the DIGITAL OUT (COAXIAL or OPTICAL)/ HDMI OUT jack. If your amplifier (receiver) has L and R audio input jacks only, use C-2 . CD/DVD player Hookups Optical digital cord (not supplied) Remove plug cap before connecting.
... are not output from the DIGITAL OUT (COAXIAL or OPTICAL)/ HDMI OUT jack. If your amplifier (receiver) has L and R audio input jacks only, use C-2 . CD/DVD player Hookups Optical digital cord (not supplied) Remove plug cap before connecting.
Operating Instructions
Page 24
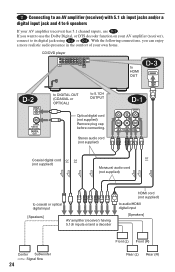
CD/DVD player to HDMI OUT to DIGITAL OUT (COAXIAL or OPTICAL) to audio/HDMI digital input [Speakers] Center Subwoofer l: Signal flow 24 Front (L) Front (R) Rear (L) Rear (R) D Connecting ...
CD/DVD player to HDMI OUT to DIGITAL OUT (COAXIAL or OPTICAL) to audio/HDMI digital input [Speakers] Center Subwoofer l: Signal flow 24 Front (L) Front (R) Rear (L) Rear (R) D Connecting ...
Operating Instructions
Page 30
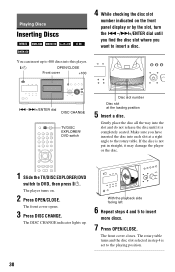
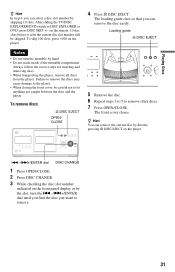
... front panel display or by the slot, turn the .-/>+/ENTER dial until it may damage the player or the disc. 1 Slide the TV/DISC EXPLORER/DVD switch to insert a disc. Make sure you want to DVD, then press [/1. The rotary table turns and the disc slot selected in straight, it is ...the disc is not put in step 4 is completely seated. Gently place the disc all the way into this player. [/1 OPEN/CLOSE Front cover +100 .-/>+/ENTER dial DISC CHANGE TV/DISC EXPLORER/ DVD switch Disc slot number Disc slot at a right angle to the playing position. 30 The front cover closes....
... front panel display or by the slot, turn the .-/>+/ENTER dial until it may damage the player or the disc. 1 Slide the TV/DISC EXPLORER/DVD switch to insert a disc. Make sure you want to DVD, then press [/1. The rotary table turns and the disc slot selected in straight, it is ...the disc is not put in step 4 is completely seated. Gently place the disc all the way into this player. [/1 OPEN/CLOSE Front cover +100 .-/>+/ENTER dial DISC CHANGE TV/DISC EXPLORER/ DVD switch Disc slot number Disc slot at a right angle to the playing position. 30 The front cover closes....
Operating Instructions
Page 31
...can remove the disc easily. Failure to remove the discs may cause damage to the player. • When closing the front cover, be skipped. The front cover closes. After sliding the TV/DISC EXPLORER/DVD switch to remove other discs. 7 Press OPEN/CLOSE. The loading guide rises so... that you can remove the current disc by directly pressing A DISC EJECT on the player. .-/>+/ENTER dial DISC CHANGE 1 Press OPEN/CLOSE. 2 Press ...
...can remove the disc easily. Failure to remove the discs may cause damage to the player. • When closing the front cover, be skipped. The front cover closes. After sliding the TV/DISC EXPLORER/DVD switch to remove other discs. 7 Press OPEN/CLOSE. The loading guide rises so... that you can remove the current disc by directly pressing A DISC EJECT on the player. .-/>+/ENTER dial DISC CHANGE 1 Press OPEN/CLOSE. 2 Press ...
Operating Instructions
Page 32
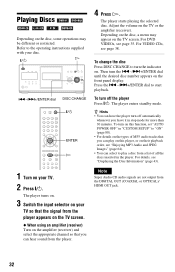
... turn on this function, set "AUTO POWER OFF" in "CUSTOM SETUP" to play on this player, or on the types of all the discs inserted in stop mode for more than 30 minutes. The player enters standby mode. Refer to the operating instructions supplied with your TV. 2 Press [/1. H [/1... .-/>+/ENTER dial DISC CHANGE [/1 ENTER H 1 Turn on your disc. Adjust the volume on the front panel display. For DVD VIDEOs, see page 38. To turn the ...
... turn on this function, set "AUTO POWER OFF" in "CUSTOM SETUP" to play on this player, or on the types of all the discs inserted in stop mode for more than 30 minutes. The player enters standby mode. Refer to the operating instructions supplied with your TV. 2 Press [/1. H [/1... .-/>+/ENTER dial DISC CHANGE [/1 ENTER H 1 Turn on your disc. Adjust the volume on the front panel display. For DVD VIDEOs, see page 38. To turn the ...
Operating Instructions
Page 33
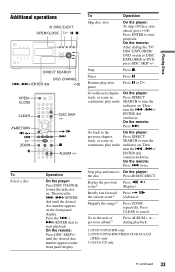
...album3) Press ALBUM + or - On the remote: After sliding the TV/ DISC EXPLORER/ DVD switch to turn the indicator on the front panel display. Resume play and remove On the player: the disc Press A DISC EJECT. Then turn the .-/>+/ENTER dial until the desired disc.... Magnify the image2) Press ZOOM repeatedly. On the remote: Press DISC SKIP+/- Go to the next chapter, On the player: track, or scene in SEARCH to DISC EXPLORER or DVD, press DISC SKIP +/-. Playing Discs Additional operations A DISC EJECT OPEN/CLOSE H X x DIRECT SEARCH DISC CHANGE .-/>+/ENTER ...
...album3) Press ALBUM + or - On the remote: After sliding the TV/ DISC EXPLORER/ DVD switch to turn the indicator on the front panel display. Resume play and remove On the player: the disc Press A DISC EJECT. Then turn the .-/>+/ENTER dial until the desired disc.... Magnify the image2) Press ZOOM repeatedly. On the remote: Press DISC SKIP+/- Go to the next chapter, On the player: track, or scene in SEARCH to DISC EXPLORER or DVD, press DISC SKIP +/-. Playing Discs Additional operations A DISC EJECT OPEN/CLOSE H X x DIRECT SEARCH DISC CHANGE .-/>+/ENTER ...
Operating Instructions
Page 36
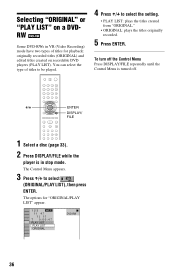
... turned off. The options for playback: originally recorded titles (ORIGINAL) and edited titles created on recordable DVD players (PLAY LIST). The Control Menu appears. 3 Press X/x to select the setting. • PLAY LIST: plays the titles created from "ORIGINAL." • ORIGINAL: ...two types of titles to be played. 4 Press X/x to select (ORIGINAL/PLAY LIST), then press ENTER. Selecting "ORIGINAL" or "PLAY LIST" on a DVDRW Some DVD-RWs in stop mode. You can select the type of titles for "ORIGINAL/PLAY LIST" appear. 1 2 3 ALL 1( 4) 1( 1) T 0:00:47 PLAY LIST PLAY ...
... turned off. The options for playback: originally recorded titles (ORIGINAL) and edited titles created on recordable DVD players (PLAY LIST). The Control Menu appears. 3 Press X/x to select the setting. • PLAY LIST: plays the titles created from "ORIGINAL." • ORIGINAL: ...two types of titles to be played. 4 Press X/x to select (ORIGINAL/PLAY LIST), then press ENTER. Selecting "ORIGINAL" or "PLAY LIST" on a DVDRW Some DVD-RWs in stop mode. You can select the type of titles for "ORIGINAL/PLAY LIST" appear. 1 2 3 ALL 1( 4) 1( 1) T 0:00:47 PLAY LIST PLAY ...


