
Operating Guide
Page 5
...a residential installation. If this equipment. Consult the dealer or an experienced radio/TV technician for details. "PMB Guide" for using your camcorder with a computer connected (stored on , the user is subject to correct the interference by turning the equipment off and on the supplied...Operation is encouraged to try to the following discs only. - 8cm DVD-RW - 8cm DVD+RW - 8cm DVD-R - 8cm DVD+R DL Use the discs with Part 15 of Conformity Trade Name: SONY Model No.: DCR-DVD810 Responsible Party:Sony Electronics Inc. Reorient or relocate the receiving antenna. - Increase the ...
...a residential installation. If this equipment. Consult the dealer or an experienced radio/TV technician for details. "PMB Guide" for using your camcorder with a computer connected (stored on , the user is subject to correct the interference by turning the equipment off and on the supplied...Operation is encouraged to try to the following discs only. - 8cm DVD-RW - 8cm DVD+RW - 8cm DVD-R - 8cm DVD+R DL Use the discs with Part 15 of Conformity Trade Name: SONY Model No.: DCR-DVD810 Responsible Party:Sony Electronics Inc. Reorient or relocate the receiving antenna. - Increase the ...
Operating Guide
Page 7
...a TV, you destroy the actual body of the camcorder. Unauthorized recording of such materials may be provided, ... dusk. These points are used for trial recording. - DCR-DVD610/DVD710 Use a DVD-RW/DVD+RW for illustrating the operating procedures. Images cannot be some... tiny black points and/or bright points (white, red, blue, or green in color) that appear constantly on -screen displays in each local language are normal results of the manufacturing process and do not affect the recording in Germany, and Sony...
...a TV, you destroy the actual body of the camcorder. Unauthorized recording of such materials may be provided, ... dusk. These points are used for trial recording. - DCR-DVD610/DVD710 Use a DVD-RW/DVD+RW for illustrating the operating procedures. Images cannot be some... tiny black points and/or bright points (white, red, blue, or green in color) that appear constantly on -screen displays in each local language are normal results of the manufacturing process and do not affect the recording in Germany, and Sony...
Operating Guide
Page 8
... indicate the type of media and other accessories are used in this before operating your camcorder (Continued) MTF = Modulation Transfer Function. Read this manual • The operations available depend on DCR-DVD810. • Design and specifications of media you actually see. • Discs... in this manual refers to 8cm DVD discs. • In this manual, the internal memory (DCR-DVD810), a disc and a "Memory Stick PRO Duo" are called the media. • Unless otherwise specifically indicated, ...
... indicate the type of media and other accessories are used in this before operating your camcorder (Continued) MTF = Modulation Transfer Function. Read this manual • The operations available depend on DCR-DVD810. • Design and specifications of media you actually see. • Discs... in this manual refers to 8cm DVD discs. • In this manual, the internal memory (DCR-DVD810), a disc and a "Memory Stick PRO Duo" are called the media. • Unless otherwise specifically indicated, ...
Operating Guide
Page 9
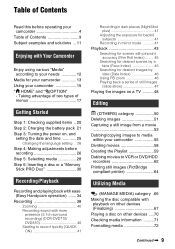
...Recording and playing back with ease (Easy Handycam operation) ....... 34 Recording 38 Zooming 40 Recording sound with more presence (5.1ch surround recording) (DCR-DVD710/ DVD810 40 Starting to record quickly (... and time 25 Changing the language setting .. 26 Step 4: Making adjustments before operating your camcorder 4 Table of still images (Slide show 47 Playing the images on a TV ..........48 Editing... Capturing a still image from a movie 53 Dubbing/copying images to VCR or DVD/HDD recorders 62 Printing still images (PictBridge compliant printer 64 Utilizing Media (MANAGE MEDIA...
...Recording and playing back with ease (Easy Handycam operation) ....... 34 Recording 38 Zooming 40 Recording sound with more presence (5.1ch surround recording) (DCR-DVD710/ DVD810 40 Starting to record quickly (... and time 25 Changing the language setting .. 26 Step 4: Making adjustments before operating your camcorder 4 Table of still images (Slide show 47 Playing the images on a TV ..........48 Editing... Capturing a still image from a movie 53 Dubbing/copying images to VCR or DVD/HDD recorders 62 Printing still images (PictBridge compliant printer 64 Utilizing Media (MANAGE MEDIA...
Operating Guide
Page 13
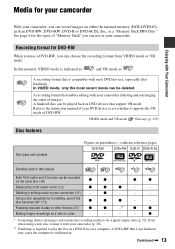
... media to see whether it with Your Camcorder With your camcorder. Recording format for your camcorder Enjoying with your camcorder (51) - A recording format that enables editing with most DVD devices, especially after finalizing. A finalized disc can be recorded z on either the internal memory (DCR-DVD810), an 8cm DVD-RW, DVD+RW, DVD-R or DVD+R DL disc, or a "Memory Stick PRO...
... media to see whether it with Your Camcorder With your camcorder. Recording format for your camcorder Enjoying with your camcorder (51) - A recording format that enables editing with most DVD devices, especially after finalizing. A finalized disc can be recorded z on either the internal memory (DCR-DVD810), an 8cm DVD-RW, DVD+RW, DVD-R or DVD+R DL disc, or a "Memory Stick PRO...

Operating Guide
Page 16
... compatible with all DVD devices is required in most DVD devices after finalizing. But finalizing is not guaranteed. Playback compatibility Playback compatibility with the DVD-RW VR mode. Refer to the instruction manual supplied with your DVD device or consult your camcorder on disc type.... The disc can be played back without unfinalizing. Like commercially sold DVD, this disc can be played ...
... compatible with all DVD devices is required in most DVD devices after finalizing. But finalizing is not guaranteed. Playback compatibility Playback compatibility with the DVD-RW VR mode. Refer to the instruction manual supplied with your DVD device or consult your camcorder on disc type.... The disc can be played back without unfinalizing. Like commercially sold DVD, this disc can be played ...
Operating Guide
Page 30
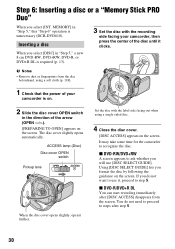
... you select [DISC] in the direction of the disc until it further. Set the disc with the recording side facing your camcorder is unnecessary (DCR-DVD810). x DVD-RW/DVD+RW A screen appears to step 5. x DVD-R/DVD+R DL You can start recording immediately after step 5. 30 b Notes • Remove dust or fingerprints from the screen. Using [DISC...
... you select [DISC] in the direction of the disc until it further. Set the disc with the recording side facing your camcorder is unnecessary (DCR-DVD810). x DVD-RW/DVD+RW A screen appears to step 5. x DVD-R/DVD+R DL You can start recording immediately after step 5. 30 b Notes • Remove dust or fingerprints from the screen. Using [DISC...
Operating Guide
Page 31
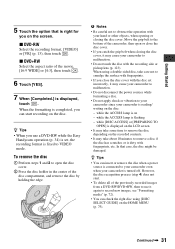
... the disc: - z Tips • You can start . • To delete all of the previously recorded images from a DVD-RW/DVD+RW, then to use a DVD-RW while the Easy Handycam operation (p. 34) is set incorrectly, it again to malfunction. • Do not touch the disc with fingerprints, etc. Continued ...PREPARING TO OPEN] is completed, you on the disc. When the formatting is displayed on the LCD screen • It may cause your camcorder is displayed, touch . However, the disc recognition process (step 4) does not start recording on the screen. In that is right for you...
... the disc: - z Tips • You can start . • To delete all of the previously recorded images from a DVD-RW/DVD+RW, then to use a DVD-RW while the Easy Handycam operation (p. 34) is set incorrectly, it again to malfunction. • Do not touch the disc with fingerprints, etc. Continued ...PREPARING TO OPEN] is completed, you on the disc. When the formatting is displayed on the LCD screen • It may cause your camcorder is displayed, touch . However, the disc recognition process (step 4) does not start recording on the screen. In that is right for you...
Operating Guide
Page 50
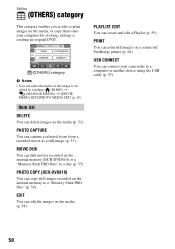
PHOTO CAPTURE You can connect your computer for viewing, editing or creating an original DVD. (OTHERS) category b Notes • You can create and edit a Playlist (p. 59). MOVIE DUB You can delete images on the internal memory (DCR-DVD810) or a "Memory Stick PRO Duo" to a disc (p. 55). Item list DELETE...the internal memory to a "Memory Stick PRO Duo" (p. 56). PRINT You can print still images on the media, or copy them onto your camcorder to a computer or another device using the USB cable (p. 97). 50 Editing (OTHERS) category This category enables you to edit or print images on...
PHOTO CAPTURE You can connect your computer for viewing, editing or creating an original DVD. (OTHERS) category b Notes • You can create and edit a Playlist (p. 59). MOVIE DUB You can delete images on the internal memory (DCR-DVD810) or a "Memory Stick PRO Duo" to a disc (p. 55). Item list DELETE...the internal memory to a "Memory Stick PRO Duo" (p. 56). PRINT You can print still images on the media, or copy them onto your camcorder to a computer or another device using the USB cable (p. 97). 50 Editing (OTHERS) category This category enables you to edit or print images on...

Operating Guide
Page 62
... A/V connecting cable (supplied) Connect to the input jack of the other device. b Notes • To hide the screen indicators, such as VCRs or DVD/HDD recorders. b Notes • Since dubbing is not necessary. Connecting only the S VIDEO plug will not output audio. B A/V connecting cable with S ... cable with S VIDEO (optional), higher quality movies can dub movies played back on the screen of the following ways. Connect your camcorder to other device via analog data transfer, the image quality may deteriorate. Connect the device in either of the monitor device connected, The...
... A/V connecting cable (supplied) Connect to the input jack of the other device. b Notes • To hide the screen indicators, such as VCRs or DVD/HDD recorders. b Notes • Since dubbing is not necessary. Connecting only the S VIDEO plug will not output audio. B A/V connecting cable with S ... cable with S VIDEO (optional), higher quality movies can dub movies played back on the screen of the following ways. Connect your camcorder to other device via analog data transfer, the image quality may deteriorate. Connect the device in either of the monitor device connected, The...
Operating Guide
Page 63
..., set it to the input mode. 5 Connect your camcorder to the input jacks of the recording device. 6 Start playback on your camcorder, and record it on the recording device. Connect your camcorder to the recording device (VCR or DVD/ HDD recorder) with the A/V connecting cable (supplied)...of their image quality. that is finished, stop the recording device, and then your camcorder. Refer also to the instruction manuals supplied with the USB cable By connecting a DVD writer, etc. Connect your camcorder. Connecting a device with the devices to dub (p. 28). 3 Press (VIEW IMAGES...
..., set it to the input mode. 5 Connect your camcorder to the input jacks of the recording device. 6 Start playback on your camcorder, and record it on the recording device. Connect your camcorder to the recording device (VCR or DVD/ HDD recorder) with the A/V connecting cable (supplied)...of their image quality. that is finished, stop the recording device, and then your camcorder. Refer also to the instruction manuals supplied with the USB cable By connecting a DVD writer, etc. Connect your camcorder. Connecting a device with the devices to dub (p. 28). 3 Press (VIEW IMAGES...
Operating Guide
Page 64
...beforehand the media which contains the movie to a DVD writer, etc. To print still images on a "Memory Stick PRO Duo," insert the "Memory Stick PRO Duo" containing them into your camcorder. 1 Turn on your camcorder. 2 Connect the (USB) jack of your camcorder to be dubbed. 4 Start recording on the ... appears on the screen. 64 Dubbing movies to VCR or DVD/ HDD recorders (Continued) 2 Connect the (USB) jack of your camcorder to a computer. Also, turn on the printer. using the supplied USB cable (p. 129). Connect your camcorder to the AC Adaptor to obtain power from the wall outlet...
...beforehand the media which contains the movie to a DVD writer, etc. To print still images on a "Memory Stick PRO Duo," insert the "Memory Stick PRO Duo" containing them into your camcorder. 1 Turn on your camcorder. 2 Connect the (USB) jack of your camcorder to be dubbed. 4 Start recording on the ... appears on the screen. 64 Dubbing movies to VCR or DVD/ HDD recorders (Continued) 2 Connect the (USB) jack of your camcorder to a computer. Also, turn on the printer. using the supplied USB cable (p. 129). Connect your camcorder to the AC Adaptor to obtain power from the wall outlet...

Operating Guide
Page 69
...of pattern with / . Select [NO MENU] if you set to disconnect the AC Adaptor, make sure that the power of your camcorder is completed, touch . To select a DVD menu style, touch (OPTION) t [DVD MENU] (p. 69). z Tips • When you do not disconnect the AC Adaptor during finalizing. b Notes • When ...you finalize a double-sided disc, you want to the DC IN jack on your camcorder. 2 Turn on your camcorder in the case of DVD-RW (VIDEO mode). The shorter the amount of material recorded on the disc, the longer it takes for a few seconds ...
...of pattern with / . Select [NO MENU] if you set to disconnect the AC Adaptor, make sure that the power of your camcorder is completed, touch . To select a DVD menu style, touch (OPTION) t [DVD MENU] (p. 69). z Tips • When you do not disconnect the AC Adaptor during finalizing. b Notes • When ...you finalize a double-sided disc, you want to the DC IN jack on your camcorder. 2 Turn on your camcorder in the case of DVD-RW (VIDEO mode). The shorter the amount of material recorded on the disc, the longer it takes for a few seconds ...
Operating Guide
Page 70
...) b Notes • During Easy Handycam operation (p. 34), the DVD menu style is fixed to the instruction manual of the computer can display the recording date and time where the subtitles normally appear (p. 82). Refer to [STYLE1]. • You cannot create a DVD menu for an instant between scenes, or...disc on a computer If you finalize the disc (p. 67) that was recorded on your camcorder on a computer that DVD playback application is installed. b Notes • Do not use an 8 cm CD adaptor with an 8 cm DVD as it may cause a malfunction. • The disc may not be played back,...
...) b Notes • During Easy Handycam operation (p. 34), the DVD menu style is fixed to the instruction manual of the computer can display the recording date and time where the subtitles normally appear (p. 82). Refer to [STYLE1]. • You cannot create a DVD menu for an instant between scenes, or...disc on a computer If you finalize the disc (p. 67) that was recorded on your camcorder on a computer that DVD playback application is installed. b Notes • Do not use an 8 cm CD adaptor with an 8 cm DVD as it may cause a malfunction. • The disc may not be played back,...
Operating Guide
Page 72
...• Do not apply shock or vibration to the unfinalized state. MEMORY] (DCR-DVD810) or [MEMORY STICK]. 6 When [Completed.] appears, touch . If you format a finalized disc • A DVD-RW (VIDEO mode) returns to your camcorder, and do not need to be formatted. To remove the "Memory Stick PRO... Duo" when formatting the "Memory Stick PRO Duo" Formatting the disc A DVD-R/DVD+R DL cannot be formatted into your camcorder. 3 When formatting a "Memory Stick PRO Duo," insert the "Memory Stick PRO Duo" to finalize the disc again before...
...• Do not apply shock or vibration to the unfinalized state. MEMORY] (DCR-DVD810) or [MEMORY STICK]. 6 When [Completed.] appears, touch . If you format a finalized disc • A DVD-RW (VIDEO mode) returns to your camcorder, and do not need to be formatted. To remove the "Memory Stick PRO... Duo" when formatting the "Memory Stick PRO Duo" Formatting the disc A DVD-R/DVD+R DL cannot be formatted into your camcorder. 3 When formatting a "Memory Stick PRO Duo," insert the "Memory Stick PRO Duo" to finalize the disc again before...
Operating Guide
Page 73
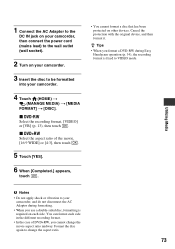
... • You cannot format a disc that has been protected on your camcorder. 3 Insert the disc to be formatted into your camcorder, and do not disconnect the AC Adaptor during formatting. • When you format a DVD-RW during Easy Handycam operation (p. 34), the recording format is fixed to VIDEO mode. 1 ...Connect the AC Adaptor to the DC IN jack on your camcorder, then connect the power cord (mains lead) to the wall outlet ...
... • You cannot format a disc that has been protected on your camcorder. 3 Insert the disc to be formatted into your camcorder, and do not disconnect the AC Adaptor during formatting. • When you format a DVD-RW during Easy Handycam operation (p. 34), the recording format is fixed to VIDEO mode. 1 ...Connect the AC Adaptor to the DC IN jack on your camcorder, then connect the power cord (mains lead) to the wall outlet ...
Operating Guide
Page 74
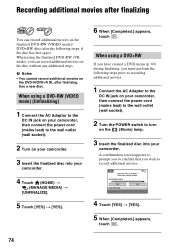
... (VR mode), you wish to the wall outlet (wall socket). 2 Turn on the DVD-R/DVD+R DL after the following steps prior to recording additional movies. 1 Connect the AC Adaptor to the DC IN jack on your camcorder, then connect the power cord (mains lead) to the wall outlet (wall socket). 2 Turn... the POWER switch to turn on your camcorder. When using a DVD-RW (VIDEO mode) (Unfinalizing) 1 Connect the AC Adaptor to the DC IN...
... (VR mode), you wish to the wall outlet (wall socket). 2 Turn on the DVD-R/DVD+R DL after the following steps prior to recording additional movies. 1 Connect the AC Adaptor to the DC IN jack on your camcorder, then connect the power cord (mains lead) to the wall outlet (wall socket). 2 Turn... the POWER switch to turn on your camcorder. When using a DVD-RW (VIDEO mode) (Unfinalizing) 1 Connect the AC Adaptor to the DC IN...
Operating Guide
Page 75
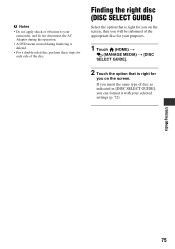
b Notes • Do not apply shock or vibration to your camcorder, and do not disconnect the AC Adaptor during the operation. • A DVD menu created during finalizing is deleted. • For a double-sided disc, perform these steps for each side of disc as indicated in [DISC SELECT GUIDE], ...
b Notes • Do not apply shock or vibration to your camcorder, and do not disconnect the AC Adaptor during the operation. • A DVD menu created during finalizing is deleted. • For a double-sided disc, perform these steps for each side of disc as indicated in [DISC SELECT GUIDE], ...
Operating Guide
Page 91
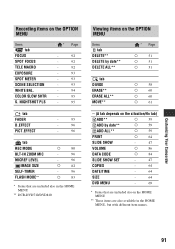
COLOR SLOW SHTR S. Customizing Your Camcorder 91 NIGHTSHOT PLS * Page - 92 - 92 - 92 - 93 - 93 - 93 - 94 - 95 -...MODE** a 80 - 96 - 96 a 82 - 96 a 83 * Items that are included also in the HOME MENU ** DCR-DVD710/DVD810 Viewing items on the OPTION MENU Items tab DELETE** DELETE by date** a 59 ADD ALL** a 59 PRINT a 64 SLIDE...- 47 VOLUME a 86 DATA CODE a 84 SLIDE SHOW SET - 47 COPIES - 64 DATE/TIME - 64 SIZE - 64 DVD MENU - 69 * Items that are included also in the HOME MENU ** These items are also available in the HOME MENU, but...
COLOR SLOW SHTR S. Customizing Your Camcorder 91 NIGHTSHOT PLS * Page - 92 - 92 - 92 - 93 - 93 - 93 - 94 - 95 -...MODE** a 80 - 96 - 96 a 82 - 96 a 83 * Items that are included also in the HOME MENU ** DCR-DVD710/DVD810 Viewing items on the OPTION MENU Items tab DELETE** DELETE by date** a 59 ADD ALL** a 59 PRINT a 64 SLIDE...- 47 VOLUME a 86 DATA CODE a 84 SLIDE SHOW SET - 47 COPIES - 64 DATE/TIME - 64 SIZE - 64 DVD MENU - 69 * Items that are included also in the HOME MENU ** These items are also available in the HOME MENU, but...
Operating Guide
Page 97
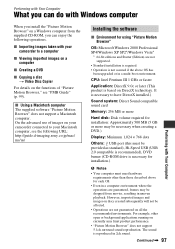
... It is necessary to a computer x Viewing imported images on a computer x Creating a DVD x Copying a disc t Video Disc Copier For details on the functions of images on your camcorder connected to your camcorder to have DirectX installed.) Sound system: Direct Sound compatible sound card Memory: 256 MB or ...has been upgraded or in a multi-boot environment. Performing with Your Computer What you can enjoy the following URL: http://guide.d-imaging.sony.co.jp/mac/ ms/us/ Installing the software x Environment for using "Picture Motion Browser" OS: Microsoft Windows 2000 Professional SP4/Windows...
... It is necessary to a computer x Viewing imported images on a computer x Creating a DVD x Copying a disc t Video Disc Copier For details on the functions of images on your camcorder connected to your camcorder to have DirectX installed.) Sound system: Direct Sound compatible sound card Memory: 256 MB or ...has been upgraded or in a multi-boot environment. Performing with Your Computer What you can enjoy the following URL: http://guide.d-imaging.sony.co.jp/mac/ ms/us/ Installing the software x Environment for using "Picture Motion Browser" OS: Microsoft Windows 2000 Professional SP4/Windows...


