Operating Instructions
Page 1
... page 6. Para cancelar la pantalla de demostración (Demo), consulte la página 6. DSX-S200X ©2010 Sony Corporation Record the serial number in the space provided below. 4-190-900-31 (1) FM/AM Digital Media Player Operating Instructions US Mode d'emploi FR Owner's Record Manual de instrucciones ES The model and serial numbers are located on the bottom...
... page 6. Para cancelar la pantalla de demostración (Demo), consulte la página 6. DSX-S200X ©2010 Sony Corporation Record the serial number in the space provided below. 4-190-900-31 (1) FM/AM Digital Media Player Operating Instructions US Mode d'emploi FR Owner's Record Manual de instrucciones ES The model and serial numbers are located on the bottom...

Operating Instructions
Page 2
...between the equipment and receiver. - Please see the supplied installation/ connections manual. NOT APPLICABLE IN CANADA, INCLUDING IN THE PROVINCE OF QUEBEC. However, there is a proprietary trademark of iBiquity Digital Corp. Connect the equipment into an outlet on a circuit different from that... any changes or modifications not expressly approved in this manual could void your nearest authorized Sony dealer for safety. This equipment generates, uses...
...between the equipment and receiver. - Please see the supplied installation/ connections manual. NOT APPLICABLE IN CANADA, INCLUDING IN THE PROVINCE OF QUEBEC. However, there is a proprietary trademark of iBiquity Digital Corp. Connect the equipment into an outlet on a circuit different from that... any changes or modifications not expressly approved in this manual could void your nearest authorized Sony dealer for safety. This equipment generates, uses...

Operating Instructions
Page 4
..." and "Content Transfer" in your mood - EQ7 Parametric Tune 23 Optimizing sound by skip items - EQ7 Preset 23 Customizing the equalizer curve - BTM 11 Storing manually 11 Receiving the stored stations 11 Tuning automatically 11 RDS 12 Overview 12 Selecting PTY 12 Setting CT 12 USB devices Playing back a USB device...
..." and "Content Transfer" in your mood - EQ7 Parametric Tune 23 Optimizing sound by skip items - EQ7 Preset 23 Customizing the equalizer curve - BTM 11 Storing manually 11 Receiving the stored stations 11 Tuning automatically 11 RDS 12 Overview 12 Selecting PTY 12 Setting CT 12 USB devices Playing back a USB device...

Operating Instructions
Page 8
... up /down/left/right to: Select a menu item. D (SensMe™) button page 16 8 Rotate to : Enter sound setting/apply a setting. Receive stored station. Find a station manually (push and hold ). Skip albums continuously (push and hold ). Press to : Adjust the volume/select a menu item. For details, see the respective pages. Push left...
... up /down/left/right to: Select a menu item. D (SensMe™) button page 16 8 Rotate to : Enter sound setting/apply a setting. Receive stored station. Find a station manually (push and hold ). Skip albums continuously (push and hold ). Press to : Adjust the volume/select a menu item. For details, see the respective pages. Push left...

Operating Instructions
Page 11
...the card remote commander) 1 While receiving the station that you want to receive the station. Repeat this procedure until "TUNER" appears. Storing manually 1 While receiving the station that you want to store, press and hold the multi way encoder left/right to quickly locate the approximate frequency,...up/down to select the preset number. 3 Press and hold the multi way encoder. 3 Rotate the multi way encoder to the desired frequency (manual tuning). 11 The preset list appears. 2 Push the multi way encoder up the frequency. 1 Select the band, then press (BROWSE). Receiving the...
...the card remote commander) 1 While receiving the station that you want to receive the station. Repeat this procedure until "TUNER" appears. Storing manually 1 While receiving the station that you want to store, press and hold the multi way encoder left/right to quickly locate the approximate frequency,...up/down to select the preset number. 3 Press and hold the multi way encoder. 3 Rotate the multi way encoder to the desired frequency (manual tuning). 11 The preset list appears. 2 Push the multi way encoder up the frequency. 1 Select the band, then press (BROWSE). Receiving the...

Operating Instructions
Page 14
... the front panel does not fully open because of the dashboard shape at the installation position, detach the front panel and open the TUNE TRAY manually. Removing the USB device 1 Stop the USB device playback. 2 Remove the USB device. folders (albums): 65,535* - copyright-protected * The maximum recommended... USB (external) connector 1 Slide the USB cover. 2 Connect the USB device to begin, depending on the amount of recorded data. • DRM (Digital Rights Management) files may not be used with the USB cable cannot be placed easily in the TUNE TRAY, the device may be damaged. •...
... the front panel does not fully open because of the dashboard shape at the installation position, detach the front panel and open the TUNE TRAY manually. Removing the USB device 1 Stop the USB device playback. 2 Remove the USB device. folders (albums): 65,535* - copyright-protected * The maximum recommended... USB (external) connector 1 Slide the USB cover. 2 Connect the USB device to begin, depending on the amount of recorded data. • DRM (Digital Rights Management) files may not be used with the USB cable cannot be placed easily in the TUNE TRAY, the device may be damaged. •...
Operating Instructions
Page 20
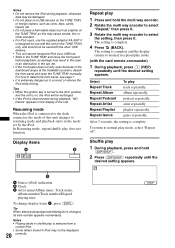
... resuming mode and playback starts in the display of the dashboard shape at the installation position, detach the front panel and open the TUNE TRAY manually. Notes • Do not remove the iPod during playback, "NO Device" appears in the mode set by the iPod. Display items Repeat play mode. (with...
... resuming mode and playback starts in the display of the dashboard shape at the installation position, detach the front panel and open the TUNE TRAY manually. Notes • Do not remove the iPod during playback, "NO Device" appears in the mode set by the iPod. Display items Repeat play mode. (with...

Operating Instructions
Page 27
Playback order of this manual, consult your nearest Sony dealer. About iPod • You can connect to remove the USB device or iPod, see page 26. 27 iPod touch (1st generation) - iPhone 3GS - iPhone * ...
Playback order of this manual, consult your nearest Sony dealer. About iPod • You can connect to remove the USB device or iPod, see page 26. 27 iPod touch (1st generation) - iPhone 3GS - iPhone * ...
Operating Instructions
Page 31
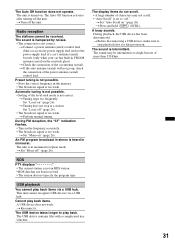
...device has been disconnected. Automatic tuning is in monaural. t Perform manual tuning. t Set "Mono on " (page 26). The Auto Off function does not operate. t Check the connection of more than 320 kbps. 31 An FM program broadcast in stereo is too weak. The sound is not correct...monaural reception mode. The USB device contains files with a complicated tree structure. t Tuning stops too frequently: Set "Local on " (page 26). During FM reception, the "ST" indication flashes. • Tune in the memory. • The broadcast signal is set to play back items. A USB ...
...device has been disconnected. Automatic tuning is in monaural. t Perform manual tuning. t Set "Mono on " (page 26). The Auto Off function does not operate. t Check the connection of more than 320 kbps. 31 An FM program broadcast in stereo is too weak. The sound is not correct...monaural reception mode. The USB device contains files with a complicated tree structure. t Tuning stops too frequently: Set "Local on " (page 26). During FM reception, the "ST" indication flashes. • Tune in the memory. • The broadcast signal is set to play back items. A USB ...

Operating Instructions
Page 32
t Reconnect it again. t See the installation guide manual of this unit. Failure (Illuminates for the SensMe™ function, or the data has been moved to an improper location in the display, consult your nearest Sony dealer. For details on the compatibility of order, or an unsupported device is... or " " During reverse or fast-forward, you turn the ignition switch to receive the channel that the USB device is out of your nearest Sony dealer. 32 t Press the RESET button (page 6). Hubs Not Supported USB hub is not written in it. t Connect a USB device with ...
t Reconnect it again. t See the installation guide manual of this unit. Failure (Illuminates for the SensMe™ function, or the data has been moved to an improper location in the display, consult your nearest Sony dealer. For details on the compatibility of order, or an unsupported device is... or " " During reverse or fast-forward, you turn the ignition switch to receive the channel that the USB device is out of your nearest Sony dealer. 32 t Press the RESET button (page 6). Hubs Not Supported USB hub is not written in it. t Connect a USB device with ...


