
Operating Instructions
Page 14
... (1) (p. 15, 16) 3 A/V connecting cable (1) (p. 47) 4 Wireless Remote Commander (1) (p. 258) 5 Size AA (R6) battery for Remote Commander (2) (p. 259) 6 Shoulder strap (1) 7 Lens cap (1) (p. 25) 8 "Memory Stick" (1) (p. 135) 9 USB cable (1) (p. 190) 0 CD-ROM (SPVD-008 USB Driver) (1) (p. 195) qa Cleaning cloth (1) (p. 245) qs Wide lens hood (1) (p. 32) qd XLR adaptor (with your camcorder. 1 2 3 4 5 6 7 8 9 q;
... (1) (p. 15, 16) 3 A/V connecting cable (1) (p. 47) 4 Wireless Remote Commander (1) (p. 258) 5 Size AA (R6) battery for Remote Commander (2) (p. 259) 6 Shoulder strap (1) 7 Lens cap (1) (p. 25) 8 "Memory Stick" (1) (p. 135) 9 USB cable (1) (p. 190) 0 CD-ROM (SPVD-008 USB Driver) (1) (p. 195) qa Cleaning cloth (1) (p. 245) qs Wide lens hood (1) (p. 32) qd XLR adaptor (with your camcorder. 1 2 3 4 5 6 7 8 9 q;

Operating Instructions
Page 190
... There are the following ways of the USB driver before connecting the camcorder to install the USB driver correctly. Tape stills and movies "Memory Stick" stills and movies Camcorder Connection jack USB jack i.LINK (DV Interface) USB jack Connection cable USB cable (supplied) i.LINK cable (optional) USB cable (supplied) Computer environment requirements USB connector, editing software DV connector, editing...
... There are the following ways of the USB driver before connecting the camcorder to install the USB driver correctly. Tape stills and movies "Memory Stick" stills and movies Camcorder Connection jack USB jack i.LINK (DV Interface) USB jack Connection cable USB cable (supplied) i.LINK cable (optional) USB cable (supplied) Computer environment requirements USB connector, editing software DV connector, editing...
Operating Instructions
Page 193
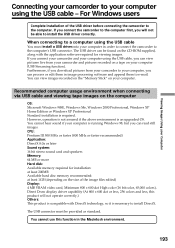
...) Display: 4 MB VRAM video card, Minimum 800 × 600 dot High color (16 bit color, 65,000 colors), Direct Draw display driver capability (At 800 × 600 dot or less, 256 colors and less, this function in image processing software and append them in the Macintosh...download pictures from your camcorder and pictures recorded on a tape on the size of the USB driver before connecting the camcorder to the computer's USB connector. The USB driver can process or edit them to install the USB driver correctly. If you connect the camcorder to the computer first, you can be able ...
...) Display: 4 MB VRAM video card, Minimum 800 × 600 dot High color (16 bit color, 65,000 colors), Direct Draw display driver capability (At 800 × 600 dot or less, 256 colors and less, this function in image processing software and append them in the Macintosh...download pictures from your camcorder and pictures recorded on a tape on the size of the USB driver before connecting the camcorder to the computer's USB connector. The USB driver can process or edit them to install the USB driver correctly. If you connect the camcorder to the computer first, you can be able ...

Operating Instructions
Page 195
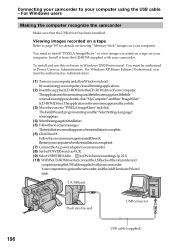
...to "Making the computer recognize the camcorder." Windows XP Home Edition/Professional users If you connect the USB cable before USB driver installation is ideal for details. 195 Carry out installation again in accordance with permission of Administrators. .... (4) Followtheon-screenmessagestoinstalltheUSBdriver. (5) RemovetheCD-ROMandthenrestartthecomputer,inaccordancewiththe instructions on page 198. This is complete, the USB driver will not be properly registered. Viewing Images Using your Computer Connecting your camcorder to your computer.
...to "Making the computer recognize the camcorder." Windows XP Home Edition/Professional users If you connect the USB cable before USB driver installation is ideal for details. 195 Carry out installation again in accordance with permission of Administrators. .... (4) Followtheon-screenmessagestoinstalltheUSBdriver. (5) RemovetheCD-ROMandthenrestartthecomputer,inaccordancewiththe instructions on page 198. This is complete, the USB driver will not be properly registered. Viewing Images Using your Computer Connecting your camcorder to your computer.
Operating Instructions
Page 196
... (6) ClickDirectX Follow the on your camcorder. For Windows users Making the computer recognize the camcorder Make sure that the USB driver has been installed. The Install Wizard program starts up and the title screen appears. To install and use this software...and then "ImageMixer" (CD-ROM Drive). Your computer recognizes the camcorder, and the Add Hardware Wizard starts. (USB) jack Push into the end USB connector 196 USB cable (supplied) The application software starts up and the "Select Settings Language" screen appears. (4) Selectthelanguageforinstallation. (5) Followtheon...
... (6) ClickDirectX Follow the on your camcorder. For Windows users Making the computer recognize the camcorder Make sure that the USB driver has been installed. The Install Wizard program starts up and the title screen appears. To install and use this software...and then "ImageMixer" (CD-ROM Drive). Your computer recognizes the camcorder, and the Add Hardware Wizard starts. (USB) jack Push into the end USB connector 196 USB cable (supplied) The application software starts up and the "Select Settings Language" screen appears. (4) Selectthelanguageforinstallation. (5) Followtheon...

Operating Instructions
Page 197
... Images Using your Computer Connecting your camcorder to your camcorder. Viewing images recorded on -screen messages so that the Add Hardware Wizard recognizes that the USB drivers have been installed. For Windows users (11) Follow the on a "Memory Stick" Set USBCONNECT in to NORMAL in the menu settings. (The default setting is...
... Images Using your Computer Connecting your camcorder to your camcorder. Viewing images recorded on -screen messages so that the Add Hardware Wizard recognizes that the USB drivers have been installed. For Windows users (11) Follow the on a "Memory Stick" Set USBCONNECT in to NORMAL in the menu settings. (The default setting is...
Operating Instructions
Page 198
... the "Device Manager" button. If there is no "System" inside "Pick a category" after clicking "Control Panel," click "Switch to your camcorder before installation of the USB driver was completed. Windows 98 SE/Windows Me: Select"MyComputer" t"ControlPanel" t"System,"andclick"Device Manager." 5 Selectanddeletetheunderlineddevicesbelow. 198 Windows 98SE Windows Me Perform the following procedure to...
... the "Device Manager" button. If there is no "System" inside "Pick a category" after clicking "Control Panel," click "Switch to your camcorder before installation of the USB driver was completed. Windows 98 SE/Windows Me: Select"MyComputer" t"ControlPanel" t"System,"andclick"Device Manager." 5 Selectanddeletetheunderlineddevicesbelow. 198 Windows 98SE Windows Me Perform the following procedure to...

Operating Instructions
Page 199
For Windows users Viewing Images Using your computer using the USB cable - Step 2: Install the USB driver on the supplied CD-ROM Perform the entire procedure described in "Installing the USB driver" on page 195. 199 Connecting your camcorder to your Computer Windows 2000 Professional Windows XP Home Edition/Professional 6 TurnthePOWERswitchtoOFF(CHG)onyourcamcorder,andthen disconnect the USB cable. 7 Restartyourcomputer.
For Windows users Viewing Images Using your computer using the USB cable - Step 2: Install the USB driver on the supplied CD-ROM Perform the entire procedure described in "Installing the USB driver" on page 195. 199 Connecting your camcorder to your Computer Windows 2000 Professional Windows XP Home Edition/Professional 6 TurnthePOWERswitchtoOFF(CHG)onyourcamcorder,andthen disconnect the USB cable. 7 Restartyourcomputer.
Operating Instructions
Page 200
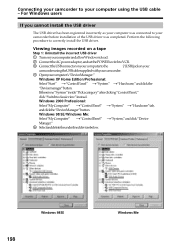
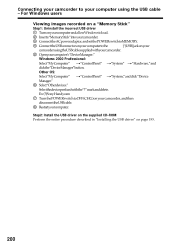
..." t"ControlPanel" t"System,"andclick"Device Manager." 6 Select"Otherdevices." Ex: (?)Sony Handycam 7 TurnthePOWERswitchtoOFF(CHG)onyourcamcorder,andthen disconnect the USB cable. 8 Restartyourcomputer. Connecting your camcorder to your computer using the USB cable supplied with the "?" For Windows users Viewing images recorded on a "Memory Stick" Step1: Uninstall the incorrect USB driver 1 TurnonyourcomputerandallowWindowstoload. 2 Inserta"MemoryStick"intoyourcamcorder. 3 ConnecttheACpoweradaptor,andsetthePOWERswitchtoMEMORY. 4 ConnecttheUSBconnectoronyourcomputertothe...
..." t"ControlPanel" t"System,"andclick"Device Manager." 6 Select"Otherdevices." Ex: (?)Sony Handycam 7 TurnthePOWERswitchtoOFF(CHG)onyourcamcorder,andthen disconnect the USB cable. 8 Restartyourcomputer. Connecting your camcorder to your computer using the USB cable supplied with the "?" For Windows users Viewing images recorded on a "Memory Stick" Step1: Uninstall the incorrect USB driver 1 TurnonyourcomputerandallowWindowstoload. 2 Inserta"MemoryStick"intoyourcamcorder. 3 ConnecttheACpoweradaptor,andsetthePOWERswitchtoMEMORY. 4 ConnecttheUSBconnectoronyourcomputertothe...

Operating Instructions
Page 201
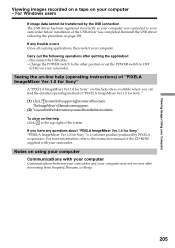
...,andinsertatapeintoyourcamcorder. (3) SetthePOWERswitchtoVCR. SelectUSBSTREAMin toONinthemenusettings.(p.221) (4) Select"Start" t"Programs" t"PIXELA" t"ImageMixer" t"PIXELA ImageMixer Ver.1.0 for Sony" startup screen appears on your computer. For Windows users Capturing images with "PIXELA ImageMixer Ver.1.0 for Sony" You need to install the USB driver and "PIXELA ImageMixer" to view taped images on your computer - Viewing Images Using your Computer...
...,andinsertatapeintoyourcamcorder. (3) SetthePOWERswitchtoVCR. SelectUSBSTREAMin toONinthemenusettings.(p.221) (4) Select"Start" t"Programs" t"PIXELA" t"ImageMixer" t"PIXELA ImageMixer Ver.1.0 for Sony" startup screen appears on your computer. For Windows users Capturing images with "PIXELA ImageMixer Ver.1.0 for Sony" You need to install the USB driver and "PIXELA ImageMixer" to view taped images on your computer - Viewing Images Using your Computer...
Operating Instructions
Page 205
... POWER switch to the other position or set the POWER switch to the instruction manual of "PIXELA ImageMixer Ver.1.0 for Sony" on-line help Click at the top right of the USB driver was connected to your camcorder. For more information, refer to OFF (CHG) on your camcorder before installation of the screen...
... POWER switch to the other position or set the POWER switch to the instruction manual of "PIXELA ImageMixer Ver.1.0 for Sony" on-line help Click at the top right of the USB driver was connected to your camcorder. For more information, refer to OFF (CHG) on your camcorder before installation of the screen...
Operating Instructions
Page 206
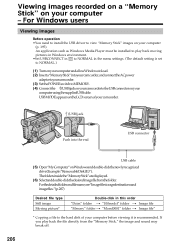
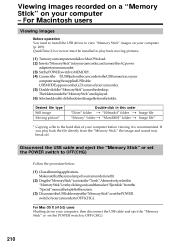
For Windows users Viewing images Before operation •You need to install the USB driver to view "Memory Stick" images on your computer - The folders inside the "Memory Stick" ...file "Mssony" folder t "Moml0001" folder t Image file* * Copying a file to your camcorder. (3) SetthePOWERswitchtoMEMORY. (4) Connectthe (USB)jackonyourcamcordertotheUSBconnectoronyour computer using the supplied USB cable. USB MODE appears on the LCD screen of your computer before viewing it is set to NORMAL.) (1) TurnonyourcomputerandallowWindowstoload. (2) Inserta"MemoryStick"intoyourcamcorder,...
For Windows users Viewing images Before operation •You need to install the USB driver to view "Memory Stick" images on your computer - The folders inside the "Memory Stick" ...file "Mssony" folder t "Moml0001" folder t Image file* * Copying a file to your camcorder. (3) SetthePOWERswitchtoMEMORY. (4) Connectthe (USB)jackonyourcamcordertotheUSBconnectoronyour computer using the supplied USB cable. USB MODE appears on the LCD screen of your computer before viewing it is set to NORMAL.) (1) TurnonyourcomputerandallowWindowstoload. (2) Inserta"MemoryStick"intoyourcamcorder,...

Operating Instructions
Page 208
... - QuickTime 3.0 or newer must be installed (to play back moving pictures). However, note that is required. The USB driver is packaged together with application software for viewing images on the CD-ROM supplied with your computer Mac OS 8.5.1/8.6/9.0/9.1/9.2 or Mac OS X...OS 8.6 standard installation and a slot loading type CD-ROM drive •iBook or Power Mac G4 with the Mac OS 8.6 standard installation The USB connector must be provided as standard. Furthermore, "TM" and "®" are not guaranteed for all the recommended computer environments mentioned above. •Macintosh...
... - QuickTime 3.0 or newer must be installed (to play back moving pictures). However, note that is required. The USB driver is packaged together with application software for viewing images on the CD-ROM supplied with your computer Mac OS 8.5.1/8.6/9.0/9.1/9.2 or Mac OS X...OS 8.6 standard installation and a slot loading type CD-ROM drive •iBook or Power Mac G4 with the Mac OS 8.6 standard installation The USB connector must be provided as standard. Furthermore, "TM" and "®" are not guaranteed for all the recommended computer environments mentioned above. •Macintosh...
Operating Instructions
Page 209
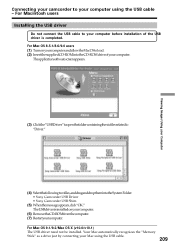
... to your computer before installation of the USB driver is installed on your Computer (3) Clickthe"USBDriver"toopenthefoldercontainingthesixfilesrelatedto "Driver." (4) Selectthefollowingtwofiles,anddraganddropthemintotheSystemFolder. • Sony Camcorder USB Driver • Sony Camcorder USB Shim (5) Whenthemessageappears,click"OK." For Mac OS 9.1/9.2/Mac OS X (v10.0/v10.1) The USB driver need not be installed. The application software screen appears. The USB driver is completed. Your Mac automatically recognizes the...
... to your computer before installation of the USB driver is installed on your Computer (3) Clickthe"USBDriver"toopenthefoldercontainingthesixfilesrelatedto "Driver." (4) Selectthefollowingtwofiles,anddraganddropthemintotheSystemFolder. • Sony Camcorder USB Driver • Sony Camcorder USB Shim (5) Whenthemessageappears,click"OK." For Mac OS 9.1/9.2/Mac OS X (v10.0/v10.1) The USB driver need not be installed. The application software screen appears. The USB driver is completed. Your Mac automatically recognizes the...
Operating Instructions
Page 210
... this order "Dcim" folder t "100msdcf" folder t Image file "Mssony" folder t "Moml0001" folder t Image file* * Copying a file to OFF (CHG). USB MODE appears on the LCD screen of your camcorder is not lit. (2) Dragthe"MemoryStick"iconintothe"Trash."Alternatively,selectthe "Memory Stick" icon by clicking on it... is recommended. For Macintosh users Viewing images Before operation You need to install the USB driver to OFF (CHG). 210 Disconnect the USB cable and eject the "Memory Stick" or set the POWER switch to view "Memory Stick" images on your computer ...
... this order "Dcim" folder t "100msdcf" folder t Image file "Mssony" folder t "Moml0001" folder t Image file* * Copying a file to OFF (CHG). USB MODE appears on the LCD screen of your camcorder is not lit. (2) Dragthe"MemoryStick"iconintothe"Trash."Alternatively,selectthe "Memory Stick" icon by clicking on it... is recommended. For Macintosh users Viewing images Before operation You need to install the USB driver to OFF (CHG). 210 Disconnect the USB cable and eject the "Memory Stick" or set the POWER switch to view "Memory Stick" images on your computer ...

Operating Instructions
Page 230
...set to PTP in the viewfinder. c Press the LCD screen lightly. This is not set to MEMORY. c Uninstall the incorrect USB driver and re-install the USB driver (p. 195, 198, 209). • USBCONNECT is not properly installed. The melody or beep sounds for at least one minute....POWER switch is because some functions use a linear mechanism. c Remove the cassette and leave your camcorder. c Please contact your Sony dealer or local authorized Sony service facility. • Disconnect the power cord of the AC power adaptor or remove the battery, then reconnect it to NORMAL...
...set to PTP in the viewfinder. c Press the LCD screen lightly. This is not set to MEMORY. c Uninstall the incorrect USB driver and re-install the USB driver (p. 195, 198, 209). • USBCONNECT is not properly installed. The melody or beep sounds for at least one minute....POWER switch is because some functions use a linear mechanism. c Remove the cassette and leave your camcorder. c Please contact your Sony dealer or local authorized Sony service facility. • Disconnect the power cord of the AC power adaptor or remove the battery, then reconnect it to NORMAL...


