Operating Instructions
Page 1
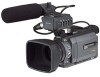
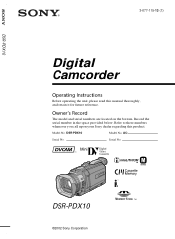
3-077-115-13 (1) DSR-PDX10 Digital Camcorder Operating Instructions Before operating the unit, please read this product. Serial No. TM SERIES DSR-PDX10 ©2002 Sony Corporation Refer to these numbers whenever you call upon your Sony dealer regarding this manual thoroughly, and retain it for future reference. DSR-PDX10 Model No. Owner's Record The model and serial numbers are located on the bottom. Record the serial number in the space provided below. Model No. AC- Serial No.
3-077-115-13 (1) DSR-PDX10 Digital Camcorder Operating Instructions Before operating the unit, please read this product. Serial No. TM SERIES DSR-PDX10 ©2002 Sony Corporation Refer to these numbers whenever you call upon your Sony dealer regarding this manual thoroughly, and retain it for future reference. DSR-PDX10 Model No. Owner's Record The model and serial numbers are located on the bottom. Record the serial number in the space provided below. Model No. AC- Serial No.
Operating Instructions
Page 2
...soon be of sufficient magnitude to disassemble the cabinet. Bernardo Dr, San Diego, CA 92127 U.S.A. Your Digital camcorder is loaded with this product, you may cause undesired operation. 2 You will increase eye hazard. and ...Sony Digital camcorder. NOTICE If static electricity or electromagnetism causes data transfer to rain or moisture. Telephone No.: 858-942-2230 This device complies with superior picture and sound quality. CAUTION The use . Refer to servicing to the presence of Conformity Trade Name: SONY Model No.: DSR-PDX10 Responsible Party: Sony...
...soon be of sufficient magnitude to disassemble the cabinet. Bernardo Dr, San Diego, CA 92127 U.S.A. Your Digital camcorder is loaded with this product, you may cause undesired operation. 2 You will increase eye hazard. and ...Sony Digital camcorder. NOTICE If static electricity or electromagnetism causes data transfer to rain or moisture. Telephone No.: 858-942-2230 This device complies with superior picture and sound quality. CAUTION The use . Refer to servicing to the presence of Conformity Trade Name: SONY Model No.: DSR-PDX10 Responsible Party: Sony...

Operating Instructions
Page 4
... the USB cable (p. 206, 210) •Viewing moving pictures recorded on tapes using the USB cable (p. 201) •Capturing images on your computer from your camcorder using the USB cable (p. 203) •Converting an analog signal to digital to capture images onto your computer (p. 211) Capturing images on your computer 4
... the USB cable (p. 206, 210) •Viewing moving pictures recorded on tapes using the USB cable (p. 201) •Capturing images on your computer from your camcorder using the USB cable (p. 203) •Converting an analog signal to digital to capture images onto your computer (p. 211) Capturing images on your computer 4

Operating Instructions
Page 7
... - Memory PB ZOOM 180 Playing back images continuously - DELETE 184 Writing a print mark - Introduction 190 Connecting your camcorder to correct trouble 224 Self-diagnosis display 231 Warning indicators and messages .... 232 Additional Information Compatibility of DVCAM and DV ... "Memory Stick" on a "Memory Stick" - Image protection 183 Deleting images - Memory Photo recording ......... 144 Recording images from a tape - Digital program editing (on a "Memory Stick") ... 167 Copying still images from a tape as a moving picture 163 Recording edited pictures from an analog...
... - Memory PB ZOOM 180 Playing back images continuously - DELETE 184 Writing a print mark - Introduction 190 Connecting your camcorder to correct trouble 224 Self-diagnosis display 231 Warning indicators and messages .... 232 Additional Information Compatibility of DVCAM and DV ... "Memory Stick" on a "Memory Stick" - Image protection 183 Deleting images - Memory Photo recording ......... 144 Recording images from a tape - Digital program editing (on a "Memory Stick") ... 167 Copying still images from a tape as a moving picture 163 Recording edited pictures from an analog...

Operating Instructions
Page 58
... an old movie type atmosphere to pictures. OLD MOVIE You can record still images successively at constant intervals. Using special effects - Digital effect You can record the picture so that it is superimposed on a moving picture. TRAIL You can add special effects to SEPIA..., and sets the appropriate shutter speed. Your camcorder automatically sets the wide mode to ON and picture effect to recorded pictures using the various digital functions. Still image Moving picture 58 STILL You can swap a brighter area in a still...
... an old movie type atmosphere to pictures. OLD MOVIE You can record still images successively at constant intervals. Using special effects - Digital effect You can record the picture so that it is superimposed on a moving picture. TRAIL You can add special effects to SEPIA..., and sets the appropriate shutter speed. Your camcorder automatically sets the wide mode to ON and picture effect to recorded pictures using the various digital functions. Still image Moving picture 58 STILL You can swap a brighter area in a still...

Operating Instructions
Page 65
...following cases: - MEMORYMIX While the color bar is displayed on the screen. If you press BARS, the color bar is displayed during Digital effect or MEMORY MIX These effects cannot be displayed. 65 Digitaleffect - Toadjustscreencolor. Spotlight - While using the fader The color bar cannot... be added on the TV screen. BARS When you adjust color on the screen Connect your camcorder to CAMERA. Shutterspeedadjustment - Backlight - Advanced Recording Operations Using the color bar If you press BARS again the color bar disappears. Use...
...following cases: - MEMORYMIX While the color bar is displayed on the screen. If you press BARS, the color bar is displayed during Digital effect or MEMORY MIX These effects cannot be displayed. 65 Digitaleffect - Toadjustscreencolor. Spotlight - While using the fader The color bar cannot... be added on the TV screen. BARS When you adjust color on the screen Connect your camcorder to CAMERA. Shutterspeedadjustment - Backlight - Advanced Recording Operations Using the color bar If you press BARS again the color bar disappears. Use...

Operating Instructions
Page 95
... as a player. Notes • Youcannotprocessexternallyinputscenesusingdigitaleffect. • Youcannotrecordimagesonatapeonyourcamcorderwhenyouhaveprocessedthe image using digital effect. However, you set the POWER switch to FN Press EXIT. Playing back tapes with digital effect During playback, you can record images on a "Memory Stick" (p. 151, 163), or on a VCR using your camcorder as a still image. (4) Press-/+toadjusttheeffect.Refertopage59fordetails. (5) Press OKtoreturntoPAGE2. 1 FN...
... as a player. Notes • Youcannotprocessexternallyinputscenesusingdigitaleffect. • Youcannotrecordimagesonatapeonyourcamcorderwhenyouhaveprocessedthe image using digital effect. However, you set the POWER switch to FN Press EXIT. Playing back tapes with digital effect During playback, you can record images on a "Memory Stick" (p. 151, 163), or on a VCR using your camcorder as a still image. (4) Press-/+toadjusttheeffect.Refertopage59fordetails. (5) Press OKtoreturntoPAGE2. 1 FN...

Operating Instructions
Page 100
... or PB ZOOM These pictures are transmitted in digital form for recording, then set the input selector to LINE. Also, when you want to record over) into the VCR, and insert the recorded tape into your camcorder. (2) Prepare the VCR for high-quality editing. Refer to the operating instructions of the VCR.... Dubbing a tape Using the i.LINK cable Simply connect the i.LINK cable (optional) to the DV Interface on your camcorder and to DV IN on the VCR. Refer to the operating instructions of the VCR. (3) Set the POWER switch to VCR on your...
... or PB ZOOM These pictures are transmitted in digital form for recording, then set the input selector to LINE. Also, when you want to record over) into the VCR, and insert the recorded tape into your camcorder. (2) Prepare the VCR for high-quality editing. Refer to the operating instructions of the VCR.... Dubbing a tape Using the i.LINK cable Simply connect the i.LINK cable (optional) to the DV Interface on your camcorder and to DV IN on the VCR. Refer to the operating instructions of the VCR. (3) Set the POWER switch to VCR on your...

Operating Instructions
Page 101
...the operation signals cannot be selected by frame. See p. 167 for more information. Unwanted scene Unwanted scene Switch the order Editing Before operating the Digital program editing on tapes recorded on page 100. When you use the A/V connecting cable, connect the devices as illustrated on other equipment Operation ...(dubbingatape)(p.111). Step 1: Connecting the VCR You can dub on other equipment Step 1 ConnectingtheVCR. When you dub using the i.LINK cable With a digital-to 20 programs. Your camcorder can connect both an A/V connecting cable and an i.LINK cable.
...the operation signals cannot be selected by frame. See p. 167 for more information. Unwanted scene Unwanted scene Switch the order Editing Before operating the Digital program editing on tapes recorded on page 100. When you use the A/V connecting cable, connect the devices as illustrated on other equipment Operation ...(dubbingatape)(p.111). Step 1: Connecting the VCR You can dub on other equipment Step 1 ConnectingtheVCR. When you dub using the i.LINK cable With a digital-to 20 programs. Your camcorder can connect both an A/V connecting cable and an i.LINK cable.

Operating Instructions
Page 102
... SETUP PAUSEMODE IR TEST RETURN [MENU] : END 00:08:55:06 5 VIDEO EDIT 00:08:55:06 EDIT SET CONTROL IR ADJ TEST i. Digital program editing (on your camcorder. 2 Turn the power of your VCR, then press the dial. Check the code in to TAPE, then press the dial. (p. 223) 4 Turn the...
... SETUP PAUSEMODE IR TEST RETURN [MENU] : END 00:08:55:06 5 VIDEO EDIT 00:08:55:06 EDIT SET CONTROL IR ADJ TEST i. Digital program editing (on your camcorder. 2 Turn the power of your VCR, then press the dial. Check the code in to TAPE, then press the dial. (p. 223) 4 Turn the...

Operating Instructions
Page 103
... is stored in the memory of your VCR. Be sure to set the correct code to match your camcorder. Digital program editing (on IR SETUP codes Digital program editing is code number 3. Brand IR SETUP code Sony 1, 2, 3, 4, 5, 6 Admiral (M. Editing Dubbing only desired scenes - Wards) 89 Aiwa 47, 54, 80 Akai 49, 51 Audio Dynamic...
... is stored in the memory of your VCR. Be sure to set the correct code to match your camcorder. Digital program editing (on IR SETUP codes Digital program editing is code number 3. Brand IR SETUP code Sony 1, 2, 3, 4, 5, 6 Admiral (M. Editing Dubbing only desired scenes - Wards) 89 Aiwa 47, 54, 80 Akai 49, 51 Audio Dynamic...

Operating Instructions
Page 104
... your camcorder and the VCR to face each other Locate the infrared rays emitter of the VCR. Set the devices about 30 cm (12 in.) apart, and remove any obstacles between the devices. Infrared rays emitter VCR Remote sensor A/V connecting cable (supplied) 104 SelectPAUSEifthebuttontocancelrecordingpauseis X. - SelectRECifthebuttontocancelrecordingpauseis z. - Digital program ...-OUT" IR SETUP PAUSEMODE PAUSE IR TEST RETURN [MENU] : END Buttons to cancel recording pause on your camcorder and face it towards the remote sensor of your VCR. To cancel recording pause: -
... your camcorder and the VCR to face each other Locate the infrared rays emitter of the VCR. Set the devices about 30 cm (12 in.) apart, and remove any obstacles between the devices. Infrared rays emitter VCR Remote sensor A/V connecting cable (supplied) 104 SelectPAUSEifthebuttontocancelrecordingpauseis X. - SelectRECifthebuttontocancelrecordingpauseis z. - Digital program ...-OUT" IR SETUP PAUSEMODE PAUSE IR TEST RETURN [MENU] : END Buttons to cancel recording pause on your camcorder and face it towards the remote sensor of your VCR. To cancel recording pause: -

Operating Instructions
Page 106
...the titles, display indicators. VIDEO EDIT MARK UNDO ERASE ALL START EDIT SET 00:08:55:06 1 IN TOTAL 0:00:00:00 SCENE 0 [MENU] : END Digital program editing (on tapes) Step 2: Setting the VCR to operate with the i.LINK cable When you connect using the i.LINK cable (optional), follow the procedure... below. (1) Set the POWER switch to VCR on your camcorder. (2) Turn the power of the connected VCR on, then set VIDEO EDIT in to TAPE, then press the dial. (p. 223) (4) Turn the SEL/PUSH ...
...the titles, display indicators. VIDEO EDIT MARK UNDO ERASE ALL START EDIT SET 00:08:55:06 1 IN TOTAL 0:00:00:00 SCENE 0 [MENU] : END Digital program editing (on tapes) Step 2: Setting the VCR to operate with the i.LINK cable When you connect using the i.LINK cable (optional), follow the procedure... below. (1) Set the POWER switch to VCR on your camcorder. (2) Turn the power of the connected VCR on, then set VIDEO EDIT in to TAPE, then press the dial. (p. 223) (4) Turn the SEL/PUSH ...

Operating Instructions
Page 107
.... The calculated start slow playback. The EXECUTING indicator flashes on tapes) Step 3: Adjusting the synchronization of the VCR You can adjust the synchronization of your camcorder. (1) Insert a blank tape (or a tape you want to record over) into the VCR, then set . (10) Turn the SEL/PUSH EXEC ... Turn the SEL/PUSH EXEC dial to COMPLETE. (4) Rewind the tape in CONTROL, you select i.LINK in the VCR, then start position for notes. Digital program editing (on the screen. When finished, the indicator changes to select EXECUTE, then press the dial. When you do not need to set . ...
.... The calculated start slow playback. The EXECUTING indicator flashes on tapes) Step 3: Adjusting the synchronization of the VCR You can adjust the synchronization of your camcorder. (1) Insert a blank tape (or a tape you want to record over) into the VCR, then set . (10) Turn the SEL/PUSH EXEC ... Turn the SEL/PUSH EXEC dial to COMPLETE. (4) Rewind the tape in CONTROL, you select i.LINK in the VCR, then start position for notes. Digital program editing (on the screen. When finished, the indicator changes to select EXECUTE, then press the dial. When you do not need to set . ...

Operating Instructions
Page 109
... maximum. You can fine-adjust one frame at a time with EDITSEARCH. (6) Press MARK on tapes) Operation 1: Making a program (1) Insert the tape for playback into your camcorder, and insert a tape for recording into the VCR. (2) Press MENU, then turn the SEL/PUSH EXEC dial to light blue. (5) Search for the beginning of... changes to light blue. (7) Repeat steps 3 to 6, then set , and the top part of the program mark changes to select MARK, then press the dial. Digital program editing (on the Remote Commander, or the SEL/PUSH EXEC dial.
... maximum. You can fine-adjust one frame at a time with EDITSEARCH. (6) Press MARK on tapes) Operation 1: Making a program (1) Insert the tape for playback into your camcorder, and insert a tape for recording into the VCR. (2) Press MENU, then turn the SEL/PUSH EXEC dial to light blue. (5) Search for the beginning of... changes to light blue. (7) Repeat steps 3 to 6, then set , and the top part of the program mark changes to select MARK, then press the dial. Digital program editing (on the Remote Commander, or the SEL/PUSH EXEC dial.

Operating Instructions
Page 111
... the SEL/PUSH EXEC dial to select START. (2) Turn the SEL/PUSH EXEC dial to select EXECUTE, then press the dial. To end the Digital program editing Your camcorder stops when the dubbing ends. i.LINKisselectedbutani.LINKcableisnotconnected. - To stop . Press MENU to light blue after dubbing ends. TheIRSETUPcodeisnotcorrect.(whenIRisselected) - Search for the beginning...
... the SEL/PUSH EXEC dial to select START. (2) Turn the SEL/PUSH EXEC dial to select EXECUTE, then press the dial. To end the Digital program editing Your camcorder stops when the dubbing ends. i.LINKisselectedbutani.LINKcableisnotconnected. - To stop . Press MENU to light blue after dubbing ends. TheIRSETUPcodeisnotcorrect.(whenIRisselected) - Search for the beginning...

Operating Instructions
Page 114
... and the button on its right simultaneously on your camcorder, then immediately press X on your camcorder. (4) Press N on the VCR to start playback. Using the Remote Commander Instep3,press zRECandMARKsimultaneously,thenimmediatelypress press Xatthescenewhereyouwanttostartrecordingfrom. X. With a digital-to-digital connection, video and audio signals are transmitted in digital form for high-quality editing. (1) Insert a blank tape (or...
... and the button on its right simultaneously on your camcorder, then immediately press X on your camcorder. (4) Press N on the VCR to start playback. Using the Remote Commander Instep3,press zRECandMARKsimultaneously,thenimmediatelypress press Xatthescenewhereyouwanttostartrecordingfrom. X. With a digital-to-digital connection, video and audio signals are transmitted in digital form for high-quality editing. (1) Insert a blank tape (or...
Operating Instructions
Page 115
... remote control operation. However, this does not affect the dubbed picture. When you play back the picture using the i.LINK cable During digital editing The color of the VCR with the DV Interface The recorded picture becomes rough. If you record playback pause picture with black paper.... 115 Editing Recording video or TV programs You can connect one VCR only using your camcorder from other Sony VCRs to distinguish your camcorder, the picture may be uneven. If you use another Sony VCR in the commander mode VTR 2, we recommend changing the commander mode or covering the ...
... remote control operation. However, this does not affect the dubbed picture. When you play back the picture using the i.LINK cable During digital editing The color of the VCR with the DV Interface The recorded picture becomes rough. If you record playback pause picture with black paper.... 115 Editing Recording video or TV programs You can connect one VCR only using your camcorder from other Sony VCRs to distinguish your camcorder, the picture may be uneven. If you use another Sony VCR in the commander mode VTR 2, we recommend changing the commander mode or covering the ...
Operating Instructions
Page 234
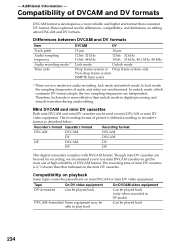
... On DV video equipment On DVCAM video equipment DV-formatted Can be played back Can be played back (only when recorded in digital processing and smooth transition during audio editing. - Here explained are two modes for recording, we recommend you to use mini DVCAM...of audio and video are independent. Recorder's format Cassette's format Recording format DVCAM DVCAM DVCAM DV DVCAM DV DVCAM DV DV DV This digital camcorder complies with DVCAM format. Therefore, lock mode is 2/3 shorter than consumer DV format. In unlock mode, which consumer DV format adopts...
... On DV video equipment On DVCAM video equipment DV-formatted Can be played back Can be played back (only when recorded in digital processing and smooth transition during audio editing. - Here explained are two modes for recording, we recommend you to use mini DVCAM...of audio and video are independent. Recorder's format Cassette's format Recording format DVCAM DVCAM DVCAM DV DVCAM DV DVCAM DV DV DV This digital camcorder complies with DVCAM format. Therefore, lock mode is 2/3 shorter than consumer DV format. In unlock mode, which consumer DV format adopts...
Operating Instructions
Page 235
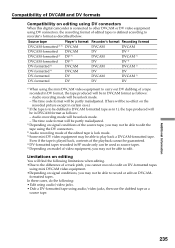
... be dubbed is defined according to recorder's format as described below. Compatibility of DVCAM and DV formats Compatibility on editing using DV connectors When this digital camcorder is connected to other DVCAM or DV video equipment using DV connectors, the recording format of edited tapes is DVCAM formatted tape as in 1), the...
... be dubbed is defined according to recorder's format as described below. Compatibility of DVCAM and DV formats Compatibility on editing using DV connectors When this digital camcorder is connected to other DVCAM or DV video equipment using DV connectors, the recording format of edited tapes is DVCAM formatted tape as in 1), the...


