Operating Instructions
Page 3
... programs, films, video tapes and other materials may occur, causing damage to ship your authority to operate this unit within 100 V to 240 V AC, 50/60 Hz. Precautions • Do not damage the power cord and AC adaptor. • Use only the supplied power cord and supplied AC adaptor. &#... Consult the dealer or an experienced radio/TV technician for a Class B digital device, pursuant to excessive soot, steam, humidity or dust. Unauthorized recording of the wall outlet [b]. Also, use the unit in an environment that is no guarantee that to which can be serviced. AC-SU1 [a] ...
... programs, films, video tapes and other materials may occur, causing damage to ship your authority to operate this unit within 100 V to 240 V AC, 50/60 Hz. Precautions • Do not damage the power cord and AC adaptor. • Use only the supplied power cord and supplied AC adaptor. &#... Consult the dealer or an experienced radio/TV technician for a Class B digital device, pursuant to excessive soot, steam, humidity or dust. Unauthorized recording of the wall outlet [b]. Also, use the unit in an environment that is no guarantee that to which can be serviced. AC-SU1 [a] ...

Operating Instructions
Page 4
... Features 7 (GB) Location and Function of Parts 8 (GB) Front Panel 8 (GB) Rear Panel 11 (GB) Supplied Remote Commander 13 (GB) Notes on Video Cassettes 15 (GB) Preparations 17 (GB) Power Preparations 17 (GB) Inserting/Ejecting Cassettes 17 (GB) Notes on Recording/Playback 19 (GB) Playback 20 (GB) Connections for Playback 20 (GB) Settings for Playback...
... Features 7 (GB) Location and Function of Parts 8 (GB) Front Panel 8 (GB) Rear Panel 11 (GB) Supplied Remote Commander 13 (GB) Notes on Video Cassettes 15 (GB) Preparations 17 (GB) Power Preparations 17 (GB) Inserting/Ejecting Cassettes 17 (GB) Notes on Recording/Playback 19 (GB) Playback 20 (GB) Connections for Playback 20 (GB) Settings for Playback...
Operating Instructions
Page 11
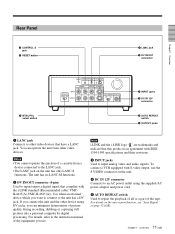
...use the S VIDEO connector on the unit. 4 DC IN 12V connector Connects to an AC power outlet using the supplied AC power adaptor and power cord. 5... AUTO REPEAT switch Used to repeat the playback of all or a part of the tape. For details, refer to the instruction manual of the equipment you can operate the unit from a device connected to the LANC jack. • The LANC jack on page 32 (GB). 11...cassette from other video devices that have a LANC jack. Notes • You cannot operate the ejection of picture quality during recording, dubbing or ...
...use the S VIDEO connector on the unit. 4 DC IN 12V connector Connects to an AC power outlet using the supplied AC power adaptor and power cord. 5... AUTO REPEAT switch Used to repeat the playback of all or a part of the tape. For details, refer to the instruction manual of the equipment you can operate the unit from a device connected to the LANC jack. • The LANC jack on page 32 (GB). 11...cassette from other video devices that have a LANC jack. Notes • You cannot operate the ejection of picture quality during recording, dubbing or ...

Operating Instructions
Page 12
...the tip of a ball-point pen or similar tool to a remote control unit (DSRM-20, not supplied) for a short time at the beginning of the playback. • If you play back a tape... signals is not possible) Therefore, to output video signals without text data, carry out the following limitations apply. - At the point where the recorded signals format changes, the picture may be distorted...the switch is stabilized. • Do not change the switch setting, turn off the power of the signals output from the unit, you cannot operate the unit with the horizontal sync signal. ...
...the tip of a ball-point pen or similar tool to a remote control unit (DSRM-20, not supplied) for a short time at the beginning of the playback. • If you play back a tape... signals is not possible) Therefore, to output video signals without text data, carry out the following limitations apply. - At the point where the recorded signals format changes, the picture may be distorted...the switch is stabilized. • Do not change the switch setting, turn off the power of the signals output from the unit, you cannot operate the unit with the horizontal sync signal. ...

Operating Instructions
Page 17
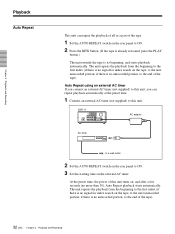
DSR-11 to DC IN 12V connector AC adaptor AC-SU1 (supplied) to close the cassette lid when using the unit. Make sure to wall outlet Power cord (supplied) Inserting/Ejecting Cassettes To insert a cassette Notes • Do not insert the cassette forcibly. The...(Continued) 17 Chapter 2 Playback and Recording (GB) Then, connect the power plug to light. Chapter 2 Playback and Recording Preparations Power Preparations Connect the power cord (supplied) to the AC adaptor (AC-SU1, supplied) and connect the AC adaptor to disconnect the power cord from the wall outlet first. When...
DSR-11 to DC IN 12V connector AC adaptor AC-SU1 (supplied) to close the cassette lid when using the unit. Make sure to wall outlet Power cord (supplied) Inserting/Ejecting Cassettes To insert a cassette Notes • Do not insert the cassette forcibly. The...(Continued) 17 Chapter 2 Playback and Recording (GB) Then, connect the power plug to light. Chapter 2 Playback and Recording Preparations Power Preparations Connect the power cord (supplied) to the AC adaptor (AC-SU1, supplied) and connect the AC adaptor to disconnect the power cord from the wall outlet first. When...
Operating Instructions
Page 32
...portion; DSR-11 AC adaptor AC timer to a wall outlet 2 Set the AUTO REPEAT switch on the rear panel to ON. 3 Set the starting time on the tape, to the next unrecorded portion; Chapter 2 Playback and Recording Playback ...Auto Repeat This unit can repeat playback automatically at the preset time. 1 Connect an external AC timer (not supplied) to this unit turns on, and after a few seconds ... to the end of the tape). 32 (GB) Chapter 2 Playback and Recording At the preset time, the power of the tape).
...portion; DSR-11 AC adaptor AC timer to a wall outlet 2 Set the AUTO REPEAT switch on the rear panel to ON. 3 Set the starting time on the tape, to the next unrecorded portion; Chapter 2 Playback and Recording Playback ...Auto Repeat This unit can repeat playback automatically at the preset time. 1 Connect an external AC timer (not supplied) to this unit turns on, and after a few seconds ... to the end of the tape). 32 (GB) Chapter 2 Playback and Recording At the preset time, the power of the tape).
Operating Instructions
Page 50
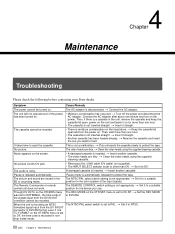
...video heads using the supplied cleaning cassette. A damaged cassette is not appropriate. The NTSC/PAL select switch setting is inserted. The REMOTE CONTROL switch setting is not a malfunction. Troubleshooting 4 Chapter Maintenance Chapter 4 Maintenance Troubleshooting Please check the following before contacting your Sony dealer. Symptom Cause/Remedy The power... the i.LINK cable (DV cable) (not supplied). • The INPUT SELECT selector is recording an NTSC formatted signal input from the DV IN/OUT connector cannot be recorded. t Set it straight. • Another ...
...video heads using the supplied cleaning cassette. A damaged cassette is not appropriate. The NTSC/PAL select switch setting is inserted. The REMOTE CONTROL switch setting is not a malfunction. Troubleshooting 4 Chapter Maintenance Chapter 4 Maintenance Troubleshooting Please check the following before contacting your Sony dealer. Symptom Cause/Remedy The power... the i.LINK cable (DV cable) (not supplied). • The INPUT SELECT selector is recording an NTSC formatted signal input from the DV IN/OUT connector cannot be recorded. t Set it straight. • Another ...
Operating Instructions
Page 51
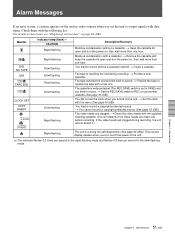
... t Remove the cassette and keep the cassette lid open and turn the power on , then wait more than one . The video heads are clean only before recording. This caution display ceases when you turn the power on , then wait more than one hour. Moisture condensation (with the menu...(without a cassette inserted. You tried to record. t Clean the video heads with a new one hour. Chapter 4 Maintenance 51 Chapter 4 Maintenance (GB) t Rewind the tape or replace the tape with the supplied cleaning cassette. (The unit detects if the video heads are clogged. The cassette is write-...
... t Remove the cassette and keep the cassette lid open and turn the power on , then wait more than one . The video heads are clean only before recording. This caution display ceases when you turn the power on , then wait more than one hour. Moisture condensation (with the menu...(without a cassette inserted. You tried to record. t Clean the video heads with a new one hour. Chapter 4 Maintenance 51 Chapter 4 Maintenance (GB) t Rewind the tape or replace the tape with the supplied cleaning cassette. (The unit detects if the video heads are clogged. The cassette is write-...
Operating Instructions
Page 54
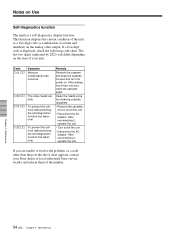
...Chapter 4 Maintenance 54 (GB) Chapter 4 Maintenance The last two digits (indicated by ss) will differ depending on the analog video output. C:22:ss The video heads are unable to resolve the problem, or a code other than one hour, insert the cassette again. Remedy Remove the ...Sony service facility and inform them of your unit. If you are dirty. Code C:21:ss Symptom Moisture condensation has occurred. If a five-digit code is displayed, check the following code chart. Clean the heads using the cleaning cassette (supplied). • Remove the cassette, or turn the power...
...Chapter 4 Maintenance 54 (GB) Chapter 4 Maintenance The last two digits (indicated by ss) will differ depending on the analog video output. C:22:ss The video heads are unable to resolve the problem, or a code other than one hour, insert the cassette again. Remedy Remove the ...Sony service facility and inform them of your unit. If you are dirty. Code C:21:ss Symptom Moisture condensation has occurred. If a five-digit code is displayed, check the following code chart. Clean the heads using the cleaning cassette (supplied). • Remove the cassette, or turn the power...
Operating Instructions
Page 59
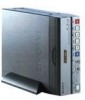
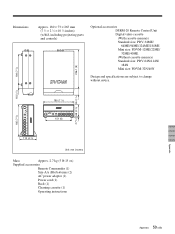
...8260;8 × 10 1⁄2 inches) (w/h/d, including projecting parts and controls) 226.1 (9) Optional accessories DSRM-20 Remote Control Unit Digital video cassette (With cassette memory) Standard size: PDV-34ME/ 64ME/94ME/124ME/184ME Mini size: PDVM-12ME/22ME/ 32ME/40ME (Without cassette....4 (1 9/16) 180 (7 1/8) 151 (6) 185 (7 3/8) 110 (4 3/8) Unit: mm (inches) Mass Approx. 2.7 kg (5 lb 15 oz) Supplied accessories Remote Commander (1) Size AA (R6) batteries (2) AC power adaptor (1) Power cord (1) Rack (1) Cleaning cassette (1) Operating instructions Appendix 59 Appendix (GB)
...8260;8 × 10 1⁄2 inches) (w/h/d, including projecting parts and controls) 226.1 (9) Optional accessories DSRM-20 Remote Control Unit Digital video cassette (With cassette memory) Standard size: PDV-34ME/ 64ME/94ME/124ME/184ME Mini size: PDVM-12ME/22ME/ 32ME/40ME (Without cassette....4 (1 9/16) 180 (7 1/8) 151 (6) 185 (7 3/8) 110 (4 3/8) Unit: mm (inches) Mass Approx. 2.7 kg (5 lb 15 oz) Supplied accessories Remote Commander (1) Size AA (R6) batteries (2) AC power adaptor (1) Power cord (1) Rack (1) Cleaning cassette (1) Operating instructions Appendix 59 Appendix (GB)

