
Instruction Manual (Large File - 11.45 MB)
Page 1
Additional information on a computer Printing images Others Index Interchangeable Lens Digital Camera Instruction Manual A-mount Preparing the camera Before your operation Shooting images Using the shooting function Using the viewing function Changing your setup Viewing images on this product and answers to frequently asked questions can be found at our Customer Support Website. Printed on 70% or more recycled paper using VOC (Volatile Organic Compound)-free vegetable oil based ink.
Additional information on a computer Printing images Others Index Interchangeable Lens Digital Camera Instruction Manual A-mount Preparing the camera Before your operation Shooting images Using the shooting function Using the viewing function Changing your setup Viewing images on this product and answers to frequently asked questions can be found at our Customer Support Website. Printed on 70% or more recycled paper using VOC (Volatile Organic Compound)-free vegetable oil based ink.

Instruction Manual (Large File - 11.45 MB)
Page 7
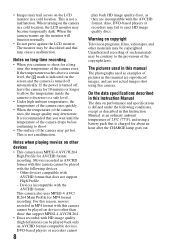
... eyestrain, nausea, or a tired feeling while watching 3D-images recorded with the LCD monitor. Back up recommendation To avoid the potential risk of the camera. 1080 60i-compatible device:60i 1080 50i-compatible device:50i • You may cause a fire. 7 The internal mechanism may be different from the...balance, or Drange optimizer, depending on the method used with an expert, such as a pediatric or ophthalmic doctor. Notes on the LCD monitor and lens • The LCD monitor is focused on the bottom of data loss, always copy (back up) data to watch 3D-images, we recommend that...
... eyestrain, nausea, or a tired feeling while watching 3D-images recorded with the LCD monitor. Back up recommendation To avoid the potential risk of the camera. 1080 60i-compatible device:60i 1080 50i-compatible device:50i • You may cause a fire. 7 The internal mechanism may be different from the...balance, or Drange optimizer, depending on the method used with an expert, such as a pediatric or ophthalmic doctor. Notes on the LCD monitor and lens • The LCD monitor is focused on the bottom of data loss, always copy (back up) data to watch 3D-images, we recommend that...
Instruction Manual (Large File - 11.45 MB)
Page 8
...used as they are not actual images shot using a battery pack that you continue to shoot for a long time, the temperature of the camera may get hot. This is charged for MP4 format recording. The monitor may deteriorate. Also, DVD-based players or recorders may fail to the...those that support MPEG-4 AVC/H.264. • Discs recorded with AVCHD format that may be copyrighted. Notes on AVCHD format-compatible devices. When the camera warms up, the monitor will function normally. • Do not press against the LCD monitor. This is turned off automatically. For this reason, ...
...used as they are not actual images shot using a battery pack that you continue to shoot for a long time, the temperature of the camera may get hot. This is charged for MP4 format recording. The monitor may deteriorate. Also, DVD-based players or recorders may fail to the...those that support MPEG-4 AVC/H.264. • Discs recorded with AVCHD format that may be copyrighted. Notes on AVCHD format-compatible devices. When the camera warms up, the monitor will function normally. • Do not press against the LCD monitor. This is turned off automatically. For this reason, ...
Instruction Manual (Large File - 11.45 MB)
Page 9
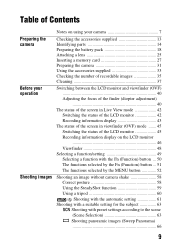
... the accessories supplied 13 Identifying parts 14 Preparing the battery pack 18 Attaching a lens 25 Inserting a memory card 27 Preparing the camera 31 Using the accessories supplied 33 Checking the number of recordable images 35 Cleaning 37 Switching between the LCD monitor and ...button ... 50 The functions selected by the Fn (Function) button ... 51 The functions selected by the MENU button 52 Shooting an image without camera shake 58 Correct posture 58 Using the SteadyShot function 59 Using a tripod 60 Shooting with the automatic setting 61 Shooting with a suitable setting for...
... the accessories supplied 13 Identifying parts 14 Preparing the battery pack 18 Attaching a lens 25 Inserting a memory card 27 Preparing the camera 31 Using the accessories supplied 33 Checking the number of recordable images 35 Cleaning 37 Switching between the LCD monitor and ...button ... 50 The functions selected by the Fn (Function) button ... 51 The functions selected by the MENU button 52 Shooting an image without camera shake 58 Correct posture 58 Using the SteadyShot function 59 Using a tripod 60 Shooting with the automatic setting 61 Shooting with a suitable setting for...
Instruction Manual (Large File - 11.45 MB)
Page 12
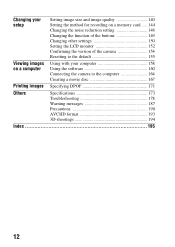
... setting 148 Changing the function of the buttons 149 Changing other settings 150 Setting the LCD monitor 152 Confirming the version of the camera 154 Resetting to the default 155 Viewing images on a computer Using with your computer 158 Using the software 160 Connecting the... camera to the computer 164 Creating a movie disc 167 Printing images Specifying DPOF 171 Others Specifications 173 Troubleshooting 178 Warning messages 187 Precautions 190 ...
... setting 148 Changing the function of the buttons 149 Changing other settings 150 Setting the LCD monitor 152 Confirming the version of the camera 154 Resetting to the default 155 Viewing images on a computer Using with your computer 158 Using the software 160 Connecting the... camera to the computer 164 Creating a movie disc 167 Printing images Specifying DPOF 171 Others Specifications 173 Troubleshooting 178 Warning messages 187 Precautions 190 ...
Instruction Manual (Large File - 11.45 MB)
Page 13
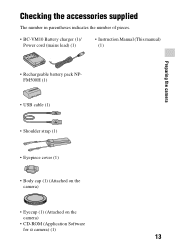
Preparing the camera Checking the accessories supplied The number in parentheses indicates the number of pieces. • BC-VM10 Battery charger (1)/ Power cord (mains lead) (1) • Instruction Manual (This manual) (1) Preparing the camera • Rechargeable battery pack NPFM500H (1) • USB cable (1) • Shoulder strap (1) • Eyepiece cover (1) • Body cap (1) (Attached on the camera) • Eyecup (1) (Attached on the camera) • CD-ROM (Application Software for α camera) (1) 13
Preparing the camera Checking the accessories supplied The number in parentheses indicates the number of pieces. • BC-VM10 Battery charger (1)/ Power cord (mains lead) (1) • Instruction Manual (This manual) (1) Preparing the camera • Rechargeable battery pack NPFM500H (1) • USB cable (1) • Shoulder strap (1) • Eyepiece cover (1) • Body cap (1) (Attached on the camera) • Eyecup (1) (Attached on the camera) • CD-ROM (Application Software for α camera) (1) 13
Instruction Manual (Large File - 11.45 MB)
Page 15
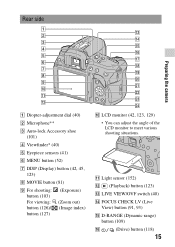
Rear side Preparing the camera A Diopter-adjustment dial (40) B Microphone** C Auto-lock Accessory shoe (101) D Viewfinder* (40) E Eyepiece sensors (41) F MENU button (52) G DISP (Display) button (42, 45, 123) H MOVIE button (81) I For shooting: button (103) For viewing: button (126)/ button (127) (Exposure) (Zoom out) (Image index) J LCD monitor (42, 123, 129) •...
Rear side Preparing the camera A Diopter-adjustment dial (40) B Microphone** C Auto-lock Accessory shoe (101) D Viewfinder* (40) E Eyepiece sensors (41) F MENU button (52) G DISP (Display) button (42, 45, 123) H MOVIE button (81) I For shooting: button (103) For viewing: button (126)/ button (127) (Exposure) (Zoom out) (Image index) J LCD monitor (42, 123, 129) •...

Instruction Manual (Large File - 11.45 MB)
Page 17
...guide of the REMOTE terminal. F Hooks for shoulder strap (33) G DC IN terminal • When connecting the ACPW10AM AC Adaptor (sold separately) to the camera, insert the plug of the Remote Commander into the REMOTE terminal, aligning the guide of the plug with a screw length of less than 5.5 mm (7/32... inch), and may damage the camera. 17 When the external microphone is a plugin-power type, the power of the microphone is turned off , then plug the connector of the AC ...
...guide of the REMOTE terminal. F Hooks for shoulder strap (33) G DC IN terminal • When connecting the ACPW10AM AC Adaptor (sold separately) to the camera, insert the plug of the Remote Commander into the REMOTE terminal, aligning the guide of the plug with a screw length of less than 5.5 mm (7/32... inch), and may damage the camera. 17 When the external microphone is a plugin-power type, the power of the microphone is turned off , then plug the connector of the AC ...

Instruction Manual (Large File - 11.45 MB)
Page 18
... battery pack The "InfoLITHIUM" battery pack can also be able to charge the NPFM500H "InfoLITHIUM" battery pack (supplied). Preparing the battery pack When using the camera for the first time, be charged even when it has not been fully depleted. You may not be used after being charged. It can be...
... battery pack The "InfoLITHIUM" battery pack can also be able to charge the NPFM500H "InfoLITHIUM" battery pack (supplied). Preparing the battery pack When using the camera for the first time, be charged even when it has not been fully depleted. You may not be used after being charged. It can be...
Instruction Manual (Large File - 11.45 MB)
Page 19
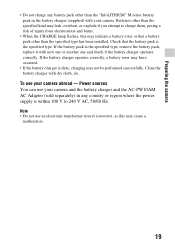
... the battery charger and the AC-PW10AM AC Adaptor (sold separately) in the battery charger (supplied) with your camera abroad - Preparing the camera • Do not charge any battery pack other than the "InfoLITHIUM" M series battery pack in any country or region where the power supply is within ...; When the CHARGE lamp flashes, this may not be performed successfully. If the battery pack is the specified type. Power sources You can use your camera. Batteries other than the specified kind may leak, overheat, or explode if you attempt to 240 V AC, 50/60 Hz.
... the battery charger and the AC-PW10AM AC Adaptor (sold separately) in the battery charger (supplied) with your camera abroad - Preparing the camera • Do not charge any battery pack other than the "InfoLITHIUM" M series battery pack in any country or region where the power supply is within ...; When the CHARGE lamp flashes, this may not be performed successfully. If the battery pack is the specified type. Power sources You can use your camera. Batteries other than the specified kind may leak, overheat, or explode if you attempt to 240 V AC, 50/60 Hz.

Instruction Manual (Large File - 11.45 MB)
Page 22
Inserting the charged battery pack 1 While sliding the battery cover open lever, open the battery cover. 2 Firmly insert the battery pack all the way while pressing the lock lever with the tip of the arrow. Lock lever To remove the battery pack Turn off the camera and slide the lock lever in the direction of the battery. 3 Close the battery cover. Be careful not to drop the battery pack. Lock lever 22
Inserting the charged battery pack 1 While sliding the battery cover open lever, open the battery cover. 2 Firmly insert the battery pack all the way while pressing the lock lever with the tip of the arrow. Lock lever To remove the battery pack Turn off the camera and slide the lock lever in the direction of the battery. 3 Close the battery cover. Be careful not to drop the battery pack. Lock lever 22
Instruction Manual (Large File - 11.45 MB)
Page 23
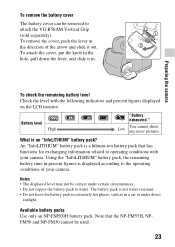
... for exchanging information related to the operating conditions of the arrow and slide it in the direction of your camera. Preparing the camera To check the remaining battery level Check the level with your camera. An "InfoLITHIUM" battery pack is not water-resistant. • Do not leave the battery pack in extremely hot...
... for exchanging information related to the operating conditions of the arrow and slide it in the direction of your camera. Preparing the camera To check the remaining battery level Check the level with your camera. An "InfoLITHIUM" battery pack is not water-resistant. • Do not leave the battery pack in extremely hot...
Instruction Manual (Large File - 11.45 MB)
Page 24
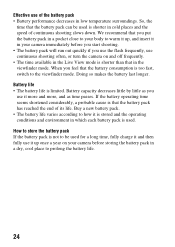
...the battery pack can be used for a long time, fully charge it and then fully use it up , and insert it in your camera before you start shooting. • The battery pack will run out quickly if you use it is stored and the operating conditions and ...place to the viewfinder mode. Battery capacity decreases little by little as you use the flash frequently, use continuous shooting often, or turn the camera on your camera immediately before storing the battery pack in low temperature surroundings. Buy a new battery pack. • The battery life varies according to be used...
...the battery pack can be used for a long time, fully charge it and then fully use it up , and insert it in your camera before you start shooting. • The battery pack will run out quickly if you use it is stored and the operating conditions and ...place to the viewfinder mode. Battery capacity decreases little by little as you use the flash frequently, use continuous shooting often, or turn the camera on your camera immediately before storing the battery pack in low temperature surroundings. Buy a new battery pack. • The battery life varies according to be used...
Instruction Manual (Large File - 11.45 MB)
Page 25
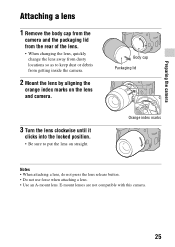
... • Do not use force when attaching a lens. • Use an A-mount lens. Preparing the camera Attaching a lens 1 Remove the body cap from the camera and the packaging lid from the rear of the lens. • When changing the lens, quickly change the lens away from dusty locations so as to keep dust ...or debris from getting inside the camera. 2 Mount the lens by aligning the orange index marks on the lens and camera. 3 Turn the lens clockwise until it clicks into...
... • Do not use force when attaching a lens. • Use an A-mount lens. Preparing the camera Attaching a lens 1 Remove the body cap from the camera and the packaging lid from the rear of the lens. • When changing the lens, quickly change the lens away from dusty locations so as to keep dust ...or debris from getting inside the camera. 2 Mount the lens by aligning the orange index marks on the lens and camera. 3 Turn the lens clockwise until it clicks into...
Instruction Manual (Large File - 11.45 MB)
Page 26
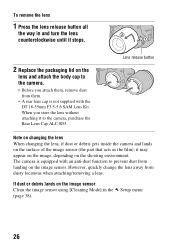
...the image sensor using [Cleaning Mode] in and turn the lens counterclockwise until it stops. 2 Replace the packaging lid on the lens and attach the body cap to the camera, purchase the Rear Lens Cap ALC-R55. However, quickly change the lens away from landing on the surface of the image sensor (... on the shooting environment. Setup menu 26 Lens release button Note on changing the lens When changing the lens, if dust or debris gets inside the camera and lands on the image sensor. When you attach them, remove dust from them. • A rear lens cap is equipped with the DT 18-55mm...
...the image sensor using [Cleaning Mode] in and turn the lens counterclockwise until it stops. 2 Replace the packaging lid on the lens and attach the body cap to the camera, purchase the Rear Lens Cap ALC-R55. However, quickly change the lens away from landing on the surface of the image sensor (... on the shooting environment. Setup menu 26 Lens release button Note on changing the lens When changing the lens, if dust or debris gets inside the camera and lands on the image sensor. When you attach them, remove dust from them. • A rear lens cap is equipped with the DT 18-55mm...

Instruction Manual (Large File - 11.45 MB)
Page 27
Inserting a memory card 1 Open the memory card cover. Preparing the camera 2 Insert "Memory Stick PRO Duo" media or an SD memory card. • Insert the memory card until it clicks as illustrated. Face side (SD memory card) Terminal part Face side ("Memory Stick PRO Duo") Terminal part 3 Select the type of memory card you want to use using the memory card switch. • If you switch the memory card while the power is turned on, the LCD monitor is not a malfunction. 4 Close the memory card cover. 27 This is turned off for a few seconds.
Inserting a memory card 1 Open the memory card cover. Preparing the camera 2 Insert "Memory Stick PRO Duo" media or an SD memory card. • Insert the memory card until it clicks as illustrated. Face side (SD memory card) Terminal part Face side ("Memory Stick PRO Duo") Terminal part 3 Select the type of memory card you want to use using the memory card switch. • If you switch the memory card while the power is turned on, the LCD monitor is not a malfunction. 4 Close the memory card cover. 27 This is turned off for a few seconds.
Instruction Manual (Large File - 11.45 MB)
Page 28
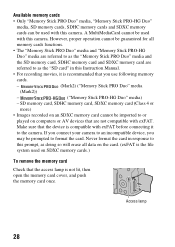
... card Check that the device is the file system used on computers or AV devices that you may be used with this camera. Access lamp 28 If you connect your camera to an incompatible device, you use following memory cards. - (Mark2) ("Memory Stick PRO Duo" media (Mark2)) - (".... However, proper operation cannot be guaranteed for all data on the card. (exFAT is compatible with exFAT. A MultiMediaCard cannot be prompted to the camera. Never format the card in this Instruction Manual. • For recording movies, it is not lit, then open the memory card cover, and...
... card Check that the device is the file system used on computers or AV devices that you may be used with this camera. Access lamp 28 If you connect your camera to an incompatible device, you use following memory cards. - (Mark2) ("Memory Stick PRO Duo" media (Mark2)) - (".... However, proper operation cannot be guaranteed for all data on the card. (exFAT is compatible with exFAT. A MultiMediaCard cannot be prompted to the camera. Never format the card in this Instruction Manual. • For recording movies, it is not lit, then open the memory card cover, and...

Instruction Manual (Large File - 11.45 MB)
Page 29
...disassemble or modify the memory cards. • Do not leave the memory cards within the reach of small children. Humid locations or locations with this camera. Locations exposed to format the memory cards using memory cards • Do not strike, bend or drop the memory card. • Do not use... has been used . • Do not press down hard when you write down on the memo area. • Do not attach a label on using the camera. • Data read/write speeds differ depending on the combination of a computer. • When you handle it . 29 They might accidentally swallow it . &#...
...disassemble or modify the memory cards. • Do not leave the memory cards within the reach of small children. Humid locations or locations with this camera. Locations exposed to format the memory cards using memory cards • Do not strike, bend or drop the memory card. • Do not use... has been used . • Do not press down hard when you write down on the memo area. • Do not attach a label on using the camera. • Data read/write speeds differ depending on the combination of a computer. • When you handle it . 29 They might accidentally swallow it . &#...
Instruction Manual (Large File - 11.45 MB)
Page 30
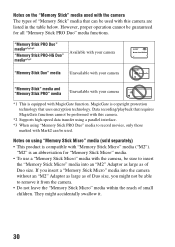
... for "Memory Stick Micro" media. • To use a "Memory Stick Micro" media with the camera, be sure to insert the "Memory Stick Micro" media into an "M2" Adaptor as large as ...of Duo size, you insert a "Memory Stick Micro" media into the camera without an "M2" Adaptor as large as of Duo size. Data recording/playback that requires MagicGate... technology. However, proper operation cannot be used . Notes on the "Memory Stick" media used with this camera. *2 Supports high-speed data transfer using a parallel interface. *3 When using "Memory Stick Micro" media ...
... for "Memory Stick Micro" media. • To use a "Memory Stick Micro" media with the camera, be sure to insert the "Memory Stick Micro" media into an "M2" Adaptor as large as ...of Duo size, you insert a "Memory Stick Micro" media into the camera without an "M2" Adaptor as large as of Duo size. Data recording/playback that requires MagicGate... technology. However, proper operation cannot be used . Notes on the "Memory Stick" media used with this camera. *2 Supports high-speed data transfer using a parallel interface. *3 When using "Memory Stick Micro" media ...
Instruction Manual (Large File - 11.45 MB)
Page 31
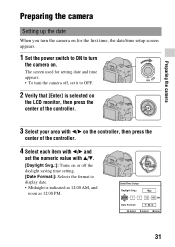
... is indicated as 12:00 AM, and noon as 12:00 PM. 31 Preparing the camera Preparing the camera Setting up the date When you turn the camera on for setting date and time appears. • To turn the camera off, set it to OFF. 2 Verify that [Enter] is selected on the LCD monitor... b/B and set the numeric value with v/V. [Daylight Svg.:]: Turns on or off the daylight saving time setting. [Date Format:]: Selects the format to turn the camera on.
... is indicated as 12:00 AM, and noon as 12:00 PM. 31 Preparing the camera Preparing the camera Setting up the date When you turn the camera on for setting date and time appears. • To turn the camera off, set it to OFF. 2 Verify that [Enter] is selected on the LCD monitor... b/B and set the numeric value with v/V. [Daylight Svg.:]: Turns on or off the daylight saving time setting. [Date Format:]: Selects the format to turn the camera on.


