
Instruction Manual
Page 1
Printed on this product and answers to frequently asked questions can be found at our Customer Support Website. Additional information on 70% or more recycled paper using VOC (Volatile Organic Compound)-free vegetable oil based ink. Digital Single Lens Reflex Camera Instruction Manual DSLR-A300/A350 © 2008 Sony Corporation Preparing the camera Before your operation Shooting images Using the shooting function Using the viewing function Changing your setup Viewing images on a computer Printing images
Printed on this product and answers to frequently asked questions can be found at our Customer Support Website. Additional information on 70% or more recycled paper using VOC (Volatile Organic Compound)-free vegetable oil based ink. Digital Single Lens Reflex Camera Instruction Manual DSLR-A300/A350 © 2008 Sony Corporation Preparing the camera Before your operation Shooting images Using the shooting function Using the viewing function Changing your setup Viewing images on a computer Printing images

Instruction Manual
Page 8
...from the image you monitored with such issues that may appear in Live view mode, you must place the camera under direct sunlight, attach the lens cap. • Images may trail across on the camera in a cold location, the LCD monitor may be compensated for effective use. When shooting a low-intensity... in this manual are reproduced images, and are not actual images shot using this camera. 8 Notes on the LCD monitor. However, there may be discolored and that constantly appear on the LCD monitor and lens • The LCD monitor is not possible due to direct sunlight. These points ...
...from the image you monitored with such issues that may appear in Live view mode, you must place the camera under direct sunlight, attach the lens cap. • Images may trail across on the camera in a cold location, the LCD monitor may be compensated for effective use. When shooting a low-intensity... in this manual are reproduced images, and are not actual images shot using this camera. 8 Notes on the LCD monitor. However, there may be discolored and that constantly appear on the LCD monitor and lens • The LCD monitor is not possible due to direct sunlight. These points ...
Instruction Manual
Page 9
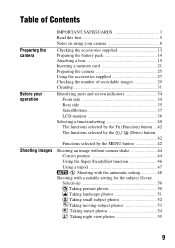
...Shooting images IMPORTANT SAFEGUARDS 3 Read this first 5 Notes on using your camera 8 Checking the accessories supplied 13 Preparing the battery pack 14 Attaching a lens 19 Inserting a memory card 21 Preparing the camera 25 Using the accessories supplied 27 Checking the number of recordable images ... button ... 42 The functions selected by the (Drive) button 42 Functions selected by the MENU button 42 Shooting an image without camera shake 44 Correct posture 44 Using the Super SteadyShot function 46 Using a tripod 47 / Shooting with the automatic setting 48 Shooting with...
...Shooting images IMPORTANT SAFEGUARDS 3 Read this first 5 Notes on using your camera 8 Checking the accessories supplied 13 Preparing the battery pack 14 Attaching a lens 19 Inserting a memory card 21 Preparing the camera 25 Using the accessories supplied 27 Checking the number of recordable images ... button ... 42 The functions selected by the (Drive) button 42 Functions selected by the MENU button 42 Shooting an image without camera shake 44 Correct posture 44 Using the Super SteadyShot function 46 Using a tripod 47 / Shooting with the automatic setting 48 Shooting with...
Instruction Manual
Page 12
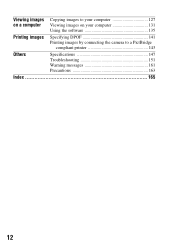
Viewing images Copying images to your computer 127 on a computer Viewing images on your computer 131 Using the software 135 Printing images Specifying DPOF 141 Printing images by connecting the camera to a PictBridge compliant printer 143 Others Specifications 147 Troubleshooting 151 Warning messages 161 Precautions 163 Index 165 12
Viewing images Copying images to your computer 127 on a computer Viewing images on your computer 131 Using the software 135 Printing images Specifying DPOF 141 Printing images by connecting the camera to a PictBridge compliant printer 143 Others Specifications 147 Troubleshooting 151 Warning messages 161 Precautions 163 Index 165 12

Instruction Manual
Page 13
Preparing the camera Preparing the camera Checking the accessories supplied The number in parentheses indicates the number of pieces. • BC-VM10 Battery charger (1)/ Power cord (mains lead) (1) • Rechargeable battery pack NPFM500H (1) • Eyecup (1) (Attached on the camera) • CD-ROM (Application Software for α camera) (1) • Quick Start Guide (1) • Instruction Manual (This manual) (1) • USB cable (1) • Video cable (1) • Shoulder strap (1) • Eyepiece cover (1) • Body cap (1) (Attached on the camera) 13
Preparing the camera Preparing the camera Checking the accessories supplied The number in parentheses indicates the number of pieces. • BC-VM10 Battery charger (1)/ Power cord (mains lead) (1) • Rechargeable battery pack NPFM500H (1) • Eyecup (1) (Attached on the camera) • CD-ROM (Application Software for α camera) (1) • Quick Start Guide (1) • Instruction Manual (This manual) (1) • USB cable (1) • Video cable (1) • Shoulder strap (1) • Eyepiece cover (1) • Body cap (1) (Attached on the camera) 13
Instruction Manual
Page 14
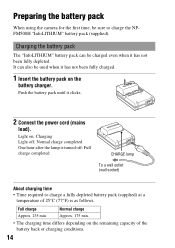
... a wall outlet (wall socket) About charging time • Time required to charge the NPFM500H "InfoLITHIUM" battery pack (supplied). Preparing the battery pack When using the camera for the first time, be used when it clicks. 2 Connect the power cord (mains lead).
... a wall outlet (wall socket) About charging time • Time required to charge the NPFM500H "InfoLITHIUM" battery pack (supplied). Preparing the battery pack When using the camera for the first time, be used when it clicks. 2 Connect the power cord (mains lead).
Instruction Manual
Page 15
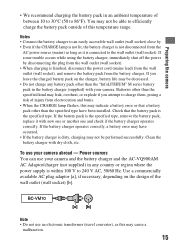
...outlet (wall socket), and remove the battery pack from the AC power source (mains) as long as this temperature range. To use your camera and the battery charger and the AC-VQ900AM AC Adaptor/charger (not supplied) in any battery pack other than the "InfoLITHIUM" M series battery...wall outlet (wall socket). • When charging is the specified type. Note • Do not use your camera abroad - Notes • Connect the battery charger to the wall outlet (wall socket). Preparing the camera • We recommend charging the battery pack in the battery charger (supplied) with your...
...outlet (wall socket), and remove the battery pack from the AC power source (mains) as long as this temperature range. To use your camera and the battery charger and the AC-VQ900AM AC Adaptor/charger (not supplied) in any battery pack other than the "InfoLITHIUM" M series battery...wall outlet (wall socket). • When charging is the specified type. Note • Do not use your camera abroad - Notes • Connect the battery charger to the wall outlet (wall socket). Preparing the camera • We recommend charging the battery pack in the battery charger (supplied) with your...
Instruction Manual
Page 16
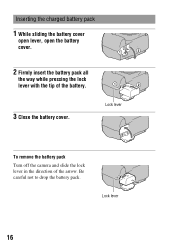
Lock lever To remove the battery pack Turn off the camera and slide the lock lever in the direction of the battery. 3 Close the battery cover. Lock lever 16 Be careful not to drop the battery pack. Inserting the charged battery pack 1 While sliding the battery cover open lever, open the battery cover. 2 Firmly insert the battery pack all the way while pressing the lock lever with the tip of the arrow.
Lock lever To remove the battery pack Turn off the camera and slide the lock lever in the direction of the battery. 3 Close the battery cover. Lock lever 16 Be careful not to drop the battery pack. Inserting the charged battery pack 1 While sliding the battery cover open lever, open the battery cover. 2 Firmly insert the battery pack all the way while pressing the lock lever with the tip of the arrow.
Instruction Manual
Page 17
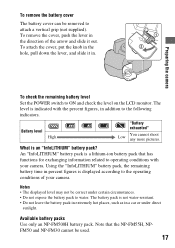
...push the lever in the hole, pull down the lever, and slide it out. An "InfoLITHIUM" battery pack is indicated with your camera. To remove the battery cover The battery cover can be used. 17 Note that has functions for exchanging information related to operating conditions ...with the percent figures, in . Preparing the camera To check the remaining battery level Set the POWER switch to water. Using the "InfoLITHIUM" battery pack, the remaining battery time in a...
...push the lever in the hole, pull down the lever, and slide it out. An "InfoLITHIUM" battery pack is indicated with your camera. To remove the battery cover The battery cover can be used. 17 Note that has functions for exchanging information related to operating conditions ...with the percent figures, in . Preparing the camera To check the remaining battery level Set the POWER switch to water. Using the "InfoLITHIUM" battery pack, the remaining battery time in a...
Instruction Manual
Page 18
We recommend the following to ensure longer battery pack use: put the battery pack in a pocket close to your body to warm it up once a year on your camera immediately before storing the battery pack in which each battery pack is used. So, the time that the battery pack has reached the...battery pack • Battery performance decreases in cold places. Battery capacity decreases little by little as you use it up , and insert it in your camera before you start shooting. • The battery pack will run out quickly if you use the flash frequently. Battery life • The battery life...
We recommend the following to ensure longer battery pack use: put the battery pack in a pocket close to your body to warm it up once a year on your camera immediately before storing the battery pack in which each battery pack is used. So, the time that the battery pack has reached the...battery pack • Battery performance decreases in cold places. Battery capacity decreases little by little as you use it up , and insert it in your camera before you start shooting. • The battery pack will run out quickly if you use the flash frequently. Battery life • The battery life...
Instruction Manual
Page 19
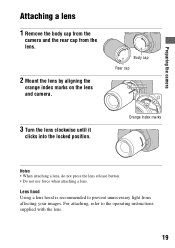
... button. • Do not use force when attaching a lens. Lens hood Using a lens hood is recommended to the operating instructions supplied with the lens. 19 Body cap Rear cap 3 Turn the lens clockwise until it clicks into the locked position. Preparing the camera Attaching a lens 1 Remove the body cap from the camera and the rear cap from affecting your images.
... button. • Do not use force when attaching a lens. Lens hood Using a lens hood is recommended to the operating instructions supplied with the lens. 19 Body cap Rear cap 3 Turn the lens clockwise until it clicks into the locked position. Preparing the camera Attaching a lens 1 Remove the body cap from the camera and the rear cap from affecting your images.

Instruction Manual
Page 20
...dust function to prevent dust from the cap. Lens release button Note on changing the lens When changing the lens, if dust or debris gets inside the camera. 2 Replace the cap on the lens and attach the body cap to keep dust from getting inside the camera and lands on the surface of the image sensor... (the part that acts as to the camera. • Before ...
...dust function to prevent dust from the cap. Lens release button Note on changing the lens When changing the lens, if dust or debris gets inside the camera. 2 Replace the cap on the lens and attach the body cap to keep dust from getting inside the camera and lands on the surface of the image sensor... (the part that acts as to the camera. • Before ...
Instruction Manual
Page 21
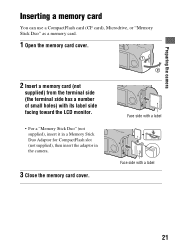
Preparing the camera Inserting a memory card You can use a CompactFlash card (CF card), Microdrive, or "Memory Stick Duo" as a memory card. 1 Open the memory card cover. 2 Insert a memory card (not supplied) from the terminal side (the terminal side has a number of small holes) with a label 21 Face side with a label Face side with its label side facing toward the LCD monitor. • For a "Memory Stick Duo" (not supplied), insert it in a Memory Stick Duo Adaptor for CompactFlash slot (not supplied), then insert the adaptor in the camera. 3 Close the memory card cover.
Preparing the camera Inserting a memory card You can use a CompactFlash card (CF card), Microdrive, or "Memory Stick Duo" as a memory card. 1 Open the memory card cover. 2 Insert a memory card (not supplied) from the terminal side (the terminal side has a number of small holes) with a label 21 Face side with a label Face side with its label side facing toward the LCD monitor. • For a "Memory Stick Duo" (not supplied), insert it in a Memory Stick Duo Adaptor for CompactFlash slot (not supplied), then insert the adaptor in the camera. 3 Close the memory card cover.
Instruction Manual
Page 22
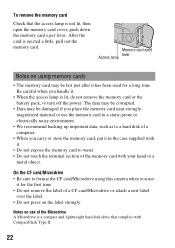
... time. • Do not remove the label of a CF card/Microdrive or attach a new label over the label. • Do not press on using this camera when you use the memory card in a static-prone or electrically noisy environment. • We recommend backing up important data, such as to water. •...
... time. • Do not remove the label of a CF card/Microdrive or attach a new label over the label. • Do not press on using this camera when you use the memory card in a static-prone or electrically noisy environment. • We recommend backing up important data, such as to water. •...
Instruction Manual
Page 23
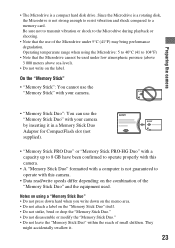
Notes on using the Microdrive: 5 to 40°C (41 to 104°F) • Note that the use the "Memory Stick Duo" with your camera. • "Memory Stick Duo": You can use of the Microdrive under low atmospheric pressure (above 3 000 meters above sea-level). • Do not write...area. • Do not attach a label on the label. On the "Memory Stick" • "Memory Stick": You cannot use the "Memory Stick" with your camera by inserting it . 23 They might accidentally swallow it in a Memory Stick Duo Adaptor for CompactFlash slot (not supplied). • "Memory Stick PRO Duo" or...
Notes on using the Microdrive: 5 to 40°C (41 to 104°F) • Note that the use the "Memory Stick Duo" with your camera. • "Memory Stick Duo": You can use of the Microdrive under low atmospheric pressure (above 3 000 meters above sea-level). • Do not write...area. • Do not attach a label on the label. On the "Memory Stick" • "Memory Stick": You cannot use the "Memory Stick" with your camera by inserting it . 23 They might accidentally swallow it in a Memory Stick Duo Adaptor for CompactFlash slot (not supplied). • "Memory Stick PRO Duo" or...
Instruction Manual
Page 25
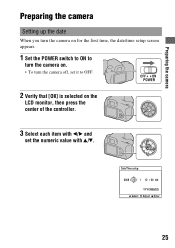
Preparing the camera Preparing the camera Setting up the date When you turn the camera on for the first time, the date/time setup screen appears. 1 Set the POWER switch to ON to turn the camera on. • To turn the camera off, set it to OFF. 2 Verify that [OK] is selected on the LCD monitor, then press the center of the controller. 3 Select each item with b/B and set the numeric value with v/V. 25
Preparing the camera Preparing the camera Setting up the date When you turn the camera on for the first time, the date/time setup screen appears. 1 Set the POWER switch to ON to turn the camera on. • To turn the camera off, set it to OFF. 2 Verify that [OK] is selected on the LCD monitor, then press the center of the controller. 3 Select each item with b/B and set the numeric value with v/V. 25
Instruction Manual
Page 27
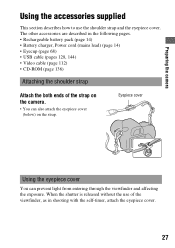
... the shoulder strap and the eyepiece cover. The other accessories are described in shooting with the self-timer, attach the eyepiece cover. 27 Preparing the camera Using the accessories supplied This section describes how to use of the viewfinder, as in the following pages. • Rechargeable battery pack (page 14) •... 128, 144) • Video cable (page 112) • CD-ROM (page 136) Attaching the shoulder strap Attach the both ends of the strap on the camera. • You can prevent light from entering through the viewfinder and affecting the exposure.
... the shoulder strap and the eyepiece cover. The other accessories are described in shooting with the self-timer, attach the eyepiece cover. 27 Preparing the camera Using the accessories supplied This section describes how to use of the viewfinder, as in the following pages. • Rechargeable battery pack (page 14) •... 128, 144) • Video cable (page 112) • CD-ROM (page 136) Attaching the shoulder strap Attach the both ends of the strap on the camera. • You can prevent light from entering through the viewfinder and affecting the exposure.
Instruction Manual
Page 29
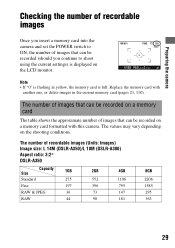
... be recorded (should you continue to shoot using the current settings) is displayed on the shooting conditions. Replace the memory card with this camera. The values may vary depending on the LCD monitor. The number of images that can be recorded on a memory card The table shows...memory card (pages 21, 110). Note • If "0" is full. The number of recordable images (Units: Images) Image size: L 14M (DSLR-A350)/L 10M (DSLR-A300) Aspect ratio: 3:2* DSLR-A350 Size Capacity 1GB 2GB 4GB 8GB Standard 275 552 1106 2206 Fine 197 396 795 1585 RAW & JPEG 36 73 147 295...
... be recorded (should you continue to shoot using the current settings) is displayed on the shooting conditions. Replace the memory card with this camera. The values may vary depending on the LCD monitor. The number of images that can be recorded on a memory card The table shows...memory card (pages 21, 110). Note • If "0" is full. The number of recordable images (Units: Images) Image size: L 14M (DSLR-A350)/L 10M (DSLR-A300) Aspect ratio: 3:2* DSLR-A350 Size Capacity 1GB 2GB 4GB 8GB Standard 275 552 1106 2206 Fine 197 396 795 1585 RAW & JPEG 36 73 147 295...
Instruction Manual
Page 30
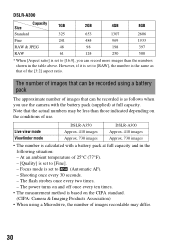
...as follows when you can be recorded using a Microdrive, the number of the [3:2] aspect ratio. Live view mode Viewfinder mode DSLR-A350 Approx. 410 images Approx. 730 images DSLR-A300 Approx. 410 images Approx. 730 images • The number is set to [Fine]. - The flash strobes once every two...actual numbers may differ. 30 The number of images that can record more images than those indicated depending on the CIPA standard. (CIPA: Camera & Imaging Products Association) • When using a battery pack The approximate number of images that can be recorded is as that of ...
...as follows when you can be recorded using a Microdrive, the number of the [3:2] aspect ratio. Live view mode Viewfinder mode DSLR-A350 Approx. 410 images Approx. 730 images DSLR-A300 Approx. 410 images Approx. 730 images • The number is set to [Fine]. - The flash strobes once every two...actual numbers may differ. 30 The number of images that can record more images than those indicated depending on the CIPA standard. (CIPA: Camera & Imaging Products Association) • When using a battery pack The approximate number of images that can be recorded is as that of ...
Instruction Manual
Page 31
... not use a cleaning solution containing organic solvents, such as lens contacts, or the mirror. Cleaning the camera surface Clean the camera surface with a soft cloth slightly moistened with water, then wipe the surface with lens cleaning solution. Do not spray lens cleaning solution directly onto the lens surface. • Do not touch the inside of the...
... not use a cleaning solution containing organic solvents, such as lens contacts, or the mirror. Cleaning the camera surface Clean the camera surface with a soft cloth slightly moistened with water, then wipe the surface with lens cleaning solution. Do not spray lens cleaning solution directly onto the lens surface. • Do not touch the inside of the...


