Instruction Manual
Page 9
... the accessories supplied 13 Preparing the battery pack 14 Attaching a lens 19 Inserting a memory card 21 Preparing the camera 25 Using the accessories supplied 27 Checking the number of recordable images 29 Cleaning 31 Identifying parts and screen indicators 34 Front side 34 Rear side 35 Sides/Bottom 37 LCD monitor 38 Selecting...
... the accessories supplied 13 Preparing the battery pack 14 Attaching a lens 19 Inserting a memory card 21 Preparing the camera 25 Using the accessories supplied 27 Checking the number of recordable images 29 Cleaning 31 Identifying parts and screen indicators 34 Front side 34 Rear side 35 Sides/Bottom 37 LCD monitor 38 Selecting...

Instruction Manual
Page 11
... of the image (D-Range Optimizer 95 Selecting your desired image processing (Creative Style) 95 Selecting the drive mode 97 Shooting single shot 97 Shooting continuously 97 Using the self-timer 98 Shooting images with the exposure shifted (Exposure bracket 98 Shooting with white...101 function Checking the information of recorded images 106 Protecting images (Protect 109 Deleting images (Delete 110 Viewing images on a TV screen 112 Changing your setup Setting image size and image quality 114 Setting the method for recording on a memory card ..... 116 Changing...
... of the image (D-Range Optimizer 95 Selecting your desired image processing (Creative Style) 95 Selecting the drive mode 97 Shooting single shot 97 Shooting continuously 97 Using the self-timer 98 Shooting images with the exposure shifted (Exposure bracket 98 Shooting with white...101 function Checking the information of recorded images 106 Protecting images (Protect 109 Deleting images (Delete 110 Viewing images on a TV screen 112 Changing your setup Setting image size and image quality 114 Setting the method for recording on a memory card ..... 116 Changing...
Instruction Manual
Page 25
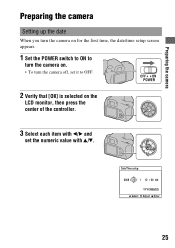
Preparing the camera Preparing the camera Setting up the date When you turn the camera on for the first time, the date/time setup screen appears. 1 Set the POWER switch to ON to turn the camera on. • To turn the camera off, set it to OFF. 2 Verify that [OK] is selected on the LCD monitor, then press the center of the controller. 3 Select each item with b/B and set the numeric value with v/V. 25
Preparing the camera Preparing the camera Setting up the date When you turn the camera on for the first time, the date/time setup screen appears. 1 Set the POWER switch to ON to turn the camera on. • To turn the camera off, set it to OFF. 2 Verify that [OK] is selected on the LCD monitor, then press the center of the controller. 3 Select each item with b/B and set the numeric value with v/V. 25
Instruction Manual
Page 31
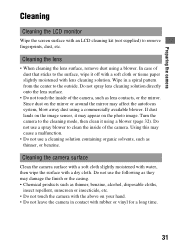
... cloths, insect repellent, sunscreen or insecticide, etc. • Do not touch the camera with the above on the photo image. Wipe in contact with lens cleaning solution. In case of the camera, such as lens contacts, or the mirror. Since dust on the mirror or around the mirror may appear... blower. Using this may damage the finish or the casing. • Chemical products such as thinner, or benzine. Preparing the camera Cleaning Cleaning the LCD monitor Wipe the screen surface with a dry cloth. Do not use the following as they may cause a malfunction. • Do not use a spray...
... cloths, insect repellent, sunscreen or insecticide, etc. • Do not touch the camera with the above on the photo image. Wipe in contact with lens cleaning solution. In case of the camera, such as lens contacts, or the mirror. Since dust on the mirror or around the mirror may appear... blower. Using this may damage the finish or the casing. • Chemical products such as thinner, or benzine. Preparing the camera Cleaning Cleaning the LCD monitor Wipe the screen surface with a dry cloth. Do not use the following as they may cause a malfunction. • Do not use a spray...

Instruction Manual
Page 34
Front side A Shutter button (48) B Control dial (58, 120) C Self-timer lamp (98) D Lens contacts* E Mirror* F Lens mount G Built-in parentheses for details of operation. Before your operation Identifying parts and screen indicators See the pages in flash* (79) H Mode dial (48) I (Flash pop-up) button (79) J Lens release button (20) K Focus mode switch (72, 75) * Do not directly touch these parts. 34
Front side A Shutter button (48) B Control dial (58, 120) C Self-timer lamp (98) D Lens contacts* E Mirror* F Lens mount G Built-in parentheses for details of operation. Before your operation Identifying parts and screen indicators See the pages in flash* (79) H Mode dial (48) I (Flash pop-up) button (79) J Lens release button (20) K Focus mode switch (72, 75) * Do not directly touch these parts. 34
Instruction Manual
Page 39
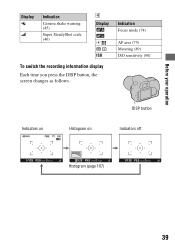
Before your operation Display Indication Camera shake warning (45) Super SteadyShot scale (46) D Display ISO To switch the recording information display Each time you press the DISP button, the screen changes as follows. Indication Focus mode (74) AF area (75) Metering (89) ISO sensitivity (90) Indicators on Histogram on DISP button Indicators off Histogram (page 107) 39
Before your operation Display Indication Camera shake warning (45) Super SteadyShot scale (46) D Display ISO To switch the recording information display Each time you press the DISP button, the screen changes as follows. Indication Focus mode (74) AF area (75) Metering (89) ISO sensitivity (90) Indicators on Histogram on DISP button Indicators off Histogram (page 107) 39
Instruction Manual
Page 40
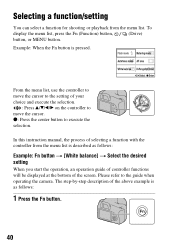
...from the menu list is described as follows: 1 Press the Fn button. 40 From the menu list, use the controller to the setting of the screen. In this instruction manual, the process of selecting a function with the controller from the menu list. The step-by-step description of the above ... the selection. : Press v/V/b/B on the controller to move the cursor to move the cursor. z: Press the center button to the guide when operating the camera. Please refer to execute the selection. To display the menu list, press the Fn (Function) button, (Drive) button, or MENU button.
...from the menu list is described as follows: 1 Press the Fn button. 40 From the menu list, use the controller to the setting of the screen. In this instruction manual, the process of selecting a function with the controller from the menu list. The step-by-step description of the above ... the selection. : Press v/V/b/B on the controller to move the cursor to move the cursor. z: Press the center button to the guide when operating the camera. Please refer to execute the selection. To display the menu list, press the Fn (Function) button, (Drive) button, or MENU button.
Instruction Manual
Page 67
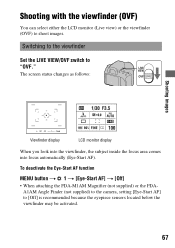
... 1 t [Eye-Start AF] t [Off] • When attaching the FDA-M1AM Magnifier (not supplied) or the FDAA1AM Angle Finder (not supplied) to the camera, setting [Eye-Start AF] to "OVF." Shooting with the viewfinder (OVF) You can select either the LCD monitor (Live view) or the viewfinder (OVF) to... shoot images. The screen status changes as follows: Shooting images Viewfinder display LCD monitor display When you look into the viewfinder, the subject inside the focus area comes into...
... 1 t [Eye-Start AF] t [Off] • When attaching the FDA-M1AM Magnifier (not supplied) or the FDAA1AM Angle Finder (not supplied) to the camera, setting [Eye-Start AF] to "OVF." Shooting with the viewfinder (OVF) You can select either the LCD monitor (Live view) or the viewfinder (OVF) to... shoot images. The screen status changes as follows: Shooting images Viewfinder display LCD monitor display When you look into the viewfinder, the subject inside the focus area comes into...
Instruction Manual
Page 70
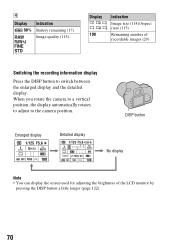
DISP button Enlarged display Detailed display No display Note • You can display the screen used for adjusting the brightness of recordable images (29) Switching the recording information display Press the DISP button to the camera position. When you rotate the camera to a vertical position, the display automatically rotates to adjust to switch between...
DISP button Enlarged display Detailed display No display Note • You can display the screen used for adjusting the brightness of recordable images (29) Switching the recording information display Press the DISP button to the camera position. When you rotate the camera to a vertical position, the display automatically rotates to adjust to switch between...

Instruction Manual
Page 85
... the viewfinder mode. 2 Adjust the exposure with the control dial. Adjust in the + direction Using the shooting function 1 Press the button. • The exposure compensation screen is automatically acquired. (Automatic exposure) Based on your preference. button Standard exposure 85 The entire image becomes darker when you can make the entire image...
... the viewfinder mode. 2 Adjust the exposure with the control dial. Adjust in the + direction Using the shooting function 1 Press the button. • The exposure compensation screen is automatically acquired. (Automatic exposure) Based on your preference. button Standard exposure 85 The entire image becomes darker when you can make the entire image...

Instruction Manual
Page 87
... will change the histogram accordingly. Adjust the exposure if necessary and shoot again. Using the shooting function Number of pixels To shoot while checking the screen using the histogram A histogram is applied on aperture setting, etc. • The histogram differs between shooting and playback in Live view mode does not indicate...
... will change the histogram accordingly. Adjust the exposure if necessary and shoot again. Using the shooting function Number of pixels To shoot while checking the screen using the histogram A histogram is applied on aperture setting, etc. • The histogram differs between shooting and playback in Live view mode does not indicate...

Instruction Manual
Page 89
... can perform more accurate flash compensation by using more accurate distance information. A filter with an exposure factor, such as the camera cannot perform flash compensations with the lens. A diffuser is used for measuring the brightness of a subject (Metering mode) Fn button t [Metering mode] t Select... area into multiple areas and determines the proper exposure of the entire screen. (Center weighted) While emphasizing the central area of the screen, this mode measures the average brightness of the entire screen. (Spot) This mode measures light only in the spot metering circle...
... can perform more accurate flash compensation by using more accurate distance information. A filter with an exposure factor, such as the camera cannot perform flash compensations with the lens. A diffuser is used for measuring the brightness of a subject (Metering mode) Fn button t [Metering mode] t Select... area into multiple areas and determines the proper exposure of the entire screen. (Center weighted) While emphasizing the central area of the screen, this mode measures the average brightness of the entire screen. (Spot) This mode measures light only in the spot metering circle...

Instruction Manual
Page 90
... the number, the higher the sensitivity. 1 Press the ISO button to light is not provided in recording mode M. Setting ISO Sensitivity to display the ISO screen. If you change the recording mode to [100]. Recording mode AUTO, Scene Selection P, A, S ISO The range differs depending on the controller. • The larger the...
... the number, the higher the sensitivity. 1 Press the ISO button to light is not provided in recording mode M. Setting ISO Sensitivity to display the ISO screen. If you change the recording mode to [100]. Recording mode AUTO, Scene Selection P, A, S ISO The range differs depending on the controller. • The larger the...
Instruction Manual
Page 101
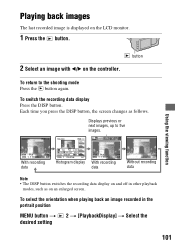
... Playing back images The last recorded image is displayed on the LCD monitor. 1 Press the button. 2 Select an image with b/B on an enlarged screen. Each time you press the DISP button, the screen changes as on the controller. Displays previous or next images, up to the shooting mode Press the button again.
... Playing back images The last recorded image is displayed on the LCD monitor. 1 Press the button. 2 Select an image with b/B on an enlarged screen. Each time you press the DISP button, the screen changes as on the controller. Displays previous or next images, up to the shooting mode Press the button again.
Instruction Manual
Page 102
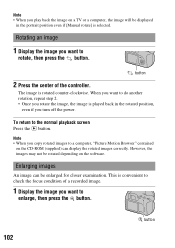
... button. Enlarging images An image can display the rotated images correctly. button 102 Rotating an image 1 Display the image you want to the normal playback screen Press the button. Note • When you copy rotated images to enlarge, then press the button. button 2 Press the center of a recorded image. 1 Display the...
... button. Enlarging images An image can display the rotated images correctly. button 102 Rotating an image 1 Display the image you want to the normal playback screen Press the button. Note • When you copy rotated images to enlarge, then press the button. button 2 Press the center of a recorded image. 1 Display the...

Instruction Manual
Page 103
Using the viewing function button 2 Press the center of the controller, the screen changes between the zoomed screen and the full-screen mode. The red frame appears. 3 Move the red frame to the center point you want to the normal size. When you shoot multiple images with ...
Using the viewing function button 2 Press the center of the controller, the screen changes between the zoomed screen and the full-screen mode. The red frame appears. 3 Move the red frame to the center point you want to the normal size. When you shoot multiple images with ...

Instruction Manual
Page 104
... button 2 Press the DISP button repeatedly to select the desired screen format. • The screen changes in the following order: 9 images t 25 images t 4 images DISP button To return to the single-image screen Press the button or the center of the controller when you ... controller to return to the previous screen. • To cancel the enlarged playback, press the button. The portion inside the red frame is as follows. Image size L M S Scaling range DSLR-A350 Approx. ×1.1 - ×14 Approx. ×1.1 - ×11 Approx. ×1.1 - ×7.2 DSLR-A300 Approx. ×1.1 - ×12...
... button 2 Press the DISP button repeatedly to select the desired screen format. • The screen changes in the following order: 9 images t 25 images t 4 images DISP button To return to the single-image screen Press the button or the center of the controller when you ... controller to return to the previous screen. • To cancel the enlarged playback, press the button. The portion inside the red frame is as follows. Image size L M S Scaling range DSLR-A350 Approx. ×1.1 - ×14 Approx. ×1.1 - ×11 Approx. ×1.1 - ×7.2 DSLR-A300 Approx. ×1.1 - ×12...
Instruction Manual
Page 112
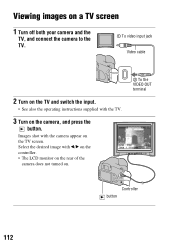
Select the desired image with b/B on the controller. • The LCD monitor on the rear of the camera does not turned on the camera, and press the button. Viewing images on a TV screen 1 Turn off both your camera and the TV, and connect the camera to the TV. 1 To video input jack Video cable 2 Turn on the TV and switch the input. • See also the operating instructions supplied with the TV. 3 Turn on . 2 To the VIDEO OUT terminal Controller button 112 Images shot with the camera appear on the TV screen.
Select the desired image with b/B on the controller. • The LCD monitor on the rear of the camera does not turned on the camera, and press the button. Viewing images on a TV screen 1 Turn off both your camera and the TV, and connect the camera to the TV. 1 To video input jack Video cable 2 Turn on the TV and switch the input. • See also the operating instructions supplied with the TV. 3 Turn on . 2 To the VIDEO OUT terminal Controller button 112 Images shot with the camera appear on the TV screen.

Instruction Manual
Page 113
... color system of the TV must match that of your digital still camera. Check the following lists for the TV color system of the country or region where the camera is used. On TV color systems If you want to view images on a TV screen, you need a TV with a video input jack and the... Brazil PAL-N system Argentina, Paraguay, Uruguay SECAM system Bulgaria, France, Guiana, Iran, Iraq, Monaco, Russia, Ukraine, etc. Using the viewing function 113 To use your camera abroad It may be necessary to switch the video signal output to match that of your TV system.
... color system of the TV must match that of your digital still camera. Check the following lists for the TV color system of the country or region where the camera is used. On TV color systems If you want to view images on a TV screen, you need a TV with a video input jack and the... Brazil PAL-N system Argentina, Paraguay, Uruguay SECAM system Bulgaria, France, Guiana, Iran, Iraq, Monaco, Russia, Ukraine, etc. Using the viewing function 113 To use your camera abroad It may be necessary to switch the video signal output to match that of your TV system.
Instruction Manual
Page 122
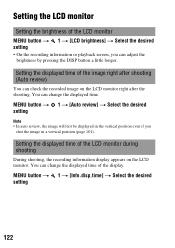
... the LCD monitor Setting the brightness of the LCD monitor MENU button t 1 t [LCD brightness] t Select the desired setting • On the recording information or playback screen, you shot the image in the vertical position even if you can change the displayed time. MENU button t 1 t [Info.disp.time] t Select the desired setting...
... the LCD monitor Setting the brightness of the LCD monitor MENU button t 1 t [LCD brightness] t Select the desired setting • On the recording information or playback screen, you shot the image in the vertical position even if you can change the displayed time. MENU button t 1 t [Info.disp.time] t Select the desired setting...

