Instruction Manual
Page 1
Printed in Japan Digital Single Lens Reflex Camera Instruction Manual DSLR-A200 © 2008 Sony Corporation 3-277-950-11 (1) Preparing the camera Before your operation Shooting images Using the shooting function Using the viewing function Changing your setup Viewing images on 70% or more recycled paper using VOC (Volatile Organic Compound)-free vegetable oil based ink. Printed on a computer Printing images Additional information on this product and answers to frequently asked questions can be found at our Customer Support Website.
Printed in Japan Digital Single Lens Reflex Camera Instruction Manual DSLR-A200 © 2008 Sony Corporation 3-277-950-11 (1) Preparing the camera Before your operation Shooting images Using the shooting function Using the viewing function Changing your setup Viewing images on 70% or more recycled paper using VOC (Volatile Organic Compound)-free vegetable oil based ink. Printed on a computer Printing images Additional information on this product and answers to frequently asked questions can be found at our Customer Support Website.
Instruction Manual
Page 3
.... If you are unable to have a suitable outlet installed. Overloading Do not overload wall outlets, extension cords or convenience receptacles beyond their capacity, since this manual for example, near water - Never spill liquid of any kind into the set should still fail to operate from the type of electrical power supplied...
.... If you are unable to have a suitable outlet installed. Overloading Do not overload wall outlets, extension cords or convenience receptacles beyond their capacity, since this manual for example, near water - Never spill liquid of any kind into the set should still fail to operate from the type of electrical power supplied...
Instruction Manual
Page 5
...Regulatory Information Declaration of Conformity Trade Name: SONY Model No.: DSLR-A200 Responsible Party: Sony Electronics Inc. Telephone No.: 858-942-...recycling of rechargeable batteries, call : Sony Customer Information Services Center 1-800-222-SONY (7669) The number below is for the FCC related matters only. This Class B digital apparatus complies with Part 15 of the... Lithium-Ion batteries are cautioned that any changes or modifications not expressly approved in this manual could void your used rechargeable batteries to the collection and recycling location nearest you may ...
...Regulatory Information Declaration of Conformity Trade Name: SONY Model No.: DSLR-A200 Responsible Party: Sony Electronics Inc. Telephone No.: 858-942-...recycling of rechargeable batteries, call : Sony Customer Information Services Center 1-800-222-SONY (7669) The number below is for the FCC related matters only. This Class B digital apparatus complies with Part 15 of the... Lithium-Ion batteries are cautioned that any changes or modifications not expressly approved in this manual could void your used rechargeable batteries to the collection and recycling location nearest you may ...
Instruction Manual
Page 8
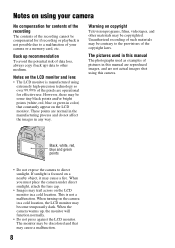
...of such materials may be discolored and that constantly appear on the LCD monitor. When you must place the camera under direct sunlight, attach the lens cap. • Images may trail across on the camera in a cold location. When turning on the LCD monitor in a cold location, the LCD monitor may ... The contents of the recording cannot be contrary to the provisions of pictures in this manual are reproduced images, and are normal in the manufacturing process and do not affect the images in this manual The photographs used as examples of the copyright laws. Back up , the monitor will...
...of such materials may be discolored and that constantly appear on the LCD monitor. When you must place the camera under direct sunlight, attach the lens cap. • Images may trail across on the camera in a cold location. When turning on the LCD monitor in a cold location, the LCD monitor may ... The contents of the recording cannot be contrary to the provisions of pictures in this manual are reproduced images, and are normal in the manufacturing process and do not affect the images in this manual The photographs used as examples of the copyright laws. Back up , the monitor will...
Instruction Manual
Page 10
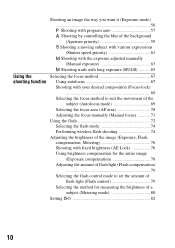
...the background (Aperture priority 59 Shooting a moving subject with various expressions (Shutter speed priority 61 Shooting with the exposure adjusted manually (Manual exposure 63 Shooting trails with long exposure (BULB 65 Using the Selecting the focus method 67 shooting function Using autofocus 67 ...method to suit the movement of the subject (Autofocus mode 69 Selecting the focus area (AF area 70 Adjusting the focus manually (Manual focus 71 Using the flash 72 Selecting the flash mode 74 Performing wireless flash shooting 74 Adjusting the brightness of the image...
...the background (Aperture priority 59 Shooting a moving subject with various expressions (Shutter speed priority 61 Shooting with the exposure adjusted manually (Manual exposure 63 Shooting trails with long exposure (BULB 65 Using the Selecting the focus method 67 shooting function Using autofocus 67 ...method to suit the movement of the subject (Autofocus mode 69 Selecting the focus area (AF area 70 Adjusting the focus manually (Manual focus 71 Using the flash 72 Selecting the flash mode 74 Performing wireless flash shooting 74 Adjusting the brightness of the image...
Instruction Manual
Page 13
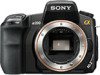
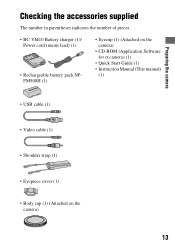
Preparing the camera Preparing the camera Checking the accessories supplied The number in parentheses indicates the number of pieces. • BC-VM10 Battery charger (1)/ Power cord (mains lead) (1) • Rechargeable battery pack NPFM500H (1) • Eyecup (1) (Attached on the camera) • CD-ROM (Application Software for α camera) (1) • Quick Start Guide (1) • Instruction Manual (This manual) (1) • USB cable (1) • Video cable (1) • Shoulder strap (1) • Eyepiece cover (1) • Body cap (1) (Attached on the camera) 13
Preparing the camera Preparing the camera Checking the accessories supplied The number in parentheses indicates the number of pieces. • BC-VM10 Battery charger (1)/ Power cord (mains lead) (1) • Rechargeable battery pack NPFM500H (1) • Eyecup (1) (Attached on the camera) • CD-ROM (Application Software for α camera) (1) • Quick Start Guide (1) • Instruction Manual (This manual) (1) • USB cable (1) • Video cable (1) • Shoulder strap (1) • Eyepiece cover (1) • Body cap (1) (Attached on the camera) 13
Instruction Manual
Page 37
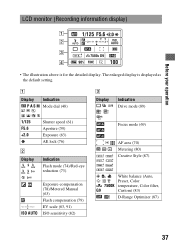
....6 +2.0 B Display Shutter speed (61) Aperture (59) Exposure (63) AE lock (76) Indication Flash mode (74)/Red-eye reduction (73) ISO AUTO Exposure-compensation (78)/Metered Manual (63) Flash compensation (79) EV scale (63, 91) ISO sensitivity (82) Focus mode (69) AF area (70) Metering (80) Creative Style (87) White balance (Auto...
....6 +2.0 B Display Shutter speed (61) Aperture (59) Exposure (63) AE lock (76) Indication Flash mode (74)/Red-eye reduction (73) ISO AUTO Exposure-compensation (78)/Metered Manual (63) Flash compensation (79) EV scale (63, 91) ISO sensitivity (82) Focus mode (69) AF area (70) Metering (80) Creative Style (87) White balance (Auto...
Instruction Manual
Page 40
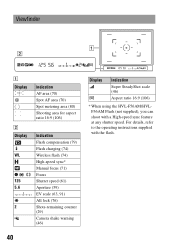
... 16:9 (106) Indication Flash compensation (79) Flash charging (74) Wireless flash (74) High-speed sync* Manual focus (71) Focus Shutter speed (61) Aperture (59) EV scale (63, 91) AE lock (76) Shots-remaining counter (29) Camera shake warning (46) 40 Display Indication Super SteadyShot scale (46) Aspect ratio 16:9 (106) * When using...
... 16:9 (106) Indication Flash compensation (79) Flash charging (74) Wireless flash (74) High-speed sync* Manual focus (71) Focus Shutter speed (61) Aperture (59) EV scale (63, 91) AE lock (76) Shots-remaining counter (29) Camera shake warning (46) 40 Display Indication Super SteadyShot scale (46) Aspect ratio 16:9 (106) * When using...
Instruction Manual
Page 41
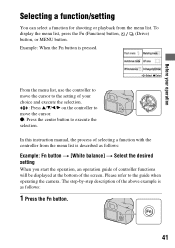
z: Press the center button to the guide when operating the camera. In this instruction manual, the process of selecting a function with the controller from the menu list. Please refer to execute the selection. Before your choice and execute the selection. : ...
z: Press the center button to the guide when operating the camera. In this instruction manual, the process of selecting a function with the controller from the menu list. Please refer to execute the selection. Before your choice and execute the selection. : ...
Instruction Manual
Page 63
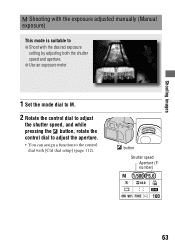
Shooting images Shooting with the exposure adjusted manually (Manual exposure) This mode is suitable to the control dial with the desired exposure setting by adjusting both the shutter speed and aperture. z Use an exposure meter. 1 Set the mode dial to M. 2 Rotate the control dial to adjust the shutter speed, and while pressing the button, rotate the control dial to adjust the aperture. • You can assign a function to z Shoot with [Ctrl dial setup] (page 112). button Shutter speed Aperture (Fnumber) 63
Shooting images Shooting with the exposure adjusted manually (Manual exposure) This mode is suitable to the control dial with the desired exposure setting by adjusting both the shutter speed and aperture. z Use an exposure meter. 1 Set the mode dial to M. 2 Rotate the control dial to adjust the shutter speed, and while pressing the button, rotate the control dial to adjust the aperture. • You can assign a function to z Shoot with [Ctrl dial setup] (page 112). button Shutter speed Aperture (Fnumber) 63

Instruction Manual
Page 64
Toward -: Images become brighter. AEL button 64 Set the ISO sensitivity as necessary. Manual shift You can change the shutter speed and aperture value combination without changing the exposure you set to select the shutter speed ...]. Toward +: Images become darker. The arrow starts flashing if the difference becomes greater. : Metered Manual LCD monitor (Detailed display) Standard value Viewfinder Standard value Notes • The (Camera shake warning) indicator is not indicated in manual exposure mode. • When the mode dial is set . • Check the exposure value on...
Toward -: Images become brighter. AEL button 64 Set the ISO sensitivity as necessary. Manual shift You can change the shutter speed and aperture value combination without changing the exposure you set to select the shutter speed ...]. Toward +: Images become darker. The arrow starts flashing if the difference becomes greater. : Metered Manual LCD monitor (Detailed display) Standard value Viewfinder Standard value Notes • The (Camera shake warning) indicator is not indicated in manual exposure mode. • When the mode dial is set . • Check the exposure value on...

Instruction Manual
Page 66
... a shutter button lock function (not supplied), you can leave the shutter open using the Remote Commander. 4 Press the shutter button halfway down to infinity in manual focus mode when shooting fireworks, etc. • If you use a Remote Commander that the shutter was open.
... a shutter button lock function (not supplied), you can leave the shutter open using the Remote Commander. 4 Press the shutter button halfway down to infinity in manual focus mode when shooting fireworks, etc. • If you use a Remote Commander that the shutter was open.
Instruction Manual
Page 67
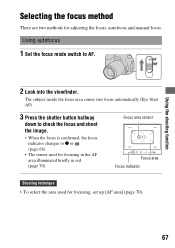
... image. • When the focus is confirmed, the focus indicator changes to z or (page 68). • The sensor used for adjusting the focus: autofocus and manual focus.
... image. • When the focus is confirmed, the focus indicator changes to z or (page 68). • The sensor used for adjusting the focus: autofocus and manual focus.
Instruction Manual
Page 68
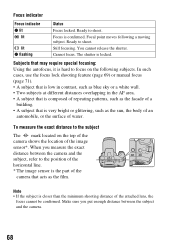
... sun, the body of an automobile, or the surface of the attached lens, the focus cannot be confirmed. When you put enough distance between the camera and the subject, refer to the position of the horizontal line. * The...subject. Ready to shoot. Still focusing. Make sure you measure the exact distance between the subject and the camera. 68 The shutter is composed of repeating patterns, such as blue sky or a white wall. •...such cases, use the focus lock shooting feature (page 69) or manual focus (page 71). • A subject that is low in contrast, such as the facade of the image sensor*....
... sun, the body of an automobile, or the surface of the attached lens, the focus cannot be confirmed. When you put enough distance between the camera and the subject, refer to the position of the horizontal line. * The...subject. Ready to shoot. Still focusing. Make sure you measure the exact distance between the subject and the camera. 68 The shutter is composed of repeating patterns, such as blue sky or a white wall. •...such cases, use the focus lock shooting feature (page 69) or manual focus (page 71). • A subject that is low in contrast, such as the facade of the image sensor*....
Instruction Manual
Page 71
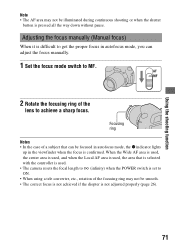
... manually (Manual focus) When it is confirmed. Focusing ring Notes • In the case of a subject that is selected with the controller is used. • The camera resets the focal length to (infinity) when the POWER switch is set to ON. • When using a tele converter, etc., rotation of the lens ..., the z indicator lights up in the viewfinder when the focus is difficult to get the proper focus in autofocus mode, you can adjust the focus manually. 1 Set the focus mode switch to achieve a sharp focus. Using the shooting function Note • The AF area may not be smooth. •...
... manually (Manual focus) When it is confirmed. Focusing ring Notes • In the case of a subject that is selected with the controller is used. • The camera resets the focal length to (infinity) when the POWER switch is set to ON. • When using a tele converter, etc., rotation of the lens ..., the z indicator lights up in the viewfinder when the focus is difficult to get the proper focus in autofocus mode, you can adjust the focus manually. 1 Set the focus mode switch to achieve a sharp focus. Using the shooting function Note • The AF area may not be smooth. •...
Instruction Manual
Page 89
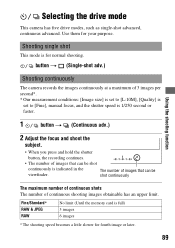
... full) 3 images 6 images * The shooting speed becomes a little slower for normal shooting. Use them for your purpose. button t (Single-shot adv.) Shooting continuously The camera records the images continuously at a maximum of 3 images per second*. * Our measurement conditions: [Image size] is set to [L:10M], ...[Quality] is set to [Fine], manual focus, and the shutter speed is indicated in the viewfinder. The number ...
... full) 3 images 6 images * The shooting speed becomes a little slower for normal shooting. Use them for your purpose. button t (Single-shot adv.) Shooting continuously The camera records the images continuously at a maximum of 3 images per second*. * Our measurement conditions: [Image size] is set to [L:10M], ...[Quality] is set to [Fine], manual focus, and the shutter speed is indicated in the viewfinder. The number ...
Instruction Manual
Page 94
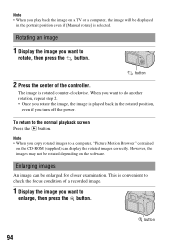
... you want to do another rotation, repeat step 2. • Once you rotate the image, the image is played back in the portrait position even if [Manual rotate] is selected. To return to check the focus condition of the controller. Rotating an image 1 Display the image you want to a computer, "Picture Motion...
... you want to do another rotation, repeat step 2. • Once you rotate the image, the image is played back in the portrait position even if [Manual rotate] is selected. To return to check the focus condition of the controller. Rotating an image 1 Display the image you want to a computer, "Picture Motion...
Instruction Manual
Page 112
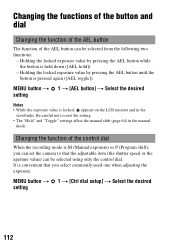
...button can be selected from the following two functions: - Holding the locked exposure value by pressing the AEL button while the button is M (Manual exposure) or P (Program shift), you select commonly-used one when adjusting the exposure. It is locked, appears on the LCD monitor and in... 1 t [Ctrl dial setup] t Select the desired setting 112 Be careful not to that you can set the camera to reset the setting. • The "Hold" and "Toggle" settings affect the manual shift (page 64) in the viewfinder. Changing the functions of the button and dial Changing the function of the...
...button can be selected from the following two functions: - Holding the locked exposure value by pressing the AEL button while the button is M (Manual exposure) or P (Program shift), you select commonly-used one when adjusting the exposure. It is locked, appears on the LCD monitor and in... 1 t [Ctrl dial setup] t Select the desired setting 112 Be careful not to that you can set the camera to reset the setting. • The "Hold" and "Toggle" settings affect the manual shift (page 64) in the viewfinder. Changing the functions of the button and dial Changing the function of the...
Instruction Manual
Page 142
However, the ™ or ® marks are , in this manual are not used in this manual. 142 • Microdrive is a registered trademark of Hitachi Global Storage Technologies in the United States and/or other countries. • Adobe is a registered trademark or a trademark of Adobe Systems Incorporated in the United States and/or other countries. • D-Range Optimizer Advanced uses technology provided by Apical Limited. • In addition, system and product names used in all cases in general, trademarks or registered trademarks of their respective developers or manufacturers.
However, the ™ or ® marks are , in this manual are not used in this manual. 142 • Microdrive is a registered trademark of Hitachi Global Storage Technologies in the United States and/or other countries. • Adobe is a registered trademark or a trademark of Adobe Systems Incorporated in the United States and/or other countries. • D-Range Optimizer Advanced uses technology provided by Apical Limited. • In addition, system and product names used in all cases in general, trademarks or registered trademarks of their respective developers or manufacturers.

Instruction Manual
Page 144
...This is not inserted. Shooting images Nothing is displayed on (page 110). The shutter does not release. • Check the free capacity of time, the camera turns to turn off if no operation is turned on. • In the default setting, the LCD monitor will turn the LCD monitor on (page... 39). Use the focus-lock or manual focus function (pages 69, 71). Attach the lens properly (page 19). • When an astronomical telescope, etc., is turned on the LCD monitor when the power is registered for...
...This is not inserted. Shooting images Nothing is displayed on (page 110). The shutter does not release. • Check the free capacity of time, the camera turns to turn off if no operation is turned on. • In the default setting, the LCD monitor will turn the LCD monitor on (page... 39). Use the focus-lock or manual focus function (pages 69, 71). Attach the lens properly (page 19). • When an astronomical telescope, etc., is turned on the LCD monitor when the power is registered for...


