
User Guide
Page 3
... company. Cleaning Unplug the set should still fail to fit, contact your protection, please read these slots and openings must never be operated only from battery power, or other ). Carefully observe all warnings, precautions and instructions on the set in a wet basement, or near water - Never place the set . Never cover...
... company. Cleaning Unplug the set should still fail to fit, contact your protection, please read these slots and openings must never be operated only from battery power, or other ). Carefully observe all warnings, precautions and instructions on the set in a wet basement, or near water - Never place the set . Never cover...

User Guide
Page 5
... energy and, if not installed and used rechargeable batteries to provide reasonable protection against harmful interference in accordance with Part 15 of Conformity Trade Name: SONY Model No.: DSLR-A100 Responsible Party: Sony Electronics Inc. However, there is for the FCC... related matters only. If this equipment does cause harmful interference to radio or television reception, which the receiver is connected. - Consult the dealer or an experienced radio/TV technician for a Class B digital...
... energy and, if not installed and used rechargeable batteries to provide reasonable protection against harmful interference in accordance with Part 15 of Conformity Trade Name: SONY Model No.: DSLR-A100 Responsible Party: Sony Electronics Inc. However, there is for the FCC... related matters only. If this equipment does cause harmful interference to radio or television reception, which the receiver is connected. - Consult the dealer or an experienced radio/TV technician for a Class B digital...
User Guide
Page 7
...; Do not shake or strike the camera. "Memory Stick": you can be repairable. • Do not look at the sun or a strong light through a removed lens or the viewfinder. This is working correctly. • Be careful not to your eyes. Notes on the battery pack • Charge the NP-FM55H... (supplied) battery pack before using the camera for a long time, use up the existing charge and remove...
...; Do not shake or strike the camera. "Memory Stick": you can be repairable. • Do not look at the sun or a strong light through a removed lens or the viewfinder. This is working correctly. • Be careful not to your eyes. Notes on the battery pack • Charge the NP-FM55H... (supplied) battery pack before using the camera for a long time, use up the existing charge and remove...
User Guide
Page 9
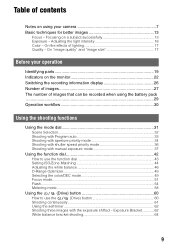
...lighting 17 Quality - Adjusting the light intensity 16 Color - On the effects of images that can be recorded when using the battery pack ...29 Operation workflow 30 Using the shooting functions Using the mode dial 31 Scene Selection 32 Shooting with Program auto 33 Shooting...with the exposure shifted - Exposure Bracket 62 White balance bracket shooting 64 9 On "image quality" and "image size 17 Before your camera 7 Basic techniques for better images 13 Focus - Table of contents Notes on using your operation Identifying parts 19 Indicators on a subject successfully 13...
...lighting 17 Quality - Adjusting the light intensity 16 Color - On the effects of images that can be recorded when using the battery pack ...29 Operation workflow 30 Using the shooting functions Using the mode dial 31 Scene Selection 32 Shooting with Program auto 33 Shooting...with the exposure shifted - Exposure Bracket 62 White balance bracket shooting 64 9 On "image quality" and "image size 17 Before your camera 7 Basic techniques for better images 13 Focus - Table of contents Notes on using your operation Identifying parts 19 Indicators on a subject successfully 13...
User Guide
Page 12
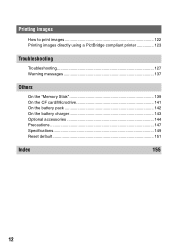
Printing images How to print images 122 Printing images directly using a PictBridge compliant printer 123 Troubleshooting Troubleshooting 127 Warning messages 137 Others On the "Memory Stick 139 On the CF card/Microdrive 141 On the battery pack 142 On the battery charger 143 Optional accessories 144 Precautions 147 Specifications 149 Reset default 151 Index 155 12
Printing images How to print images 122 Printing images directly using a PictBridge compliant printer 123 Troubleshooting Troubleshooting 127 Warning messages 137 Others On the "Memory Stick 139 On the CF card/Microdrive 141 On the battery pack 142 On the battery charger 143 Optional accessories 144 Precautions 147 Specifications 149 Reset default 151 Index 155 12

User Guide
Page 20
... be unable to firmly secure the camera to tripods having screws longer than 5.5 mm (7/32 inch). B Battery cover open lever (t step 1 in "Read This First") C Lock lever (t step 1 in "Read This First") D Battery insertion slot (t step 1 in "Read This First") E Battery cover (t step 1 in "Read... This First") A Tripod receptacle • Use a tripod with a screw length of less than 5.5 mm (7/32 inch), and may damage the camera. N For shooting: +/- (Exposure) button (37...
... be unable to firmly secure the camera to tripods having screws longer than 5.5 mm (7/32 inch). B Battery cover open lever (t step 1 in "Read This First") C Lock lever (t step 1 in "Read This First") D Battery insertion slot (t step 1 in "Read This First") E Battery cover (t step 1 in "Read... This First") A Tripod receptacle • Use a tripod with a screw length of less than 5.5 mm (7/32 inch), and may damage the camera. N For shooting: +/- (Exposure) button (37...

User Guide
Page 23
...) AF mode (53) RP Release priority (93) Drive mode (60) FINE STD RAW RAW+ Image size (83) Image quality (83) D Display Indication AE lock (67) Battery remaining (t step 1 in "Read This First") AWB +1 White balance (Auto, 5500K M1 Preset, Color temperature, CC filter, Custom) (46) 0039 Remaining number of recordable images...
...) AF mode (53) RP Release priority (93) Drive mode (60) FINE STD RAW RAW+ Image size (83) Image quality (83) D Display Indication AE lock (67) Battery remaining (t step 1 in "Read This First") AWB +1 White balance (Auto, 5500K M1 Preset, Color temperature, CC filter, Custom) (46) 0039 Remaining number of recordable images...

User Guide
Page 24
file number (112) Battery remaining (t step 1 in "Read This First") Date of images 24 Display L:10M M:5.6M S:2.5M FINE STD RAW RAW+ 35mm 1/125 -0.3 F3.5 P A S M Indication Playback image (74) ... "Read This First") Date of recording Protect (89) DPOF set (91) Folder - file number (112) Frame number/total number of recording Protect (89) LCD monitor (single-image playback) LCD monitor (Histogram display) Display L:10M M:5.6M S:2.5M FINE STD RAW RAW+ 10:30 2006.01.01 3 100-0003 [0003/0007] Indication Image...
file number (112) Battery remaining (t step 1 in "Read This First") Date of images 24 Display L:10M M:5.6M S:2.5M FINE STD RAW RAW+ 35mm 1/125 -0.3 F3.5 P A S M Indication Playback image (74) ... "Read This First") Date of recording Protect (89) DPOF set (91) Folder - file number (112) Frame number/total number of recording Protect (89) LCD monitor (single-image playback) LCD monitor (Histogram display) Display L:10M M:5.6M S:2.5M FINE STD RAW RAW+ 10:30 2006.01.01 3 100-0003 [0003/0007] Indication Image...

User Guide
Page 26
... mode, see page 72. 26 Press the (Display) button to minimize battery consumption. When you rotate the camera to a vertical position, the display automatically rotates to adjust to the camera position. Horizontal position Detailed display Enlarged display No display (Display) button Vertical... display No display (Display) button • The instructions in this operating instructions are based on the back of the camera displays various recording information. Switching the recording information display When recording, the LCD monitor on the detailed display in the horizontal...
... mode, see page 72. 26 Press the (Display) button to minimize battery consumption. When you rotate the camera to a vertical position, the display automatically rotates to adjust to the camera position. Horizontal position Detailed display Enlarged display No display (Display) button Vertical... display No display (Display) button • The instructions in this operating instructions are based on the back of the camera displays various recording information. Switching the recording information display When recording, the LCD monitor on the detailed display in the horizontal...

User Guide
Page 29
...once every ten times. • The measurement method is based on the CIPA standard. (CIPA: Camera & Imaging Products Association) • The number of shooting images does not change, regardless of image size. • The battery capacity decreases as the number of uses increases and also over time (page 142). • ... indicated depending on and off many times. - [AF mode] is set to [Automatic AF]. - The power turns on the conditions of use the camera with the battery pack (supplied) at full capacity and at an ambient temperature of 25°C (77°F). Recording medium No.
...once every ten times. • The measurement method is based on the CIPA standard. (CIPA: Camera & Imaging Products Association) • The number of shooting images does not change, regardless of image size. • The battery capacity decreases as the number of uses increases and also over time (page 142). • ... indicated depending on and off many times. - [AF mode] is set to [Automatic AF]. - The power turns on the conditions of use the camera with the battery pack (supplied) at full capacity and at an ambient temperature of 25°C (77°F). Recording medium No.
User Guide
Page 30
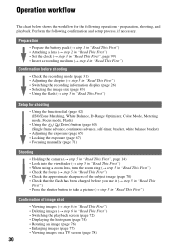
preparation, shooting, and playback. Preparation • Prepare the battery pack (t step 1 in "Read This First") • Attaching a lens (t step 2 in "Read This First") • Set ... Color Mode, Metering mode, Focus mode, Flash) • Using the (Drive) button (page 60) (Single frame advance, continuous advance, self-timer, bracket, white balance bracket) • Adjusting the exposure (page 65)...exposure (page 67) • Focusing manually (page 71) Shooting • Holding the camera (t step 5 in "Read This First", page 14) • Look into the viewfinder (t step 5 in "...
preparation, shooting, and playback. Preparation • Prepare the battery pack (t step 1 in "Read This First") • Attaching a lens (t step 2 in "Read This First") • Set ... Color Mode, Metering mode, Focus mode, Flash) • Using the (Drive) button (page 60) (Single frame advance, continuous advance, self-timer, bracket, white balance bracket) • Adjusting the exposure (page 65)...exposure (page 67) • Focusing manually (page 71) Shooting • Holding the camera (t step 5 in "Read This First", page 14) • Look into the viewfinder (t step 5 in "...

User Guide
Page 40
..., connecting the Remote Commander (not supplied) is recommended (page 144). 40 You can shoot in bulb exposure mode up to the camera when using a fully charged battery pack. • After shooting, the noise reduction will be done for the duration of the shooting. • You can shoot trails of time that the...
..., connecting the Remote Commander (not supplied) is recommended (page 144). 40 You can shoot in bulb exposure mode up to the camera when using a fully charged battery pack. • After shooting, the noise reduction will be done for the duration of the shooting. • You can shoot trails of time that the...

User Guide
Page 85
... cannot take the next picture until the process is being performed, the message "Processing..." On Automatically adjusts the focus. • This mode uses up the battery charge faster than [Off]. appears on the operation 1 page 80 Noise reductn Long exposure makes noise conspicuous. This is common in long exposures. Off Does...
... cannot take the next picture until the process is being performed, the message "Processing..." On Automatically adjusts the focus. • This mode uses up the battery charge faster than [Off]. appears on the operation 1 page 80 Noise reductn Long exposure makes noise conspicuous. This is common in long exposures. Off Does...

User Guide
Page 103
...be completed quickly. 1 Confirm that acts as "Delete this default option so that [Yes] is . Low battery power during cleaning can set this image?", appears. The message "After cleaning the CCD, turn camera off. "No" [No] is selected by default. • This setting applies to the shutter. Normally...page 80 Delete conf. Setup menu For details on the CCD (the part that the battery is fully charged. • The use of an AC Adaptor/charger (not supplied) is lifted. 4 Detach the lens. 5 Use the blower brush to prevent the dust from resettling in front is recommended. ...
...be completed quickly. 1 Confirm that acts as "Delete this default option so that [Yes] is . Low battery power during cleaning can set this image?", appears. The message "After cleaning the CCD, turn camera off. "No" [No] is selected by default. • This setting applies to the shutter. Normally...page 80 Delete conf. Setup menu For details on the CCD (the part that the battery is fully charged. • The use of an AC Adaptor/charger (not supplied) is lifted. 4 Detach the lens. 5 Use the blower brush to prevent the dust from resettling in front is recommended. ...

User Guide
Page 104
... default You can reset the main functions of a blower brush into the cavity beyond the lens mount. Stop the cleaning immediately and set the POWER switch to OFF. • The camera starts beeping if the battery pack becomes low during cleaning. You do not put the blower brush close to the CCD.... 6 Attach the lens and set the POWER switch to be reset, see "Reset default" (page 151)....
... default You can reset the main functions of a blower brush into the cavity beyond the lens mount. Stop the cleaning immediately and set the POWER switch to OFF. • The camera starts beeping if the battery pack becomes low during cleaning. You do not put the blower brush close to the CCD.... 6 Attach the lens and set the POWER switch to be reset, see "Reset default" (page 151)....

User Guide
Page 107
... Windows computer as follows. Stage 1: Preparing the camera and the computer 1 Insert a recording medium with the recording medium inserted to a computer using insufficient battery pack, copying may fail or image data may become corrupted if the battery pack shut down too soon. 3 Turn on .... Using your computer using the USB connection Follow Stages 1 through 4 on the camera and the computer. For connecting the camera with recorded images into the camera. 2 Insert the sufficiently charged battery pack in the computer and copy the images. For directly inserting the recording medium ...
... Windows computer as follows. Stage 1: Preparing the camera and the computer 1 Insert a recording medium with the recording medium inserted to a computer using insufficient battery pack, copying may fail or image data may become corrupted if the battery pack shut down too soon. 3 Turn on .... Using your computer using the USB connection Follow Stages 1 through 4 on the camera and the computer. For connecting the camera with recorded images into the camera. 2 Insert the sufficiently charged battery pack in the computer and copy the images. For directly inserting the recording medium ...

User Guide
Page 127
...). • The battery terminal is dirty. The battery remaining indicator is incorrect, or sufficient battery remaining indicator is displayed but the power runs out too quickly. • This phenomenon occurs when you use the tip of time, the camera turns to 136. Clean the battery terminal with your Sony dealer or local authorized Sony service facility. Replace...
...). • The battery terminal is dirty. The battery remaining indicator is incorrect, or sufficient battery remaining indicator is displayed but the power runs out too quickly. • This phenomenon occurs when you use the tip of time, the camera turns to 136. Clean the battery terminal with your Sony dealer or local authorized Sony service facility. Replace...

User Guide
Page 128
... not clear in the viewfinder. • Adjust the diopter scale properly using the diopter-adjustment dial (t step 5 in the camera. Attach the lens properly (t step 2 in "Read This First"). - Shooting images Nothing is displayed on the LCD monitor when the power is turned on. • In the ..., the LCD monitor will turn off if no operation is registered for more than one of the following: - Press the (Display) button to minimize the battery consumption. If it is full, do one second, such as a bulb exposure, is using the "Memory Stick Duo" with "----" flashing at the upper-right...
... not clear in the viewfinder. • Adjust the diopter scale properly using the diopter-adjustment dial (t step 5 in the camera. Attach the lens properly (t step 2 in "Read This First"). - Shooting images Nothing is displayed on the LCD monitor when the power is turned on. • In the ..., the LCD monitor will turn off if no operation is registered for more than one of the following: - Press the (Display) button to minimize the battery consumption. If it is full, do one second, such as a bulb exposure, is using the "Memory Stick Duo" with "----" flashing at the upper-right...
User Guide
Page 132
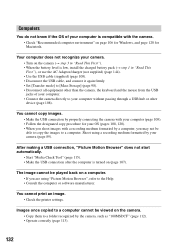
...is compatible with the camera. • Check "Recommended computer environment" on (page 107). Your computer does not recognize your camera. • Turn on a computer. • If you may not be played back on the camera (t step 3 in "Read This First"). • When the battery level is low, ...install the charged battery pack (t step 1 in "Read This First"), or ...
...is compatible with the camera. • Check "Recommended computer environment" on (page 107). Your computer does not recognize your camera. • Turn on a computer. • If you may not be played back on the camera (t step 3 in "Read This First"). • When the battery level is low, ...install the charged battery pack (t step 1 in "Read This First"), or ...

User Guide
Page 136
... supplied) is set the date again (t step 3 in The lens gets fogged. • Moisture condensation has occurred. The five bars of the Super SteadyShot scale flash. • The Super SteadyShot function does not work. Turn off the camera and leave it to ON. The message "Set date and time... with a JPEG image (page 83). If the Super SteadyShot scale continues to flash, consult your Sony dealer or local authorized Sony service facility. Others Your camera does not work. • Use the type of battery pack you can continue to OFF and the access lamp is not illuminated (t step 1 in "...
... supplied) is set the date again (t step 3 in The lens gets fogged. • Moisture condensation has occurred. The five bars of the Super SteadyShot scale flash. • The Super SteadyShot function does not work. Turn off the camera and leave it to ON. The message "Set date and time... with a JPEG image (page 83). If the Super SteadyShot scale continues to flash, consult your Sony dealer or local authorized Sony service facility. Others Your camera does not work. • Use the type of battery pack you can continue to OFF and the access lamp is not illuminated (t step 1 in "...


