
Instruction Manual
Page 1
http://rd1.sony.net/help/dsc/1515/h_zz/ DSC-HX90V/DSC-HX90/DSC-WX500 4-572-610-11(1) Digital Still Camera Instruction Manual "Help Guide" (Web manual) Refer to "Help Guide" for in-depth instructions on the many functions of the camera.
http://rd1.sony.net/help/dsc/1515/h_zz/ DSC-HX90V/DSC-HX90/DSC-WX500 4-572-610-11(1) Digital Still Camera Instruction Manual "Help Guide" (Web manual) Refer to "Help Guide" for in-depth instructions on the many functions of the camera.
Instruction Manual
Page 2
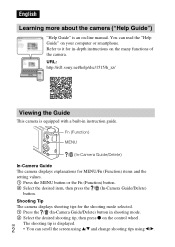
... in-depth instructions on the control wheel. URL: http://rd1.sony.net/help/dsc/1515/h_zz/ Viewing the Guide This camera is equipped with a built-in shooting mode. 2 Select the desired shooting tip, then press z on the many functions of the camera. Shooting Tip The camera displays shooting tips for the shooting mode selected. 1 Press...
... in-depth instructions on the control wheel. URL: http://rd1.sony.net/help/dsc/1515/h_zz/ Viewing the Guide This camera is equipped with a built-in shooting mode. 2 Select the desired shooting tip, then press z on the many functions of the camera. Shooting Tip The camera displays shooting tips for the shooting mode selected. 1 Press...

Instruction Manual
Page 8
...Help Guide" (page 2). About language setting Change the screen language before using the camera if necessary (page 20). Checking the supplied items The number in parentheses indicates the number of the DSC-HX90V unless noted otherwise. On Illustrations Illustrations used in the USA and Canada) ...(1) • Wrist Strap (1) • Instruction Manual (this manual are of pieces. • Camera (1) • Rechargeable Battery Pack NP-BX1 (1) ...
...Help Guide" (page 2). About language setting Change the screen language before using the camera if necessary (page 20). Checking the supplied items The number in parentheses indicates the number of the DSC-HX90V unless noted otherwise. On Illustrations Illustrations used in the USA and Canada) ...(1) • Wrist Strap (1) • Instruction Manual (this manual are of pieces. • Camera (1) • Rechargeable Battery Pack NP-BX1 (1) ...
Instruction Manual
Page 9
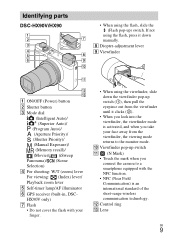
L Control ring M Lens GB 9 Identifying parts DSC-HX90V/HX90 • When using the flash, press it clicks (2). • When you look into the viewfinder, the viewfinder mode is activated, and when you connect the camera to the monitor mode. J Viewfinder pop-up switch K (N Mark) • Touch the mark when you take your finger...
L Control ring M Lens GB 9 Identifying parts DSC-HX90V/HX90 • When using the flash, press it clicks (2). • When you look into the viewfinder, the viewfinder mode is activated, and when you connect the camera to the monitor mode. J Viewfinder pop-up switch K (N Mark) • Touch the mark when you take your finger...

Instruction Manual
Page 10
D Access lamp E Memory card slot F HDMI micro jack G Battery/Memory card cover H Speaker Otherwise, you cannot firmly secure the camera, and damage to Smartphone) button F MOVIE (Movie) button G MENU button H Charge lamp I Multi/Micro USB Terminal • Supports Micro USB... 5.5 mm (7/32 inches) long. D Eye sensor E For shooting: Fn (Function) button For viewing: (Send to the camera may occur. K Hook for strap L Control wheel M (Playback) button N / (In-Camera Guide/Delete) button A Microphone B (Flash pop-up) switch C Monitor • You can adjust the monitor to an easily...
D Access lamp E Memory card slot F HDMI micro jack G Battery/Memory card cover H Speaker Otherwise, you cannot firmly secure the camera, and damage to Smartphone) button F MOVIE (Movie) button G MENU button H Charge lamp I Multi/Micro USB Terminal • Supports Micro USB... 5.5 mm (7/32 inches) long. D Eye sensor E For shooting: Fn (Function) button For viewing: (Send to the camera may occur. K Hook for strap L Control wheel M (Playback) button N / (In-Camera Guide/Delete) button A Microphone B (Flash pop-up) switch C Monitor • You can adjust the monitor to an easily...
Instruction Manual
Page 11
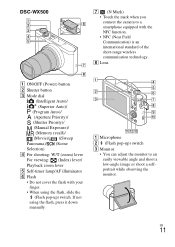
... flash with the NFC function. • NFC (Near Field Communication) is an international standard of the short-range wireless communication technology. DSC-WX500 G (N Mark) • Touch the mark when you connect the camera to an easily viewable angle and shoot a low-angle image or shoot a selfportrait while observing the monitor. A Microphone B (Flash pop...
... flash with the NFC function. • NFC (Near Field Communication) is an international standard of the short-range wireless communication technology. DSC-WX500 G (N Mark) • Touch the mark when you connect the camera to an easily viewable angle and shoot a low-angle image or shoot a selfportrait while observing the monitor. A Microphone B (Flash pop...

Instruction Manual
Page 12
I Wi-Fi antenna (built-in) J Hook for strap K Control wheel L (Playback) button M / (In-Camera Guide/Delete) button A Battery lock lever B Battery insertion slot C Tripod socket hole • Use a tripod with a screw less than 5.5 mm (7/32 inches) long. D Access...F HDMI micro jack G Battery/Memory card cover H Speaker GB 12 D For shooting: Fn (Function) button For viewing: (Send to the camera may occur. Otherwise, you cannot firmly secure the camera, and damage to Smartphone) button E MOVIE (Movie) button F MENU button G Charge lamp H Multi/Micro USB Terminal • Supports Micro USB...
I Wi-Fi antenna (built-in) J Hook for strap K Control wheel L (Playback) button M / (In-Camera Guide/Delete) button A Battery lock lever B Battery insertion slot C Tripod socket hole • Use a tripod with a screw less than 5.5 mm (7/32 inches) long. D Access...F HDMI micro jack G Battery/Memory card cover H Speaker GB 12 D For shooting: Fn (Function) button For viewing: (Send to the camera may occur. Otherwise, you cannot firmly secure the camera, and damage to Smartphone) button E MOVIE (Movie) button F MENU button G Charge lamp H Multi/Micro USB Terminal • Supports Micro USB...

Instruction Manual
Page 13
GB 13 Make sure that the battery lock lever locks after insertion. • Closing the cover with the battery inserted incorrectly may damage the camera. Inserting the battery pack Battery lock lever 1 Open the cover. 2 Insert the battery pack. • While pressing the battery lock lever, insert the battery pack as illustrated.
GB 13 Make sure that the battery lock lever locks after insertion. • Closing the cover with the battery inserted incorrectly may damage the camera. Inserting the battery pack Battery lock lever 1 Open the cover. 2 Insert the battery pack. • While pressing the battery lock lever, insert the battery pack as illustrated.
Instruction Manual
Page 14
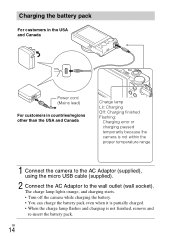
... battery pack even when it is partially charged. • When the charge lamp flashes and charging is not within the proper temperature range 1 Connect the camera to the AC Adaptor (supplied), using the micro USB cable (supplied). 2 Connect the AC Adaptor to the wall outlet (wall socket). Charging the battery pack... in countries/regions other than the USA and Canada Charge lamp Lit: Charging Off: Charging finished Flashing: Charging error or charging paused temporarily because the camera is not finished, remove and re-insert the battery pack.
... battery pack even when it is partially charged. • When the charge lamp flashes and charging is not within the proper temperature range 1 Connect the camera to the AC Adaptor (supplied), using the micro USB cable (supplied). 2 Connect the AC Adaptor to the wall outlet (wall socket). Charging the battery pack... in countries/regions other than the USA and Canada Charge lamp Lit: Charging Off: Charging finished Flashing: Charging error or charging paused temporarily because the camera is not finished, remove and re-insert the battery pack.

Instruction Manual
Page 15
...to 30°C (50ºF to 86ºF). • The battery pack may not be effectively charged if the terminal section of use only genuine Sony brand battery packs, micro USB cable (supplied) and AC Adaptor (supplied). • The AC Adaptor AC-UD11 (sold separately) may take longer depending on... the camera flashes when the AC Adaptor is connected to clean the terminal section of 25°C (77°F). Notes • If the charge lamp on conditions ...
...to 30°C (50ºF to 86ºF). • The battery pack may not be effectively charged if the terminal section of use only genuine Sony brand battery packs, micro USB cable (supplied) and AC Adaptor (supplied). • The AC Adaptor AC-UD11 (sold separately) may take longer depending on... the camera flashes when the AC Adaptor is connected to clean the terminal section of 25°C (77°F). Notes • If the charge lamp on conditions ...
Instruction Manual
Page 16
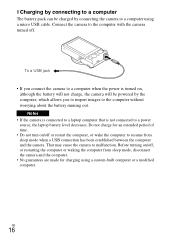
... connected to a laptop computer that is turned on, although the battery will not charge, the camera will be charged by the computer, which allows you connect the camera to a computer when the power is not connected to a power source, the laptop battery level decreases. Before turning on /off or restart the computer... the computer without worrying about the battery running out. To a USB jack • If you to import images to resume from sleep mode, disconnect the camera and the computer. • No guarantees are made for charging using a micro USB cable. That may cause the...
... connected to a laptop computer that is turned on, although the battery will not charge, the camera will be charged by the computer, which allows you connect the camera to a computer when the power is not connected to a power source, the laptop battery level decreases. Before turning on /off or restart the computer... the computer without worrying about the battery running out. To a USB jack • If you to import images to resume from sleep mode, disconnect the camera and the computer. • No guarantees are made for charging using a micro USB cable. That may cause the...
Instruction Manual
Page 17
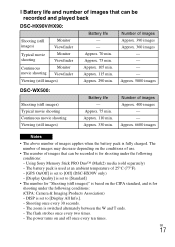
...shooting under the following conditions: - Viewing (still images) Approx. 290 min. shooting Viewfinder Approx. 75 min. - Using Sony Memory Stick PRO Duo™ (Mark2) media (sold separately) - The flash strobes once every two times. - x ...Camera & Imaging Products Association) - Approx. 75 min. Number of images applies when the battery pack is fully charged. The number of images may decrease depending on and off once every ten times. GB 17 DISP is switched alternately between the W and T ends. - Shooting once every 30 seconds. - Approx. 5800 images DSC-WX500...
...shooting under the following conditions: - Viewing (still images) Approx. 290 min. shooting Viewfinder Approx. 75 min. - Using Sony Memory Stick PRO Duo™ (Mark2) media (sold separately) - The flash strobes once every two times. - x ...Camera & Imaging Products Association) - Approx. 75 min. Number of images applies when the battery pack is fully charged. The number of images may decrease depending on and off once every ten times. GB 17 DISP is switched alternately between the W and T ends. - Shooting once every 30 seconds. - Approx. 5800 images DSC-WX500...

Instruction Manual
Page 18
...runs out. Typical movie shooting: Battery life based on repeatedly starting/stopping shooting, zooming, turning on the CIPA standard, and are not operated. The camera turns off , etc. - Continuous movie shooting: Battery life based on non-stop shooting until it clicks into place. 3 Close the cover. GB ... to supply power when shooting or playing back images without using power from the battery while the supplied AC adaptor is connected to the camera. x Supplying power You can shoot and play back images using up the battery life. Other functions, such as illustrated, insert the ...
...runs out. Typical movie shooting: Battery life based on repeatedly starting/stopping shooting, zooming, turning on the CIPA standard, and are not operated. The camera turns off , etc. - Continuous movie shooting: Battery life based on non-stop shooting until it clicks into place. 3 Close the cover. GB ... to supply power when shooting or playing back images without using power from the battery while the supplied AC adaptor is connected to the camera. x Supplying power You can shoot and play back images using up the battery life. Other functions, such as illustrated, insert the ...

Instruction Manual
Page 19
.... Capacity of the products. • When using Memory Stick Micro media or microSD memory cards with this camera, make sure to use with the desired capacity. For memory cards produced by manufacturers other than Sony, consult the manufacturers of 64 GB or more - This may cause damage to eject the memory card...
.... Capacity of the products. • When using Memory Stick Micro media or microSD memory cards with this camera, make sure to use with the desired capacity. For memory cards produced by manufacturers other than Sony, consult the manufacturers of 64 GB or more - This may cause damage to eject the memory card...
Instruction Manual
Page 20
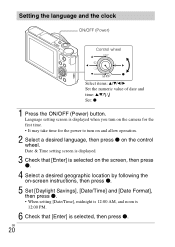
...; When setting [Date/Time], midnight is 12:00 AM, and noon is 12:00 PM. 6 Check that [Enter] is displayed when you turn on the camera for the first time. • It may take time for the power to turn on and allow operation. 2 Select a desired language, then press z on the...
...; When setting [Date/Time], midnight is 12:00 AM, and noon is 12:00 PM. 6 Check that [Enter] is displayed when you turn on the camera for the first time. • It may take time for the power to turn on and allow operation. 2 Select a desired language, then press z on the...

Instruction Manual
Page 21
When movie recording is in MOVIE Shooting still images 1 Press the shutter button halfway down to shoot an image. Sound from the camera tends to be recorded. Recording may stop to stop recording. Notes • When using the zoom function while shooting a movie, the ... shooting, the recorded image may be less than 360 degrees. • Continuous movie shooting is possible for approximately 29 minutes at one time with the camera's default settings and when the ambient temperature is shot. Shooting movies 1 Press the MOVIE (Movie) button to start recording. • Use the W/T...
When movie recording is in MOVIE Shooting still images 1 Press the shutter button halfway down to shoot an image. Sound from the camera tends to be recorded. Recording may stop to stop recording. Notes • When using the zoom function while shooting a movie, the ... shooting, the recorded image may be less than 360 degrees. • Continuous movie shooting is possible for approximately 29 minutes at one time with the camera's default settings and when the ambient temperature is shot. Shooting movies 1 Press the MOVIE (Movie) button to start recording. • Use the W/T...

Instruction Manual
Page 22
x Deleting an image 1 Press the / (In-Camera Guide/Delete) button. 2 Select [Delete] with v on the control wheel or by turning the control wheel. x Selecting next/previous image Select an image by pressing B (...next)/b (previous) on the control wheel, then press z. x Returning to view movies. GB 22 Press z in Control wheel (Playback) / (In-Camera Guide/Delete) Select images: B (next)/b (previous) or turn the control Set: z wheel 1 Press the (Playback) button. Viewing images W: zoom out T: zoom in the center of...
x Deleting an image 1 Press the / (In-Camera Guide/Delete) button. 2 Select [Delete] with v on the control wheel or by turning the control wheel. x Selecting next/previous image Select an image by pressing B (...next)/b (previous) on the control wheel, then press z. x Returning to view movies. GB 22 Press z in Control wheel (Playback) / (In-Camera Guide/Delete) Select images: B (next)/b (previous) or turn the control Set: z wheel 1 Press the (Playback) button. Viewing images W: zoom out T: zoom in the center of...

Instruction Manual
Page 23
... button Allows you to select a flash mode for still images. x Control ring (DSC-HX90V/HX90 only) Your favorite functions can be assigned to the control ring. Introduction of other functions Control ring (DSC-HX90V/HX90 only) MENU Fn (Function) Control wheel x Control wheel DISP (Display ...shooting, continuous shooting or bracket shooting. / (Exposure Comp./Photo Creativity): Allows you to adjust image brightness./Allows you to operate the camera intuitively and shoot creative images easily. (Flash Mode): Allows you to register 12 functions and recall those functions when shooting. 1 Press...
... button Allows you to select a flash mode for still images. x Control ring (DSC-HX90V/HX90 only) Your favorite functions can be assigned to the control ring. Introduction of other functions Control ring (DSC-HX90V/HX90 only) MENU Fn (Function) Control wheel x Control wheel DISP (Display ...shooting, continuous shooting or bracket shooting. / (Exposure Comp./Photo Creativity): Allows you to adjust image brightness./Allows you to operate the camera intuitively and shoot creative images easily. (Flash Mode): Allows you to register 12 functions and recall those functions when shooting. 1 Press...
Instruction Manual
Page 24
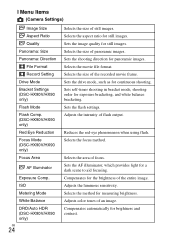
...as for measuring brightness. Selects the method for continuous shooting. Adjusts color tones of panoramic images. ISO Metering Mode White Balance DRO/Auto HDR (DSC-HX90V/HX90 only) GB 24 Selects the size of flash output. Selects the aspect ratio for a dark scene to aid focusing. Adjusts the... flash settings. Compensates for brightness and contrast. Sets the shooting direction for panoramic images. Selects the movie file format. x Menu Items (Camera Settings) Image Size Aspect Ratio Quality Panorama: Size Panorama: Direction File Format Record Setting Drive Mode Bracket Settings...
...as for measuring brightness. Selects the method for continuous shooting. Adjusts color tones of panoramic images. ISO Metering Mode White Balance DRO/Auto HDR (DSC-HX90V/HX90 only) GB 24 Selects the size of flash output. Selects the aspect ratio for a dark scene to aid focusing. Adjusts the... flash settings. Compensates for brightness and contrast. Sets the shooting direction for panoramic images. Selects the movie file format. x Menu Items (Camera Settings) Image Size Aspect Ratio Quality Panorama: Size Panorama: Direction File Format Record Setting Drive Mode Bracket Settings...
Instruction Manual
Page 26
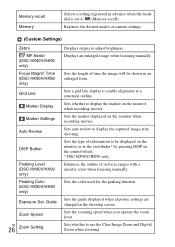
...with a specific color when focusing manually. Sets the zooming speed when you operate the zoom lever. Registers the desired modes or camera settings. (Custom Settings) Zebra MF Assist (DSC-HX90V/HX90 only) Focus Magnif. Sets the length of time the image will be displayed on the monitor or in the ...viewfinder* by pressing DISP on the control wheel. * DSC-HX90V/HX90 only Enhances the outline of information to a structural outline. Sets the color used for the peaking function. Sets the guide displayed when ...
...with a specific color when focusing manually. Sets the zooming speed when you operate the zoom lever. Registers the desired modes or camera settings. (Custom Settings) Zebra MF Assist (DSC-HX90V/HX90 only) Focus Magnif. Sets the length of time the image will be displayed on the monitor or in the ...viewfinder* by pressing DISP on the control wheel. * DSC-HX90V/HX90 only Enhances the outline of information to a structural outline. Sets the color used for the peaking function. Sets the guide displayed when ...


