
Limited Warranty (U.S. Only)
Page 1
... gives you specific legal rights and you . Some states do not allow limitations on your responsibility to www.sonv.com/su000rt. SONY® Digital Camera LIMITED WARRANTY (US Only) Sony Electronics Inc. ("Sony") warrants this product against defects in any enclosed software Limited Warranty. This Limited Warranty covers only the hardware components packaged with...
... gives you specific legal rights and you . Some states do not allow limitations on your responsibility to www.sonv.com/su000rt. SONY® Digital Camera LIMITED WARRANTY (US Only) Sony Electronics Inc. ("Sony") warrants this product against defects in any enclosed software Limited Warranty. This Limited Warranty covers only the hardware components packaged with...
Instruction Manual
Page 2
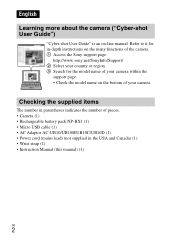
...User Guide") "Cyber-shot User Guide" is an on the many functions of the camera. 1 Access the Sony support page. http://www.sony.net/SonyInfo/Support/ 2 Select your camera. Refer to it for the model name of your camera within the support page. • Check the model name on the bottom of ...pieces. • Camera (1) • Rechargeable battery pack NP-BX1 (1) • Micro USB cable (1) • AC Adaptor ...
...User Guide") "Cyber-shot User Guide" is an on the many functions of the camera. 1 Access the Sony support page. http://www.sony.net/SonyInfo/Support/ 2 Select your camera. Refer to it for the model name of your camera within the support page. • Check the model name on the bottom of ...pieces. • Camera (1) • Rechargeable battery pack NP-BX1 (1) • Micro USB cable (1) • AC Adaptor ...

Instruction Manual
Page 4
...that are recyclable. • Be sure to charge the battery pack using a genuine Sony battery charger or a device that can help preserve our environment by Sony. • Dispose of specific absorption ratio (SAR). The power cord (mains lead...), if supplied, is subject to the collection and recycling location nearest you. Disconnect the AC Adaptor from the wall outlet (wall socket) immediately if any interference received, including interference that may not cause harmful interference, and (2) this camera...
...that are recyclable. • Be sure to charge the battery pack using a genuine Sony battery charger or a device that can help preserve our environment by Sony. • Dispose of specific absorption ratio (SAR). The power cord (mains lead...), if supplied, is subject to the collection and recycling location nearest you. Disconnect the AC Adaptor from the wall outlet (wall socket) immediately if any interference received, including interference that may not cause harmful interference, and (2) this camera...
Instruction Manual
Page 6
... related to product compliance based on behalf of the Directive 1999/5/EC. GB 6 For any interference, including interference that this DSC-WX300 Digital Still Camera is subject to the following URL: http://www.compliance.sony.de/ [ Notice for using connection cables shorter than 3 meters (9.8 feet). [ Attention The electromagnetic fields at the specific frequencies may...
... related to product compliance based on behalf of the Directive 1999/5/EC. GB 6 For any interference, including interference that this DSC-WX300 Digital Still Camera is subject to the following URL: http://www.compliance.sony.de/ [ Notice for using connection cables shorter than 3 meters (9.8 feet). [ Attention The electromagnetic fields at the specific frequencies may...

Instruction Manual
Page 9
Otherwise, you cannot firmly secure the camera, and damage to the camera may occur. GB 9 Identifying parts A Shutter button B Mode dial (Intelligent Auto)/ (Superior Auto)/ (Program Auto)/ (iSweep Panorama)/ (Movie Mode)/ (3D Still Image)/ ... (Playback) button L MOVIE (Movie) button M Multi/Micro USB Terminal* N Hook for wrist strap O Wi-Fi receiver (built-in) P Control wheel Q MENU button R / (In-Camera Guide/Delete) button S Speaker T Tripod receptacle • Use a tripod with a screw less than 5.5 mm (7/32 inches) long. U HDMI micro jack V Memory card slot W Access lamp...
Otherwise, you cannot firmly secure the camera, and damage to the camera may occur. GB 9 Identifying parts A Shutter button B Mode dial (Intelligent Auto)/ (Superior Auto)/ (Program Auto)/ (iSweep Panorama)/ (Movie Mode)/ (3D Still Image)/ ... (Playback) button L MOVIE (Movie) button M Multi/Micro USB Terminal* N Hook for wrist strap O Wi-Fi receiver (built-in) P Control wheel Q MENU button R / (In-Camera Guide/Delete) button S Speaker T Tripod receptacle • Use a tripod with a screw less than 5.5 mm (7/32 inches) long. U HDMI micro jack V Memory card slot W Access lamp...
Instruction Manual
Page 10
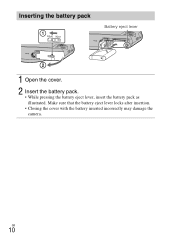
GB 10 Make sure that the battery eject lever locks after insertion. • Closing the cover with the battery inserted incorrectly may damage the camera. Inserting the battery pack Battery eject lever 1 Open the cover. 2 Insert the battery pack. • While pressing the battery eject lever, insert the battery pack as illustrated.
GB 10 Make sure that the battery eject lever locks after insertion. • Closing the cover with the battery inserted incorrectly may damage the camera. Inserting the battery pack Battery eject lever 1 Open the cover. 2 Insert the battery pack. • While pressing the battery eject lever, insert the battery pack as illustrated.

Instruction Manual
Page 11
...in countries/regions other than the USA and Canada Charge lamp Lit: Charging Off: Charging finished Flashing: Charging error or charging paused temporarily because the camera is not finished, remove and re-insert the battery pack. The Charge lamp lights orange, and charging starts. • Turn off the... camera while charging the battery. • You can charge the battery pack even when it is partially charged. • When the Charge lamp flashes and ...
...in countries/regions other than the USA and Canada Charge lamp Lit: Charging Off: Charging finished Flashing: Charging error or charging paused temporarily because the camera is not finished, remove and re-insert the battery pack. The Charge lamp lights orange, and charging starts. • Turn off the... camera while charging the battery. • You can charge the battery pack even when it is partially charged. • When the Charge lamp flashes and ...

Instruction Manual
Page 12
... Charging time (Full charge) The charging time is outside the recommended range. Notes • If the Charge lamp on conditions of use only genuine Sony brand battery packs, micro USB cable (supplied) and AC Adaptor (supplied). We recommend charging the battery pack in an ambient temperature of between 10°...;C to 30°C (50ºF to 86ºF). • The battery pack may take longer depending on the camera flashes when the AC Adaptor is connected to the wall outlet (wall socket), this case, wipe any dust off lightly using a soft cloth or a...
... Charging time (Full charge) The charging time is outside the recommended range. Notes • If the Charge lamp on conditions of use only genuine Sony brand battery packs, micro USB cable (supplied) and AC Adaptor (supplied). We recommend charging the battery pack in an ambient temperature of between 10°...;C to 30°C (50ºF to 86ºF). • The battery pack may take longer depending on the camera flashes when the AC Adaptor is connected to the wall outlet (wall socket), this case, wipe any dust off lightly using a soft cloth or a...

Instruction Manual
Page 13
No guarantees are made for charging using a micro USB cable. Approx. 80 min. The battery pack is fully charged. Using Sony "Memory Stick PRO Duo" (Mark2) media (sold separately) GB - GB To a USB jack Notes • Note the following conditions: - Do not ...the laptop battery level decreases. x Charging by connecting to a computer The battery pack can be charged by connecting the camera to a computer using a custom-built computer or a modified computer. The camera may decrease depending on the conditions of use. • The number of 25°C (77°F). 13 Approx. ...
No guarantees are made for charging using a micro USB cable. Approx. 80 min. The battery pack is fully charged. Using Sony "Memory Stick PRO Duo" (Mark2) media (sold separately) GB - GB To a USB jack Notes • Note the following conditions: - Do not ...the laptop battery level decreases. x Charging by connecting to a computer The battery pack can be charged by connecting the camera to a computer using a custom-built computer or a modified computer. The camera may decrease depending on the conditions of use. • The number of 25°C (77°F). 13 Approx. ...

Instruction Manual
Page 14
...using the supplied AC Adaptor. • If you can import images to a computer without worrying about draining the battery pack by connecting the camera to a power outlet using the micro USB cable (supplied). GB 14 - [Disp. Press (Playback) button to switch to [ON]....the following conditions: - Resolution]: [Standard] • The number for "Shooting (still images)" is for shooting under the following conditions: (CIPA: Camera & Imaging Products Association) - The flash strobes once every two times. - Shooting once every 30 seconds. - The zoom is not inserted in ...
...using the supplied AC Adaptor. • If you can import images to a computer without worrying about draining the battery pack by connecting the camera to a power outlet using the micro USB cable (supplied). GB 14 - [Disp. Press (Playback) button to switch to [ON]....the following conditions: - Resolution]: [Standard] • The number for "Shooting (still images)" is for shooting under the following conditions: (CIPA: Camera & Imaging Products Association) - The flash strobes once every two times. - Shooting once every 30 seconds. - The zoom is not inserted in ...

Instruction Manual
Page 16
Notes • To use a "Memory Stick Micro" media or microSD memory card with the camera, be sure to drop the battery pack. Notes • Never remove the memory card/battery pack when the access lamp (page 9) is displayed when you ... the power to turn on and allow operation. 2 Select a desired language. 3 Select a desired geographic location by following the on-screen instructions, then press z on the camera for the first time. • It may cause damage to data in once to eject the memory card. Date & Time setting is lit.
Notes • To use a "Memory Stick Micro" media or microSD memory card with the camera, be sure to drop the battery pack. Notes • Never remove the memory card/battery pack when the access lamp (page 9) is displayed when you ... the power to turn on and allow operation. 2 Select a desired language. 3 Select a desired geographic location by following the on-screen instructions, then press z on the camera for the first time. • It may cause damage to data in once to eject the memory card. Date & Time setting is lit.
Instruction Manual
Page 18
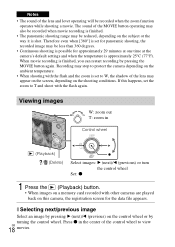
... registration screen for approximately 29 minutes at one time at the camera's default settings and when the temperature is approximately 25°C (77°F). Press z in Control wheel (Playback) / (Delete) Select images: B (next)/b (previous) or turn the..., depending on the shooting conditions. Viewing images W: zoom out T: zoom in the center of the control wheel to protect the camera depending on the ambient temperature. • When shooting with other cameras are played back on this happens, set for panoramic shooting, the recorded image may be less than 360 degrees. •...
... registration screen for approximately 29 minutes at one time at the camera's default settings and when the temperature is approximately 25°C (77°F). Press z in Control wheel (Playback) / (Delete) Select images: B (next)/b (previous) or turn the..., depending on the shooting conditions. Viewing images W: zoom out T: zoom in the center of the control wheel to protect the camera depending on the ambient temperature. • When shooting with other cameras are played back on this happens, set for panoramic shooting, the recorded image may be less than 360 degrees. •...
Instruction Manual
Page 19
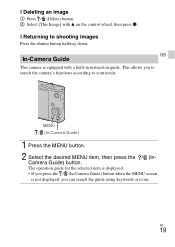
...The operation guide for the selected item is displayed. • If you press the / (In-Camera Guide) button when the MENU screen is equipped with v on the control wheel, then press z. GB 19 Camera Guide) button. This allows you can search the guide using keywords or icons. x Deleting an image... 1 Press / (Delete) button. 2 Select [This Image] with a built-in instruction guide. x Returning to your needs. GB In-Camera Guide This camera is not displayed, you to search the camera's functions according to shooting images Press the shutter button halfway down.
...The operation guide for the selected item is displayed. • If you press the / (In-Camera Guide) button when the MENU screen is equipped with v on the control wheel, then press z. GB 19 Camera Guide) button. This allows you can search the guide using keywords or icons. x Deleting an image... 1 Press / (Delete) button. 2 Select [This Image] with a built-in instruction guide. x Returning to your needs. GB In-Camera Guide This camera is not displayed, you to search the camera's functions according to shooting images Press the shutter button halfway down.

Instruction Manual
Page 20
...can use the self-timer and burst shooting mode. (Photo Creativity): Allows you to operate the camera intuitively. (Flash): Allows you to change the screen display. / (Cont. Center button (Tracking focus): The camera tracks the subject and adjusts focus automatically even when the subject is equipped with an original texture... Select pre-set settings to select a flash mode for still images. Shoot still images using the control wheel or MENU button on the camera. Control wheel MENU Function Guide x Control wheel DISP (Display Setting): Allows you to match various scene conditions.
...can use the self-timer and burst shooting mode. (Photo Creativity): Allows you to operate the camera intuitively. (Flash): Allows you to change the screen display. / (Cont. Center button (Tracking focus): The camera tracks the subject and adjusts focus automatically even when the subject is equipped with an original texture... Select pre-set settings to select a flash mode for still images. Shoot still images using the control wheel or MENU button on the camera. Control wheel MENU Function Guide x Control wheel DISP (Display Setting): Allows you to match various scene conditions.

Instruction Manual
Page 21
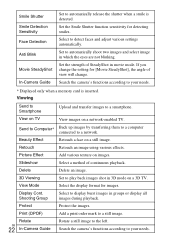
... Cont. GB 21 HDR Painting effect When [HDR Painting] is selected in Picture Effect, sets the effect level. Color hue When [Toy camera] is selected in Picture Effect, selects the color to determine the exposure. Defocus Effect Set the level of emphasis When [Miniature] is selected... in Background Defocus mode. Ctrl with Smartphone Shoot still images and movies by controlling the camera remotely by transferring them to a computer connected to automatically detect shooting conditions. Exposure Compensation Adjust the exposure manually.
... Cont. GB 21 HDR Painting effect When [HDR Painting] is selected in Picture Effect, sets the effect level. Color hue When [Toy camera] is selected in Picture Effect, selects the color to determine the exposure. Defocus Effect Set the level of emphasis When [Miniature] is selected... in Background Defocus mode. Ctrl with Smartphone Shoot still images and movies by controlling the camera remotely by transferring them to a computer connected to automatically detect shooting conditions. Exposure Compensation Adjust the exposure manually.
Instruction Manual
Page 22
...on a network-enabled TV. Retouch Retouch an image using various effects. View Mode Select the display format for detecting smiles. Rotate GB 22 In-Camera Guide Rotate a still image to a network. View on TV View images on a still image. Send to Computer* Back up images by ... Select to a still image. Protect Protect the images. Set the strength of SteadyShot in which the eyes are not blinking. Search the camera's functions according to a smartphone. If you change the setting for [Movie SteadyShot], the angle of continuous playback. Viewing Send to Smartphone Upload...
...on a network-enabled TV. Retouch Retouch an image using various effects. View Mode Select the display format for detecting smiles. Rotate GB 22 In-Camera Guide Rotate a still image to a network. View on TV View images on a still image. Send to Computer* Back up images by ... Select to a still image. Protect Protect the images. Set the strength of SteadyShot in which the eyes are not blinking. Search the camera's functions according to a smartphone. If you change the setting for [Movie SteadyShot], the angle of continuous playback. Viewing Send to Smartphone Upload...

Instruction Manual
Page 24
... to network services z Downloading "PlayMemories Home" (for importing AVCHD movies to use them. Importing images from the following URL: http://www.sony.co.jp/imsoft/Mac/ GB 24 "PlayMemories Online" or other network services. "PlayMemories Home" is required for Windows only) You can ...download "PlayMemories Home" from your camera Viewing images on Calendar Sharing images on your computer and use "PlayMemories Online" or other network services may not be available in some...
... to network services z Downloading "PlayMemories Home" (for importing AVCHD movies to use them. Importing images from the following URL: http://www.sony.co.jp/imsoft/Mac/ GB 24 "PlayMemories Online" or other network services. "PlayMemories Home" is required for Windows only) You can ...download "PlayMemories Home" from your camera Viewing images on Calendar Sharing images on your computer and use "PlayMemories Online" or other network services may not be available in some...

Instruction Manual
Page 25
... Home], then select [PlayMemories Home Help Guide] from [Help] menu. • For details on your computer, go to a computer is displayed, connect the camera and computer using the micro USB cable (supplied). x Installing "PlayMemories Home" on a computer 1 Using the Internet browser on "PlayMemories Home", you can also see... the "Cyber-shot User Guide" (page 2) or the following URL, then click [Install] t [Run]. www.sony.net/pm 2 Follow the instructions on the screen to complete the installation. • When the message to connect the...
... Home], then select [PlayMemories Home Help Guide] from [Help] menu. • For details on your computer, go to a computer is displayed, connect the camera and computer using the micro USB cable (supplied). x Installing "PlayMemories Home" on a computer 1 Using the Internet browser on "PlayMemories Home", you can also see... the "Cyber-shot User Guide" (page 2) or the following URL, then click [Install] t [Run]. www.sony.net/pm 2 Follow the instructions on the screen to complete the installation. • When the message to connect the...
Instruction Manual
Page 26
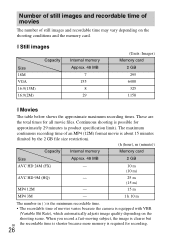
... is required for approximately 29 minutes (a product specification limit). Number of still images and recordable time of movies The number of movies varies because the camera is equipped with VBR (Variable Bit Rate), which automatically adjusts image quality depending on the shooting conditions and the memory card. The maximum continuous recording...
... is required for approximately 29 minutes (a product specification limit). Number of still images and recordable time of movies The number of movies varies because the camera is equipped with VBR (Variable Bit Rate), which automatically adjusts image quality depending on the shooting conditions and the memory card. The maximum continuous recording...

Instruction Manual
Page 27
... sure he/she observes the above precautions when viewing such images. Consult a pediatrician or ophthalmologist before using the camera Functions built into this camera on the bottom of the camera. 1080 60i-compatible device: 60i 1080 50i-compatible device: 50i • Do not watch 3D images shot... monitors. • When you may be able to the individual. To prevent these symptoms, we recommend that the camera is working correctly. • The camera is a 1080 60i-compatible device or 1080 50i-compatible GB device, check for extended periods of breaks you experience ...
... sure he/she observes the above precautions when viewing such images. Consult a pediatrician or ophthalmologist before using the camera Functions built into this camera on the bottom of the camera. 1080 60i-compatible device: 60i 1080 50i-compatible device: 50i • Do not watch 3D images shot... monitors. • When you may be able to the individual. To prevent these symptoms, we recommend that the camera is working correctly. • The camera is a 1080 60i-compatible device or 1080 50i-compatible GB device, check for extended periods of breaks you experience ...


