
User Guide
Page 27
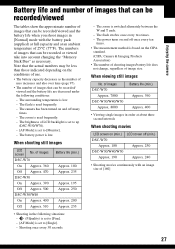
...) is set to [Fine]. - [AF Mode] is switched alternately between the W and T ends. - The camera has been turned on (min.) LCD screen off (min.) DSC-W70 Approx. 180 Approx. 230 DSC-W30/W40/W50 Approx. 190 Approx. 240 • Shooting movies continuously with the battery pack (supplied) at full ... and off once every ten times. • The measurement method is set to [Monitor]. - The battery power is low. - The flash strobes once every two times. - The power turns on and off many times. - The flash is used frequently. - When shooting still images LCD screen No...
...) is set to [Fine]. - [AF Mode] is switched alternately between the W and T ends. - The camera has been turned on (min.) LCD screen off (min.) DSC-W70 Approx. 180 Approx. 230 DSC-W30/W40/W50 Approx. 190 Approx. 240 • Shooting movies continuously with the battery pack (supplied) at full ... and off once every ten times. • The measurement method is set to [Monitor]. - The battery power is low. - The flash strobes once every two times. - The power turns on and off many times. - The flash is used frequently. - When shooting still images LCD screen No...

User Guide
Page 46
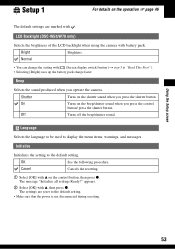
...turn...the Setup screen. v/V/b/B button Mode dial z button MENU button Control button 1 Turn on the camera. 2 Press MENU to display the menu. 3 After pressing B on the... control button, go to the press B again. (Setup) setting, then 4 Press v/V/b/B on the control button to the menu from the (Setup) screen, press b on the control button. The frame of the selected item turns... yellow. 5 Press z to set. When the menu is turned off the (Setup) screen, press MENU. ...
...turn...the Setup screen. v/V/b/B button Mode dial z button MENU button Control button 1 Turn on the camera. 2 Press MENU to display the menu. 3 After pressing B on the... control button, go to the press B again. (Setup) setting, then 4 Press v/V/b/B on the control button to the menu from the (Setup) screen, press b on the control button. The frame of the selected item turns... yellow. 5 Press z to set. When the menu is turned off the (Setup) screen, press MENU. ...
User Guide
Page 53
... to be used to the default setting. The message "Initialize all settings Ready?" LCD Backlight (DSC-W50/W70 only) Selects the brightness of the LCD backlight when using the camera with . Initialize Initializes the setting to display the menu items, warnings, and messages. Using the... Make sure that the power is not disconnected during resetting. 53 Bright Brightens. On Turns on the shutter sound when you press the shutter button. Off Turns off the beep/shutter sound. Shutter Turns on the beep/shutter sound when you operate the camera. Cancel Cancels the resetting....
... to be used to the default setting. The message "Initialize all settings Ready?" LCD Backlight (DSC-W50/W70 only) Selects the brightness of the LCD backlight when using the camera with . Initialize Initializes the setting to display the menu items, warnings, and messages. Using the... Make sure that the power is not disconnected during resetting. 53 Bright Brightens. On Turns on the shutter sound when you press the shutter button. Off Turns off the beep/shutter sound. Shutter Turns on the beep/shutter sound when you operate the camera. Cancel Cancels the resetting....
User Guide
Page 73
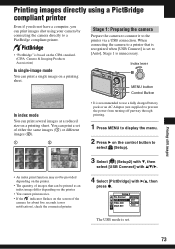
...the same images (1) or different images (2). 1 2 • It is recommended to use a fully charged battery pack or an AC Adaptor (not supplied) to prevent the power from turning off partway through printing. 1 Press MENU to display the menu. 2 Press B on the control button to [Auto], Stage 1 is set . Printing still images 73... at a reduced size on a printing sheet. Printing images directly using a PictBridge compliant printer Even if you do not have a computer, you can print images shot using your camera by connecting the camera directly to the printer via a USB connection.
...the same images (1) or different images (2). 1 2 • It is recommended to use a fully charged battery pack or an AC Adaptor (not supplied) to prevent the power from turning off partway through printing. 1 Press MENU to display the menu. 2 Press B on the control button to [Auto], Stage 1 is set . Printing still images 73... at a reduced size on a printing sheet. Printing images directly using a PictBridge compliant printer Even if you do not have a computer, you can print images shot using your camera by connecting the camera directly to the printer via a USB connection.
User Guide
Page 80
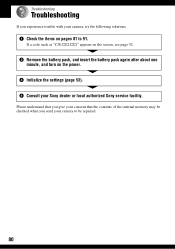
If a code such as "C/E:ss:ss" appears on the screen, see page 92. 2 Remove the battery pack, and insert the battery pack again after about one minute, and turn on pages 81 to be repaired. 80 Please understand that you give your consent that the contents of the internal memory may be checked when you experience trouble with your camera, try the following solutions. 1 Check the items on the power. 3 Initialize the settings (page 53). 4 Consult your camera to 91. Troubleshooting Troubleshooting If you send your Sony dealer or local authorized Sony service facility.
If a code such as "C/E:ss:ss" appears on the screen, see page 92. 2 Remove the battery pack, and insert the battery pack again after about one minute, and turn on pages 81 to be repaired. 80 Please understand that you give your consent that the contents of the internal memory may be checked when you experience trouble with your camera, try the following solutions. 1 Check the items on the power. 3 Initialize the settings (page 53). 4 Consult your camera to 91. Troubleshooting Troubleshooting If you send your Sony dealer or local authorized Sony service facility.
User Guide
Page 81
...; The displayed battery remaining differs from the current one . The power turns off automatically to correct the display. • The battery pack is dead (page 97). The battery pack runs down the battery pack. Turn on the camera again (t step 2 in an extremely cold location (page 97)....1 in "Read This First"). 81 Troubleshooting Replace it with a new one . Cannot turn on , the camera turns off suddenly. • If you do not operate the camera for about three minutes while the power is on the camera. • Install the battery pack correctly (t step 1 in "Read This First"). ...
...; The displayed battery remaining differs from the current one . The power turns off automatically to correct the display. • The battery pack is dead (page 97). The battery pack runs down the battery pack. Turn on the camera again (t step 2 in an extremely cold location (page 97)....1 in "Read This First"). 81 Troubleshooting Replace it with a new one . Cannot turn on , the camera turns off suddenly. • If you do not operate the camera for about three minutes while the power is on the camera. • Install the battery pack correctly (t step 1 in "Read This First"). ...
User Guide
Page 82
...images (t step 6 in "Read This First"). Do one of the following : - The subject is not visible on the screen. • Your camera is set to position the lens farther away from the subject than [640(Fine)]. - This is selected. The image is out of focus" on ... used while shooting movies. 82 Your camera cannot record images. • Check the free capacity of the following : - Shooting still images/movies The screen does not turn on even when the power is turned on. • Turn on page 34. Precision digital zoom does not function. • Set [Digital Zoom] to a position other than...
...images (t step 6 in "Read This First"). Do one of the following : - The subject is not visible on the screen. • Your camera is set to position the lens farther away from the subject than [640(Fine)]. - This is selected. The image is out of focus" on ... used while shooting movies. 82 Your camera cannot record images. • Check the free capacity of the following : - Shooting still images/movies The screen does not turn on even when the power is turned on. • Turn on page 34. Precision digital zoom does not function. • Set [Digital Zoom] to a position other than...

User Guide
Page 91
...; The battery level is not a malfunction. Charge the battery pack (t step 1 in microcomputer is discharged. Turn off the camera. • The battery pack is not working properly. The power is on the camera. • Set the date and time again (t step 2 in "Read This First") or use the AC Adaptor (not... supplied). The Clock Set screen appears when you turn on the screen. • See page 19. Others Your camera does not work . •...
...; The battery level is not a malfunction. Charge the battery pack (t step 1 in microcomputer is discharged. Turn off the camera. • The battery pack is not working properly. The power is on the camera. • Set the date and time again (t step 2 in "Read This First") or use the AC Adaptor (not... supplied). The Clock Set screen appears when you turn on the screen. • See page 19. Others Your camera does not work . •...
User Guide
Page 92
...digits (indicated by ss) will differ depending on the "Memory Stick Duo". E • The battery level is not an NP-BG1 battery pack. Memory Stick type error • The inserted "Memory Stick Duo" cannot be used in "Read This First"). C:32:ss • There is trouble with your camera...System error • Turn the power off and then on again. 92 Messages If the following corrective actions a few times, your camera (page 95). •... the camera (page 53), then turn off and on again (t step 2 in your camera (page 95). Internal memory error • Turn the power off ...
...digits (indicated by ss) will differ depending on the "Memory Stick Duo". E • The battery level is not an NP-BG1 battery pack. Memory Stick type error • The inserted "Memory Stick Duo" cannot be used in "Read This First"). C:32:ss • There is trouble with your camera...System error • Turn the power off and then on again. 92 Messages If the following corrective actions a few times, your camera (page 95). •... the camera (page 53), then turn off and on again (t step 2 in your camera (page 95). Internal memory error • Turn the power off ...


