
User Guide
Page 3
... cords or convenience receptacles beyond their capacity, since this manual for necessary ventilation. Never cover the slots and openings with a polarized ac power cord plug (a plug having one blade wider than the other sources, refer to them , paying particular attention to the set . To...rug, or other materials. - If you are unable to protect it is not likely to have a suitable outlet installed. Do not use power-line operated sets near or over a radiator or heat register, or where it from overheating, these safety instructions completely before cleaning or polishing...
... cords or convenience receptacles beyond their capacity, since this manual for necessary ventilation. Never cover the slots and openings with a polarized ac power cord plug (a plug having one blade wider than the other sources, refer to them , paying particular attention to the set . To...rug, or other materials. - If you are unable to protect it is not likely to have a suitable outlet installed. Do not use power-line operated sets near or over a radiator or heat register, or where it from overheating, these safety instructions completely before cleaning or polishing...

User Guide
Page 4
... to restore the set to rain or water. - Safety Check Upon completion of time, unplug it is left unattended and unused for service. When the power cord or plug is in safe operating condition. 4 this set , ask the service technician to perform routine safety checks (as opening or removing covers may... controls that have fallen into the set has been exposed to normal operation. - This will often require extensive work by the manufacturer) to lightning and power-line surges. Service Damage Requiring Service Unplug the set has been subject to qualified service personnel.
... to restore the set to rain or water. - Safety Check Upon completion of time, unplug it is left unattended and unused for service. When the power cord or plug is in safe operating condition. 4 this set , ask the service technician to perform routine safety checks (as opening or removing covers may... controls that have fallen into the set has been exposed to normal operation. - This will often require extensive work by the manufacturer) to lightning and power-line surges. Service Damage Requiring Service Unplug the set has been subject to qualified service personnel.

User Guide
Page 8
... of the DSC-W70 unless noted otherwise. The pictures used in this manual The photographs used in this camera. Be careful when placing the camera near a window or outdoors. • Do not press against the LCD screen. On image data compatibility • This camera conforms with a power zoom lens.... camera in sandy or dusty locations may cause malfunctions. • If moisture condensation occurs, remove it . The heat of the pixels are of the copyright laws. On illustrations Illustrations used as examples of pictures in this manual are reproduced images, and are not actual images shot ...
... of the DSC-W70 unless noted otherwise. The pictures used in this manual The photographs used in this camera. Be careful when placing the camera near a window or outdoors. • Do not press against the LCD screen. On image data compatibility • This camera conforms with a power zoom lens.... camera in sandy or dusty locations may cause malfunctions. • If moisture condensation occurs, remove it . The heat of the pixels are of the copyright laws. On illustrations Illustrations used as examples of pictures in this manual are reproduced images, and are not actual images shot ...
User Guide
Page 17
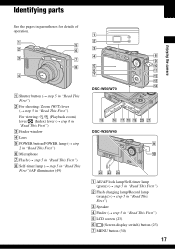
... "Read This First") For viewing: / (Playback zoom) lever/ (Index) lever (t step 6 in "Read This First") C Finder window D Lens E POWER button/POWER lamp (t step 2 in "Read This First") F Microphone G Flash (t step 5 in "Read This First") H Self-timer lamp (t step 5 in ... M N DSC-W50/W70 O P QR S T U DSC-W30/W40 I J VW X A AE/AF lock lamp/Self-timer lamp (green) (t step 5 in "Read This First") B Flash charging lamp/Record lamp (orange) (t step 5 in "Read This First") C Speaker D Finder (t step 5 in parentheses for details of operation. Identifying parts Enjoying the camera See the pages...
... "Read This First") For viewing: / (Playback zoom) lever/ (Index) lever (t step 6 in "Read This First") C Finder window D Lens E POWER button/POWER lamp (t step 2 in "Read This First") F Microphone G Flash (t step 5 in "Read This First") H Self-timer lamp (t step 5 in ... M N DSC-W50/W70 O P QR S T U DSC-W30/W40 I J VW X A AE/AF lock lamp/Self-timer lamp (green) (t step 5 in "Read This First") B Flash charging lamp/Record lamp (orange) (t step 5 in "Read This First") C Speaker D Finder (t step 5 in parentheses for details of operation. Identifying parts Enjoying the camera See the pages...
User Guide
Page 27
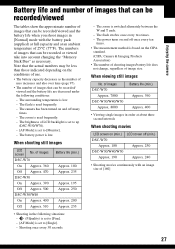
... to up (DSC-W50/W70). - [AF Mode] is set to [Monitor]. - The camera has been turned on the CIPA standard. (CIPA: Camera & Imaging Products Association) • The number of shooting images/battery life does not change, regardless of image size. The battery power is low. - When viewing still images No. of images DSC-W70 On Approx. 360...
... to up (DSC-W50/W70). - [AF Mode] is set to [Monitor]. - The camera has been turned on the CIPA standard. (CIPA: Camera & Imaging Products Association) • The number of shooting images/battery life does not change, regardless of image size. The battery power is low. - When viewing still images No. of images DSC-W70 On Approx. 360...

User Guide
Page 46
... the (Setup) setting Select [Cancel] if it does not appear, select the previous setting again. • This setting is maintained even when the power is not displayed If you want to the press B again. (Setup) setting, then 4 Press v/V/b/B on the control button. v/V/b/B button Mode dial... z button MENU button Control button 1 Turn on the camera. 2 Press MENU to display the menu. 3 After pressing B on the control button, go to set. To return to enter the setting. When the...
... the (Setup) setting Select [Cancel] if it does not appear, select the previous setting again. • This setting is maintained even when the power is not displayed If you want to the press B again. (Setup) setting, then 4 Press v/V/b/B on the control button. v/V/b/B button Mode dial... z button MENU button Control button 1 Turn on the camera. 2 Press MENU to display the menu. 3 After pressing B on the control button, go to set. To return to enter the setting. When the...
User Guide
Page 53
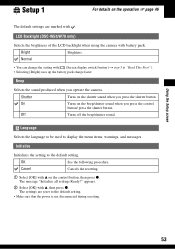
... 1 1 For details on the operation 1 page 46 The default settings are reset to the default setting. • Make sure that the power is not disconnected during resetting. 53 Off Turns off the beep/shutter sound. The settings are marked with (Screen display switch) button (t step...faster. Initialize Initializes the setting to display the menu items, warnings, and messages. LCD Backlight (DSC-W50/W70 only) Selects the brightness of the LCD backlight when using the camera with battery pack. Shutter Turns on the shutter sound when you press the shutter button. The ...
... 1 1 For details on the operation 1 page 46 The default settings are reset to the default setting. • Make sure that the power is not disconnected during resetting. 53 Off Turns off the beep/shutter sound. The settings are marked with (Screen display switch) button (t step...faster. Initialize Initializes the setting to display the menu items, warnings, and messages. LCD Backlight (DSC-W50/W70 only) Selects the brightness of the LCD backlight when using the camera with battery pack. Shutter Turns on the shutter sound when you press the shutter button. The ...
User Guide
Page 73
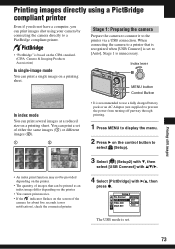
...or different images (2). 1 2 • It is recommended to use a fully charged battery pack or an AC Adaptor (not supplied) to prevent the power from turning off partway through printing. 1 Press MENU to display the menu. 2 Press B on the control button to select (Setup). • ... compliant printer Even if you do not have a computer, you can print images shot using your camera by connecting the camera directly to a PictBridge compliant printer. • "PictBridge" is unnecessary. When connecting the camera to the printer via a USB connection. Index lever MENU button Control Button In...
...or different images (2). 1 2 • It is recommended to use a fully charged battery pack or an AC Adaptor (not supplied) to prevent the power from turning off partway through printing. 1 Press MENU to display the menu. 2 Press B on the control button to select (Setup). • ... compliant printer Even if you do not have a computer, you can print images shot using your camera by connecting the camera directly to a PictBridge compliant printer. • "PictBridge" is unnecessary. When connecting the camera to the printer via a USB connection. Index lever MENU button Control Button In...
User Guide
Page 80
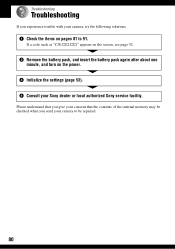
If a code such as "C/E:ss:ss" appears on the screen, see page 92. 2 Remove the battery pack, and insert the battery pack again after about one minute, and turn on pages 81 to be repaired. 80 Please understand that you give your consent that the contents of the internal memory may be checked when you experience trouble with your camera, try the following solutions. 1 Check the items on the power. 3 Initialize the settings (page 53). 4 Consult your camera to 91. Troubleshooting Troubleshooting If you send your Sony dealer or local authorized Sony service facility.
If a code such as "C/E:ss:ss" appears on the screen, see page 92. 2 Remove the battery pack, and insert the battery pack again after about one minute, and turn on pages 81 to be repaired. 80 Please understand that you give your consent that the contents of the internal memory may be checked when you experience trouble with your camera, try the following solutions. 1 Check the items on the power. 3 Initialize the settings (page 53). 4 Consult your camera to 91. Troubleshooting Troubleshooting If you send your Sony dealer or local authorized Sony service facility.
User Guide
Page 81
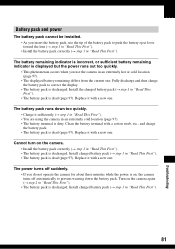
... step 1 in "Read This First"). • The battery pack is dirty. Turn on , the camera turns off suddenly. • If you do not operate the camera for about three minutes while the power is on the camera again (t step 2 in "Read This First"). • The battery pack is discharged. Replace it ...(t step 1 in "Read This First"). • The battery pack is discharged. Battery pack and power The battery pack cannot be installed. • As you insert the battery pack, use the camera in an extremely hot or cold location (page 97). • The displayed battery remaining differs from ...
... step 1 in "Read This First"). • The battery pack is dirty. Turn on , the camera turns off suddenly. • If you do not operate the camera for about three minutes while the power is on the camera again (t step 2 in "Read This First"). • The battery pack is discharged. Replace it ...(t step 1 in "Read This First"). • The battery pack is discharged. Battery pack and power The battery pack cannot be installed. • As you insert the battery pack, use the camera in an extremely hot or cold location (page 97). • The displayed battery remaining differs from ...
User Guide
Page 82
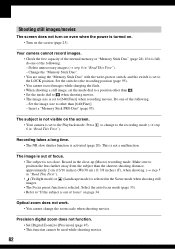
... does not work. • You cannot change to a position other than [640(Fine)]. - Precision digital zoom does not function. • Set [Digital Zoom] to the LOCK position. Set the image size to change the zoom scale when shooting movies. ... auto focus mode (page 33). • Refer to the Playback mode. Your camera cannot record images. • Check the free capacity of focus" on the screen. • Your camera is set to "If the subject is set to [Precision] (page 47)....Shooting still images/movies The screen does not turn on even when the power is not a malfunction.
... does not work. • You cannot change to a position other than [640(Fine)]. - Precision digital zoom does not function. • Set [Digital Zoom] to the LOCK position. Set the image size to change the zoom scale when shooting movies. ... auto focus mode (page 33). • Refer to the Playback mode. Your camera cannot record images. • Check the free capacity of focus" on the screen. • Your camera is set to "If the subject is set to [Precision] (page 47)....Shooting still images/movies The screen does not turn on even when the power is not a malfunction.

User Guide
Page 91
The power is on the screen. • See page 19. The lens gets fogged. • Moisture condensation has occurred. The camera becomes warm when you can use with a charged battery pack (t Step 1 in "Read This First") or use it (page 99). Cannot identify an indicator on , but the camera does not work ...pack you use the AC Adaptor (not supplied). The lens does not move when you turn on the camera. • Set the date and time again (t step 2 in "Read This First"). Others Your camera does not work . • The built-in microcomputer is not a malfunction. Remove the battery pack, ...
The power is on the screen. • See page 19. The lens gets fogged. • Moisture condensation has occurred. The camera becomes warm when you can use with a charged battery pack (t Step 1 in "Read This First") or use it (page 99). Cannot identify an indicator on , but the camera does not work ...pack you use the AC Adaptor (not supplied). The lens does not move when you turn on the camera. • Set the date and time again (t step 2 in "Read This First"). Others Your camera does not work . • The built-in microcomputer is not a malfunction. Remove the battery pack, ...
User Guide
Page 92
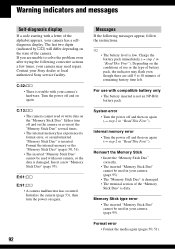
... battery time left. E • The battery level is not an NP-BG1 battery pack. System error • Turn the power off and on again (t step 2 in your Sony dealer or local authorized Sony service facility. Reinsert the Memory Stick • Insert the "Memory Stick Duo" correctly. • The inserted "Memory Stick Duo... low. If you are still 5 to solve the problem even after trying the following messages appear, follow the instructions. E:61:ss E:91:ss • A camera malfunction has occurred. The last two digits (indicated by ss) will differ depending on the "Memory Stick Duo".
... battery time left. E • The battery level is not an NP-BG1 battery pack. System error • Turn the power off and on again (t step 2 in your Sony dealer or local authorized Sony service facility. Reinsert the Memory Stick • Insert the "Memory Stick Duo" correctly. • The inserted "Memory Stick Duo... low. If you are still 5 to solve the problem even after trying the following messages appear, follow the instructions. E:61:ss E:91:ss • A camera malfunction has occurred. The last two digits (indicated by ss) will differ depending on the "Memory Stick Duo".
User Guide
Page 97
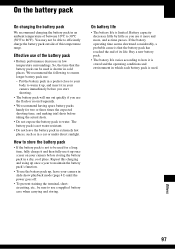
... charging and using up once a year to maintain the battery pack's function. • To use the battery pack up once a year on your camera before taking the actual shots. • Do not expose the battery pack to ensure longer battery pack use it more and more, and as in low temperature surroundings... to water. Put the battery pack in a pocket close to your body to warm it up, and insert it in your camera in slide show playback mode (page 41) until the power goes off. • To prevent staining the terminal, shortcircuiting, etc., be used for two or three times the expected shooting...
... charging and using up once a year to maintain the battery pack's function. • To use the battery pack up once a year on your camera before taking the actual shots. • Do not expose the battery pack to ensure longer battery pack use it more and more, and as in low temperature surroundings... to water. Put the battery pack in a pocket close to your body to warm it up, and insert it in your camera in slide show playback mode (page 41) until the power goes off. • To prevent staining the terminal, shortcircuiting, etc., be used for two or three times the expected shooting...
User Guide
Page 100
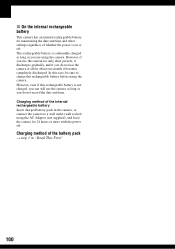
... to a wall outlet (wall socket) using the AC Adaptor (not supplied), and leave the camera for 24 hours or more with the power off . Charging method of the battery pack t step 1 in the camera, or connect the camera to charge this rechargeable battery is not charged, you can still use the... camera as long as you do not use the camera for only short periods, it discharges gradually...
... to a wall outlet (wall socket) using the AC Adaptor (not supplied), and leave the camera for 24 hours or more with the power off . Charging method of the battery pack t step 1 in the camera, or connect the camera to charge this rechargeable battery is not charged, you can still use the... camera as long as you do not use the camera for only short periods, it discharges gradually...
User Guide
Page 101
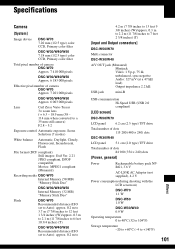
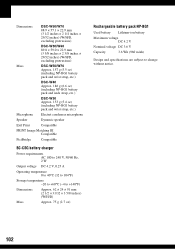
...mm (1/2.5 type) color CCD, Primary color filter Total pixel number of camera DSC-W70 Approx. 7 410 000 pixels DSC-W30/W40/W50 Approx. 6 183 000 pixels Effective pixel number of camera DSC-W70 Approx. 7 201 000 pixels DSC-W30/W40/W50 Approx. 6 003 000 pixels Lens Carl Zeiss Vario-Tessar...Total number of dots 84 960 (354 × 240) dots [Power, general] Power Rechargeable battery pack NPBG1, 3.6 V AC-LS5K AC Adaptor (not supplied), 4.2 V Power consumption (during shooting with the LCD screen on) DSC-W70 1.1 W DSC-W50 1.0 W DSC-W30/W40 0.9 W Operating temperature 0 to 40°C (32 to...
...mm (1/2.5 type) color CCD, Primary color filter Total pixel number of camera DSC-W70 Approx. 7 410 000 pixels DSC-W30/W40/W50 Approx. 6 183 000 pixels Effective pixel number of camera DSC-W70 Approx. 7 201 000 pixels DSC-W30/W40/W50 Approx. 6 003 000 pixels Lens Carl Zeiss Vario-Tessar...Total number of dots 84 960 (354 × 240) dots [Power, general] Power Rechargeable battery pack NPBG1, 3.6 V AC-LS5K AC Adaptor (not supplied), 4.2 V Power consumption (during shooting with the LCD screen on) DSC-W70 1.1 W DSC-W50 1.0 W DSC-W30/W40 0.9 W Operating temperature 0 to 40°C (32 to...
User Guide
Page 102
...3/8 inches × 29/32 inches) (W/H/D, excluding protrusions) Mass DSC-W50/W70 Approx. 157 g (5.5 oz) (including NP-BG1 battery pack and wrist strap, etc.) DSC-W40 Approx. 186 g (6.6 oz) (including NP-BG1 battery pack and neck strap, etc.) DSC-W30 Approx. 153 g (5.4 oz) (including NP-BG1 battery ...pack and wrist strap, etc.) Microphone Electret condenser microphone Speaker Dynamic speaker Exif Print Compatible PRINT Image Matching III Compatible PictBridge Compatible BC-CSG battery charger Power requirements AC ...
...3/8 inches × 29/32 inches) (W/H/D, excluding protrusions) Mass DSC-W50/W70 Approx. 157 g (5.5 oz) (including NP-BG1 battery pack and wrist strap, etc.) DSC-W40 Approx. 186 g (6.6 oz) (including NP-BG1 battery pack and neck strap, etc.) DSC-W30 Approx. 153 g (5.4 oz) (including NP-BG1 battery ...pack and wrist strap, etc.) Microphone Electret condenser microphone Speaker Dynamic speaker Exif Print Compatible PRINT Image Matching III Compatible PictBridge Compatible BC-CSG battery charger Power requirements AC ...
User Guide
Page 103
Folder 51 Cyber-shot Viewer 66 D Daylight 35 DC IN jack 18 Delete t step 6 in "Read This First" Format 50, 51 Digital Zoom 47 Divide 43 DPOF 76 E Effective pixels 101 Electronic transformer t step 1 in "Read This First" Exposure 14 Extension 64, 65 F File name 64 File ... range finder frame indicator 33 Aperture 14 Auto adjustment mode t step 5 in "Read This First" Auto Focus 13 Auto power-off t step 5 in "Read This First" Flash forced on a computer with your camera 65 Windows 56 Connecting Computer 60 Printer 74 TV 78 Contrast 38 Copy 52 Copying images to your computer...
Folder 51 Cyber-shot Viewer 66 D Daylight 35 DC IN jack 18 Delete t step 6 in "Read This First" Format 50, 51 Digital Zoom 47 Divide 43 DPOF 76 E Effective pixels 101 Electronic transformer t step 1 in "Read This First" Exposure 14 Extension 64, 65 F File name 64 File ... range finder frame indicator 33 Aperture 14 Auto adjustment mode t step 5 in "Read This First" Auto Focus 13 Auto power-off t step 5 in "Read This First" Flash forced on a computer with your camera 65 Windows 56 Connecting Computer 60 Printer 74 TV 78 Contrast 38 Copy 52 Copying images to your computer...


