
User Guide
Page 11
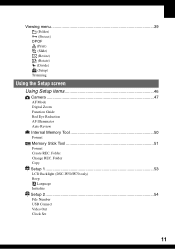
Folder Change REC. Viewing menu 39 (Folder) - (Protect) DPOF (Print) (Slide) (Resize) (Rotate) (Divide) (Setup) Trimming Using the Setup screen Using Setup items 46 Camera 47 AF Mode Digital Zoom Function Guide Red Eye Reduction AF Illuminator Auto Review Internal Memory Tool 50 Format Memory Stick Tool 51 Format Create REC. Folder Copy Setup 1 53 1 LCD Backlight (DSC-W50/W70 only) Beep Language Initialize Setup 2 54 2 File Number USB Connect Video Out Clock Set 11
Folder Change REC. Viewing menu 39 (Folder) - (Protect) DPOF (Print) (Slide) (Resize) (Rotate) (Divide) (Setup) Trimming Using the Setup screen Using Setup items 46 Camera 47 AF Mode Digital Zoom Function Guide Red Eye Reduction AF Illuminator Auto Review Internal Memory Tool 50 Format Memory Stick Tool 51 Format Create REC. Folder Copy Setup 1 53 1 LCD Backlight (DSC-W50/W70 only) Beep Language Initialize Setup 2 54 2 File Number USB Connect Video Out Clock Set 11
User Guide
Page 17
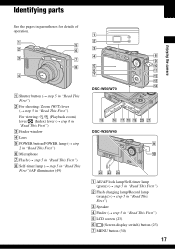
... step 5 in "Read This First") H Self-timer lamp (t step 5 in "Read This First")/AF illuminator (49) A B C D H I E J F K G L M N DSC-W50/W70 O P QR S T U DSC-W30/W40 I J VW X A AE/AF lock lamp/Self-timer lamp (green) (t step 5 in "Read This First") B Flash charging lamp/Record lamp (orange) (t step 5 in ..."Read This First") C Speaker D Finder (t step 5 in parentheses for details of operation. Identifying parts Enjoying the camera ...
... step 5 in "Read This First") H Self-timer lamp (t step 5 in "Read This First")/AF illuminator (49) A B C D H I E J F K G L M N DSC-W50/W70 O P QR S T U DSC-W30/W40 I J VW X A AE/AF lock lamp/Self-timer lamp (green) (t step 5 in "Read This First") B Flash charging lamp/Record lamp (orange) (t step 5 in ..."Read This First") C Speaker D Finder (t step 5 in parentheses for details of operation. Identifying parts Enjoying the camera ...

User Guide
Page 18
...in "Read This First") N (Image Size/Delete) button (t step 4 and 6 in "Read This First") U Multi connector (bottom) (DSC-W50/ W70) V A/V OUT jack (DSC-W30/W40) W Jack cover (DSC-W30/W40) X (USB) jack (DSC-W30/W40) 18 P Battery/"Memory Stick Duo" cover (t step 1 and 3 in "Read This First") Q Access lamp (t step 4 ...Use a tripod with the AC adaptor. You will be unable to firmly secure the camera to the operation manual supplied with a screw length of less than 5.5 mm (7/32 inch), and may damage the camera. • After use the battery charger. H (Playback) button (t step 6 ...
...in "Read This First") N (Image Size/Delete) button (t step 4 and 6 in "Read This First") U Multi connector (bottom) (DSC-W50/ W70) V A/V OUT jack (DSC-W30/W40) W Jack cover (DSC-W30/W40) X (USB) jack (DSC-W30/W40) 18 P Battery/"Memory Stick Duo" cover (t step 1 and 3 in "Read This First") Q Access lamp (t step 4 ...Use a tripod with the AC adaptor. You will be unable to firmly secure the camera to the operation manual supplied with a screw length of less than 5.5 mm (7/32 inch), and may damage the camera. • After use the battery charger. H (Playback) button (t step 6 ...
User Guide
Page 23
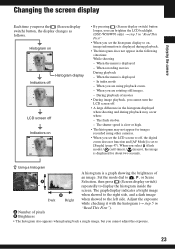
... on • By pressing (Screen display switch) button longer, you can brighten the LCD backlight. (DSC-W50/W70 only) t step 5 in "Read This First" • When you are rotating still images. -... Brightness A histogram is slow or high. • The histogram may not appear for about two seconds. Enjoying the camera Changing the screen display Each time you select (flash mode) / (self-timer) / (macro), the image is ... when playing back a single image, but you set the LCD screen to off, the digital zoom does not function and [AF Mode] is set the histogram display to [Single] (page...
... on • By pressing (Screen display switch) button longer, you can brighten the LCD backlight. (DSC-W50/W70 only) t step 5 in "Read This First" • When you are rotating still images. -... Brightness A histogram is slow or high. • The histogram may not appear for about two seconds. Enjoying the camera Changing the screen display Each time you select (flash mode) / (self-timer) / (macro), the image is ... when playing back a single image, but you set the LCD screen to off, the digital zoom does not function and [AF Mode] is set the histogram display to [Single] (page...
User Guide
Page 27
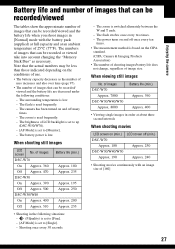
... "Memory Stick Duo" as the number of uses increases and also over time (page 97). • The number of LCD backlight is set to up (DSC-W50/W70). - [AF Mode] is set to [Monitor]. - Shooting once every 30 seconds. 27 The zoom is low. - The numbers of 25°C (77°F). The ... the camera Battery life and number of images that can be recorded/viewed The tables show the approximate number of images that can be recorded/viewed and the battery life when you shoot images in [Normal] mode with an image size of images DSC-W70 On Approx. 360 Off Approx. 470 DSC-W50 On Approx...
... "Memory Stick Duo" as the number of uses increases and also over time (page 97). • The number of LCD backlight is set to up (DSC-W50/W70). - [AF Mode] is set to [Monitor]. - Shooting once every 30 seconds. 27 The zoom is low. - The numbers of 25°C (77°F). The ... the camera Battery life and number of images that can be recorded/viewed The tables show the approximate number of images that can be recorded/viewed and the battery life when you shoot images in [Normal] mode with an image size of images DSC-W70 On Approx. 360 Off Approx. 470 DSC-W50 On Approx...
User Guide
Page 53
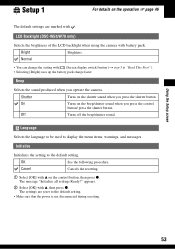
Shutter Turns on the shutter sound when you operate the camera. Off Turns off the beep/shutter sound. Cancel Cancels the resetting. 1 Select [OK] with v, then press z. The message "Initialize all settings Ready?" appears. 2 Select [OK... procedure. Bright Brightens. The settings are marked with . Normal • You can change the setting with battery pack. LCD Backlight (DSC-W50/W70 only) Selects the brightness of the LCD backlight when using the camera with (Screen display switch) button (t step 5 in "Read This First"). • Selecting [Bright] uses up the battery pack...
Shutter Turns on the shutter sound when you operate the camera. Off Turns off the beep/shutter sound. Cancel Cancels the resetting. 1 Select [OK] with v, then press z. The message "Initialize all settings Ready?" appears. 2 Select [OK... procedure. Bright Brightens. The settings are marked with . Normal • You can change the setting with battery pack. LCD Backlight (DSC-W50/W70 only) Selects the brightness of the LCD backlight when using the camera with (Screen display switch) button (t step 5 in "Read This First"). • Selecting [Bright] uses up the battery pack...
User Guide
Page 54
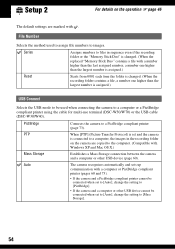
... the setting to images. Setup 2 2 For details on the camera are marked with . PictBridge Connects the camera to a computer or a PictBridge compliant printer using the cable for multi-use terminal (DSC-W50/W70) or the USB cable (DSC-W30/W40). Series Assigns numbers to files in sequence even if ...Selects the USB mode to be connected when set and the camera is set to [Auto], change the setting to [PictBridge]. • If the camera and a computer or other USB device (page 60). Auto The camera recognizes automatically and sets up communication with Windows XP and Mac ...
... the setting to images. Setup 2 2 For details on the camera are marked with . PictBridge Connects the camera to a computer or a PictBridge compliant printer using the cable for multi-use terminal (DSC-W50/W70) or the USB cable (DSC-W30/W40). Series Assigns numbers to files in sequence even if ...Selects the USB mode to be connected when set and the camera is set to [Auto], change the setting to [PictBridge]. • If the camera and a computer or other USB device (page 60). Auto The camera recognizes automatically and sets up communication with Windows XP and Mac ...
User Guide
Page 60
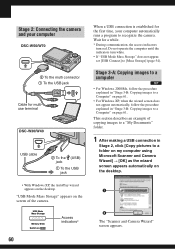
Stage 2: Connecting the camera and your computer DSC-W50/W70 2 To the multi connector 1 To the USB jack Cable for the first time, your computer automatically runs a program to recognize the camera. "USB Mode Mass Storage" appears on the desktop. 1 2 The "Scanner and Camera Wizard" screen appears. Stage... not appear automatically, follow the procedure explained in Stage 2, click [Copy pictures to a folder on my computer using Microsoft Scanner and Camera Wizard] t [OK] as the wizard screen appears automatically on the screen of copying images to a "My Documents" folder. 1 After...
Stage 2: Connecting the camera and your computer DSC-W50/W70 2 To the multi connector 1 To the USB jack Cable for the first time, your computer automatically runs a program to recognize the camera. "USB Mode Mass Storage" appears on the desktop. 1 2 The "Scanner and Camera Wizard" screen appears. Stage... not appear automatically, follow the procedure explained in Stage 2, click [Copy pictures to a folder on my computer using Microsoft Scanner and Camera Wizard] t [OK] as the wizard screen appears automatically on the screen of copying images to a "My Documents" folder. 1 After...

User Guide
Page 61
... [Next]. 1 2 The "Picture Name and Destination" screen appears. 4 Select a name and destination for multi-use terminal (DSC-W50/W70) or the USB cable (DSCW30/W40) (page 63). The images saved on the "Memory Stick Duo" of the camera appear. • If no "Memory Stick Duo" is completed, the "Other Options" screen appears. • This...
... [Next]. 1 2 The "Picture Name and Destination" screen appears. 4 Select a name and destination for multi-use terminal (DSC-W50/W70) or the USB cable (DSCW30/W40) (page 63). The images saved on the "Memory Stick Duo" of the camera appear. • If no "Memory Stick Duo" is completed, the "Other Options" screen appears. • This...
User Guide
Page 63
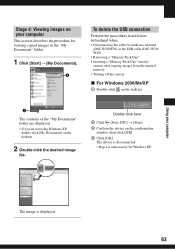
...Sony DSC) t [Stop]. 3 Confirm the device on the desktop. 2 Double-click the desired image file. Stage 4: Viewing images on your computer The image is unnecessary for multi-use terminal (DSC-W50/W70) or the USB cable (DSC-W30/ W40) • Removing a "Memory Stick Duo" • Inserting a "Memory Stick Duo" into the camera... after copying images from the internal memory • Turning off the camera x For Windows 2000/Me...
...Sony DSC) t [Stop]. 3 Confirm the device on the desktop. 2 Double-click the desired image file. Stage 4: Viewing images on your computer The image is unnecessary for multi-use terminal (DSC-W50/W70) or the USB cable (DSC-W30/ W40) • Removing a "Memory Stick Duo" • Inserting a "Memory Stick Duo" into the camera... after copying images from the internal memory • Turning off the camera x For Windows 2000/Me...
User Guide
Page 66
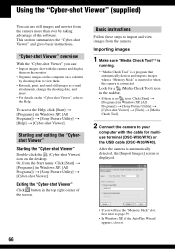
... import and view images from the Start menu: Click [Start] t [Programs] (in Windows XP, [All Programs]) t [Sony Picture Utility] t [Help] t [Cyber-shot Viewer]. Look for multiuse terminal (DSC-W50/W70) or the USB cable (DSC-W30/W40). After the camera is automatically detected, the [Import Images] screen is connected. Basic instructions Follow these steps to your computer with...
... import and view images from the Start menu: Click [Start] t [Programs] (in Windows XP, [All Programs]) t [Sony Picture Utility] t [Help] t [Cyber-shot Viewer]. Look for multiuse terminal (DSC-W50/W70) or the USB cable (DSC-W30/W40). After the camera is automatically detected, the [Import Images] screen is connected. Basic instructions Follow these steps to your computer with...
User Guide
Page 70
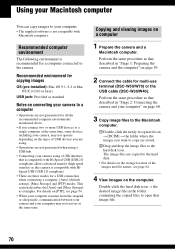
... at the same time. Perform the same procedure as this camera is compatible with Macintosh computers. Using your Macintosh computer You can copy images to your computer. • The supplied software is recommended for multi-use terminal (DSC-W50/W70) or the USB cable (DSC-W30/W40). Recommended computer environment The following environment is not...
... at the same time. Perform the same procedure as this camera is compatible with Macintosh computers. Using your Macintosh computer You can copy images to your computer. • The supplied software is recommended for multi-use terminal (DSC-W50/W70) or the USB cable (DSC-W30/W40). Recommended computer environment The following environment is not...
User Guide
Page 71
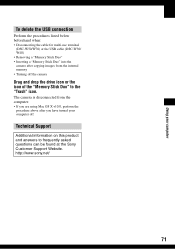
http://www.sony.net/ 71 The camera is disconnected from the internal memory • Turning off . Using your computer To delete the USB connection Perform the procedures listed below beforehand when: • Disconnecting the cable for multi-use terminal (DSC-W50/W70) or the USB cable (DSC-W30/ W40) • ...Removing a "Memory Stick Duo" • Inserting a "Memory Stick Duo" into the camera after copying images from the computer. • If you are using ...
http://www.sony.net/ 71 The camera is disconnected from the internal memory • Turning off . Using your computer To delete the USB connection Perform the procedures listed below beforehand when: • Disconnecting the cable for multi-use terminal (DSC-W50/W70) or the USB cable (DSC-W30/ W40) • ...Removing a "Memory Stick Duo" • Inserting a "Memory Stick Duo" into the camera after copying images from the computer. • If you are using ...
User Guide
Page 74
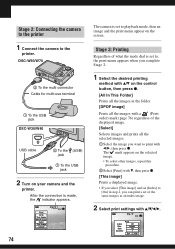
... you want to print with v/V/b/B. Stage 2: Connecting the camera to the printer 1 Connect the camera to , the print menu appears when you complete Stage 2. 1 Select the desired printing method with v/V on your camera and the printer. DSC-W50/W70 2 To the multi connector Cable for multi-use terminal ...1 To the USB jack DSC-W30/W40 USB cable 2 To the (USB) jack 1 To the USB jack 2 Turn ...
... you want to print with v/V/b/B. Stage 2: Connecting the camera to the printer 1 Connect the camera to , the print menu appears when you complete Stage 2. 1 Select the desired printing method with v/V on your camera and the printer. DSC-W50/W70 2 To the multi connector Cable for multi-use terminal ...1 To the USB jack DSC-W30/W40 USB cable 2 To the (USB) jack 1 To the USB jack 2 Turn ...
User Guide
Page 75
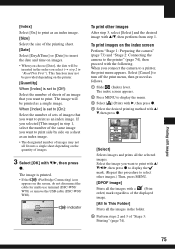
...Select] Selects images and prints all fit onto a single sheet depending on the screen, do not disconnect the cable for multi-use terminal (DSC-W50/ W70) or remove the USB cable (DSC-W30/ W40). To print images on the printer. [Quantity] When [Index] is set to [On]: Select the number of sets of ...the images with a (Print order) mark regardless of the displayed image. [All In This Folder] Prints all the images in the order you connect the camera to print. Select the image you want to print with v/ V/b/B, then press z to display the mark. (Repeat this procedure to select other images ...
...Select] Selects images and prints all fit onto a single sheet depending on the screen, do not disconnect the cable for multi-use terminal (DSC-W50/ W70) or remove the USB cable (DSC-W30/ W40). To print images on the printer. [Quantity] When [Index] is set to [On]: Select the number of sets of ...the images with a (Print order) mark regardless of the displayed image. [All In This Folder] Prints all the images in the order you connect the camera to print. Select the image you want to print with v/ V/b/B, then press z to display the mark. (Repeat this procedure to select other images ...
User Guide
Page 78
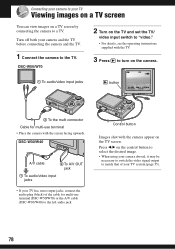
... your TV Viewing images on a TV screen You can view images on a TV screen by connecting the camera to match that of the cable for multi-use terminal (DSC-W50/W70) or the A/V cable (DSC-W30/W40) to the left audio jack. button VGA 2/9 101-0002 2006 1 1 10:30PM BACK/NEXT VOLUME 2 To ...desired image. • When using your camera and the TV before connecting the camera and the TV. 1 Connect the camera to turn on the TV screen. Turn off both your camera abroad, it may be necessary to switch the video signal output to a TV. Control button Images shot with the TV. 3 Press to ...
... your TV Viewing images on a TV screen You can view images on a TV screen by connecting the camera to match that of the cable for multi-use terminal (DSC-W50/W70) or the A/V cable (DSC-W30/W40) to the left audio jack. button VGA 2/9 101-0002 2006 1 1 10:30PM BACK/NEXT VOLUME 2 To ...desired image. • When using your camera and the TV before connecting the camera and the TV. 1 Connect the camera to turn on the TV screen. Turn off both your camera abroad, it may be necessary to switch the video signal output to a TV. Control button Images shot with the TV. 3 Press to ...
User Guide
Page 84
... (t step 5 in conjunction with the following items. 84 Vertical streaks appear when you view the screen in a dark place. • The camera is too high, adjust the brightness of low illumination. Install charged battery pack. To confirm the recordable range, use the LCD screen. The eyes...[Red Eye Reduction] in the (Setup) menu to increase the visibility of the screen by temporarily brightening the image under conditions of the LCD backlight (DSC-W50/W70 only) (page 23, t step5 in "Read This First"). The image is too bright. • You are shooting a spotlighted subject in a dark...
... (t step 5 in conjunction with the following items. 84 Vertical streaks appear when you view the screen in a dark place. • The camera is too high, adjust the brightness of low illumination. Install charged battery pack. To confirm the recordable range, use the LCD screen. The eyes...[Red Eye Reduction] in the (Setup) menu to increase the visibility of the screen by temporarily brightening the image under conditions of the LCD backlight (DSC-W50/W70 only) (page 23, t step5 in "Read This First"). The image is too bright. • You are shooting a spotlighted subject in a dark...
User Guide
Page 85
...set to the color system of your camera, playback on your camera is not guaranteed. • The camera is connected (page 78). The image does not appear on the screen. • Remove the cable for multi-use terminal (DSC-W50/W70) or the USB cable (DSC-W30/W40) is connected to image ...processing. Deleting/Editing images Your camera cannot delete an image. • Cancel the protection (page 41). • You are not affected...
...set to the color system of your camera, playback on your camera is not guaranteed. • The camera is connected (page 78). The image does not appear on the screen. • Remove the cable for multi-use terminal (DSC-W50/W70) or the USB cable (DSC-W30/W40) is connected to image ...processing. Deleting/Editing images Your camera cannot delete an image. • Cancel the protection (page 41). • You are not affected...
User Guide
Page 86
...and the mouse from your computer is compatible with the cable for multi-use terminal (DSC-W50/W70) or the USB cable (DSC-W30/W40) before you connected the camera and your computer. • Connect the camera directly to install the USB driver again. The "Removable disk" icon does not appear... (page 18). • Use the cable for multi-use terminal (supplied) (DSC-W50/W70) or the USB cable (supplied) (DSC-W30/W40) (page 60). • Disconnect the cable for multi-use terminal (DSC-W50/W70) or the USB cable (DSC-W30/ W40), and connect it again firmly. Install the software (page 58). ...
...and the mouse from your computer is compatible with the cable for multi-use terminal (DSC-W50/W70) or the USB cable (DSC-W30/W40) before you connected the camera and your computer. • Connect the camera directly to install the USB driver again. The "Removable disk" icon does not appear... (page 18). • Use the cable for multi-use terminal (supplied) (DSC-W50/W70) or the USB cable (supplied) (DSC-W30/W40) (page 60). • Disconnect the cable for multi-use terminal (DSC-W50/W70) or the USB cable (DSC-W30/ W40), and connect it again firmly. Install the software (page 58). ...
User Guide
Page 90
... Disconnect the cable for multi-use terminal (DSC-W50/W70) or the USB cable (DSC- Disconnect and connect the cable for multi-use terminal (DSC-W50/ W70) or the USB cable (DSC-W30/W40) connected, then connect the printer again. • The print setting of either the camera (page 75) or the printer. It ..., turn the printer off and then on, then connect the cable again. • Movies cannot be printed. • Images shot using cameras other than this camera or images modified with a computer may not be inserted in the index mode. • The printer does not provide these functions...
... Disconnect the cable for multi-use terminal (DSC-W50/W70) or the USB cable (DSC- Disconnect and connect the cable for multi-use terminal (DSC-W50/ W70) or the USB cable (DSC-W30/W40) connected, then connect the printer again. • The print setting of either the camera (page 75) or the printer. It ..., turn the printer off and then on, then connect the cable again. • Movies cannot be printed. • Images shot using cameras other than this camera or images modified with a computer may not be inserted in the index mode. • The printer does not provide these functions...


