User Manual
Page 2
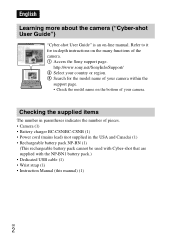
Checking the supplied items The number in parentheses indicates the number of your camera within the support page. • Check the model name on the bottom of pieces. • Camera (1) • Battery charger BC-CSN/BC-CSNB (1) • Power cord (mains lead) (not supplied in -depth ...instructions on -line manual. English Learning more about the camera ("Cyber-shot User Guide") "Cyber-shot User Guide" is an on the many functions of the camera. 1 Access the Sony support page. http://www.sony.net/SonyInfo/Support/ 2 Select your country or region. 3 Search for ...
Checking the supplied items The number in parentheses indicates the number of your camera within the support page. • Check the model name on the bottom of pieces. • Camera (1) • Battery charger BC-CSN/BC-CSNB (1) • Power cord (mains lead) (not supplied in -depth ...instructions on -line manual. English Learning more about the camera ("Cyber-shot User Guide") "Cyber-shot User Guide" is an on the many functions of the camera. 1 Access the Sony support page. http://www.sony.net/SonyInfo/Support/ 2 Select your country or region. 3 Search for ...
User Manual
Page 8
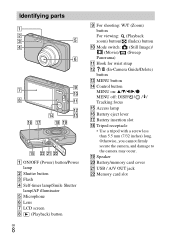
Otherwise, you cannot firmly secure the camera, and damage to the camera may occur. Identifying parts A ON/OFF (Power) button/Power lamp B Shutter button C Flash D Self-timer lamp/Smile Shutter lamp/AF illuminator E Microphone F...For shooting: W/T (Zoom) button For viewing: (Playback zoom) button/ (Index) button J Mode switch: (Still Image)/ (Movie)/ (Sweep Panorama) K Hook for wrist strap L / (In-Camera Guide/Delete) button M MENU button N Control button MENU on: v/V/b/B/z MENU off: DISP/ / / / Tracking focus O Access lamp P Battery eject lever Q Battery insertion slot R Tripod receptacle ...
Otherwise, you cannot firmly secure the camera, and damage to the camera may occur. Identifying parts A ON/OFF (Power) button/Power lamp B Shutter button C Flash D Self-timer lamp/Smile Shutter lamp/AF illuminator E Microphone F...For shooting: W/T (Zoom) button For viewing: (Playback zoom) button/ (Index) button J Mode switch: (Still Image)/ (Movie)/ (Sweep Panorama) K Hook for wrist strap L / (In-Camera Guide/Delete) button M MENU button N Control button MENU on: v/V/b/B/z MENU off: DISP/ / / / Tracking focus O Access lamp P Battery eject lever Q Battery insertion slot R Tripod receptacle ...
User Manual
Page 10
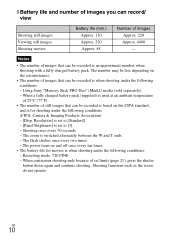
...and continue shooting. The power turns on and off once every ten times. • The battery life for shooting under the following conditions. (CIPA: Camera & Imaging Products Association) - [Disp. When a fully charged battery pack (supplied) is used at an ambient temperature of 25°C (77°F)....on the circumstances. • The number of images Approx. 220 Approx. 4400 - The zoom is when shooting under the following conditions: - Using Sony "Memory Stick PRO Duo" (Mark2) media (sold separately). - x Battery life and number of images you can record/ view Shooting still images ...
...and continue shooting. The power turns on and off once every ten times. • The battery life for shooting under the following conditions. (CIPA: Camera & Imaging Products Association) - [Disp. When a fully charged battery pack (supplied) is used at an ambient temperature of 25°C (77°F)....on the circumstances. • The number of images Approx. 220 Approx. 4400 - The zoom is when shooting under the following conditions: - Using Sony "Memory Stick PRO Duo" (Mark2) media (sold separately). - x Battery life and number of images you can record/ view Shooting still images ...

User Manual
Page 11
Inserting the battery pack/a memory card (sold separately) Battery eject lever GB Ensure the notched corner faces correctly. 1 Open the cover. 2 Insert the memory card (sold separately). • With the notched corner facing as illustrated, insert the memory card until it clicks into place. 3 Insert the battery pack. • While pressing the battery eject lever, insert the battery pack as illustrated. GB 11 Make sure that the battery eject lever locks after insertion. 4 Close the cover. • Closing the cover with the battery inserted incorrectly may damage the camera.
Inserting the battery pack/a memory card (sold separately) Battery eject lever GB Ensure the notched corner faces correctly. 1 Open the cover. 2 Insert the memory card (sold separately). • With the notched corner facing as illustrated, insert the memory card until it clicks into place. 3 Insert the battery pack. • While pressing the battery eject lever, insert the battery pack as illustrated. GB 11 Make sure that the battery eject lever locks after insertion. 4 Close the cover. • Closing the cover with the battery inserted incorrectly may damage the camera.
User Manual
Page 12
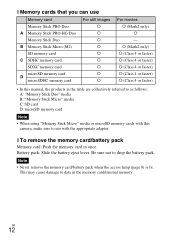
... card/internal memory. GB 12 a (Mark2 only) a (Class 4 or faster) a (Class 4 or faster) a (Class 4 or faster) a (Class 4 or faster) a (Class 4 or faster) • In this camera, make sure to use Memory card For still images Memory Stick PRO Duo a A Memory Stick PRO-HG Duo a Memory Stick Duo a B Memory Stick Micro (M2...
... card/internal memory. GB 12 a (Mark2 only) a (Class 4 or faster) a (Class 4 or faster) a (Class 4 or faster) a (Class 4 or faster) a (Class 4 or faster) • In this camera, make sure to use Memory card For still images Memory Stick PRO Duo a A Memory Stick PRO-HG Duo a Memory Stick Duo a B Memory Stick Micro (M2...
User Manual
Page 14
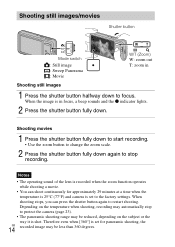
... is set for approximately 29 minutes at a time when the temperature is 25°C (77°F) and camera is in Shooting still images 1 Press the shutter button halfway down again to stop to protect the camera (page 23). • The panoramic shooting range may be less than 360 degrees. Shooting movies 1 Press...
... is set for approximately 29 minutes at a time when the temperature is 25°C (77°F) and camera is in Shooting still images 1 Press the shutter button halfway down again to stop to protect the camera (page 23). • The panoramic shooting range may be less than 360 degrees. Shooting movies 1 Press...
User Manual
Page 15
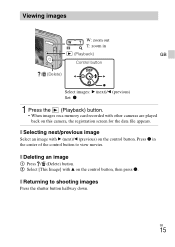
... an image with v on the control button, then press z. GB 15 x Deleting an image 1 Press / (Delete) button. 2 Select [This Image] with B (next)/b (previous) on this camera, the registration screen for the data file appears. Press z in (Playback) GB Control button / (Delete) Select images: B (next)/b (previous) Set: z 1 Press the (Playback) button. •...
... an image with v on the control button, then press z. GB 15 x Deleting an image 1 Press / (Delete) button. 2 Select [This Image] with B (next)/b (previous) on this camera, the registration screen for the data file appears. Press z in (Playback) GB Control button / (Delete) Select images: B (next)/b (previous) Set: z 1 Press the (Playback) button. •...
User Manual
Page 16
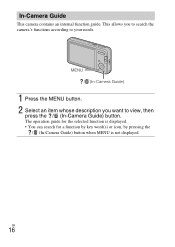
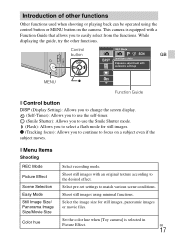
MENU / (In-Camera Guide) 1 Press the MENU button. 2 Select an item whose description you to search the camera's functions according to view, then press the / (In-Camera Guide) button. GB 16 In-Camera Guide This camera contains an internal function guide. This allows you want to your needs. The operation guide for the selected function is displayed. • You can search for a function by key word(s) or icon, by pressing the / (In-Camera Guide) button when MENU is not displayed.
MENU / (In-Camera Guide) 1 Press the MENU button. 2 Select an item whose description you to search the camera's functions according to view, then press the / (In-Camera Guide) button. GB 16 In-Camera Guide This camera contains an internal function guide. This allows you want to your needs. The operation guide for the selected function is displayed. • You can search for a function by key word(s) or icon, by pressing the / (In-Camera Guide) button when MENU is not displayed.
User Manual
Page 17
... Guide that allows you to the desired effect. Set the color hue when [Toy camera] is equipped with an original texture according to easily select from the functions. Introduction of other functions. This camera is selected in Picture Effect. While displaying the guide, try the other functions Other...use the self-timer. (Smile Shutter): Allows you to use the Smile Shutter mode. (Flash): Allows you to continue to focus on the camera. Select pre-set settings to select a flash mode for still images, panoramic images or movie files. x Menu Items Shooting REC Mode Picture ...
... Guide that allows you to the desired effect. Set the color hue when [Toy camera] is equipped with an original texture according to easily select from the functions. Introduction of other functions. This camera is selected in Picture Effect. While displaying the guide, try the other functions Other...use the self-timer. (Smile Shutter): Allows you to use the Smile Shutter mode. (Flash): Allows you to continue to focus on the camera. Select pre-set settings to select a flash mode for still images, panoramic images or movie files. x Menu Items Shooting REC Mode Picture ...
User Manual
Page 18
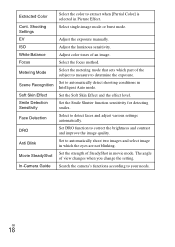
...part of SteadyShot in Picture Effect. GB 18 Set to correct the brightness and contrast and improve the image quality. Search the camera's functions according to automatically shoot two images and select image in Intelligent Auto mode. Adjust the luminous sensitivity. Adjust color tones of...EV ISO White Balance Focus Metering Mode Scene Recognition Soft Skin Effect Smile Detection Sensitivity Face Detection DRO Anti Blink Movie SteadyShot In-Camera Guide Select the color to determine the exposure. Select single-image mode or burst mode. Adjust the exposure manually. Select the...
...part of SteadyShot in Picture Effect. GB 18 Set to correct the brightness and contrast and improve the image quality. Search the camera's functions according to automatically shoot two images and select image in Intelligent Auto mode. Adjust the luminous sensitivity. Adjust color tones of...EV ISO White Balance Focus Metering Mode Scene Recognition Soft Skin Effect Smile Detection Sensitivity Face Detection DRO Anti Blink Movie SteadyShot In-Camera Guide Select the color to determine the exposure. Select single-image mode or burst mode. Adjust the exposure manually. Select the...
User Manual
Page 19
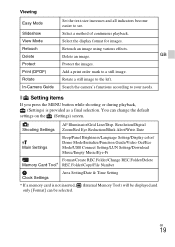
...MENU button while shooting or during playback, (Settings) is not inserted, (Internal Memory Tool) will be selected. GB 19 Search the camera's functions according to the left. Resolution/Digital Shooting Settings Zoom/Red Eye Reduction/Blink Alert/Write Date Main Settings Beep/Panel Brightness/Language ...various effects. Select a method of continuous playback. Viewing Easy Mode Slideshow View Mode Retouch Delete Protect Print (DPOF) Rotate In-Camera Guide Set the text-size increases and all indicators become easier to a still image. Add a print order mark to see.
...MENU button while shooting or during playback, (Settings) is not inserted, (Internal Memory Tool) will be selected. GB 19 Search the camera's functions according to the left. Resolution/Digital Shooting Settings Zoom/Red Eye Reduction/Blink Alert/Write Date Main Settings Beep/Panel Brightness/Language ...various effects. Select a method of continuous playback. Viewing Easy Mode Slideshow View Mode Retouch Delete Protect Print (DPOF) Rotate In-Camera Guide Set the text-size increases and all indicators become easier to a still image. Add a print order mark to see.
User Manual
Page 20
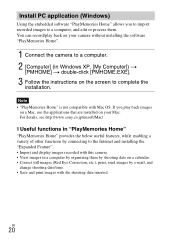
... PC application (Windows) Using the embedded software "PlayMemories Home" allows you play back on your Mac. For details, see http://www.sony.co.jp/imsoft/Mac/ x Useful functions in a computer by e-mail, and change shooting date/time. • Save and print images...organizing them . If you to import recorded images to the Internet and installing the "Expanded Feature". • Import and display images recorded with this camera. • View images in "PlayMemories Home" "PlayMemories Home" provides the below useful features, while enabling a variety of other functions by connecting to...
... PC application (Windows) Using the embedded software "PlayMemories Home" allows you play back on your Mac. For details, see http://www.sony.co.jp/imsoft/Mac/ x Useful functions in a computer by e-mail, and change shooting date/time. • Save and print images...organizing them . If you to import recorded images to the Internet and installing the "Expanded Feature". • Import and display images recorded with this camera. • View images in "PlayMemories Home" "PlayMemories Home" provides the below useful features, while enabling a variety of other functions by connecting to...
User Manual
Page 21
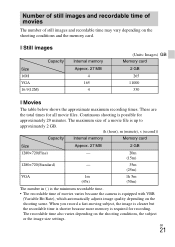
... depending on the shooting conditions and the memory card. Number of still images and recordable time of movies The number of movies varies because the camera is required for recording. GB 21 When you record a fast-moving subject, the image is clearer but the recordable time is shorter because more memory...
... depending on the shooting conditions and the memory card. Number of still images and recordable time of movies The number of movies varies because the camera is required for recording. GB 21 When you record a fast-moving subject, the image is clearer but the recordable time is shorter because more memory...
User Manual
Page 22
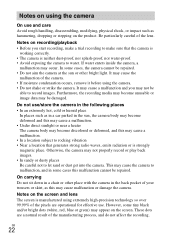
...the following places • In an extremely hot, cold or humid place In places such as in a car parked in the back pocket of the camera. • If moisture condensation occurs, remove it before using extremely high-precision technology so over 99.99% of the manufacturing process, and do not..., blue or green) may not be damaged. These dots are a normal result of the pixels are operational for effective use. Notes on using the camera On use and care Avoid rough handling, disassembling, modifying, physical shock, or impact such as hammering, dropping or stepping on the screen and lens The...
...the following places • In an extremely hot, cold or humid place In places such as in a car parked in the back pocket of the camera. • If moisture condensation occurs, remove it before using extremely high-precision technology so over 99.99% of the manufacturing process, and do not..., blue or green) may not be damaged. These dots are a normal result of the pixels are operational for effective use. Notes on using the camera On use and care Avoid rough handling, disassembling, modifying, physical shock, or impact such as hammering, dropping or stepping on the screen and lens The...
User Manual
Page 23
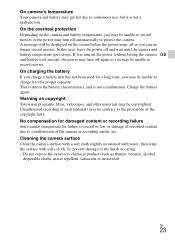
... dry cloth. Do not expose the camera to the finish or casing: - In this case, leave the power off or you may be contrary to the provisions of such materials may be unable to record movies. No compensation for damaged content or recording failure Sony cannot compensate for a long time, you... turn on the screen before the power turns off and wait until the camera and battery temperature goes down. If you may get hot due to continuous use, but...
... dry cloth. Do not expose the camera to the finish or casing: - In this case, leave the power off or you may be contrary to the provisions of such materials may be unable to record movies. No compensation for damaged content or recording failure Sony cannot compensate for a long time, you... turn on the screen before the power turns off and wait until the camera and battery temperature goes down. If you may get hot due to continuous use, but...

User Manual
Page 24
... Audio output USB communication USB communication: Hi-Speed USB (USB 2.0) [Screen] LCD screen: 6.7 cm (2.7 type) TFT drive Total number of camera: Approx. 16.1 Megapixels Lens: Sony G 10× zoom lens f = 4.45 mm - 44.5 mm (25 mm - 250 mm (35 mm film equivalent)) F3.3 (W) - Specifications... Camera [System] Image device: 7.75 mm (1/2.3 type) color CCD, Primary color filter Total pixel number of camera: Approx. 16.4 Megapixels Effective pixel number of ...
... Audio output USB communication USB communication: Hi-Speed USB (USB 2.0) [Screen] LCD screen: 6.7 cm (2.7 type) TFT drive Total number of camera: Approx. 16.1 Megapixels Lens: Sony G 10× zoom lens f = 4.45 mm - 44.5 mm (25 mm - 250 mm (35 mm film equivalent)) F3.3 (W) - Specifications... Camera [System] Image device: 7.75 mm (1/2.3 type) color CCD, Primary color filter Total pixel number of camera: Approx. 16.4 Megapixels Effective pixel number of ...


