Handycam® Handbook
Page 5
... MENU/Settings Search Index Notes on using the camera How to use this handbook 2 Notes on using the camera 3 Operation Search 8 MENU/Settings Search 10 Identifying parts 14 List of icons displayed on the screen 15 Using the mode dial 17 Using the internal memory 18 Shooting Intelligent Auto Adjustment 19 Easy Shooting 20 Program Auto 22 Sweep Panorama 23 Scene Selection 25 Movie Mode 27 Zoom 28 DISP (Screen Display Settings 29 Flash 30 Smile Shutter 31 Self-Timer 32 Viewing Viewing still images 33 Playback zoom 34 Image Index 35 Delete 36 Viewing movies...
... MENU/Settings Search Index Notes on using the camera How to use this handbook 2 Notes on using the camera 3 Operation Search 8 MENU/Settings Search 10 Identifying parts 14 List of icons displayed on the screen 15 Using the mode dial 17 Using the internal memory 18 Shooting Intelligent Auto Adjustment 19 Easy Shooting 20 Program Auto 22 Sweep Panorama 23 Scene Selection 25 Movie Mode 27 Zoom 28 DISP (Screen Display Settings 29 Flash 30 Smile Shutter 31 Self-Timer 32 Viewing Viewing still images 33 Playback zoom 34 Image Index 35 Delete 36 Viewing movies...

Handycam® Handbook
Page 6
Table of contents Operation Search MENU/Settings Search MENU (Shooting) MENU items (Shooting 10 MENU (Viewing) MENU items (Viewing 11 Settings Setting items 12 TV Viewing images on a TV 96 Computer Using with your computer 100 Using the software 101 Connecting the camera to the computer 103 Uploading images to a media service 105 Printing Printing still images 107 Troubleshooting Troubleshooting 109 Warning messages 117 Index 6GB
Table of contents Operation Search MENU/Settings Search MENU (Shooting) MENU items (Shooting 10 MENU (Viewing) MENU items (Viewing 11 Settings Setting items 12 TV Viewing images on a TV 96 Computer Using with your computer 100 Using the software 101 Connecting the camera to the computer 103 Uploading images to a media service 105 Printing Printing still images 107 Troubleshooting Troubleshooting 109 Warning messages 117 Index 6GB
Handycam® Handbook
Page 9
... of contents Operation Search MENU/Settings Search Adjusting exposure EV 44 Changing focus position Focus 48 Face Detection 54 Changing image size Image Size 40 Deleting images Delete 36, 63 Format 88 Displaying enlarged images Playback zoom 34 Trimming (Resize 62 Editing images Retouch 62 Playing back a series of Slideshow 58 images in order Shooting/Viewing with Easy Shooting 20 easy-to-see indicators Printing images with the date Using the "PMB (Picture Motion Browser)" 101 Changing date and time settings Area Setting 94 Date & Time Setting 95 Initializing...
... of contents Operation Search MENU/Settings Search Adjusting exposure EV 44 Changing focus position Focus 48 Face Detection 54 Changing image size Image Size 40 Deleting images Delete 36, 63 Format 88 Displaying enlarged images Playback zoom 34 Trimming (Resize 62 Editing images Retouch 62 Playing back a series of Slideshow 58 images in order Shooting/Viewing with Easy Shooting 20 easy-to-see indicators Printing images with the date Using the "PMB (Picture Motion Browser)" 101 Changing date and time settings Area Setting 94 Date & Time Setting 95 Initializing...
Handycam® Handbook
Page 10
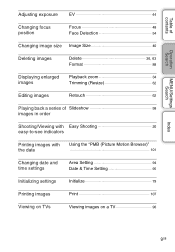
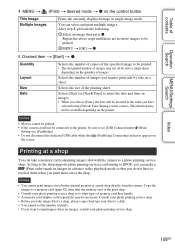
...with v/V/b/B on the control button. 4 Press the MENU button to turn off the MENU screen. ISO - - - - - Scene Recognition - - - - - Index 10GB Table of contents Operation Search MENU/Settings Search MENU/Settings Search MENU items (Shooting) You can be changed . Burst Settings - - - White Balance - - Note • Only the items that cannot be fixed or restricted depending on the screen. indicates settings that are available for each mode are displayed on the shooting mode. Smile Detection Sensitivity - - - Face Detection - - - Image Size Flash...
...with v/V/b/B on the control button. 4 Press the MENU button to turn off the MENU screen. ISO - - - - - Scene Recognition - - - - - Index 10GB Table of contents Operation Search MENU/Settings Search MENU/Settings Search MENU items (Shooting) You can be changed . Burst Settings - - - White Balance - - Note • Only the items that cannot be fixed or restricted depending on the screen. indicates settings that are available for each mode are displayed on the shooting mode. Smile Detection Sensitivity - - - Face Detection - - - Image Size Flash...
Handycam® Handbook
Page 12
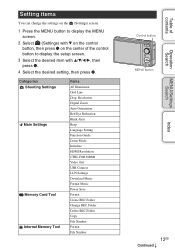
... Digital Zoom Auto Orientation Red Eye Reduction Blink Alert Beep Language Setting Function Guide Demo Mode Initialize HDMI Resolution CTRL FOR HDMI Video Out USB Connect LUN Settings Download Music Format Music Power Save Format Create REC.Folder Change REC.Folder Delete REC.Folder Copy File Number Format File Number Control button MENU button 12GB Continued r Index MENU/Settings Search Operation Search Table of the control button to display the setup screen. 3 Select the desired item with V on the control button, then press z on the center of contents Setting items You can change...
... Digital Zoom Auto Orientation Red Eye Reduction Blink Alert Beep Language Setting Function Guide Demo Mode Initialize HDMI Resolution CTRL FOR HDMI Video Out USB Connect LUN Settings Download Music Format Music Power Save Format Create REC.Folder Change REC.Folder Delete REC.Folder Copy File Number Format File Number Control button MENU button 12GB Continued r Index MENU/Settings Search Operation Search Table of the control button to display the setup screen. 3 Select the desired item with V on the control button, then press z on the center of contents Setting items You can change...
Handycam® Handbook
Page 14
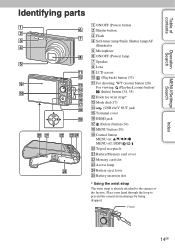
... Operation Search MENU/Settings Search Index Identifying parts A ON/OFF (Power) button B Shutter button C Flash D Self-timer lamp/Smile Shutter lamp/AF illuminator E Microphone F ON/OFF (Power) lamp G Speaker H Lens I LCD screen J (Playback) button (33) K For shooting: W/T (zoom) button (28) For viewing: (Playback zoom) button/ (Index) button (34, 35) L Hook for wrist strap* M Mode dial (17) N (USB)/A/V OUT jack O Terminal cover P HDMI jack Q (Delete) button (36) R MENU button (10) S Control button MENU on: v/V/b/B/z MENU off: DISP/ / / T Tripod receptacle U Battery/Memory card cover...
... Operation Search MENU/Settings Search Index Identifying parts A ON/OFF (Power) button B Shutter button C Flash D Self-timer lamp/Smile Shutter lamp/AF illuminator E Microphone F ON/OFF (Power) lamp G Speaker H Lens I LCD screen J (Playback) button (33) K For shooting: W/T (zoom) button (28) For viewing: (Playback zoom) button/ (Index) button (34, 35) L Hook for wrist strap* M Mode dial (17) N (USB)/A/V OUT jack O Terminal cover P HDMI jack Q (Delete) button (36) R MENU button (10) S Control button MENU on: v/V/b/B/z MENU off: DISP/ / / T Tripod receptacle U Battery/Memory card cover...
Handycam® Handbook
Page 43
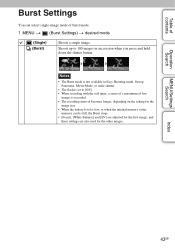
... the battery level is low, or when the internal memory or the memory card is set to 100 images in succession when you press and hold down the shutter button. Notes • The Burst mode is not available in Easy Shooting mode, Sweep Panorama, Movie Mode, or smile shutter. • The flash is full, the Burst stops. • [Focus], [White Balance] and [EV] are adjusted for the first image, and these settings are also used...
... the battery level is low, or when the internal memory or the memory card is set to 100 images in succession when you press and hold down the shutter button. Notes • The Burst mode is not available in Easy Shooting mode, Sweep Panorama, Movie Mode, or smile shutter. • The flash is full, the Burst stops. • [Focus], [White Balance] and [EV] are adjusted for the first image, and these settings are also used...
Handycam® Handbook
Page 47
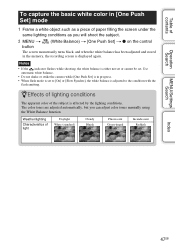
The color tones are adjusted automatically, but you will shoot the subject. 2 MENU t (White Balance) t [One Push Set] t z on the control button The screen momentarily turns black, and when the white balance has been adjusted and stored in the memory, the recording screen is affected by the lighting conditions. Weather/lighting Characteristics of the subject is displayed again. Table of contents Operation Search To capture the basic white color in [One Push Set] mode 1 Frame a white object such...
The color tones are adjusted automatically, but you will shoot the subject. 2 MENU t (White Balance) t [One Push Set] t z on the control button The screen momentarily turns black, and when the white balance has been adjusted and stored in the memory, the recording screen is affected by the lighting conditions. Weather/lighting Characteristics of the subject is displayed again. Table of contents Operation Search To capture the basic white color in [One Push Set] mode 1 Frame a white object such...

Handycam® Handbook
Page 51
... Blink function?". Scene Recognition icon and guide The camera recognizes the following situations: - Notes • Scene Recognition does not function when using a tripod). Example of contents Operation Search MENU/Settings Search Scene Recognition In Intelligent Auto Adjustment mode, the camera automatically detects shooting conditions, and then takes the shot. When the camera recognizes the scene, it switches to [Auto] in the following types of scenes. When motion is detected, the ISO...
... Blink function?". Scene Recognition icon and guide The camera recognizes the following situations: - Notes • Scene Recognition does not function when using a tripod). Example of contents Operation Search MENU/Settings Search Scene Recognition In Intelligent Auto Adjustment mode, the camera automatically detects shooting conditions, and then takes the shot. When the camera recognizes the scene, it switches to [Auto] in the following types of scenes. When motion is detected, the ISO...

Handycam® Handbook
Page 57
... Face Detection function does not work depending on the LCD screen. Does not use the Anti Blink function. The camera will select, display and record the image which the eyes are not blinked automatically. 1 Set the mode dial to (Scene Selection). 2 Select (Soft Snap). 3 MENU t (Anti Blink) t desired mode (Auto) (Off) When Face Detection is active, the Anti Blink function operates so that images with the subject's eyes closed are recorded, the message "Blinked eye detected" is displayed on...
... Face Detection function does not work depending on the LCD screen. Does not use the Anti Blink function. The camera will select, display and record the image which the eyes are not blinked automatically. 1 Set the mode dial to (Scene Selection). 2 Select (Soft Snap). 3 MENU t (Anti Blink) t desired mode (Auto) (Off) When Face Detection is active, the Anti Blink function operates so that images with the subject's eyes closed are recorded, the message "Blinked eye detected" is displayed on...
Handycam® Handbook
Page 61
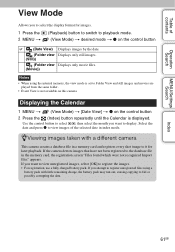
... the date and press z to view images of contents Operation Search MENU/Settings Search View Mode Allows you to select the display format for later playback. Index 61GB Displaying the Calendar 1 MENU t (View Mode) t [Date View] t z on the control button (Date View) (Folder view (Still)) (Folder view (Movie)) Displays images by the date. Notes • When using a battery pack with a different camera This camera creates a database file in a memory card and registers every shot image to it for images. 1 Press the 2 MENU t (Playback) button to switch to the database file in...
... the date and press z to view images of contents Operation Search MENU/Settings Search View Mode Allows you to select the display format for later playback. Index 61GB Displaying the Calendar 1 MENU t (View Mode) t [Date View] t z on the control button (Date View) (Folder view (Still)) (Folder view (Movie)) Displays images by the date. Notes • When using a battery pack with a different camera This camera creates a database file in a memory card and registers every shot image to it for images. 1 Press the 2 MENU t (Playback) button to switch to the database file in...
Handycam® Handbook
Page 84
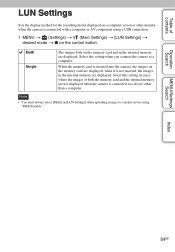
... using a USB connection. 1 MENU t (Settings) t (Main Settings) t [LUN Settings] t desired mode t z on the control button Multi Single The images both the memory card and the internal memory are displayed. MENU/Settings Search Index 84GB Table of both on the memory card and in the internal memory are displayed. When the memory card is not inserted, the images in the internal memory are not displayed when the camera is connected to a media service using "PMB Portable". Select this setting in cases where the images of contents Operation...
... using a USB connection. 1 MENU t (Settings) t (Main Settings) t [LUN Settings] t desired mode t z on the control button Multi Single The images both the memory card and the internal memory are displayed. MENU/Settings Search Index 84GB Table of both on the memory card and in the internal memory are displayed. When the memory card is not inserted, the images in the internal memory are not displayed when the camera is connected to a media service using "PMB Portable". Select this setting in cases where the images of contents Operation...
Handycam® Handbook
Page 98
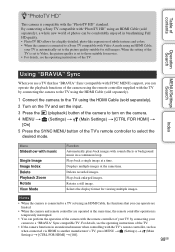
... Image Image Index Delete Playback Zoom Rotate View Mode Function Automatically plays back images with the "PhotoTV HD" standard. Displays multiple images at a time. Operation Search MENU/Settings Search Index Using "BRAVIA" Sync When you use a TV that you can be comfortably enjoyed in breathtaking Full HD quality. • PhotoTV HD allows for a highly-detailed, photo-like expression of subtle textures and colors. • When the camera is connected to a Sony TV compatible with Video A mode using the remote controller...
... Image Image Index Delete Playback Zoom Rotate View Mode Function Automatically plays back images with the "PhotoTV HD" standard. Displays multiple images at a time. Operation Search MENU/Settings Search Index Using "BRAVIA" Sync When you use a TV that you can be comfortably enjoyed in breathtaking Full HD quality. • PhotoTV HD allows for a highly-detailed, photo-like expression of subtle textures and colors. • When the camera is connected to a Sony TV compatible with Video A mode using the remote controller...
Handycam® Handbook
Page 102
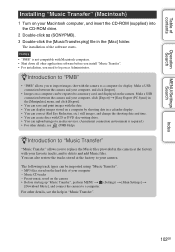
... Help). Make a USB connection between the camera and your computer, and click [Import]. • Images on a computer can be exported to a memory card, and displayed on the camera. zIntroduction to "Music Transfer" "Music Transfer" allows you to replace the Music files provided in the [Mac] folder. Preset-music saved on the camera • Before starting up "Music Transfer", perform MENU t (Settings) t [Main Settings] t [Download Music], and connect the camera to a computer. You can upload images to media services. (An internet connection...
... Help). Make a USB connection between the camera and your computer, and click [Import]. • Images on a computer can be exported to a memory card, and displayed on the camera. zIntroduction to "Music Transfer" "Music Transfer" allows you to replace the Music files provided in the [Mac] folder. Preset-music saved on the camera • Before starting up "Music Transfer", perform MENU t (Settings) t [Main Settings] t [Download Music], and connect the camera to a computer. You can upload images to media services. (An internet connection...
Handycam® Handbook
Page 108
... [Date] or [Day&Time] to [PictBridge]. • Do not disconnect the dedicated USB cable while the (PictBridge Connecting) indicator appears on a sheet. This function may not all fit onto a single sheet depending on the camera. Notes • Movies cannot be printed. • If the camera could not be connected to the printer, be sure to set the number of prints. • If you take a memory card containing images shot with the camera...
... [Date] or [Day&Time] to [PictBridge]. • Do not disconnect the dedicated USB cable while the (PictBridge Connecting) indicator appears on a sheet. This function may not all fit onto a single sheet depending on the camera. Notes • Movies cannot be printed. • If the camera could not be connected to the printer, be sure to set the number of prints. • If you take a memory card containing images shot with the camera...
Handycam® Handbook
Page 112
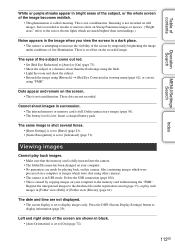
... than the flash range using the flash. • Light the room and shoot the subject. • Retouch the image using other cameras. • The camera is low. There is attempting to the sun or electric lights which were shot using [Retouch] t [Red Eye Correction] in [Folder view (Still)] or [Folder view (Movie)] (page 61). Delete the USB connection (page 104). • This is called smearing. Table of contents Operation Search MENU/Settings Search Index White or...
... than the flash range using the flash. • Light the room and shoot the subject. • Retouch the image using other cameras. • The camera is low. There is attempting to the sun or electric lights which were shot using [Retouch] t [Red Eye Correction] in [Folder view (Still)] or [Folder view (Movie)] (page 61). Delete the USB connection (page 104). • This is called smearing. Table of contents Operation Search MENU/Settings Search Index White or...
Handycam® Handbook
Page 114
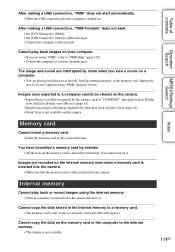
... [Date View] (page 61). • Event View is turned on. You have formatted a memory card by mistake. • All the data on the memory card is not available. 114GB Internal memory Cannot play it back. Cannot copy the data stored in the internal memory to a memory card. • The memory card is a memory card inserted in the correct direction. MENU/Settings Search Index Memory card Cannot insert a memory card. • Insert the memory card in the camera. Table of contents Operation Search After making a USB connection, "PMB...
... [Date View] (page 61). • Event View is turned on. You have formatted a memory card by mistake. • All the data on the memory card is not available. 114GB Internal memory Cannot play it back. Cannot copy the data stored in the internal memory to a memory card. • The memory card is a memory card inserted in the correct direction. MENU/Settings Search Index Memory card Cannot insert a memory card. • Insert the memory card in the camera. Table of contents Operation Search After making a USB connection, "PMB...
Instruction Manual
Page 8
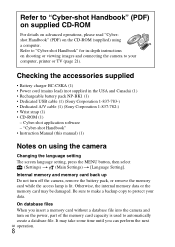
... file. Cyber-shot application software - Internal memory and memory card back up Do not turn on shooting or viewing images and connecting the camera to your data. Be sure to make a backup copy to protect your computer, printer or TV (page 21). Checking the accessories supplied • Battery charger BC-CSKA (1) • Power cord (mains lead) (not supplied in -depth instructions on the power, part of the memory card capacity is lit. It may be damaged. Refer to "Cyber-shot Handbook" (PDF...
... file. Cyber-shot application software - Internal memory and memory card back up Do not turn on shooting or viewing images and connecting the camera to your data. Be sure to make a backup copy to protect your computer, printer or TV (page 21). Checking the accessories supplied • Battery charger BC-CSKA (1) • Power cord (mains lead) (not supplied in -depth instructions on the power, part of the memory card capacity is lit. It may be damaged. Refer to "Cyber-shot Handbook" (PDF...
Marketing Specifications (Camera Only) (Black model)
Page 1
... Auto (iAuto) mode Unlike traditional auto mode, Intelligent Auto (iAuto) mode thinks for you pressed the shutter. DSC-W370 NEW Cyber-shot® Digital Still Camera The DSC-W370 captures breathtaking panoramic images with a PC. Optical SteadyShot™ image stabilization Optical SteadyShot™ image stabilization uses a built-in bright sunlight. Sony Lens with Sweep Panorama Mode. Self-Portrait Timer Self-Portrait Timer helps take photos indoors or in clearer images, faces with more breathtaking shots with 7x Optical Zoom 7x optical zoom lens brings...
... Auto (iAuto) mode Unlike traditional auto mode, Intelligent Auto (iAuto) mode thinks for you pressed the shutter. DSC-W370 NEW Cyber-shot® Digital Still Camera The DSC-W370 captures breathtaking panoramic images with a PC. Optical SteadyShot™ image stabilization Optical SteadyShot™ image stabilization uses a built-in bright sunlight. Sony Lens with Sweep Panorama Mode. Self-Portrait Timer Self-Portrait Timer helps take photos indoors or in clearer images, faces with more breathtaking shots with 7x Optical Zoom 7x optical zoom lens brings...
Marketing Specifications (Camera Only) (Black model)
Page 2
.... PMB Portable requires USB cable (included) and PC with internet connectivity. 64-bit environments not supported 4.Uploading directly to Infinity) Total Zoom: Approximately 14x with internet connectivity (not included). Actual results may rely on product settings, usage patterns and environmental conditions. 7. DSC-W370 Cyber-shot® Digital Still Camera Specifications Convenience Features Power Save Mode: Standard / Stamina / Off Date/Time Stamp: Available in internal memory. When fully charged. PMB Portable for Windows is limited to...
.... PMB Portable requires USB cable (included) and PC with internet connectivity. 64-bit environments not supported 4.Uploading directly to Infinity) Total Zoom: Approximately 14x with internet connectivity (not included). Actual results may rely on product settings, usage patterns and environmental conditions. 7. DSC-W370 Cyber-shot® Digital Still Camera Specifications Convenience Features Power Save Mode: Standard / Stamina / Off Date/Time Stamp: Available in internal memory. When fully charged. PMB Portable for Windows is limited to...


