
Cyber-shot® Handbook
Page 17
To copy (back up) data on a memory card Prepare a memory card with the dedicated USB cable, you can record images using the internal B Internal memory. To copy (back up ) data without a memory card inserted in the internal memory We ...cannot transfer image data on the memory card. memory [Playback]: Images stored in the internal memory to the internal memory. • By making a USB connection between the camera and a computer with sufficient free capacity, then perform the procedure explained in the internal memory. B [Playback]: Images on the memory card are played...
To copy (back up) data on a memory card Prepare a memory card with the dedicated USB cable, you can record images using the internal B Internal memory. To copy (back up ) data without a memory card inserted in the internal memory We ...cannot transfer image data on the memory card. memory [Playback]: Images stored in the internal memory to the internal memory. • By making a USB connection between the camera and a computer with sufficient free capacity, then perform the procedure explained in the internal memory. B [Playback]: Images on the memory card are played...
Cyber-shot® Handbook
Page 62
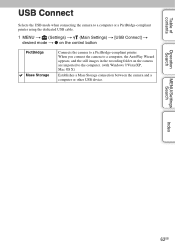
... Windows 7/Vista/XP, Mac OS X) Establishes a Mass Storage connection between the camera and a computer or other USB device. Table of contents USB Connect Selects the USB mode when connecting the camera to a computer or a PictBridge-compliant printer using the dedicated USB cable. 1 MENU t (Settings) t (Main Settings) t [USB Connect] t desired mode t z on the camera are imported to a PictBridge-compliant printer.
... Windows 7/Vista/XP, Mac OS X) Establishes a Mass Storage connection between the camera and a computer or other USB device. Table of contents USB Connect Selects the USB mode when connecting the camera to a computer or a PictBridge-compliant printer using the dedicated USB cable. 1 MENU t (Settings) t (Main Settings) t [USB Connect] t desired mode t z on the camera are imported to a PictBridge-compliant printer.
Cyber-shot® Handbook
Page 71
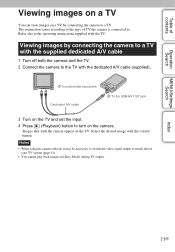
Images shot with the control button. Refer also to turn on the camera. Index 71GB Select the desired image with the camera appear on the TV and set the input. 4 Press (Playback) button to the operating instructions supplied with the TV. Table of TV the camera is connected ...can view images on a TV by connecting the camera to a TV with the supplied dedicated A/V cable 1 Turn off both the camera and the TV. 2 Connect the camera to the TV with the dedicated A/V cable (supplied). 1 To audio/video input jacks Dedicated A/V cable 2 To the USB/A/V OUT jack 3 Turn on the TV. ...
Images shot with the control button. Refer also to turn on the camera. Index 71GB Select the desired image with the camera appear on the TV and set the input. 4 Press (Playback) button to the operating instructions supplied with the TV. Table of TV the camera is connected ...can view images on a TV by connecting the camera to a TV with the supplied dedicated A/V cable 1 Turn off both the camera and the TV. 2 Connect the camera to the TV with the dedicated A/V cable (supplied). 1 To audio/video input jacks Dedicated A/V cable 2 To the USB/A/V OUT jack 3 Turn on the TV. ...
Cyber-shot® Handbook
Page 76
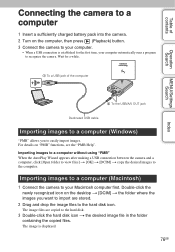
...the computer, then press (Playback) button. 3 Connect the camera to your computer. • When a USB connection is displayed. 76GB Importing images to a computer without using "PMB" When the AutoPlay Wizard appears after making a USB connection between the camera and a computer, click [Open folder to view files]...Macintosh) 1 Connect the camera to your computer automatically runs a program to recognize the camera. The image files are stored. 2 Drag and drop the image files to the hard disk icon. Table of the computer 2 To the USB/A/V OUT jack Dedicated USB cable Importing images to a ...
...the computer, then press (Playback) button. 3 Connect the camera to your computer. • When a USB connection is displayed. 76GB Importing images to a computer without using "PMB" When the AutoPlay Wizard appears after making a USB connection between the camera and a computer, click [Open folder to view files]...Macintosh) 1 Connect the camera to your computer automatically runs a program to recognize the camera. The image files are stored. 2 Drag and drop the image files to the hard disk icon. Table of the computer 2 To the USB/A/V OUT jack Dedicated USB cable Importing images to a ...

Cyber-shot® Handbook
Page 77
...of the memory card or the drive icon to 3 below before: • Disconnecting the dedicated USB cable. • Removing a memory card. • Inserting a memory card into the camera after copying images from the computer. MENU/Settings Search Index 77GB Windows XP Note Disconnect icon &#... icon of contents Operation Search Deleting the USB connection Perform the procedures from step 1 to the "Trash" icon beforehand when you use a Macintosh computer, and the camera is disconnected from the internal memory. • Turning off the camera. 1 Double-click the disconnect icon on...
...of the memory card or the drive icon to 3 below before: • Disconnecting the dedicated USB cable. • Removing a memory card. • Inserting a memory card into the camera after copying images from the computer. MENU/Settings Search Index 77GB Windows XP Note Disconnect icon &#... icon of contents Operation Search Deleting the USB connection Perform the procedures from step 1 to the "Trash" icon beforehand when you use a Macintosh computer, and the camera is disconnected from the internal memory. • Turning off the camera. 1 Double-click the disconnect icon on...
Cyber-shot® Handbook
Page 80
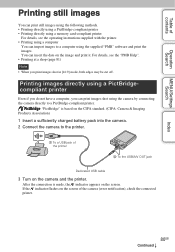
...on the CIPA standard. (CIPA: Camera & Imaging Products Association) 1 Insert a sufficiently charged battery pack into the camera. 2 Connect the camera to the printer. 1 To a USB jack of contents Operation Search MENU/Settings Search Printing still images You can print still images using the following methods. &#...a computer, you print images shot in [16:9] mode, both edges may be cut off. "PictBridge" is made, the indicator appears on the camera and the printer. Index 80GB Continued r Table of the printer 2 To the USB/A/V OUT jack Dedicated USB cable 3 Turn on the screen.
...on the CIPA standard. (CIPA: Camera & Imaging Products Association) 1 Insert a sufficiently charged battery pack into the camera. 2 Connect the camera to the printer. 1 To a USB jack of contents Operation Search MENU/Settings Search Printing still images You can print still images using the following methods. &#...a computer, you print images shot in [16:9] mode, both edges may be cut off. "PictBridge" is made, the indicator appears on the camera and the printer. Index 80GB Continued r Table of the printer 2 To the USB/A/V OUT jack Dedicated USB cable 3 Turn on the screen.
Cyber-shot® Handbook
Page 81
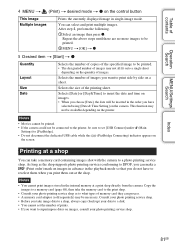
... the shop. Notes • You cannot print images stored in the internal memory at a shop You can take a memory card containing images shot with the camera to a photo printing service shop. After step 4, perform the following. 1Select an image then press z. Selects [Date] or [Day&Time]... data to a shop, always copy (back up) your data to a disk. • You cannot set [USB Connect] under (Main Settings) to [PictBridge]. • Do not disconnect the dedicated USB cable while the (PictBridge Connecting) indicator appears on the quantity of images. You can select and print multiple images.
... the shop. Notes • You cannot print images stored in the internal memory at a shop You can take a memory card containing images shot with the camera to a photo printing service shop. After step 4, perform the following. 1Select an image then press z. Selects [Date] or [Day&Time]... data to a shop, always copy (back up) your data to a disk. • You cannot set [USB Connect] under (Main Settings) to [PictBridge]. • Do not disconnect the dedicated USB cable while the (PictBridge Connecting) indicator appears on the quantity of images. You can select and print multiple images.
Cyber-shot® Handbook
Page 85
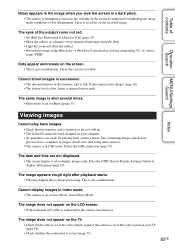
...camera, files containing images which were shot using "PMB". The same image is shot... see if the video output signal of the camera is set to the color system of your computer... screen in a dark place. • The camera is set to [Burst] (page 37). Delete... display images in index mode. • The camera is not a malfunction. The eyes of the subject...] in USB mode. Delete the USB connection (page 77). Press the DISP (Screen Display Settings) button to the camera, disconnect... (page 47), or correct using other cameras. • The camera is full. Insert a charged battery pack...
...camera, files containing images which were shot using "PMB". The same image is shot... see if the video output signal of the camera is set to the color system of your computer... screen in a dark place. • The camera is set to [Burst] (page 37). Delete... display images in index mode. • The camera is not a malfunction. The eyes of the subject...] in USB mode. Delete the USB connection (page 77). Press the DISP (Screen Display Settings) button to the camera, disconnect... (page 47), or correct using other cameras. • The camera is full. Insert a charged battery pack...
Cyber-shot® Handbook
Page 86
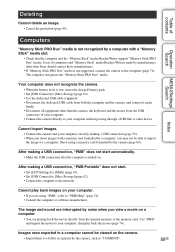
... is low, insert the charged battery pack. • Set [USB Connect] to [Mass Storage] (page 62). • Use the dedicated USB cable (supplied). • Disconnect the dedicated USB cable from both the computer and the camera, and connect it again firmly. • Disconnect all equipment other than Sony should contact those manufacturers. • If "Memory Stick PRO...
... is low, insert the charged battery pack. • Set [USB Connect] to [Mass Storage] (page 62). • Use the dedicated USB cable (supplied). • Disconnect the dedicated USB cable from both the computer and the camera, and connect it again firmly. • Disconnect all equipment other than Sony should contact those manufacturers. • If "Memory Stick PRO...
Cyber-shot® Handbook
Page 88
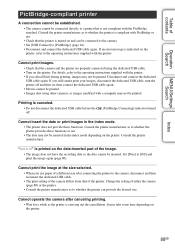
...still cannot print your images, disconnect the dedicated USB cable, turn the printer off . (PictBridge Connecting) indicator turned Cannot insert the date or print images in the index mode depending on , then connect the dedicated USB cable again. • Movies cannot be printed. • Images shot using the dedicated USB cable... for a while as to whether the printer can be connected to the camera. • Set [USB Connect] to [PictBridge] (page 62). • Disconnect and connect the dedicated USB cable again. For details, refer to the operating instructions supplied with the printer....
...still cannot print your images, disconnect the dedicated USB cable, turn the printer off . (PictBridge Connecting) indicator turned Cannot insert the date or print images in the index mode depending on , then connect the dedicated USB cable again. • Movies cannot be printed. • Images shot using the dedicated USB cable... for a while as to whether the printer can be connected to the camera. • Set [USB Connect] to [PictBridge] (page 62). • Disconnect and connect the dedicated USB cable again. For details, refer to the operating instructions supplied with the printer....

Cyber-shot® Handbook
Page 92
Operation cannot be executed in unsupported files • Processing and other cameras. This may not be performed on the printer. Table of the camera cannot be completed yet. You cannot print until it is full. No internal memory space remaining Delete images? • The internal memory is finished. To ... Search MENU/Settings Search Index • The data transmission to the internal memory, select [Yes] and delete unwanted images. 92GB Do not disconnect the dedicated USB cable. Processing... • The printer is canceling the current print job.
Operation cannot be executed in unsupported files • Processing and other cameras. This may not be performed on the printer. Table of the camera cannot be completed yet. You cannot print until it is full. No internal memory space remaining Delete images? • The internal memory is finished. To ... Search MENU/Settings Search Index • The data transmission to the internal memory, select [Yes] and delete unwanted images. 92GB Do not disconnect the dedicated USB cable. Processing... • The printer is canceling the current print job.
Instruction Manual
Page 5
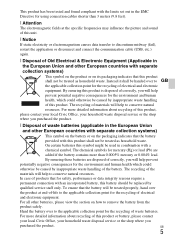
... of this unit. [ Notice If static electricity or electromagnetism causes data transfer to discontinue midway (fail), restart the application or disconnect and connect the communication cable (USB, etc.) again. [ Disposal of Old Electrical & Electronic Equipment (Applicable in the European Union and other European countries with separate collection systems) This symbol on the... in combination with a chemical symbol. This product has been tested and found compliant with the limits set out in the EMC Directive for using connection cables shorter than 0.0005% mercury or 0.004% lead.
... of this unit. [ Notice If static electricity or electromagnetism causes data transfer to discontinue midway (fail), restart the application or disconnect and connect the communication cable (USB, etc.) again. [ Disposal of Old Electrical & Electronic Equipment (Applicable in the European Union and other European countries with separate collection systems) This symbol on the... in combination with a chemical symbol. This product has been tested and found compliant with the limits set out in the EMC Directive for using connection cables shorter than 0.0005% mercury or 0.004% lead.
Instruction Manual
Page 8
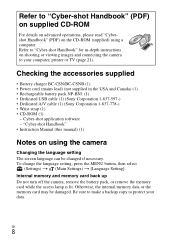
...be changed if necessary. Refer to "Cyber-shot Handbook" (PDF) on supplied CD-ROM For details on advanced operations, please read "Cybershot Handbook" (PDF) on the CD-ROM (supplied) using the camera Changing the language setting The screen language ...depth instructions on shooting or viewing images and connecting the camera to your data. Refer to "Cyber-shot Handbook" for in the USA and Canada) (1) • Rechargeable battery pack NP-BN1 (1) • Dedicated USB cable (1) (Sony Corporation 1-837-597-) • Dedicated A/V cable (1) (Sony Corporation 1-837-778-) • Wrist strap (1) ...
...be changed if necessary. Refer to "Cyber-shot Handbook" (PDF) on supplied CD-ROM For details on advanced operations, please read "Cybershot Handbook" (PDF) on the CD-ROM (supplied) using the camera Changing the language setting The screen language ...depth instructions on shooting or viewing images and connecting the camera to your data. Refer to "Cyber-shot Handbook" for in the USA and Canada) (1) • Rechargeable battery pack NP-BN1 (1) • Dedicated USB cable (1) (Sony Corporation 1-837-597-) • Dedicated A/V cable (1) (Sony Corporation 1-837-778-) • Wrist strap (1) ...
Marketing Specifications (Camera Only)
Page 2
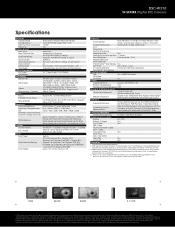
...USB cable (included) and PC with Precision Digital Zoom 2.7" Clear Photo™ LCD1 (230K) - PINK BLACK SILVER 2.7" LCD1 © 2010 Sony Electronics Inc. Reproduction in whole or in 5 groups iAUTO(F3.0/F4.3(W), 2 steps) / Program Auto(F3.0/F4.3(W), 2 steps) 5-20mm Still shots...Weights (Approx.) Approx. 4.3oz. (121g) body only; DSC-W310 W-SERIES Digital Still Camera Specifications General Camera Type Image Device Effective Pixels Resolution Processor Optics & Lens Lens... approximate and may vary Sony, Cyber-shot, Optical SteadyShot, BIONZ, Xtra Fine LCD, Clear Photo, Clear...
...USB cable (included) and PC with Precision Digital Zoom 2.7" Clear Photo™ LCD1 (230K) - PINK BLACK SILVER 2.7" LCD1 © 2010 Sony Electronics Inc. Reproduction in whole or in 5 groups iAUTO(F3.0/F4.3(W), 2 steps) / Program Auto(F3.0/F4.3(W), 2 steps) 5-20mm Still shots...Weights (Approx.) Approx. 4.3oz. (121g) body only; DSC-W310 W-SERIES Digital Still Camera Specifications General Camera Type Image Device Effective Pixels Resolution Processor Optics & Lens Lens... approximate and may vary Sony, Cyber-shot, Optical SteadyShot, BIONZ, Xtra Fine LCD, Clear Photo, Clear...


