Instruction Manual
Page 4
...[ Note: This equipment has been tested and found compliant with the limits for a digital device pursuant to Subpart B of Part 15 of materials will help prevent potential negative consequences... be determined by one or more detailed information about recycling of this product is Sony Deutschland GmbH, Hedelfinger Strasse 61, 70327 Stuttgart, Germany. Connect the equipment into ... transfer to discontinue midway (fail), restart the application or disconnect and connect the communication cable (USB, etc.) again. [ Disposal of this manual could void your household waste disposal service...
...[ Note: This equipment has been tested and found compliant with the limits for a digital device pursuant to Subpart B of Part 15 of materials will help prevent potential negative consequences... be determined by one or more detailed information about recycling of this product is Sony Deutschland GmbH, Hedelfinger Strasse 61, 70327 Stuttgart, Germany. Connect the equipment into ... transfer to discontinue midway (fail), restart the application or disconnect and connect the communication cable (USB, etc.) again. [ Disposal of this manual could void your household waste disposal service...

Instruction Manual
Page 10
... (this manual) (1) x Using the wrist strap Attach the strap and place your hand through the loop to prevent the camera from damage by being dropped. Cyber-shot application software - Hook Getting started Checking the accessories supplied • Battery charger BC-CSGD/BC-CSGE (1) • Wrist strap... cord (mains lead) (1) (not supplied in the USA and Canada) • Rechargeable battery pack NP-BG1 (1)/ Battery case (1) • USB, A/V cable for multi-use terminal (1) • Soft carrying case (1) (DSC-W275 only) • CD-ROM (1) - "Cyber-shot Handbook" - Getting started 10GB
... (this manual) (1) x Using the wrist strap Attach the strap and place your hand through the loop to prevent the camera from damage by being dropped. Cyber-shot application software - Hook Getting started Checking the accessories supplied • Battery charger BC-CSGD/BC-CSGE (1) • Wrist strap... cord (mains lead) (1) (not supplied in the USA and Canada) • Rechargeable battery pack NP-BG1 (1)/ Battery case (1) • USB, A/V cable for multi-use terminal (1) • Soft carrying case (1) (DSC-W275 only) • CD-ROM (1) - "Cyber-shot Handbook" - Getting started 10GB

Instruction Manual
Page 37
...indicator appears. 37GB After the connection is set the camera to enable USB connection between the camera and the printer. 1 Connect the camera to the printer with the cable for multi-use terminal (supplied). Use a Type2b-compliant HD Output Adaptor Cable. • Set [COMPONENT] to [PAL] (...page 48). Connecting to other devices Viewing images on a TV 1 Connect the camera to the TV with the cable for multi-use terminal (supplied). 2 Turn on the printer. Connecting to other devices Printing still images If you...
...indicator appears. 37GB After the connection is set the camera to enable USB connection between the camera and the printer. 1 Connect the camera to the printer with the cable for multi-use terminal (supplied). Use a Type2b-compliant HD Output Adaptor Cable. • Set [COMPONENT] to [PAL] (...page 48). Connecting to other devices Viewing images on a TV 1 Connect the camera to the TV with the cable for multi-use terminal (supplied). 2 Turn on the printer. Connecting to other devices Printing still images If you...

Instruction Manual
Page 41
... desktop. • To access the "PMB Guide" from the camera while the camera is displayed on the screen of the camera. appears on the screen during the communication session. Connecting to your...the camera, then press the (Playback) button. 2 Connect the camera to other devices Notes • Do not disconnect the cable for multi-use terminal (sold separately) and the USB /AV/ DC IN cable ... 1 Double-click the (PMB Guide) icon on the screen of the camera. 1 To a USB jack Cable for multi-use terminal from the start using a battery with little remaining charge, you can...
... desktop. • To access the "PMB Guide" from the camera while the camera is displayed on the screen of the camera. appears on the screen during the communication session. Connecting to your...the camera, then press the (Playback) button. 2 Connect the camera to other devices Notes • Do not disconnect the cable for multi-use terminal (sold separately) and the USB /AV/ DC IN cable ... 1 Double-click the (PMB Guide) icon on the screen of the camera. 1 To a USB jack Cable for multi-use terminal from the start using a battery with little remaining charge, you can...

Instruction Manual
Page 48
Changes music files using the cable for multi-use terminal. Formats the "Memory Stick Duo" media. ...output according to their default settings. Plays back still images at a 4:3 or 3:2 aspect ratio as a 16:9 aspect ratio on HD (High Definition) TV. Selects the USB mode when connecting the camera to be used to assign file numbers to ...to the TV connected. Selects the video signal output type according to display the function guide when you operate the camera. Selects the method used in "Memory Stick Duo" media for recording images. Category (Main Settings) ("Memory Stick"...
Changes music files using the cable for multi-use terminal. Formats the "Memory Stick Duo" media. ...output according to their default settings. Plays back still images at a 4:3 or 3:2 aspect ratio as a 16:9 aspect ratio on HD (High Definition) TV. Selects the USB mode when connecting the camera to be used to assign file numbers to ...to the TV connected. Selects the video signal output type according to display the function guide when you operate the camera. Selects the method used in "Memory Stick Duo" media for recording images. Category (Main Settings) ("Memory Stick"...

Cyber-shot® Handbook
Page 18
...internal memory. To copy (back up) data on a "Memory Stick Duo" media to the internal memory. • By making a USB connection between the camera and a computer with sufficient free capacity, then perform the procedure explained in the internal memory to 109 without error using this internal memory.... Duo" media with a cable for multi-use terminal, you copy (back up ) data on a hard disk of your computer Perform the procedure on a computer to the internal memory. Table of contents Operation Search MENU/Settings Search Using the internal memory The camera has approximately 11 MB of...
...internal memory. To copy (back up) data on a "Memory Stick Duo" media to the internal memory. • By making a USB connection between the camera and a computer with sufficient free capacity, then perform the procedure explained in the internal memory to 109 without error using this internal memory.... Duo" media with a cable for multi-use terminal, you copy (back up ) data on a hard disk of your computer Perform the procedure on a computer to the internal memory. Table of contents Operation Search MENU/Settings Search Using the internal memory The camera has approximately 11 MB of...

Cyber-shot® Handbook
Page 90
...cannot export movies to a computer. Connects the camera to a computer, the AutoPlay Wizard appears, and the still images in the recording folder on the control button Auto PictBridge PTP/MTP Mass Storage The camera recognizes automatically and sets up communication with Windows... camera and a computer or other USB device. Table of contents Operation Search USB Connect Selects the USB mode when connecting the camera to a computer or a PictBridge compliant printer using the cable for multi-use terminal. 1 MENU t (Settings) t (Main Settings) t [USB Connect] t desired mode t z on the camera...
...cannot export movies to a computer. Connects the camera to a computer, the AutoPlay Wizard appears, and the still images in the recording folder on the control button Auto PictBridge PTP/MTP Mass Storage The camera recognizes automatically and sets up communication with Windows... camera and a computer or other USB device. Table of contents Operation Search USB Connect Selects the USB mode when connecting the camera to a computer or a PictBridge compliant printer using the cable for multi-use terminal. 1 MENU t (Settings) t (Main Settings) t [USB Connect] t desired mode t z on the camera...

Cyber-shot® Handbook
Page 108
..." does not appear, set [USB Connect] to your computer. Index 108GB appears on the "PMB" functions, see the "PMB Guide". Connecting the camera to the computer When importing images from /to [Mass Storage] (page 90). Wait for a while. 1 To a USB jack Cable for multi-use terminal (sold separately...). • Use a Type2b-compliant USB/AV/DC IN cable. 3 Turn on the screen during the ...
..." does not appear, set [USB Connect] to your computer. Index 108GB appears on the "PMB" functions, see the "PMB Guide". Connecting the camera to the computer When importing images from /to [Mass Storage] (page 90). Wait for a while. 1 To a USB jack Cable for multi-use terminal (sold separately...). • Use a Type2b-compliant USB/AV/DC IN cable. 3 Turn on the screen during the ...
Cyber-shot® Handbook
Page 110
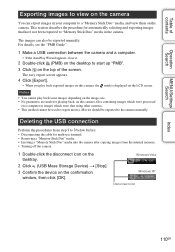
...computer or images which were shot using other cameras. • This method cannot be used to export movies. Deleting the USB connection Perform the procedures from the internal memory. • Turning off the camera. 1 Double-click the disconnect icon on the tasktray. 2 Click (USB Mass Storage Device) t ... a "Memory Stick Duo" media. • Inserting a "Memory Stick Duo" media into the camera after copying images from step 1 to 3 below before: • Disconnecting the cable for automatically selecting and exporting images that have not been exported to "Memory Stick Duo" media in...
...computer or images which were shot using other cameras. • This method cannot be used to export movies. Deleting the USB connection Perform the procedures from the internal memory. • Turning off the camera. 1 Double-click the disconnect icon on the tasktray. 2 Click (USB Mass Storage Device) t ... a "Memory Stick Duo" media. • Inserting a "Memory Stick Duo" media into the camera after copying images from step 1 to 3 below before: • Disconnecting the cable for automatically selecting and exporting images that have not been exported to "Memory Stick Duo" media in...

Cyber-shot® Handbook
Page 114
... when you want to import are copied to the hard disk. • For details on the camera. 4 Connect the camera to your computer. 1 To a USB jack Operation Search MENU/Settings Search Index Cable for multi-use terminal 2 To the multi connector 5 Double-click the newly recognized icon t [DCIM...Memory Stick Duo" media. • Inserting a "Memory Stick Duo" media into the camera, or connect the camera to a wall outlet (wall socket) with the AC Adaptor (sold separately) and the USB/AV/DC IN cable for multi-use terminal (sold separately). The image files are stored. 6 Drag and drop...
... when you want to import are copied to the hard disk. • For details on the camera. 4 Connect the camera to your computer. 1 To a USB jack Operation Search MENU/Settings Search Index Cable for multi-use terminal 2 To the multi connector 5 Double-click the newly recognized icon t [DCIM...Memory Stick Duo" media. • Inserting a "Memory Stick Duo" media into the camera, or connect the camera to a wall outlet (wall socket) with the AC Adaptor (sold separately) and the USB/AV/DC IN cable for multi-use terminal (sold separately). The image files are stored. 6 Drag and drop...

Cyber-shot® Handbook
Page 118
...using a PictBridge compliant printer Even if you do not have a computer, you can print images shot using the cable for multi-use terminal 3 Turn on the CIPA standard. (CIPA: Camera & Imaging Products Association) Note • You cannot print movies. If the indicator flashes on ..., be sure to set [USB Connect] under [PictBridge]. (Main Settings) to the printer. 1 To the USB jack 2 To the multi connector Cable for USB connection to the printer, using the camera by connecting the camera directly to a PictBridge compliant printer. Table of the camera (error notification), check the...
...using a PictBridge compliant printer Even if you do not have a computer, you can print images shot using the cable for multi-use terminal 3 Turn on the CIPA standard. (CIPA: Camera & Imaging Products Association) Note • You cannot print movies. If the indicator flashes on ..., be sure to set [USB Connect] under [PictBridge]. (Main Settings) to the printer. 1 To the USB jack 2 To the multi connector Cable for USB connection to the printer, using the camera by connecting the camera directly to a PictBridge compliant printer. Table of the camera (error notification), check the...

Cyber-shot® Handbook
Page 126
...right after playback starts. • This may happen due to the camera with the camera and a TV connected using an HD Output Adaptor Cable (sold separately), the image being shot is not displayed in black. • [Auto Orientation] is set...to [On] (page 80). Set the mode dial to other than Sony should contact those manufacturers. • If "Memory Stick PRO Duo" media is not supported, connect the camera to play back images. Computers Computer OS compatibility with a "Memory Stick"... Duo" media. 126GB This is correct (page 101). • If the USB connector of the cable for Macintosh.
...right after playback starts. • This may happen due to the camera with the camera and a TV connected using an HD Output Adaptor Cable (sold separately), the image being shot is not displayed in black. • [Auto Orientation] is set...to [On] (page 80). Set the mode dial to other than Sony should contact those manufacturers. • If "Memory Stick PRO Duo" media is not supported, connect the camera to play back images. Computers Computer OS compatibility with a "Memory Stick"... Duo" media. 126GB This is correct (page 101). • If the USB connector of the cable for Macintosh.

Cyber-shot® Handbook
Page 127
... computer, you may turn blue or otherwise not be able to import the images to a computer. After making a USB connection (page 108). • When you shoot images with the camera. This is not a malfunction. • When blue images appear, view them in the correct direction. You cannot ...the charged battery pack or use the AC adaptor (sold separately). • Set [USB Connect] to [Auto] or [Mass Storage] (page 90). • Use the cable for multi-use terminal (supplied). • Disconnect the cable for multi-use terminal from both the computer and the camera, and connect it . 127GB
... computer, you may turn blue or otherwise not be able to import the images to a computer. After making a USB connection (page 108). • When you shoot images with the camera. This is not a malfunction. • When blue images appear, view them in the correct direction. You cannot ...the charged battery pack or use the AC adaptor (sold separately). • Set [USB Connect] to [Auto] or [Mass Storage] (page 90). • Use the cable for multi-use terminal (supplied). • Disconnect the cable for multi-use terminal from both the computer and the camera, and connect it . 127GB

Cyber-shot® Handbook
Page 128
...whether the printer provides these functions or not. • When having images printed at a digital print shop, ask the shop whether they can print images with Exif information, consult the...software. • If you print an image shot with the PictBridge standard. PictBridge compliant printer A connection cannot be established. • The camera cannot be connected directly to a printer that ...is turned on and can be connected to the camera. • Set [USB Connect] to [PictBridge] (page 90). • Disconnect and connect the cable for superimposing dates on the recording date, you can...
...whether the printer provides these functions or not. • When having images printed at a digital print shop, ask the shop whether they can print images with Exif information, consult the...software. • If you print an image shot with the PictBridge standard. PictBridge compliant printer A connection cannot be established. • The camera cannot be connected directly to a printer that ...is turned on and can be connected to the camera. • Set [USB Connect] to [PictBridge] (page 90). • Disconnect and connect the cable for superimposing dates on the recording date, you can...


