Operating Instructions
Page 7
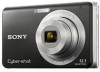
Table of contents Notes on using the camera 9 Getting started 10 Checking the accessories supplied 10 Identifying parts 11 Charging the battery pack 12 Inserting the battery pack/a "Memory Stick Duo" media (sold separately 14 Setting the clock 16 Shooting/viewing images 18 Shooting images 18 Viewing images 19 ...
Table of contents Notes on using the camera 9 Getting started 10 Checking the accessories supplied 10 Identifying parts 11 Charging the battery pack 12 Inserting the battery pack/a "Memory Stick Duo" media (sold separately 14 Setting the clock 16 Shooting/viewing images 18 Shooting images 18 Viewing images 19 ...
Operating Instructions
Page 8
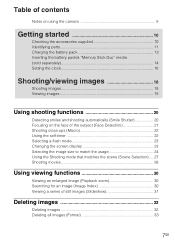
Connecting to other devices 34 Viewing images on a TV 34 Printing still images 34 Using the camera with a computer 36 Changing camera settings 40 Changing the operation sounds 40 Using the MENU items 41 Using the (Settings) items 44 Others 46 List of icons displayed on the screen 46 Learning more about the camera ("Cyber-shot Handbook 49 Troubleshooting 50 Precautions 52 Specifications 53 8GB
Connecting to other devices 34 Viewing images on a TV 34 Printing still images 34 Using the camera with a computer 36 Changing camera settings 40 Changing the operation sounds 40 Using the MENU items 41 Using the (Settings) items 44 Others 46 List of icons displayed on the screen 46 Learning more about the camera ("Cyber-shot Handbook 49 Troubleshooting 50 Precautions 52 Specifications 53 8GB
Operating Instructions
Page 9
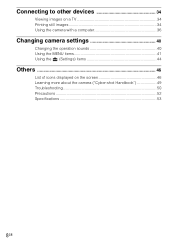
...compensation for damaged content or recording failure Sony cannot compensate for failure to record or loss or damage of recorded content due to a malfunction of the copyright laws. On image data compatibility • The camera conforms with DCF (Design rule for ...may occur. These dots are operational for Camera File system) universal standard established by JEITA (Japan Electronics and Information Technology Industries Association). • Sony does not guarantee that the camera is working correctly. • The camera is manufactured using extremely high-precision technology so...
...compensation for damaged content or recording failure Sony cannot compensate for failure to record or loss or damage of recorded content due to a malfunction of the copyright laws. On image data compatibility • The camera conforms with DCF (Design rule for ...may occur. These dots are operational for Camera File system) universal standard established by JEITA (Japan Electronics and Information Technology Industries Association). • Sony does not guarantee that the camera is working correctly. • The camera is manufactured using extremely high-precision technology so...
Operating Instructions
Page 10
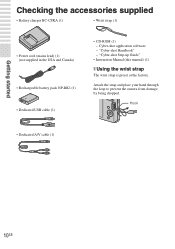
Hook • Dedicated A/V cable (1) 10GB Attach the strap and place your hand through the loop to prevent the camera from damage by being dropped. Getting started Getting started Checking the accessories supplied • Battery charger BC-CSKA (1) • Wrist strap (1) • Power cord (mains ...
Hook • Dedicated A/V cable (1) 10GB Attach the strap and place your hand through the loop to prevent the camera from damage by being dropped. Getting started Getting started Checking the accessories supplied • Battery charger BC-CSKA (1) • Wrist strap (1) • Power cord (mains ...
Operating Instructions
Page 11
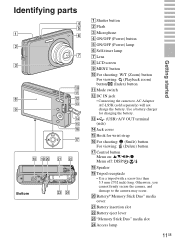
...LCD screen I MENU button J For shooting: W/T (Zoom) button For viewing: (Playback zoom) button/ (Index) button K Mode switch L DC IN jack • Connecting the camera to the camera may occur. Use a battery charger for wrist strap P For shooting: (Smile) button For viewing: (Delete) button Q Control button Menu on: v/V/b/B/z Menu off: DISP/ / ... lamp 11GB M (USB)·A/V OUT terminal (side) N Jack cover O Hook for charging the battery. Otherwise, you cannot firmly secure the camera, and damage to AC Adaptor AC-LS5K (sold separately) will not charge the battery.
...LCD screen I MENU button J For shooting: W/T (Zoom) button For viewing: (Playback zoom) button/ (Index) button K Mode switch L DC IN jack • Connecting the camera to the camera may occur. Use a battery charger for wrist strap P For shooting: (Smile) button For viewing: (Delete) button Q Control button Menu on: v/V/b/B/z Menu off: DISP/ / ... lamp 11GB M (USB)·A/V OUT terminal (side) N Jack cover O Hook for charging the battery. Otherwise, you cannot firmly secure the camera, and damage to AC Adaptor AC-LS5K (sold separately) will not charge the battery.
Operating Instructions
Page 13
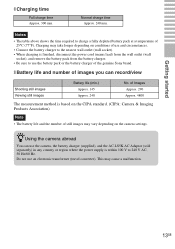
... can use an electronic transformer (travel converter). Normal charge time Approx. 240 min. x Battery life and number of the genuine Sony brand. zUsing the camera abroad You can record/view Shooting still images Viewing still images Battery life (min.) Approx. 145 Approx. 240 No. This may... vary depending on the CIPA standard. (CIPA: Camera & Imaging Products Association) Note • The battery life and the number of 25°C (77°F). Getting started x Charging time Full charge...
... can use an electronic transformer (travel converter). Normal charge time Approx. 240 min. x Battery life and number of the genuine Sony brand. zUsing the camera abroad You can record/view Shooting still images Viewing still images Battery life (min.) Approx. 145 Approx. 240 No. This may... vary depending on the CIPA standard. (CIPA: Camera & Imaging Products Association) Note • The battery life and the number of 25°C (77°F). Getting started x Charging time Full charge...
Operating Instructions
Page 15
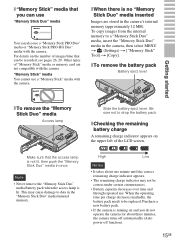
...over time and through repeated use "Memory Stick Duo" media You can be replaced. x "Memory Stick" media that you do not operate the camera for about one minute until the correct remaining charge indicator appears. • The remaining charge indicator may cause damage to data in once. Note .... To copy images from the internal memory to a "Memory Stick Duo" media, insert the "Memory Stick Duo" media in the camera's internal memory (approximately 12 MB). For details on the upper left of images/time that the access lamp is no "Memory Stick Duo" media inserted Images are...
...over time and through repeated use "Memory Stick Duo" media You can be replaced. x "Memory Stick" media that you do not operate the camera for about one minute until the correct remaining charge indicator appears. • The remaining charge indicator may cause damage to data in once. Note .... To copy images from the internal memory to a "Memory Stick Duo" media, insert the "Memory Stick Duo" media in the camera's internal memory (approximately 12 MB). For details on the upper left of images/time that the access lamp is no "Memory Stick Duo" media inserted Images are...

Operating Instructions
Page 16
Getting started Setting the clock 1 Press the ON/OFF (Power) button. The camera is indicated as 12:00 AM, and noon as 12:00 PM. 4 Select [OK], then press z. 16GB ON/OFF (Power) button Control button 3 Set the numeric value with v/V/b/B, then press z. • Midnight is turned on. • It may take time for the power to turn on and allow operation. 2 Select the date and time display format with v/V on the control button, then press z.
Getting started Setting the clock 1 Press the ON/OFF (Power) button. The camera is indicated as 12:00 AM, and noon as 12:00 PM. 4 Select [OK], then press z. 16GB ON/OFF (Power) button Control button 3 Set the numeric value with v/V/b/B, then press z. • Midnight is turned on. • It may take time for the power to turn on and allow operation. 2 Select the date and time display format with v/V on the control button, then press z.

Operating Instructions
Page 17
By using "PMB" in the CD-ROM (supplied), you can print or save images with the date. x Setting the date and time again Press the MENU button, then select (Settings) t [Clock Settings] (page 45). 17GB Getting started Note • The camera does not have a feature for superimposing dates on images.
By using "PMB" in the CD-ROM (supplied), you can print or save images with the date. x Setting the date and time again Press the MENU button, then select (Settings) t [Clock Settings] (page 45). 17GB Getting started Note • The camera does not have a feature for superimposing dates on images.
Operating Instructions
Page 18
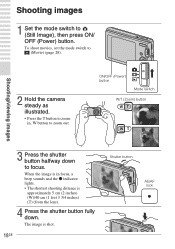
...; The shortest shooting distance is shot. 18GB Shutter button AE/AF lock To shoot movies, set the mode switch to (Movie) (page 28). 2 Hold the camera steady as illustrated. • Press the T button to focus. When the image is in , W button to (Still Image), then press ON/ OFF (Power) button. ON...
...; The shortest shooting distance is shot. 18GB Shutter button AE/AF lock To shoot movies, set the mode switch to (Movie) (page 28). 2 Hold the camera steady as illustrated. • Press the T button to focus. When the image is in , W button to (Still Image), then press ON/ OFF (Power) button. ON...
Operating Instructions
Page 19
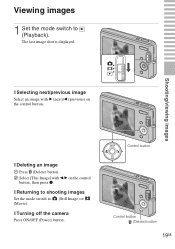
Shooting/viewing images x Selecting next/previous image Select an image with b/B on the control button. Control button Control button (Delete) button 19GB x Returning to shooting images Set the mode switch to (Playback). Viewing images 1 Set the mode switch to (Still Image) or (Movie). The last image shot is displayed. x Deleting an image 1 Press (Delete) button. 2 Select [This Image] with B (next)/b (previous) on the control button, then press z. x Turning off the camera Press ON/OFF (Power) button.
Shooting/viewing images x Selecting next/previous image Select an image with b/B on the control button. Control button Control button (Delete) button 19GB x Returning to shooting images Set the mode switch to (Playback). Viewing images 1 Set the mode switch to (Still Image) or (Movie). The last image shot is displayed. x Deleting an image 1 Press (Delete) button. 2 Select [This Image] with B (next)/b (previous) on the control button, then press z. x Turning off the camera Press ON/OFF (Power) button.
Operating Instructions
Page 20
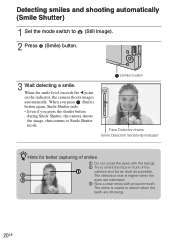
... mode switch to detect when the teeth are narrowed. 3 Give a clear smile with the bangs. 2 Try to orient the face in front of the camera and be as level as possible. The detection rate is easier to (Still Image). 2 Press (Smile) button. 3 Wait detecting a smile. The smile...showing. 20GB When you press (Smile) button again, Smile Shutter ends. • Even if you press the shutter button during Smile Shutter, the camera shoots the image, then returns to Smile Shutter mode. (Smile) button Face Detection frame Smile Detection Sensitivity indicator zHints for better capturing of smiles ...
... mode switch to detect when the teeth are narrowed. 3 Give a clear smile with the bangs. 2 Try to orient the face in front of the camera and be as level as possible. The detection rate is easier to (Still Image). 2 Press (Smile) button. 3 Wait detecting a smile. The smile...showing. 20GB When you press (Smile) button again, Smile Shutter ends. • Even if you press the shutter button during Smile Shutter, the camera shoots the image, then returns to Smile Shutter mode. (Smile) button Face Detection frame Smile Detection Sensitivity indicator zHints for better capturing of smiles ...
Operating Instructions
Page 21
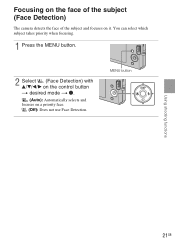
MENU button Using shooting functions 21GB You can select which subject takes priority when focusing. 1 Press the MENU button. 2 Select (Face Detection) with v/V/b/B on the control button t desired mode t z. (Auto): Automatically selects and focuses on it. Focusing on the face of the subject (Face Detection) The camera detects the face of the subject and focuses on a priority face. (Off): Does not use Face Detection.
MENU button Using shooting functions 21GB You can select which subject takes priority when focusing. 1 Press the MENU button. 2 Select (Face Detection) with v/V/b/B on the control button t desired mode t z. (Auto): Automatically selects and focuses on it. Focusing on the face of the subject (Face Detection) The camera detects the face of the subject and focuses on a priority face. (Off): Does not use Face Detection.
Operating Instructions
Page 22
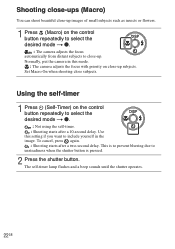
... operates. 22GB Set Macro On when shooting close -up. To cancel, press again. : Shooting starts after a 10-second delay. Use this mode. : The camera adjusts the focus with priority on close-up subjects. This is to prevent blurring due to unsteadiness when the shutter button is pressed. 2 Press the... shutter button. Normally, put the camera in this setting if you want to include yourself in the image. Using the self-timer 1 Press (Self-Timer) on the control button repeatedly ...
... operates. 22GB Set Macro On when shooting close -up. To cancel, press again. : Shooting starts after a 10-second delay. Use this mode. : The camera adjusts the focus with priority on close-up subjects. This is to prevent blurring due to unsteadiness when the shutter button is pressed. 2 Press the... shutter button. Normally, put the camera in this setting if you want to include yourself in the image. Using the self-timer 1 Press (Self-Timer) on the control button repeatedly ...
Operating Instructions
Page 26
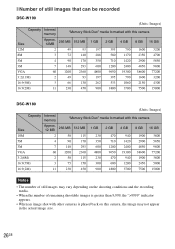
x Number of still images that can be recorded DSC-W190 (Units: Images) Capacity Internal memory "Memory Stick Duo" media formatted with this camera Size Approx. 12MB 256 MB 512 MB 1 GB 2 GB 4 GB 8 GB 16 GB 12M 2 49 93 197 395 790 1600 3200 8M 3 72 140 288 ...:9(9M) 3 66 130 262 533 1060 2150 4300 16:9(2M) 11 230 450 900 1800 3700 7500 15000 DSC-W180 (Units: Images) Capacity Internal memory "Memory Stick Duo" media formatted with this camera Size Approx. 12 MB 256 MB 512 MB 1 GB 2 GB 4 GB 8 GB 16 GB 10M 2 58 115 230 470 940...
x Number of still images that can be recorded DSC-W190 (Units: Images) Capacity Internal memory "Memory Stick Duo" media formatted with this camera Size Approx. 12MB 256 MB 512 MB 1 GB 2 GB 4 GB 8 GB 16 GB 12M 2 49 93 197 395 790 1600 3200 8M 3 72 140 288 ...:9(9M) 3 66 130 262 533 1060 2150 4300 16:9(2M) 11 230 450 900 1800 3700 7500 15000 DSC-W180 (Units: Images) Capacity Internal memory "Memory Stick Duo" media formatted with this camera Size Approx. 12 MB 256 MB 512 MB 1 GB 2 GB 4 GB 8 GB 16 GB 10M 2 58 115 230 470 940...
Operating Instructions
Page 27
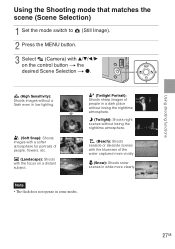
Using shooting functions Using the Shooting mode that matches the scene (Scene Selection) 1 Set the mode switch to (Still Image). 2 Press the MENU button. 3 Select (Camera) with v/V/b/B on the control button t the desired Scene Selection t z. (High Sensitivity): Shoots images without a flash even in low lighting. (Soft Snap): Shoots images with a softer ...
Using shooting functions Using the Shooting mode that matches the scene (Scene Selection) 1 Set the mode switch to (Still Image). 2 Press the MENU button. 3 Select (Camera) with v/V/b/B on the control button t the desired Scene Selection t z. (High Sensitivity): Shoots images without a flash even in low lighting. (Soft Snap): Shoots images with a softer ...
Operating Instructions
Page 29
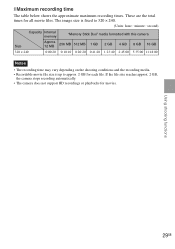
The image size is fixed to 320 × 240. (Units: hour : minute : second) Capacity Internal memory "Memory Stick Duo" media formatted with this camera Size Approx. 12 MB 256 MB 512 MB 1 GB 2 GB 4 GB 8 GB 16 GB 320 × 240 0:00:20 0:10:10 0:20:20 0:41:20 1:...GB for all movie files. These are the total times for each file. If the file size reaches approx. 2 GB, the camera stops recording automatically. • The camera does not support HD recordings or playbacks for movies. Using shooting functions 29GB x Maximum recording time The table below shows the approximate ...
The image size is fixed to 320 × 240. (Units: hour : minute : second) Capacity Internal memory "Memory Stick Duo" media formatted with this camera Size Approx. 12 MB 256 MB 512 MB 1 GB 2 GB 4 GB 8 GB 16 GB 320 × 240 0:00:20 0:10:10 0:20:20 0:41:20 1:...GB for all movie files. These are the total times for each file. If the file size reaches approx. 2 GB, the camera stops recording automatically. • The camera does not support HD recordings or playbacks for movies. Using shooting functions 29GB x Maximum recording time The table below shows the approximate ...

Operating Instructions
Page 34
...images If you have a PictBridge compliant printer, you may be using a PAL-only TV. Connecting to other devices Viewing images on a TV 1 Connect the camera to [PAL] (page 44). When images do not appear or jittery on the control button t z. 34GB MENU button Try switching the [Video Out] ...images by the following procedure. First, set to [NTSC] mode at the factory to the printer with the dedicated USB cable (supplied). 2 Turn on the camera and the printer. To the (USB)· A/V OUT terminal To audio/video input jacks Dedicated A/V cable Note • The [Video Out] setting is...
...images If you have a PictBridge compliant printer, you may be using a PAL-only TV. Connecting to other devices Viewing images on a TV 1 Connect the camera to [PAL] (page 44). When images do not appear or jittery on the control button t z. 34GB MENU button Try switching the [Video Out] ...images by the following procedure. First, set to [NTSC] mode at the factory to the printer with the dedicated USB cable (supplied). 2 Turn on the camera and the printer. To the (USB)· A/V OUT terminal To audio/video input jacks Dedicated A/V cable Note • The [Video Out] setting is...
Operating Instructions
Page 35
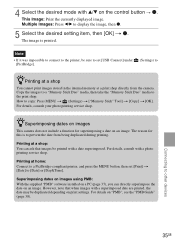
...reason for superimposing a date on the control button t z. Printing at a print shop directly from being duplicated during printing. zSuperimposing dates on images This camera does not include a function for this is printed. For details on "PMB", see the "PMB Guide" (page 38). Connecting to prevent the date... from the camera. Copy the images to a "Memory Stick Duo" media, then take the "Memory Stick Duo" media to zPrinting at a shop You cannot print...
...reason for superimposing a date on the control button t z. Printing at a print shop directly from being duplicated during printing. zSuperimposing dates on images This camera does not include a function for this is printed. For details on "PMB", see the "PMB Guide" (page 38). Connecting to prevent the date... from the camera. Copy the images to a "Memory Stick Duo" media, then take the "Memory Stick Duo" media to zPrinting at a shop You cannot print...
Operating Instructions
Page 36
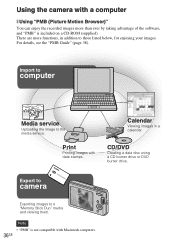
... images to those listed below, for enjoying your images. Print Printing images with Macintosh computers. 36GB Using the camera with a computer x Using "PMB (Picture Motion Browser)" You can enjoy the recorded images more functions, in a calendar. Note • "PMB" is included on a CD-ROM (...
... images to those listed below, for enjoying your images. Print Printing images with Macintosh computers. 36GB Using the camera with a computer x Using "PMB (Picture Motion Browser)" You can enjoy the recorded images more functions, in a calendar. Note • "PMB" is included on a CD-ROM (...


