
Operating Instructions
Page 1
Record the serial number in the space provided below. Digital Still Camera Operating Instructions Before operating the unit, please read this product. Refer to these numbers whenever you call upon your computer _______ Troubleshooting Additional information Index DSC-V3 Serial No DSC-V3 © 2004 Sony Corporation 2-318-592-12 (1) Getting started Shooting still images Viewing still images...
Record the serial number in the space provided below. Digital Still Camera Operating Instructions Before operating the unit, please read this product. Refer to these numbers whenever you call upon your computer _______ Troubleshooting Additional information Index DSC-V3 Serial No DSC-V3 © 2004 Sony Corporation 2-318-592-12 (1) Getting started Shooting still images Viewing still images...

Operating Instructions
Page 3
... cover, be sure to attach the fuse cover after you change the fuse. Never use the plug without the fuse cover. Please consult with this camera. You can help preserve our environment by ASTA or BSI to BS 1362, (i.e., marked with or mark) must be used. Attention The electromagnetic fi...and connect the USB cable again. For the customers in the EMC Directive for your safety and convenience. If the plug supplied with your nearest Sony service station. Notice Certain countries and regions may in Europe RECYCLING LITHIUM-ION BATTERIES Lithium-Ion batteries are recyclable.
... cover, be sure to attach the fuse cover after you change the fuse. Never use the plug without the fuse cover. Please consult with this camera. You can help preserve our environment by ASTA or BSI to BS 1362, (i.e., marked with or mark) must be used. Attention The electromagnetic fi...and connect the USB cable again. For the customers in the EMC Directive for your safety and convenience. If the plug supplied with your nearest Sony service station. Notice Certain countries and regions may in Europe RECYCLING LITHIUM-ION BATTERIES Lithium-Ion batteries are recyclable.
Operating Instructions
Page 4
... the rain or under similar conditions, be compensated for effective use. However, there may be repairable. Water entering the inside of the camera may cause malfunctions which in a cold location. If moisture condensation occurs, see page 143 and follow the instructions on the LCD screen and...; Images may cause dirt on the LCD screen in some cases may cause malfunctions. • Do not press the LCD screen hardly. The camera may cause irrecoverable damage to a disk. No compensation for contents of the recording Contents of the recording cannot be careful not to remove it...
... the rain or under similar conditions, be compensated for effective use. However, there may be repairable. Water entering the inside of the camera may cause malfunctions which in a cold location. If moisture condensation occurs, see page 143 and follow the instructions on the LCD screen and...; Images may cause dirt on the LCD screen in some cases may cause malfunctions. • Do not press the LCD screen hardly. The camera may cause irrecoverable damage to a disk. No compensation for contents of the recording Contents of the recording cannot be careful not to remove it...

Operating Instructions
Page 5
...Computer, Inc. • Macromedia and Flash are not actual images shot using this camera. The lens for this camera uses the MTF* measurement system for cameras developed jointly by Carl Zeiss, in Germany, and Sony Corporation, and offers the same quality as examples of pictures in this manual are ..., a numeric value indicating the amount of light from a specific part of reproducing fine images. About the Carl Zeiss lens This camera is equipped with a Carl Zeiss lens which is capable of the subject gathered at the corresponding position in the image. Trademarks • is a...
...Computer, Inc. • Macromedia and Flash are not actual images shot using this camera. The lens for this camera uses the MTF* measurement system for cameras developed jointly by Carl Zeiss, in Germany, and Sony Corporation, and offers the same quality as examples of pictures in this manual are ..., a numeric value indicating the amount of light from a specific part of reproducing fine images. About the Carl Zeiss lens This camera is equipped with a Carl Zeiss lens which is capable of the subject gathered at the corresponding position in the image. Trademarks • is a...
Operating Instructions
Page 6
...a "Memory Stick 22 Inserting and removing a CF card ...... 23 Setting the still image size 24 Image size and quality 26 Number of your camera 42 Viewing images on a TV screen 44 Deleting still images Deleting images 46 Formatting a recording medium 48 Before advanced operations How to setup and ...operate your camera 17 How to use the jog dial 51 Deciding the still image quality 52 Creating or selecting a folder 52 Creating a new folder 53 ...
...a "Memory Stick 22 Inserting and removing a CF card ...... 23 Setting the still image size 24 Image size and quality 26 Number of your camera 42 Viewing images on a TV screen 44 Deleting still images Deleting images 46 Formatting a recording medium 48 Before advanced operations How to setup and ...operate your camera 17 How to use the jog dial 51 Deciding the still image quality 52 Creating or selecting a folder 52 Creating a new folder 53 ...

Operating Instructions
Page 7
...Enjoying images on your computer 107 Image file storage destinations and file names 107 Viewing image files once copied to your camera.......... 109 Installing "Picture Package" and "ImageMixer VCD2 109 Copying images using "Picture Package 111 7 Multi Burst 76 Shooting in succession - Playback... a flash mode 69 Adjusting the flash level - Flash Level 71 Using an external flash 72 Using the Sony Flash 72 Using a commercially available external flash 73 Color Adjusting color tones - RAW 79 Shooting images without compression -
...Enjoying images on your computer 107 Image file storage destinations and file names 107 Viewing image files once copied to your camera.......... 109 Installing "Picture Package" and "ImageMixer VCD2 109 Copying images using "Picture Package 111 7 Multi Burst 76 Shooting in succession - Playback... a flash mode 69 Adjusting the flash level - Flash Level 71 Using an external flash 72 Using the Sony Flash 72 Using a commercially available external flash 73 Color Adjusting color tones - RAW 79 Shooting images without compression -
Operating Instructions
Page 11
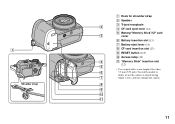
... slot (22) 5 • Use a tripod with a screw length of less than 6 5.5 mm (7/32 inch). qa 11 You will be unable to firmly secure the camera to tripods having 7 longer screws, and may damage the...
... slot (22) 5 • Use a tripod with a screw length of less than 6 5.5 mm (7/32 inch). qa 11 You will be unable to firmly secure the camera to tripods having 7 longer screws, and may damage the...
Operating Instructions
Page 12
... (Set up) You can change the focus and other adjustments as in the auto adjustment mode, but you can also change the settings of the camera (pages 51 and 140). (Movie shooting) You can shoot movies (page 97). (Playback/Edit) You can select the aperture value (page 58). The image ...functions using menus (pages 50 and 136). SCN (Scene Selection) You can shoot effective pictures according to [Fine] (page 52). Mode dial Before using your camera, set the desired mark on the mode dial onto the POWER lamp side. (Auto adjustment mode) The focus, exposure and white balance are made automatically...
... (Set up) You can change the focus and other adjustments as in the auto adjustment mode, but you can also change the settings of the camera (pages 51 and 140). (Movie shooting) You can shoot movies (page 97). (Playback/Edit) You can select the aperture value (page 58). The image ...functions using menus (pages 50 and 136). SCN (Scene Selection) You can shoot effective pictures according to [Fine] (page 52). Mode dial Before using your camera, set the desired mark on the mode dial onto the POWER lamp side. (Auto adjustment mode) The focus, exposure and white balance are made automatically...
Operating Instructions
Page 13
.... 3 DC plug Open the DC IN jack cover and connect the AC Adaptor (supplied) to turn off your camera. Use of your camera when charging the battery pack (page 17). • Your camera operates with a dry cotton bud. You can use the dirty plug. DC IN jack cover AC Adaptor mark...
.... 3 DC plug Open the DC IN jack cover and connect the AC Adaptor (supplied) to turn off your camera. Use of your camera when charging the battery pack (page 17). • Your camera operates with a dry cotton bud. You can use the dirty plug. DC IN jack cover AC Adaptor mark...
Operating Instructions
Page 14
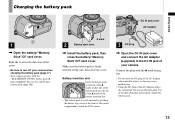
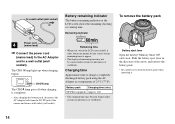
...; Connect the power cord (mains lead) to the AC Adaptor and to charge a completely discharged battery pack using the AC Adaptor at a temperature of the camera and from a wall outlet (wall socket). The CHG / lamp lights up when charging begins. Remaining indicator 60min Remaining time • When you switch the LCD...
...; Connect the power cord (mains lead) to the AC Adaptor and to charge a completely discharged battery pack using the AC Adaptor at a temperature of the camera and from a wall outlet (wall socket). The CHG / lamp lights up when charging begins. Remaining indicator 60min Remaining time • When you switch the LCD...
Operating Instructions
Page 15
... intervals Shooting movies3) Recording medium NP-FR1 (supplied) LCD screen LCD screen On Off "Memory Approx. 120 Approx. 170 Stick" min. The camera has been turned on CIPA standard. (CIPA: Camera & Imaging Products Association) Viewing still images2) Recording medium NP-FR1 (supplied) No. The flash strobes once every two times - The...
... intervals Shooting movies3) Recording medium NP-FR1 (supplied) LCD screen LCD screen On Off "Memory Approx. 120 Approx. 170 Stick" min. The camera has been turned on CIPA standard. (CIPA: Camera & Imaging Products Association) Viewing still images2) Recording medium NP-FR1 (supplied) No. The flash strobes once every two times - The...

Operating Instructions
Page 16
... a commercially available AC plug adaptor [a], if necessary, depending on the design of the camera. Using your camera in any trouble occurs while using the AC Adaptor, disconnect it both from the DC IN jack of the... camera and from a wall outlet (wall socket). • The set itself has been turned off....long as this may cause a malfunction. 16 AC-LS5/LS5B • Do not use your camera abroad Power sources You can use an electronic transformer (travel converter), as it is connected to 240 V AC, 50...
... a commercially available AC plug adaptor [a], if necessary, depending on the design of the camera. Using your camera in any trouble occurs while using the AC Adaptor, disconnect it both from the DC IN jack of the... camera and from a wall outlet (wall socket). • The set itself has been turned off....long as this may cause a malfunction. 16 AC-LS5/LS5B • Do not use your camera abroad Power sources You can use an electronic transformer (travel converter), as it is connected to 240 V AC, 50...

Operating Instructions
Page 17
... power Press POWER again. To set to prevent wearing down the battery. When you do not operate the camera for about three minutes during shooting or viewing or when performing SET UP, the camera turns off automatically to , P, S, A, M, SCN or , the lens portion moves. Do not touch the ... screen appears (page 18). The POWER lamp (green) lights up the menu or the SET UP screen (page 51), and use the control button Camera 1 1 AF Mode: 2 Digital Zoom: Date/Time: Red Eye Reduction: 1 Hologram AF: 2 Auto Review: Single Smart Off Off Auto Off SELECT Setup 2 1 File Number: USB Connect:...
... power Press POWER again. To set to prevent wearing down the battery. When you do not operate the camera for about three minutes during shooting or viewing or when performing SET UP, the camera turns off automatically to , P, S, A, M, SCN or , the lens portion moves. Do not touch the ... screen appears (page 18). The POWER lamp (green) lights up the menu or the SET UP screen (page 51), and use the control button Camera 1 1 AF Mode: 2 Digital Zoom: Date/Time: Red Eye Reduction: 1 Hologram AF: 2 Auto Review: Single Smart Off Off Auto Off SELECT Setup 2 1 File Number: USB Connect:...

Operating Instructions
Page 21
...cards compliant with CompactFlash Type I, however, we cannot guarantee proper operation of all CF cards. • Copying between media cannot be done with this camera. • For more information about the "Memory Stick", see page 144. • Before using a CF card, be obtained (page 48). CF.../CF switch Select the recording medium with CompactFlash Type II. Otherwise, satisfactory performance may not be sure to format it using this camera. This camera is not compliant with the /CF switch. : When recording images onto a "Memory Stick" or playing back images from a CF card....
...cards compliant with CompactFlash Type I, however, we cannot guarantee proper operation of all CF cards. • Copying between media cannot be done with this camera. • For more information about the "Memory Stick", see page 144. • Before using a CF card, be obtained (page 48). CF.../CF switch Select the recording medium with CompactFlash Type II. Otherwise, satisfactory performance may not be sure to format it using this camera. This camera is not compliant with the /CF switch. : When recording images onto a "Memory Stick" or playing back images from a CF card....
Operating Instructions
Page 22
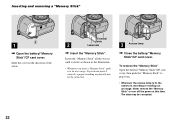
..." to pop it can go. If you insert a "Memory Stick", push it as far as it out. • Whenever the access lamp is lit, the camera is recording or reading out an image. Terminal side 2 Label side Insert the "Memory Stick".
..." to pop it can go. If you insert a "Memory Stick", push it as far as it out. • Whenever the access lamp is lit, the camera is recording or reading out an image. Terminal side 2 Label side Insert the "Memory Stick".
Operating Instructions
Page 23
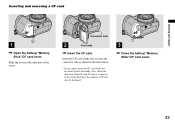
... forcefully. Connector side 2 Front side Insert the CF card. If you cannot insert the CF card all the way in the wrong direction, the camera or CF card may be damaged. 2 1 3 Close the battery/"Memory Stick"/CF card cover. 23 Also, check the direction of the arrow. Slide the...
... forcefully. Connector side 2 Front side Insert the CF card. If you cannot insert the CF card all the way in the wrong direction, the camera or CF card may be damaged. 2 1 3 Close the battery/"Memory Stick"/CF card cover. 23 Also, check the direction of the arrow. Slide the...

Operating Instructions
Page 24
... the still image size 7M 7M 3:2 5M 3M 1M Image Size CF card eject lever Access lamp • Whenever the access lamp is lit, the camera is ejected.
... the still image size 7M 7M 3:2 5M 3M 1M Image Size CF card eject lever Access lamp • Whenever the access lamp is lit, the camera is ejected.
Operating Instructions
Page 26
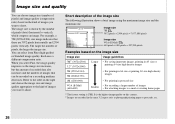
... × 2304 pixels = 7,077,888 pixels 2304 480 Image size VGA (E-Mail) VGA 640 pixels × 480 pixels = 307,200 pixels Examples based on this camera. 2) Images are 3072 pixels horizontally and 2304 pixels vertically. It is the highest image quality on the image size Image size 7M1) (3072×2304...
... × 2304 pixels = 7,077,888 pixels 2304 480 Image size VGA (E-Mail) VGA 640 pixels × 480 pixels = 307,200 pixels Examples based on this camera. 2) Images are 3072 pixels horizontally and 2304 pixels vertically. It is the highest image quality on the image size Image size 7M1) (3072×2304...

Operating Instructions
Page 28
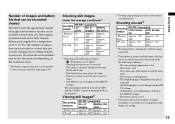
...; You can resize the images later (Resize function, see page 52. • When images recorded using earlier Sony models are played back on a recording medium that has been formatted by this camera, the display may differ from these values according to [Normal]. CF card (Units: number of images) Capacity .... • When the images are shown below. • The table below shows the approximate number of images that can be recorded on this camera. For the number of images that can be saved in other modes, see page 135. 2) For more information about the image quality (compression ...
...; You can resize the images later (Resize function, see page 52. • When images recorded using earlier Sony models are played back on a recording medium that has been formatted by this camera, the display may differ from these values according to [Normal]. CF card (Units: number of images) Capacity .... • When the images are shown below. • The table below shows the approximate number of images that can be recorded on this camera. For the number of images that can be saved in other modes, see page 135. 2) For more information about the image quality (compression ...
Operating Instructions
Page 29
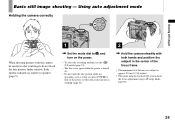
Using auto adjustment mode Holding the camera correctly When shooting pictures with the camera, be careful so that your fingers do not block the lens portion, finder window, flash emitter, infrared ray emitter or speaker (page 9). 1 &#... is operating, such as when you press POWER to turn on the power or when the zoom function is working (page 31). 2 Hold the camera steadily with both hands and position the subject in the center of the focus frame. • The minimum focal distance to a subject is approx. 50...
Using auto adjustment mode Holding the camera correctly When shooting pictures with the camera, be careful so that your fingers do not block the lens portion, finder window, flash emitter, infrared ray emitter or speaker (page 9). 1 &#... is operating, such as when you press POWER to turn on the power or when the zoom function is working (page 31). 2 Hold the camera steadily with both hands and position the subject in the center of the focus frame. • The minimum focal distance to a subject is approx. 50...


