Operating Instructions
Page 1
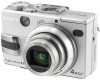
... in the space provided below. DSC-V1 Serial No. Model No. Digital Still Camera Operating Instructions Before operating the unit, please read this product. Refer to these numbers whenever you call upon your computer_________ Troubleshooting Additional information Index Owner's Record The model and serial numbers are located on your Sony dealer regarding this manual thoroughly...
... in the space provided below. DSC-V1 Serial No. Model No. Digital Still Camera Operating Instructions Before operating the unit, please read this product. Refer to these numbers whenever you call upon your computer_________ Troubleshooting Additional information Index Owner's Record The model and serial numbers are located on your Sony dealer regarding this manual thoroughly...
Operating Instructions
Page 3
...application or disconnect and connect the USB cable again. "Memory Stick" and battery pack N50 For the Customers in Canada THIS CLASS B DIGITAL APPARATUS COMPLIES WITH CANADIAN ICES-003. Notice Certain countries may influence the picture and sound of rechargeable batteries, call toll free 1-800-822...to power this equipment has a detachable fuse cover, be used rechargeable batteries to this camera. Should the fuse in Europe This product has been tested and found compliant with your nearest Sony service station. OPERATION IS SUBJECT TO THE FOLLOWING TWO CONDITIONS: (1) THIS DEVICE MAY ...
...application or disconnect and connect the USB cable again. "Memory Stick" and battery pack N50 For the Customers in Canada THIS CLASS B DIGITAL APPARATUS COMPLIES WITH CANADIAN ICES-003. Notice Certain countries may influence the picture and sound of rechargeable batteries, call toll free 1-800-822...to power this equipment has a detachable fuse cover, be used rechargeable batteries to this camera. Should the fuse in Europe This product has been tested and found compliant with your nearest Sony service station. OPERATION IS SUBJECT TO THE FOLLOWING TWO CONDITIONS: (1) THIS DEVICE MAY ...

Operating Instructions
Page 4
... force to remove it may not be trailed on the LCD screen and the LCD finder. However, there may cause malfunction. Do not aim the camera at the sun or other materials may be careful not to record or play back properly. • Do not use The heat of the copyright... so over 99.99% of the pixels are operational for if recording or playback is not a malfunction. Clean the flash surface before using the camera. The camera may cause the malfunction of images recorded or edited with the Design rule for long periods may cause malfunctions. • Images may cause dirt on...
... force to remove it may not be trailed on the LCD screen and the LCD finder. However, there may cause malfunction. Do not aim the camera at the sun or other materials may be careful not to record or play back properly. • Do not use The heat of the copyright... so over 99.99% of the pixels are operational for if recording or playback is not a malfunction. Clean the flash surface before using the camera. The camera may cause the malfunction of images recorded or edited with the Design rule for long periods may cause malfunctions. • Images may cause dirt on...
Operating Instructions
Page 5
...and product names used in all cases in the image. 5 The lens for this camera uses the MTF* measurement system for cameras developed jointly by Carl Zeiss, in Germany, and Sony Corporation, and offers the same quality as examples of the subject gathered at the ... in this camera. Trademarks • "Memory Stick," and "MagicGate Memory Stick" are trademarks of Sony Corporation. • "Memory Stick Duo" and are trademarks of Sony Corporation. • "Memory Stick PRO" and are trademarks of Sony Corporation. • "MagicGate" and are not actual images shot using this ...
...and product names used in all cases in the image. 5 The lens for this camera uses the MTF* measurement system for cameras developed jointly by Carl Zeiss, in Germany, and Sony Corporation, and offers the same quality as examples of the subject gathered at the ... in this camera. Trademarks • "Memory Stick," and "MagicGate Memory Stick" are trademarks of Sony Corporation. • "Memory Stick Duo" and are trademarks of Sony Corporation. • "Memory Stick PRO" and are trademarks of Sony Corporation. • "MagicGate" and are not actual images shot using this ...
Operating Instructions
Page 6
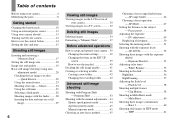
...on a TV screen 32 Deleting still images Deleting images 34 Formatting a "Memory Stick 37 Before advanced operations How to setup and operate your camera 14 How to the subject - TIFF 61 Macro 24 Using the self-timer 25 Selecting a flash mode 26 Shooting images with the finder... 29 6 Viewing still images Viewing images on the LCD screen of contents Before using auto adjustment mode 20 Checking the last image you shot - AE LOCK 52 Shooting three images with the manual adjustments... 43 Shutter speed priority mode 44 Aperture priority mode 45 Manual exposure mode...
...on a TV screen 32 Deleting still images Deleting images 34 Formatting a "Memory Stick 37 Before advanced operations How to setup and operate your camera 14 How to the subject - TIFF 61 Macro 24 Using the self-timer 25 Selecting a flash mode 26 Shooting images with the finder... 29 6 Viewing still images Viewing images on the LCD screen of contents Before using auto adjustment mode 20 Checking the last image you shot - AE LOCK 52 Shooting three images with the manual adjustments... 43 Shutter speed priority mode 44 Aperture priority mode 45 Manual exposure mode...
Operating Instructions
Page 8
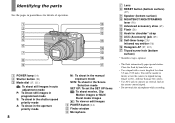
You will be unable to firmly secure the camera to tripods having longer screws, and may damage the camera. • Use ACC jack to connect an external flash or the remote control tripod. • Do not touch the microphone while recording. Close the flash ...
You will be unable to firmly secure the camera to tripods having longer screws, and may damage the camera. • Use ACC jack to connect an external flash or the remote control tripod. • Do not touch the microphone while recording. Close the flash ...

Operating Instructions
Page 10
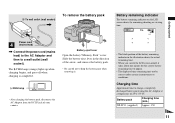
... Clean the DC plug of the battery compartment down. 3 DC plug , Open the jack cover and connect the AC Adaptor (supplied) to turn off your camera. Do not use only C type battery pack (page 120). 2 Battery eject lever , Install the battery pack, then close the cover. • The battery... battery pack. 10 Connect the plug with the v mark facing left. • Do not short the DC plug of your camera when charging the battery pack (page 14). • Your camera operates with the "InfoLITHIUM" NP-FC11 battery pack (C type) (supplied). Insert the battery pack with a dry cotton bud....
... Clean the DC plug of the battery compartment down. 3 DC plug , Open the jack cover and connect the AC Adaptor (supplied) to turn off your camera. Do not use only C type battery pack (page 120). 2 Battery eject lever , Install the battery pack, then close the cover. • The battery... battery pack. 10 Connect the plug with the v mark facing left. • Do not short the DC plug of your camera when charging the battery pack (page 14). • Your camera operates with the "InfoLITHIUM" NP-FC11 battery pack (C type) (supplied). Insert the battery pack with a dry cotton bud....
Operating Instructions
Page 11
... /off when charging is completed. /CHG lamp /CHG • After charging the battery pack, disconnect the AC Adaptor from the DC IN jack of your camera. The /CHG lamp (orange) lights up when charging begins, and goes off , it takes about one minute for the correct battery remaining time to drop...
... /off when charging is completed. /CHG lamp /CHG • After charging the battery pack, disconnect the AC Adaptor from the DC IN jack of your camera. The /CHG lamp (orange) lights up when charging begins, and goes off , it takes about one minute for the correct battery remaining time to drop...
Operating Instructions
Page 12
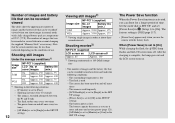
... Approx. 175 2) Viewing single images in order at about three second intervals Shooting movies3) NP-FC11 (supplied) LCD screen on LCD screen off . The camera has been turned on and off many times - The battery capacity decreases as you use it more and more and as necessary. Set the mode... charging the flash, the /CHG lamp flashes and the LCD screen turns off Approx. 85 Approx. 130 3) Shooting continuously at a temperature of use the camera with a fully charged battery pack at 160 (Mail) image size • The number of images and the battery life that can be recorded/viewed are...
... Approx. 175 2) Viewing single images in order at about three second intervals Shooting movies3) NP-FC11 (supplied) LCD screen on LCD screen off . The camera has been turned on and off many times - The battery capacity decreases as you use it more and more and as necessary. Set the mode... charging the flash, the /CHG lamp flashes and the LCD screen turns off Approx. 85 Approx. 130 3) Shooting continuously at a temperature of use the camera with a fully charged battery pack at 160 (Mail) image size • The number of images and the battery life that can be recorded/viewed are...
Operating Instructions
Page 13
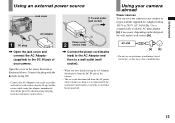
Connect the plug with the supplied AC Adaptor within 100 V to 240 V AC, 50/60 Hz. Using your camera abroad Power sources You can use an electronic transformer (travel converter), as illustrated above. Getting started Using an external power source Jack cover 2 To wall ... and then to a wall outlet (wall socket). • When you have finished using the AC Adaptor, disconnect it from the DC IN jack of the camera. • The set is not disconnected from the AC power source (mains) as long as it is connected to the wall outlet (wall socket) even...
Connect the plug with the supplied AC Adaptor within 100 V to 240 V AC, 50/60 Hz. Using your camera abroad Power sources You can use an electronic transformer (travel converter), as illustrated above. Getting started Using an external power source Jack cover 2 To wall ... and then to a wall outlet (wall socket). • When you have finished using the AC Adaptor, disconnect it from the DC IN jack of the camera. • The set is not disconnected from the AC power source (mains) as long as it is connected to the wall outlet (wall socket) even...
Operating Instructions
Page 14
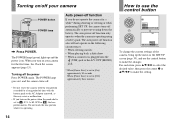
...time with the battery pack or the AC Adaptor removed, as this may cause a malfunction. • If you turn on . When you turn on your camera POWER POWER button POWER lamp , Press POWER. Do not touch the lens portion while it is operating using a battery pack. For each item, press v/V/b/B ...to select the desired value, then press the center z or v/V/b/B to , P, S, A, M, SCN or , the lens portion moves. Turning on/off your camera for the first time, the Clock Set screen appears (page 15). The POWER lamp (green) lights up the menu or the SET UP screen (page...
...time with the battery pack or the AC Adaptor removed, as this may cause a malfunction. • If you turn on . When you turn on your camera POWER POWER button POWER lamp , Press POWER. Do not touch the lens portion while it is operating using a battery pack. For each item, press v/V/b/B ...to select the desired value, then press the center z or v/V/b/B to , P, S, A, M, SCN or , the lens portion moves. Turning on/off your camera for the first time, the Clock Set screen appears (page 15). The POWER lamp (green) lights up the menu or the SET UP screen (page...

Operating Instructions
Page 17
... it clicks as illustrated. • Push the "Memory Stick" all the way in so that it out. • Whenever the access lamp is lit, the camera is securely seated in the direction of the arrow. • For details on "Memory Stick," see page 119. 2 Terminal Side , Insert the "Memory Stick." Never...
... it clicks as illustrated. • Push the "Memory Stick" all the way in so that it out. • Whenever the access lamp is lit, the camera is securely seated in the direction of the arrow. • For details on "Memory Stick," see page 119. 2 Terminal Side , Insert the "Memory Stick." Never...

Operating Instructions
Page 19
... size and quality Shooting still images You can resize the images later (Resize function, see page 41. • When images recorded using earlier Sony models are played back on this camera, the display may differ from the actual image size. • When the images are viewed on the LCD screen of the... camera, they all look the same size. • Number of shooting images can differ from among the five options in the following tables. When you can ...
... size and quality Shooting still images You can resize the images later (Resize function, see page 41. • When images recorded using earlier Sony models are played back on this camera, the display may differ from the actual image size. • When the images are viewed on the LCD screen of the... camera, they all look the same size. • Number of shooting images can differ from among the five options in the following tables. When you can ...

Operating Instructions
Page 20
... the lens portion, finder window, flash emitter, or infrared ray emitter. 1 , Set the mode dial to a subject is approx. 50 cm (19 3/4 inches). Hold the camera correctly and shoot the picture. • The minimum focal distance to , and turn on the power. The name of the folder where the image will... it is operating, such as when you press POWER to turn on the power or when the zoom function is working (page 23). • This camera can create new folders and select folders to be stored in the center of the focus frame. To shoot subjects at distances closer than this...
... the lens portion, finder window, flash emitter, or infrared ray emitter. 1 , Set the mode dial to a subject is approx. 50 cm (19 3/4 inches). Hold the camera correctly and shoot the picture. • The minimum focal distance to , and turn on the power. The name of the folder where the image will... it is operating, such as when you press POWER to turn on the power or when the zoom function is working (page 23). • This camera can create new folders and select folders to be stored in the center of the focus frame. To shoot subjects at distances closer than this...
Operating Instructions
Page 21
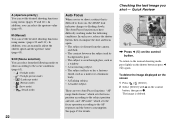
... image is ready for shooting. (The LCD screen may be frozen for still image shooting When shooting still images with your camera, you can set to steadily lit, the camera is not yet recorded. The image will be recorded in Continuous AF, page 47). 60min VGA 101 95 S AF 4... methods. (Auto adjustment mode) The focus, exposure and white balance are dark. • If you do not operate the camera for a while during recording or playback, the camera turns off automatically to allow easy shooting. In addition, you can set properly (except in the "Memory Stick." The shutter sounds...
... image is ready for shooting. (The LCD screen may be frozen for still image shooting When shooting still images with your camera, you can set to steadily lit, the camera is not yet recorded. The image will be recorded in Continuous AF, page 47). 60min VGA 101 95 S AF 4... methods. (Auto adjustment mode) The focus, exposure and white balance are dark. • If you do not operate the camera for a while during recording or playback, the camera turns off automatically to allow easy shooting. In addition, you can set properly (except in the "Memory Stick." The shutter sounds...
Operating Instructions
Page 22
... mode) - (Twilight portrait mode) - (Landscape mode) - (Portrait mode) - (Snow mode) - (Beach mode) 22 Auto Focus When you shot - In such cases, release the shutter button, then recompose the shot and focus again. • The subject is distant from the following conditions. The image is seen through glass, such as...finish, such as a mirror or a luminous body. • A flashing subject. • A backlit subject. SCN (Scene selection) You can select from the camera and dark. • The contrast between the subject and its background is poor. • The subject is deleted.
... mode) - (Twilight portrait mode) - (Landscape mode) - (Portrait mode) - (Snow mode) - (Beach mode) 22 Auto Focus When you shot - In such cases, release the shutter button, then recompose the shot and focus again. • The subject is distant from the following conditions. The image is seen through glass, such as...finish, such as a mirror or a luminous body. • A flashing subject. • A backlit subject. SCN (Scene selection) You can select from the camera and dark. • The contrast between the subject and its background is poor. • The subject is deleted.
Operating Instructions
Page 23
... the image size. [3.1M]: 5.1× [1.2M]: 8.1× [VGA]: 16× When the image size is not shown when using the smart zoom. Smart zoom Digital processing lets you press the zoom button, the zoom scaling indicator appears on the LCD screen may look rough. The AF range finder frame indicator.... • When using the smart zoom. When the smart zoom is not needed, set [Smart Zoom] to SET UP and changing [Zoom Lever] under [ ] 2 (Camera 2) (page 116). • The lens portion moves during zoom operation. The lever directions can be changed by setting the mode dial to [Off] in the...
... the image size. [3.1M]: 5.1× [1.2M]: 8.1× [VGA]: 16× When the image size is not shown when using the smart zoom. Smart zoom Digital processing lets you press the zoom button, the zoom scaling indicator appears on the LCD screen may look rough. The AF range finder frame indicator.... • When using the smart zoom. When the smart zoom is not needed, set [Smart Zoom] to SET UP and changing [Zoom Lever] under [ ] 2 (Camera 2) (page 116). • The lens portion moves during zoom operation. The lever directions can be changed by setting the mode dial to [Off] in the...

Operating Instructions
Page 25
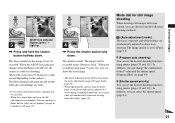
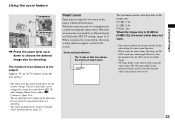
To cancel the self-timer in the middle of the camera, the focus and the exposure may not be correctly set to , and press V ( ) on the control button again. The indicator disappears from the LCD screen. &#...
To cancel the self-timer in the middle of the camera, the focus and the exposure may not be correctly set to , and press V ( ) on the control button again. The indicator disappears from the LCD screen. &#...
Operating Instructions
Page 26
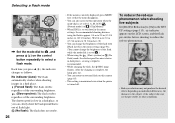
... dial is set to P, S, A, M, SCN ( (Portrait mode)) or (Clip Motion). • When [ISO] is set to 78 3/4 inches) (T) • You can also carry out this camera (page 65). • This setting is maintained even when the power is recommended. • While charging the flash, the /CHG lamp flashes. SL (Slow synchro...
... dial is set to P, S, A, M, SCN ( (Portrait mode)) or (Clip Motion). • When [ISO] is set to 78 3/4 inches) (T) • You can also carry out this camera (page 65). • This setting is maintained even when the power is recommended. • While charging the flash, the /CHG lamp flashes. SL (Slow synchro...

Operating Instructions
Page 27
... the subject has weak contrast, focus will not be achieved. (An approximate distance of 0.5 m to 2.8 m (19 3/4 inches to 110 1/4 inches) (W)/0.5 m to 2.5 m (19 3/4 inches to the camera, the hologram AF light is dirty, the hologram AF light may be dimmed and focus may not be achieved. The Hologram AF system uses gentler... eyes. * Hologram AF satisfies Class 1 (time base 30 000 seconds), specified in the SET UP settings (page 115). Although there are no problems with the Sony HVL-F32X flash. • The hologram AF does not function when SCN is not displayed.
... the subject has weak contrast, focus will not be achieved. (An approximate distance of 0.5 m to 2.8 m (19 3/4 inches to 110 1/4 inches) (W)/0.5 m to 2.5 m (19 3/4 inches to the camera, the hologram AF light is dirty, the hologram AF light may be dimmed and focus may not be achieved. The Hologram AF system uses gentler... eyes. * Hologram AF satisfies Class 1 (time base 30 000 seconds), specified in the SET UP settings (page 115). Although there are no problems with the Sony HVL-F32X flash. • The hologram AF does not function when SCN is not displayed.


