Operating Instructions (primary manual)
Page 8
...to your computer 56 1 Installing the USB driver and application .......... 58 2 Preparing your camera 67 3 Connecting your camera to your computer ........ 68 4 Copying images 70 5 Viewing the images on your camera 19 Setting the date and time 20 Shooting still images Inserting and removing a "Memory Stick ...22 Setting the still image size 23 Basic still image shooting (using auto adjustment mode 26 Using the self-timer 29...
...to your computer 56 1 Installing the USB driver and application .......... 58 2 Preparing your camera 67 3 Connecting your camera to your computer ........ 68 4 Copying images 70 5 Viewing the images on your camera 19 Setting the date and time 20 Shooting still images Inserting and removing a "Memory Stick ...22 Setting the still image size 23 Basic still image shooting (using auto adjustment mode 26 Using the self-timer 29...

Operating Instructions (primary manual)
Page 56
... Home Edition, or Windows XP Professional The above . Copying images to your computer Copying images Follow the steps below to copy the images you have shot to your OS. • After the USB driver or applications are installed, step 1 is unnecessary.
... Home Edition, or Windows XP Professional The above . Copying images to your computer Copying images Follow the steps below to copy the images you have shot to your OS. • After the USB driver or applications are installed, step 1 is unnecessary.

Operating Instructions (primary manual)
Page 58
...ImageMixer This application is used to your computer, and insert the supplied CD-ROM into the CD-ROM drive. Do not connect your camera to display and edit images that order. 58 x Image Transfer (for Windows users only) This application is used to easily transfer images from... the camera to a PC. If it does not appear, doubleclick (My Computer) t [ImageMixer] in that are stored in order to connect the camera to a computer. 1 Installing the USB driver and application Contents of the CD-ROM x USB driver This driver is needed in a computer.
...ImageMixer This application is used to your computer, and insert the supplied CD-ROM into the CD-ROM drive. Do not connect your camera to display and edit images that order. 58 x Image Transfer (for Windows users only) This application is used to easily transfer images from... the camera to a PC. If it does not appear, doubleclick (My Computer) t [ImageMixer] in that are stored in order to connect the camera to a computer. 1 Installing the USB driver and application Contents of the CD-ROM x USB driver This driver is needed in a computer.
Operating Instructions (primary manual)
Page 59
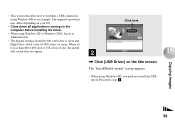
When set to step 5. Click here 2 , Click [USB Driver] on the computer before installing the driver. • When using Windows XP, you need not install the USB driver. The "InstallShield wizard" screen appears. • When using Windows XP or Windows 2000, log on as an example. Copying images 59 Proceed to less than ...
When set to step 5. Click here 2 , Click [USB Driver] on the computer before installing the driver. • When using Windows XP, you need not install the USB driver. The "InstallShield wizard" screen appears. • When using Windows XP or Windows 2000, log on as an example. Copying images 59 Proceed to less than ...

Operating Instructions (primary manual)
Page 60
3 Click here , Click [Next]. The USB driver installation starts. Your computer restarts. 60 The installation is completed, the screen informs you of completion. 4 Click here , Click [Yes, I want to restart my computer now], then click [Finish]. When the installation is completed. When the "Information" screen appears, click [Next].
3 Click here , Click [Next]. The USB driver installation starts. Your computer restarts. 60 The installation is completed, the screen informs you of completion. 4 Click here , Click [Yes, I want to restart my computer now], then click [Finish]. When the installation is completed. When the "Information" screen appears, click [Next].

Operating Instructions (primary manual)
Page 61
...agreement carefully. You must accept the terms of the agreement in order to proceed with the supplied USB cable. • The USB driver is not already installed on your computer with installation. 61 Select [English] then click [OK]. Follow the instructions that asks if you connect... the camera to install the driver will appear. If the necessary driver is needed in order to use the "Image Transfer" software to copy images to your computer automatically when you ...
...agreement carefully. You must accept the terms of the agreement in order to proceed with the supplied USB cable. • The USB driver is not already installed on your computer with installation. 61 Select [English] then click [OK]. Follow the instructions that asks if you connect... the camera to install the driver will appear. If the necessary driver is needed in order to use the "Image Transfer" software to copy images to your computer automatically when you ...

Operating Instructions (primary manual)
Page 63
When the installation is checked on page 64. 63 The "InstallShield Wizard" screen closes. The "Image Transfer" driver installation starts. If you of "ImageMixer," follow the procedure that begins on the "Image Transfer Settings" screen, then click [Next]. Copying images 9 Click here , Confirm if the checkbox is completed, the screen informs you wish to continue with the installation of completion. 10 Click here , Click [Finish].
When the installation is checked on page 64. 63 The "InstallShield Wizard" screen closes. The "Image Transfer" driver installation starts. If you of "ImageMixer," follow the procedure that begins on the "Image Transfer Settings" screen, then click [Next]. Copying images 9 Click here , Confirm if the checkbox is completed, the screen informs you wish to continue with the installation of completion. 10 Click here , Click [Finish].
Operating Instructions (primary manual)
Page 71
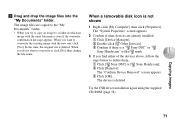
...name. The "Confirm Device Removal" screen appears. 3 Click [OK]. The device is not shown 1 Right-click [My Computer], then click [Properties]. Try the USB driver installation again using the supplied CD-ROM (page 58). In this time, the original one , click [Yes]. The "System Properties" screen appears. 2 Confirm if ...mark. 3 If you find either of the devices above, follow the steps below to a folder in which an image with the same file name is a " Sony DSC" or " Sony Handycam" with the new one is deleted. Copying images 71 When you try to copy an image to delete them. 1 Click...
...name. The "Confirm Device Removal" screen appears. 3 Click [OK]. The device is not shown 1 Right-click [My Computer], then click [Properties]. Try the USB driver installation again using the supplied CD-ROM (page 58). In this time, the original one , click [Yes]. The "System Properties" screen appears. 2 Confirm if ...mark. 3 If you find either of the devices above, follow the steps below to a folder in which an image with the same file name is a " Sony DSC" or " Sony Handycam" with the new one is deleted. Copying images 71 When you try to copy an image to delete them. 1 Click...
Operating Instructions (primary manual)
Page 76
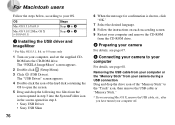
... X (v10.0/v10.1) Steps 2 to 5 1 Installing the USB driver and ImageMixer * For Mac OS 8.5.1, 8.6, or 9.0 users only 1 Turn on each succeeding screen. 9 Restart your computer and remove the CD-ROM from the CD-ROM drive. 2 Preparing your camera For details, see page 68. For Macintosh users Follow the steps... below, according to your computer, and set the supplied CDROM into the System Folder icon in the screen opened in step 4. • Sony USB Driver • Sony USB Shim 76 6 When the...
... X (v10.0/v10.1) Steps 2 to 5 1 Installing the USB driver and ImageMixer * For Mac OS 8.5.1, 8.6, or 9.0 users only 1 Turn on each succeeding screen. 9 Restart your computer and remove the CD-ROM from the CD-ROM drive. 2 Preparing your camera For details, see page 68. For Macintosh users Follow the steps... below, according to your computer, and set the supplied CDROM into the System Folder icon in the screen opened in step 4. • Sony USB Driver • Sony USB Shim 76 6 When the...
Operating Instructions (primary manual)
Page 82
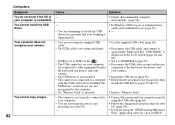
... procedure for the ones connected to a computer with the USB cable before installing the USB driver, so the device was connected to the keyboard, the mouse, and your camera. You cannot install the USB driver. p In Windows 2000, log on the LCD screen (pages 68 and 89). p ...p If you are using the correct copy procedure for Sony" application software, click on your computer are not using the "PIXELA ImageMixer for your OS (page 56). p Insert a "Memory Stick." your camera. • The USB driver is not installed. • The camera was not recognized by the computer. • No ...
... procedure for the ones connected to a computer with the USB cable before installing the USB driver, so the device was connected to the keyboard, the mouse, and your camera. You cannot install the USB driver. p In Windows 2000, log on the LCD screen (pages 68 and 89). p ...p If you are using the correct copy procedure for Sony" application software, click on your computer are not using the "PIXELA ImageMixer for your OS (page 56). p Insert a "Memory Stick." your camera. • The USB driver is not installed. • The camera was not recognized by the computer. • No ...

Operating Instructions (primary manual)
Page 99
Index A Access lamp 23 AE/AF lock 26 Auto Focus 28 Auto power-off function 19 B Battery charging time 15 preparing batteries 12 remaining indicator 15 Battery life 17 BEEP 89 Burst 38 C Charging charging the batteries 12 charging time 15 Cleaning 90 Clock set 20 Computer copying images 56, 70 Image Transfer 61 ImageMixer 64 USB cable 68 USB driver 58 Control button 11 Copying images 56, 70 D Deleting images 52 DPOF 46 E EXEC 24 Exif 94 99
Index A Access lamp 23 AE/AF lock 26 Auto Focus 28 Auto power-off function 19 B Battery charging time 15 preparing batteries 12 remaining indicator 15 Battery life 17 BEEP 89 Burst 38 C Charging charging the batteries 12 charging time 15 Cleaning 90 Clock set 20 Computer copying images 56, 70 Image Transfer 61 ImageMixer 64 USB cable 68 USB driver 58 Control button 11 Copying images 56, 70 D Deleting images 52 DPOF 46 E EXEC 24 Exif 94 99

Operating Instructions (primary manual)
Page 100
... 56, 70 file names 74 image file storage destinations 74 image size 23, 25, 87 Index screen 44 Installation Image Transfer 61 ImageMixer 64 USB driver 58 J JPEG 26 100 L LCD screen DISPLAY 29, 96 LCD LIGHT 28 M "Memory Stick" formatting a "Memory Stick 54 inserting/removing a "Memory Stick 22 number of...
... 56, 70 file names 74 image file storage destinations 74 image size 23, 25, 87 Index screen 44 Installation Image Transfer 61 ImageMixer 64 USB driver 58 J JPEG 26 100 L LCD screen DISPLAY 29, 96 LCD LIGHT 28 M "Memory Stick" formatting a "Memory Stick 54 inserting/removing a "Memory Stick 22 number of...


