
Limited Warranty (U.S. Only)
Page 1
... or consumables (such as set forth below when purchased directly from your responsibility to the Sony authorized service facility specified. SONY® Digital Camera LIMITED WARRANTY (US Only) Sony Electronics Inc. ("Sony") warrants this Limited Warranty will become the property of Sony. This Limited Warranty covers only the hardware components packaged with respect to www.sonv...
... or consumables (such as set forth below when purchased directly from your responsibility to the Sony authorized service facility specified. SONY® Digital Camera LIMITED WARRANTY (US Only) Sony Electronics Inc. ("Sony") warrants this Limited Warranty will become the property of Sony. This Limited Warranty covers only the hardware components packaged with respect to www.sonv...
Instruction Manual
Page 2
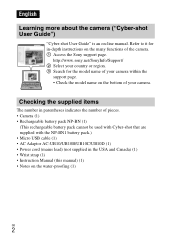
... supplied in -depth instructions on the bottom of your camera within the support page. • Check the model name on the many functions of your camera. Refer to it for the model name of the camera. 1 Access the Sony support page. English Learning more about the camera ("Cyber-shot User Guide") "Cyber-shot User Guide...
... supplied in -depth instructions on the bottom of your camera within the support page. • Check the model name on the many functions of your camera. Refer to it for the model name of the camera. 1 Access the Sony support page. English Learning more about the camera ("Cyber-shot User Guide") "Cyber-shot User Guide...

Instruction Manual
Page 4
... (mains lead), if supplied, is subject to the following two conditions: (1) This device may not cause harmful interference, and (2) this camera only, and should not be used with the same or equivalent type recommended by returning your used rechargeable batteries to the collection and recycling ...Disconnect the AC Adaptor from the wall outlet (wall socket) immediately if any interference received, including interference that can help preserve our environment by Sony. • Dispose of the FCC Rules. You can charge the battery pack. • Keep the battery pack out of the reach of...
... (mains lead), if supplied, is subject to the following two conditions: (1) This device may not cause harmful interference, and (2) this camera only, and should not be used with the same or equivalent type recommended by returning your used rechargeable batteries to the collection and recycling ...Disconnect the AC Adaptor from the wall outlet (wall socket) immediately if any interference received, including interference that can help preserve our environment by Sony. • Dispose of the FCC Rules. You can charge the battery pack. • Keep the battery pack out of the reach of...

Instruction Manual
Page 8
... 1 Sealing gasket 2 Surface contacting the sealing gasket GB 8 If the sealing gasket or its mating surfaces have not become scratched, take the camera to an authorized repair shop to have the sealing gasket replaced for a fee. • Accessories supplied do not meet water-proof, dust-proof... of Defense test method standard for shock), by the limited warranty. • This camera is water-proof/dust-proof equivalent to , malfunction of, or the water-proof performance of the camera This camera has enhanced water-proof, dust-proof and shock-proof protection. Even a small amount of...
... 1 Sealing gasket 2 Surface contacting the sealing gasket GB 8 If the sealing gasket or its mating surfaces have not become scratched, take the camera to an authorized repair shop to have the sealing gasket replaced for a fee. • Accessories supplied do not meet water-proof, dust-proof... of Defense test method standard for shock), by the limited warranty. • This camera is water-proof/dust-proof equivalent to , malfunction of, or the water-proof performance of the camera This camera has enhanced water-proof, dust-proof and shock-proof protection. Even a small amount of...

Instruction Manual
Page 9
..., you hide the icons by water splashes on the sealing gasket or its mating surfaces, wipe the area clean with water after using the camera under /near water". • Open the battery/memory card cover with less distortion. • If water drops or other foreign matter is...perform the procedure described in under /near water, it cannot be degraded. Touch for a few seconds to shoot underwater with the camera completely dry. When using the camera under/near water • The touch panel may get inside . If not rinsed, waterproof performance will lead to record clear images....
..., you hide the icons by water splashes on the sealing gasket or its mating surfaces, wipe the area clean with water after using the camera under /near water". • Open the battery/memory card cover with less distortion. • If water drops or other foreign matter is...perform the procedure described in under /near water, it cannot be degraded. Touch for a few seconds to shoot underwater with the camera completely dry. When using the camera under/near water • The touch panel may get inside . If not rinsed, waterproof performance will lead to record clear images....

Instruction Manual
Page 10
...and other matter lodged around the buttons or the lens cover. • After rinsing, wipe away water drops with good ventilation. If the camera does come in contact with sunscreen or suntan oil, quickly wipe it comes in contact with salt water inside the water, to have the ...gasket of the battery/memory card cover replaced for about 5 minutes. GB 10 Water will drain from water, place the camera on a dry cloth for a while to allow the camera to drain. • Bubbles may lead to corrosion or discoloration, and degradation of deformation and/or degraded waterproof performance. ...
...and other matter lodged around the buttons or the lens cover. • After rinsing, wipe away water drops with good ventilation. If the camera does come in contact with sunscreen or suntan oil, quickly wipe it comes in contact with salt water inside the water, to have the ...gasket of the battery/memory card cover replaced for about 5 minutes. GB 10 Water will drain from water, place the camera on a dry cloth for a while to allow the camera to drain. • Bubbles may lead to corrosion or discoloration, and degradation of deformation and/or degraded waterproof performance. ...
Instruction Manual
Page 11
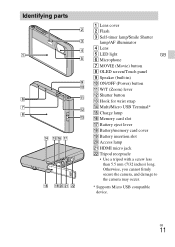
Otherwise, you cannot firmly secure the camera, and damage to the camera may occur. * Supports Micro USB compatible device. GB 11 Identifying parts A Lens cover B Flash C Self-timer lamp/Smile Shutter lamp/AF illuminator D Lens E LED light ...
Otherwise, you cannot firmly secure the camera, and damage to the camera may occur. * Supports Micro USB compatible device. GB 11 Identifying parts A Lens cover B Flash C Self-timer lamp/Smile Shutter lamp/AF illuminator D Lens E LED light ...

Instruction Manual
Page 12
Insert the battery pack until the battery eject lever locks into place. • Securely close the battery cover until you hear the slide lock on the cover catch in place and so that the yellow mark under the slide lock can no longer be seen. • Closing the cover with the guide inside the battery insertion slot. GB 12 Inserting the battery pack Battery eject lever 1 Open the cover. 2 Insert the battery pack. • Align the battery pack with the battery inserted incorrectly may damage the camera.
Insert the battery pack until the battery eject lever locks into place. • Securely close the battery cover until you hear the slide lock on the cover catch in place and so that the yellow mark under the slide lock can no longer be seen. • Closing the cover with the guide inside the battery insertion slot. GB 12 Inserting the battery pack Battery eject lever 1 Open the cover. 2 Insert the battery pack. • Align the battery pack with the battery inserted incorrectly may damage the camera.
Instruction Manual
Page 13
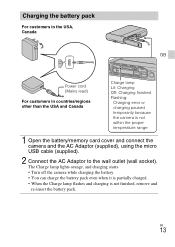
... countries/regions other than the USA and Canada Charge lamp Lit: Charging Off: Charging finished Flashing: Charging error or charging paused temporarily because the camera is not finished, remove and re-insert the battery pack. The Charge lamp lights orange, and charging starts. • Turn off the.... • When the Charge lamp flashes and charging is not within the proper temperature range 1 Open the battery/memory card cover and connect the camera and the AC Adaptor (supplied), using the micro USB cable (supplied). 2 Connect the AC Adaptor to the wall outlet (wall socket). GB 13
... countries/regions other than the USA and Canada Charge lamp Lit: Charging Off: Charging finished Flashing: Charging error or charging paused temporarily because the camera is not finished, remove and re-insert the battery pack. The Charge lamp lights orange, and charging starts. • Turn off the.... • When the Charge lamp flashes and charging is not within the proper temperature range 1 Open the battery/memory card cover and connect the camera and the AC Adaptor (supplied), using the micro USB cable (supplied). 2 Connect the AC Adaptor to the wall outlet (wall socket). GB 13
Instruction Manual
Page 14
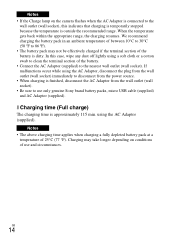
...the wall outlet (wall socket). • Be sure to use and circumstances. Notes • If the Charge lamp on conditions of use only genuine Sony brand battery packs, micro USB cable (supplied) and AC Adaptor (supplied). We recommend charging the battery pack in an ambient temperature of between 10&#...176;C to 30°C (50 ºF to 86 ºF). • The battery pack may take longer depending on the camera flashes when the AC Adaptor is connected to the wall outlet (wall socket), this case, wipe any dust off lightly using a soft cloth or a cotton...
...the wall outlet (wall socket). • Be sure to use and circumstances. Notes • If the Charge lamp on conditions of use only genuine Sony brand battery packs, micro USB cable (supplied) and AC Adaptor (supplied). We recommend charging the battery pack in an ambient temperature of between 10&#...176;C to 30°C (50 ºF to 86 ºF). • The battery pack may take longer depending on the camera flashes when the AC Adaptor is connected to the wall outlet (wall socket), this case, wipe any dust off lightly using a soft cloth or a cotton...

Instruction Manual
Page 15
... level decreases. GB 15 Do not turn on /off or restart the computer, or wake the computer to resume from sleep mode, disconnect the camera and the computer. - Before turning on /off , or restarting the computer or waking the computer from sleep mode when a USB connection has ...been established between the computer and the camera. x Charging by connecting to a computer The battery pack can be charged by connecting the camera to a computer using a custom-built computer or a modified computer. GB To a USB jack Notes &#...
... level decreases. GB 15 Do not turn on /off or restart the computer, or wake the computer to resume from sleep mode, disconnect the camera and the computer. - Before turning on /off , or restarting the computer or waking the computer from sleep mode when a USB connection has ...been established between the computer and the camera. x Charging by connecting to a computer The battery pack can be charged by connecting the camera to a computer using a custom-built computer or a modified computer. GB To a USB jack Notes &#...
Instruction Manual
Page 16
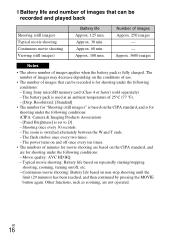
...times. - Continuous movie shooting: Battery life based on /off once every ten times. • The numbers of minutes for shooting under the following conditions: (CIPA: Camera & Imaging Products Association) - [Panel Brightness] is used at an ambient temperature of images Approx. 250 images - - Approx. 60 min. Approx. 180 min. Resolution... (29 minutes) has been reached, and then continued by pressing the MOVIE button again. Shooting once every 30 seconds. - Using Sony microSD memory card (Class 4 or faster) (sold separately) - Number of 25°C (77 °F). - [Disp.
...times. - Continuous movie shooting: Battery life based on /off once every ten times. • The numbers of minutes for shooting under the following conditions: (CIPA: Camera & Imaging Products Association) - [Panel Brightness] is used at an ambient temperature of images Approx. 250 images - - Approx. 60 min. Approx. 180 min. Resolution... (29 minutes) has been reached, and then continued by pressing the MOVIE button again. Shooting once every 30 seconds. - Using Sony microSD memory card (Class 4 or faster) (sold separately) - Number of 25°C (77 °F). - [Disp.

Instruction Manual
Page 17
... be supplied when the battery pack is not inserted in the camera. • Shooting is not possible when the camera is connected directly to a computer or to a power outlet using the supplied AC Adaptor. • If you can import images to a computer without worrying about ... from the playback screen to the playback screen. In addition, you connect the camera and a computer using the micro USB cable while the camera is in playback mode, the display on the camera will change from the wall outlet (wall socket) by connecting the camera to the AC Adaptor, using the micro USB cable.
... be supplied when the battery pack is not inserted in the camera. • Shooting is not possible when the camera is connected directly to a computer or to a power outlet using the supplied AC Adaptor. • If you can import images to a computer without worrying about ... from the playback screen to the playback screen. In addition, you connect the camera and a computer using the micro USB cable while the camera is in playback mode, the display on the camera will change from the wall outlet (wall socket) by connecting the camera to the AC Adaptor, using the micro USB cable.
Instruction Manual
Page 18
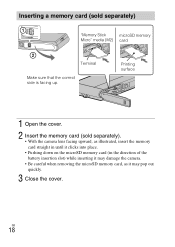
... Stick microSD memory Micro" media (M2) card Terminal Make sure that the correct side is facing up. Inserting a memory card (sold separately). • With the camera lens facing upward, as illustrated, insert the memory card straight in until it clicks into place. • Pushing down on the microSD memory card (in... the direction of the battery insertion slot) while inserting it may damage the camera. • Be careful when removing the microSD memory card, as it may pop out quickly. 3 Close the cover.
... Stick microSD memory Micro" media (M2) card Terminal Make sure that the correct side is facing up. Inserting a memory card (sold separately). • With the camera lens facing upward, as illustrated, insert the memory card straight in until it clicks into place. • Pushing down on the microSD memory card (in... the direction of the battery insertion slot) while inserting it may damage the camera. • Be careful when removing the microSD memory card, as it may pop out quickly. 3 Close the cover.

Instruction Manual
Page 19
This may cause damage to drop the battery pack. Confirm the direction of the memory card and reinsert it straight into the camera. x Memory cards that can be used Memory card For still images Memory Stick Micro A Memory Stick Micro (Mark2) microSD memory card B microSDHC memory card microSDXC ...
This may cause damage to drop the battery pack. Confirm the direction of the memory card and reinsert it straight into the camera. x Memory cards that can be used Memory card For still images Memory Stick Micro A Memory Stick Micro (Mark2) microSD memory card B microSDHC memory card microSDXC ...

Instruction Manual
Page 20
... pressing the ON/OFF (Power) button. • It may take time for the power to [High]. The camera is indicated as 12:00 AM, and noon as 12:00 PM. 5 Touch [OK]. 6 Follow the instructions on . Resolution] is set to turn on and ...
... pressing the ON/OFF (Power) button. • It may take time for the power to [High]. The camera is indicated as 12:00 AM, and noon as 12:00 PM. 5 Touch [OK]. 6 Follow the instructions on . Resolution] is set to turn on and ...

Instruction Manual
Page 21
... recording. • Use the W/T (zoom) lever to change the zoom scale. 2 Press the MOVIE button again to stop to protect the camera depending on the ambient temperature. The sound of the lever operating will be recorded when movie recording is finished. • Continuous shooting is possible ...for approximately 29 minutes at one time at the camera's default settings and when the temperature is approximately 25°C (77 °F). Notes • The sound of the MOVIE button operating may...
... recording. • Use the W/T (zoom) lever to change the zoom scale. 2 Press the MOVIE button again to stop to protect the camera depending on the ambient temperature. The sound of the lever operating will be recorded when movie recording is finished. • Continuous shooting is possible ...for approximately 29 minutes at one time at the camera's default settings and when the temperature is approximately 25°C (77 °F). Notes • The sound of the MOVIE button operating may...

Instruction Manual
Page 22
Viewing images 1 Touch (Playback). • When images on a memory card recorded with other cameras are played back on the screen. • To play back movies, touch (Playback) in the center of the screen. • To zoom in, move the W/T (...zoom) lever to shooting mode by pressing the shutter button halfway down. GB 22 x Selecting next/previous image Touch (Next)/ (Previous) on this camera, the registration screen for the data file appears. x Deleting an image Touch (Delete) t [This Image]. x Returning to shooting images Touch on the screen. • You...
Viewing images 1 Touch (Playback). • When images on a memory card recorded with other cameras are played back on the screen. • To play back movies, touch (Playback) in the center of the screen. • To zoom in, move the W/T (...zoom) lever to shooting mode by pressing the shutter button halfway down. GB 22 x Selecting next/previous image Touch (Next)/ (Previous) on this camera, the registration screen for the data file appears. x Deleting an image Touch (Delete) t [This Image]. x Returning to shooting images Touch on the screen. • You...
Instruction Manual
Page 23
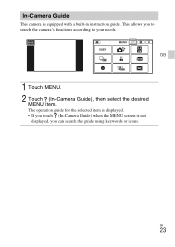
The operation guide for the selected item is displayed. • If you touch (In-Camera Guide) when the MENU screen is equipped with a built-in instruction guide. This allows you can search the guide using keywords or icons. GB 23 GB 1 Touch MENU. 2 Touch (In-Camera Guide), then select the desired MENU item. In-Camera Guide This camera is not displayed, you to search the camera's functions according to your needs.
The operation guide for the selected item is displayed. • If you touch (In-Camera Guide) when the MENU screen is equipped with a built-in instruction guide. This allows you can search the guide using keywords or icons. GB 23 GB 1 Touch MENU. 2 Touch (In-Camera Guide), then select the desired MENU item. In-Camera Guide This camera is not displayed, you to search the camera's functions according to your needs.

Instruction Manual
Page 25
... movie mode. Area of SteadyShot in which the eyes are not blinking. Color hue When [Toy camera] is selected in Picture Effect, sets the color hue. Face Detection Select to focus on. In-Camera Guide Search the camera's functions according to extract. Extracted Color When [Partial Color] is selected in Picture Effect, selects...
... movie mode. Area of SteadyShot in which the eyes are not blinking. Color hue When [Toy camera] is selected in Picture Effect, sets the color hue. Face Detection Select to focus on. In-Camera Guide Search the camera's functions according to extract. Extracted Color When [Partial Color] is selected in Picture Effect, selects...


