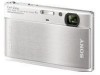
Instruction Manual
Page 6
Table of contents Notes on using the camera 8 Getting started 10 Checking the accessories supplied 10 Identifying parts 11 Charging the battery pack 12 Inserting the battery pack/a "Memory Stick Duo" media (sold ...
Table of contents Notes on using the camera 8 Getting started 10 Checking the accessories supplied 10 Identifying parts 11 Charging the battery pack 12 Inserting the battery pack/a "Memory Stick Duo" media (sold ...

Instruction Manual
Page 7
Deleting images 39 Deleting images 39 Deleting all images (Format 39 Connecting to other devices 40 Viewing images on a TV 40 Printing still images 40 Using the camera with a computer 42 Changing camera settings 46 Changing the operation sounds 46 Using the MENU items 47 Using the (Settings) items 50 Others 52 List of icons displayed on the screen 52 Learning more about the camera ("Cyber-shot Handbook 54 Troubleshooting 55 Precautions 57 Specifications 58 7GB
Deleting images 39 Deleting images 39 Deleting all images (Format 39 Connecting to other devices 40 Viewing images on a TV 40 Printing still images 40 Using the camera with a computer 42 Changing camera settings 46 Changing the operation sounds 46 Using the MENU items 47 Using the (Settings) items 50 Others 52 List of icons displayed on the screen 52 Learning more about the camera ("Cyber-shot Handbook 54 Troubleshooting 55 Precautions 57 Specifications 58 7GB

Instruction Manual
Page 8
... or "Memory Stick Duo" media may occur. If water enters inside the camera, a malfunction may be displayed on the LCD screen before use. Please use Sony genuine accessories If you use , but it before operating the camera. • Avoid exposing the camera to record images. It may cause malfunctions. • If moisture condensation occurs...
... or "Memory Stick Duo" media may occur. If water enters inside the camera, a malfunction may be displayed on the LCD screen before use. Please use Sony genuine accessories If you use , but it before operating the camera. • Avoid exposing the camera to record images. It may cause malfunctions. • If moisture condensation occurs...

Instruction Manual
Page 9
... system) universal standard established by JEITA (Japan Electronics and Information Technology Industries Association). • Sony does not guarantee that the camera will play back images recorded or edited with other equipment, or that other materials may be copyrighted. ...Unauthorized recording of such materials may be contrary to a malfunction of the copyright laws. On image data compatibility • The camera conforms with the camera. Warning on copyright Television programs, films, videotapes, and other equipment will play back images recorded with DCF (Design rule for...
... system) universal standard established by JEITA (Japan Electronics and Information Technology Industries Association). • Sony does not guarantee that the camera will play back images recorded or edited with other equipment, or that other materials may be copyrighted. ...Unauthorized recording of such materials may be contrary to a malfunction of the copyright laws. On image data compatibility • The camera conforms with the camera. Warning on copyright Television programs, films, videotapes, and other equipment will play back images recorded with DCF (Design rule for...

Instruction Manual
Page 10
... NP-BD1 (1)/ Battery case (1) x Using the paint pen The paint pen is already attached to the camera at the factory. Cyber-shot application software - "Cyber-shot Handbook" - It attaches to prevent the camera from damage by holding the paint pen. "Cyber-shot Step-up Guide" • Instruction Manual (this manual) (1) 10GB Place your hand through the loop to...
... NP-BD1 (1)/ Battery case (1) x Using the paint pen The paint pen is already attached to the camera at the factory. Cyber-shot application software - "Cyber-shot Handbook" - It attaches to prevent the camera from damage by holding the paint pen. "Cyber-shot Step-up Guide" • Instruction Manual (this manual) (1) 10GB Place your hand through the loop to...
Instruction Manual
Page 11
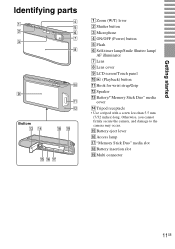
... M Battery/"Memory Stick Duo" media cover N Tripod receptacle • Use a tripod with a screw less than 5.5 mm (7/32 inches) long. Otherwise, you cannot firmly secure the camera, and damage to the...
... M Battery/"Memory Stick Duo" media cover N Tripod receptacle • Use a tripod with a screw less than 5.5 mm (7/32 inches) long. Otherwise, you cannot firmly secure the camera, and damage to the...

Instruction Manual
Page 13
...turns on conditions of use an electronic transformer (travel converter). zUsing the camera abroad You can use the battery pack or the battery charger of 25°C (77°F). - Normal charge time Approx. 160 min. Using Sony "Memory Stick PRO Duo" media (sold separately). Do not use and...The flash strobes once every two times. - Charging may cause a malfunction. 13GB Notes • The table above shows the time required to use the camera and the battery charger (supplied) in any country or region where the power supply is within 100 V to [Normal]. - A fully charged battery pack...
...turns on conditions of use an electronic transformer (travel converter). zUsing the camera abroad You can use the battery pack or the battery charger of 25°C (77°F). - Normal charge time Approx. 160 min. Using Sony "Memory Stick PRO Duo" media (sold separately). Do not use and...The flash strobes once every two times. - Charging may cause a malfunction. 13GB Notes • The table above shows the time required to use the camera and the battery charger (supplied) in any country or region where the power supply is within 100 V to [Normal]. - A fully charged battery pack...

Instruction Manual
Page 14
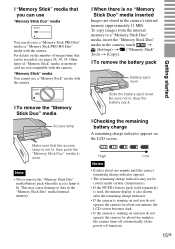
... Stick Duo" media until the battery eject lever is locked. 4 Close the cover. • Closing the cover with the battery inserted incorrectly may damage the camera. Getting started Inserting the battery pack/a "Memory Stick Duo" media (sold separately) 1 Open the cover. 2 Insert the "Memory Stick Duo" media (sold separately). Check the...
... Stick Duo" media until the battery eject lever is locked. 4 Close the cover. • Closing the cover with the battery inserted incorrectly may damage the camera. Getting started Inserting the battery pack/a "Memory Stick Duo" media (sold separately) 1 Open the cover. 2 Insert the "Memory Stick Duo" media (sold separately). Check the...
Instruction Manual
Page 15
...Battery eject lever Slide the battery eject lever. High Low Notes • It takes about one minute, the LCD screen becomes dark. • If the camera is lit. x To remove the "Memory Stick Duo" media Access lamp Make sure that the access lamp is no "Memory Stick Duo" media inserted Images... may not be recorded, see pages 24, 30, 34. For details on the number of "Memory Stick" media or memory card are stored in the camera, touch t (Settings) t ("Memory Stick" Tool) t [Copy]. To copy images from the internal memory to drop the battery pack. x When there is not lit, then push...
...Battery eject lever Slide the battery eject lever. High Low Notes • It takes about one minute, the LCD screen becomes dark. • If the camera is lit. x To remove the "Memory Stick Duo" media Access lamp Make sure that the access lamp is no "Memory Stick Duo" media inserted Images... may not be recorded, see pages 24, 30, 34. For details on the number of "Memory Stick" media or memory card are stored in the camera, touch t (Settings) t ("Memory Stick" Tool) t [Copy]. To copy images from the internal memory to drop the battery pack. x When there is not lit, then push...
Instruction Manual
Page 16
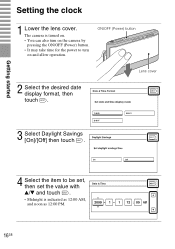
Getting started Setting the clock 1 Lower the lens cover. Lens cover 3 Select Daylight Savings [On]/[Off] then touch . 4 Select the item to turn on and allow operation. The camera is turned on. • You can also turn on the camera by pressing the ON/OFF (Power) button. • It may take time for the power to be set, then set the value with v/V and touch . • Midnight is indicated as 12:00 AM, and noon as 12:00 PM. 16GB ON/OFF (Power) button 2 Select the desired date display format, then touch .
Getting started Setting the clock 1 Lower the lens cover. Lens cover 3 Select Daylight Savings [On]/[Off] then touch . 4 Select the item to turn on and allow operation. The camera is turned on. • You can also turn on the camera by pressing the ON/OFF (Power) button. • It may take time for the power to be set, then set the value with v/V and touch . • Midnight is indicated as 12:00 AM, and noon as 12:00 PM. 16GB ON/OFF (Power) button 2 Select the desired date display format, then touch .

Instruction Manual
Page 17
Getting started 5 Select your desired area with the date. x Setting the date and time again Touch t (Settings) t (Clock Settings) (page 50). 17GB By using "PMB" in the CD-ROM (supplied), you can print or save images with b/B, then touch . 6 Touch [OK]. Note • The camera does not have a feature for superimposing dates on images.
Getting started 5 Select your desired area with the date. x Setting the date and time again Touch t (Settings) t (Clock Settings) (page 50). 17GB By using "PMB" in the CD-ROM (supplied), you can print or save images with b/B, then touch . 6 Touch [OK]. Note • The camera does not have a feature for superimposing dates on images.

Instruction Manual
Page 18
... indicator lights. • The shortest shooting distance is turned on. • To shoot movies, set (REC Mode) to (Movie Mode) (page 33). 2 Hold the camera steady as illustrated. • Slide the zoom (W/T) lever to the T side to focus. Slide to the W side to indicate that SteadyShot is... shot. 18GB Shutter button SteadyShot mark AE/AF lock The image is working. is displayed to return. Zoom (W/T) lever Lens cover Shooting/viewing images 3...
... indicator lights. • The shortest shooting distance is turned on. • To shoot movies, set (REC Mode) to (Movie Mode) (page 33). 2 Hold the camera steady as illustrated. • Slide the zoom (W/T) lever to the T side to focus. Slide to the W side to indicate that SteadyShot is... shot. 18GB Shutter button SteadyShot mark AE/AF lock The image is working. is displayed to return. Zoom (W/T) lever Lens cover Shooting/viewing images 3...

Instruction Manual
Page 19
... pressing the shutter button halfway down. x Deleting an image Touch (Delete) t [This Image]. x Returning to shooting images Touch . • You can also turn off the camera Close the lens cover. • You can also return to view the images. (Playback) button x Selecting next/previous image Touch (Next)/ (Previous) on a "Memory Stick...
... pressing the shutter button halfway down. x Deleting an image Touch (Delete) t [This Image]. x Returning to shooting images Touch . • You can also turn off the camera Close the lens cover. • You can also return to view the images. (Playback) button x Selecting next/previous image Touch (Next)/ (Previous) on a "Memory Stick...

Instruction Manual
Page 21
When the camera recognizes a scene, a Scene Recognition icon and guide, (Twilight), (Twilight Portrait), (Twilight using a tripod), (Backlight), (Backlight Portrait), (Landscape), (Macro), (Close Focus) or (Portrait) is displayed on the LCD screen. Scene Recognition icon (Guide) 3 Press the shutter button halfway down to focus and then press the shutter button fully down to shoot the image. Using shooting functions 21GB Detecting the shooting conditions automatically (Scene Recognition) 1 Touch (REC Mode) t (Intelligent Auto Adjustment). 2 Point the camera at the subject.
When the camera recognizes a scene, a Scene Recognition icon and guide, (Twilight), (Twilight Portrait), (Twilight using a tripod), (Backlight), (Backlight Portrait), (Landscape), (Macro), (Close Focus) or (Portrait) is displayed on the LCD screen. Scene Recognition icon (Guide) 3 Press the shutter button halfway down to focus and then press the shutter button fully down to shoot the image. Using shooting functions 21GB Detecting the shooting conditions automatically (Scene Recognition) 1 Touch (REC Mode) t (Intelligent Auto Adjustment). 2 Point the camera at the subject.

Instruction Manual
Page 22
zShooting two images with the eyes open to [Advanced], the camera automatically shoots two images consecutively, and selects the image with different settings and selecting the one you like Touch t (Scene Recognition) t [Advanced]. First Image... which the flash strobes on as guide Shoots with sensitivity increased with the face as follows and shoots two images with different effects. When the camera recognizes a difficult-to-shoot scene ( (Twilight), (Twilight Portrait), (Twilight using a tripod), (Backlight) and (Backlight Portrait)), it changes the settings as guide and shake ...
zShooting two images with the eyes open to [Advanced], the camera automatically shoots two images consecutively, and selects the image with different settings and selecting the one you like Touch t (Scene Recognition) t [Advanced]. First Image... which the flash strobes on as guide Shoots with sensitivity increased with the face as follows and shoots two images with different effects. When the camera recognizes a difficult-to-shoot scene ( (Twilight), (Twilight Portrait), (Twilight using a tripod), (Backlight) and (Backlight Portrait)), it changes the settings as guide and shake ...

Instruction Manual
Page 23
... in some cases. • Since several images are stitched together, the stitched part will not be recorded smoothly. 23GB Using shooting functions 2 Hold the camera at the position where you can also be played back using the supplied software "PMB". 1 Touch (REC Mode) t (Sweep Panorama). Shooting panoramic images... (Sweep Panorama) Shoots multiple images and allows you pan the camera. This part will not be taken. 3 Pan the camera to the end, following the guidance on the LCD screen.
... in some cases. • Since several images are stitched together, the stitched part will not be recorded smoothly. 23GB Using shooting functions 2 Hold the camera at the position where you can also be played back using the supplied software "PMB". 1 Touch (REC Mode) t (Sweep Panorama). Shooting panoramic images... (Sweep Panorama) Shoots multiple images and allows you pan the camera. This part will not be taken. 3 Pan the camera to the end, following the guidance on the LCD screen.
Instruction Manual
Page 24
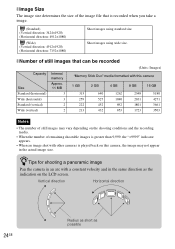
... on the LCD screen. Vertical direction Horizontal direction 24GB Radius as short as the indication on this camera Size Approx. 11 MB 1 GB 2 GB 4 GB 8 GB 16 GB Standard (horizontal) ...possible Shoot images using standard size. zTips for shooting a panoramic image Pan the camera in an arc with other cameras is recorded when you take a image. (Standard) (Vertical direction: 3424×...recorded (Units: Images) Capacity Internal memory "Memory Stick Duo" media formatted with this camera, the image may vary depending on the shooting conditions and the recording media. &#...
... on the LCD screen. Vertical direction Horizontal direction 24GB Radius as short as the indication on this camera Size Approx. 11 MB 1 GB 2 GB 4 GB 8 GB 16 GB Standard (horizontal) ...possible Shoot images using standard size. zTips for shooting a panoramic image Pan the camera in an arc with other cameras is recorded when you take a image. (Standard) (Vertical direction: 3424×...recorded (Units: Images) Capacity Internal memory "Memory Stick Duo" media formatted with this camera, the image may vary depending on the shooting conditions and the recording media. &#...

Instruction Manual
Page 25
...image. (High): Shoots up to 10 images per second in succession. (Mid): Shoots up to 5 images per second in succession. (Low): Shoots up to reduce camera shake, subject blur and noise. 1 Touch (REC Mode) t (Anti Motion Blur) or (Hand-held Twilight) when you shoot in a room. Select (Hand...-held Twilight). Using shooting functions Shooting with reduced blur (Anti Motion Blur) (Hand-held Twilight) A series of burst shots are taken, and image processing is applied to 2 images per second in succession. 25GB Select (Anti Motion Blur) when you shoot night scene without a...
...image. (High): Shoots up to 10 images per second in succession. (Mid): Shoots up to 5 images per second in succession. (Low): Shoots up to reduce camera shake, subject blur and noise. 1 Touch (REC Mode) t (Anti Motion Blur) or (Hand-held Twilight) when you shoot in a room. Select (Hand...-held Twilight). Using shooting functions Shooting with reduced blur (Anti Motion Blur) (Hand-held Twilight) A series of burst shots are taken, and image processing is applied to 2 images per second in succession. 25GB Select (Anti Motion Blur) when you shoot night scene without a...

Instruction Manual
Page 26
... touch a different face, that face is to register as the priority face during Face Detection. Focusing on the face of the subject (Face Detection) The camera detects the face of the subject and focuses on it. 1 Touch t (Face Detection) t desired mode. (When touched): Detects the face when an area with priority...
... touch a different face, that face is to register as the priority face during Face Detection. Focusing on the face of the subject (Face Detection) The camera detects the face of the subject and focuses on it. 1 Touch t (Face Detection) t desired mode. (When touched): Detects the face when an area with priority...

Instruction Manual
Page 27
Using shooting functions 2 Wait detecting a smile. When the smile level exceeds the V point on the indicator, the camera records images automatically. Smile Detection Sensitivity indicator Face Detection frame zHints for detecting smiles by touching (Big Smile), (Normal Smile) or (Slight Smile). Detecting smiles ... the eyes with an open mouth. To end the Smile Shutter, touch (Smile) again. • If you press the shutter button during Smile Shutter, the camera shoots the image then returns to Smile Shutter mode. • You can set the sensitivity for better capturing of the...
Using shooting functions 2 Wait detecting a smile. When the smile level exceeds the V point on the indicator, the camera records images automatically. Smile Detection Sensitivity indicator Face Detection frame zHints for detecting smiles by touching (Big Smile), (Normal Smile) or (Slight Smile). Detecting smiles ... the eyes with an open mouth. To end the Smile Shutter, touch (Smile) again. • If you press the shutter button during Smile Shutter, the camera shoots the image then returns to Smile Shutter mode. • You can set the sensitivity for better capturing of the...


