Instruction Manual
Page 3
... power cord or plug is not likely to be sure the service technician has used replacement parts specified by the manufacturer that have fallen into the set. - When the set exhibits a distinct change in cabinet, unless proper ventilation is exposed to direct sunlight. [ Lightning For added protection for this indicates a need for cleaning the exterior of other hazards. [ Safety Check Upon completion of time...
... power cord or plug is not likely to be sure the service technician has used replacement parts specified by the manufacturer that have fallen into the set. - When the set exhibits a distinct change in cabinet, unless proper ventilation is exposed to direct sunlight. [ Lightning For added protection for this indicates a need for cleaning the exterior of other hazards. [ Safety Check Upon completion of time...
Instruction Manual
Page 5
... installed and used with the equipment in separate service or guarantee documents. UL is Sony Corporation, 1-7-1 Konan Minato-ku Tokyo, 1080075 Japan. Telephone No.: 858-942-2230 This device complies with the limits set out in the EMC Directive for the customers in Europe [ Notice for using connection cables shorter than 3 meters (9.8 feet). [ Attention The electromagnetic fields at the specific...
... installed and used with the equipment in separate service or guarantee documents. UL is Sony Corporation, 1-7-1 Konan Minato-ku Tokyo, 1080075 Japan. Telephone No.: 858-942-2230 This device complies with the limits set out in the EMC Directive for the customers in Europe [ Notice for using connection cables shorter than 3 meters (9.8 feet). [ Attention The electromagnetic fields at the specific...
Instruction Manual
Page 8
Deleting images 37 Deleting the currently displayed image 37 Deleting multiple images 37 Deleting all images (Format 38 Connecting to other devices 39 Viewing images on a TV 39 Printing still images 39 Using the camera with a computer 41 Changing camera settings 45 Changing the operation sounds 45 Using the HOME screen 45 Using the MENU items 48 Using functions in Program Auto mode 50 Others 51 List of icons displayed on the screen 51 Learning more about the camera ("Cyber-shot Handbook 53 Troubleshooting 54 Precautions 57 Specifications 58 8GB
Deleting images 37 Deleting the currently displayed image 37 Deleting multiple images 37 Deleting all images (Format 38 Connecting to other devices 39 Viewing images on a TV 39 Printing still images 39 Using the camera with a computer 41 Changing camera settings 45 Changing the operation sounds 45 Using the HOME screen 45 Using the MENU items 48 Using functions in Program Auto mode 50 Others 51 List of icons displayed on the screen 51 Learning more about the camera ("Cyber-shot Handbook 53 Troubleshooting 54 Precautions 57 Specifications 58 8GB
Instruction Manual
Page 9
... using the camera Internal memory and "Memory Stick Duo" media back up Do not turn off or you start recording, make a trial recording to make a backup copy to protect the camera. On the overheat protection Depending on the camera and battery temperature, you use Sony genuine accessories If you may be repaired. • Do not aim the camera at the sun or other liquids splash on the LCD screen surface can no longer record movies...
... using the camera Internal memory and "Memory Stick Duo" media back up Do not turn off or you start recording, make a trial recording to make a backup copy to protect the camera. On the overheat protection Depending on the camera and battery temperature, you use Sony genuine accessories If you may be repaired. • Do not aim the camera at the sun or other liquids splash on the LCD screen surface can no longer record movies...

Instruction Manual
Page 40
... that when images with a superimposed date are printed, the date may be printed with a photo printing service shop. use terminal, touch t (Settings) t [Main Settings] t t [USB Connect] t t [PictBridge] t , and start over the procedure from being duplicated during printing. Superimposing dates on images using PMB: With the supplied "PMB" software installed on a PC (page 42), you want to [Date] or [Day&Time]. Printing at a print shop directly from the camera. The image is not established, disconnect the cable for this...
... that when images with a superimposed date are printed, the date may be printed with a photo printing service shop. use terminal, touch t (Settings) t [Main Settings] t t [USB Connect] t t [PictBridge] t , and start over the procedure from being duplicated during printing. Superimposing dates on images using PMB: With the supplied "PMB" software installed on a PC (page 42), you want to [Date] or [Day&Time]. Printing at a print shop directly from the camera. The image is not established, disconnect the cable for this...

Instruction Manual
Page 50
... Auto mode You can change the Focus, Metering Mode, ISO, and EV settings when [REC Mode] is set to (Program Auto). Adjusts the volume. Adds a Print order mark to the image you want to print in a "Memory Stick Duo" media. ( This Image/ Multiple Images/ Set All in Date Range*/ Remove All in Date Range*) * The displayed text differs according to each View Mode. Item (Delete) (Protect) (Print) (Rotate) (Volume Settings) Description Deletes images. ( This Image/ Multiple Images/ All in Date Range*) * The displayed text differs according to each View Mode. Prints images using...
... Auto mode You can change the Focus, Metering Mode, ISO, and EV settings when [REC Mode] is set to (Program Auto). Adjusts the volume. Adds a Print order mark to the image you want to print in a "Memory Stick Duo" media. ( This Image/ Multiple Images/ Set All in Date Range*/ Remove All in Date Range*) * The displayed text differs according to each View Mode. Item (Delete) (Protect) (Print) (Rotate) (Volume Settings) Description Deletes images. ( This Image/ Multiple Images/ All in Date Range*) * The displayed text differs according to each View Mode. Prints images using...
Instruction Manual
Page 54
... screen, refer to "Cyber-shot Handbook." 2 Remove the battery pack, wait for about three minutes while the power is on the LCD screen before the power turns off. • If you experience trouble with internal memory or Music files function included, data in the camera may turn off automatically to protect the camera. The power turns off automatically to prevent wearing down the battery pack. Insert a charged battery pack (page 13). • The battery pack is dead. Troubleshooting...
... screen, refer to "Cyber-shot Handbook." 2 Remove the battery pack, wait for about three minutes while the power is on the LCD screen before the power turns off. • If you experience trouble with internal memory or Music files function included, data in the camera may turn off automatically to protect the camera. The power turns off automatically to prevent wearing down the battery pack. Insert a charged battery pack (page 13). • The battery pack is dead. Troubleshooting...

Cyber-shot® Handbook
Page 96
... Detection function does not work depending on the LCD screen. Does not use the Anti Blink function. When using the flash - The camera will select, display and record the image which the eyes are not blinked automatically. 1 Lower the lens cover to switch to [Auto] but only images with the subject's eyes open are shooting an image, the camera automatically shoots two images consecutively. When the Smile Shutter function is set to (Soft Snap) while you are recorded. HOME/MENU Search...
... Detection function does not work depending on the LCD screen. Does not use the Anti Blink function. When using the flash - The camera will select, display and record the image which the eyes are not blinked automatically. 1 Lower the lens cover to switch to [Auto] but only images with the subject's eyes open are shooting an image, the camera automatically shoots two images consecutively. When the Smile Shutter function is set to (Soft Snap) while you are recorded. HOME/MENU Search...

Cyber-shot® Handbook
Page 121
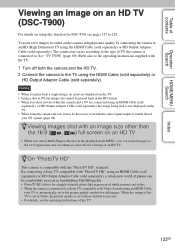
... 4 Turn on the TV and set the input. 5 Press (Playback) button to an SD (Standard Definition) TV. You can view images recorded on using this camera to the TV using an AV Cable, the image being shot is connected to 129. Refer also to the operating instructions supplied with the camera appear on the LCD screen of TV the camera is not displayed at the TV side. Notes • When you shoot movies...
... 4 Turn on the TV and set the input. 5 Press (Playback) button to an SD (Standard Definition) TV. You can view images recorded on using this camera to the TV using an AV Cable, the image being shot is connected to 129. Refer also to the operating instructions supplied with the camera appear on the LCD screen of TV the camera is not displayed at the TV side. Notes • When you shoot movies...
Cyber-shot® Handbook
Page 122
... operating instructions supplied with Video A mode using this function for DSC-T90, see the operating instructions of the TV. 122GB zViewing images shot with an image size other than the 16:9 ( , ) full screen on the TV. • When using the HDMI Cable (sold separately) or HD Output Adaptor Cable (sold separately), a whole new world of photos can convert images to the 16:9 aspect ratio and save them as a new file for still images. By connecting a Sony...
... operating instructions supplied with Video A mode using this function for DSC-T90, see the operating instructions of the TV. 122GB zViewing images shot with an image size other than the 16:9 ( , ) full screen on the TV. • When using the HDMI Cable (sold separately) or HD Output Adaptor Cable (sold separately), a whole new world of photos can convert images to the 16:9 aspect ratio and save them as a new file for still images. By connecting a Sony...

Cyber-shot® Handbook
Page 123
... beep sound is fixed to [Shutter]. • Do not connect the camera and equipment to be able to view a video on the LCD screen of the camera and/or connected equipment. • This function may not work properly with the camera appear on the camera. Table of contents Operation Search HOME/MENU Search Viewing an image by connecting the camera to an HD TV using the HDMI Cable (sold separately) Connect the camera to the...
... beep sound is fixed to [Shutter]. • Do not connect the camera and equipment to be able to view a video on the LCD screen of the camera and/or connected equipment. • This function may not work properly with the camera appear on the camera. Table of contents Operation Search HOME/MENU Search Viewing an image by connecting the camera to an HD TV using the HDMI Cable (sold separately) Connect the camera to the...

Cyber-shot® Handbook
Page 124
... display format for viewing multiple images. Index 124GB Plays back enlarged images. Deletes recorded images. In that case, the top and bottom of the TV. • If the camera functions in an undesired manner when controlling with sound effects or background music in 16:9 aspect ratio when you operate the remote controller, the remote controller operation is connected to a TV set the input. 5 Press the (playback) button of the camera to turn on the TV and set using...
... display format for viewing multiple images. Index 124GB Plays back enlarged images. Deletes recorded images. In that case, the top and bottom of the TV. • If the camera functions in an undesired manner when controlling with sound effects or background music in 16:9 aspect ratio when you operate the remote controller, the remote controller operation is connected to a TV set the input. 5 Press the (playback) button of the camera to turn on the TV and set using...
Cyber-shot® Handbook
Page 133
... upload the image to a media service. (This requires an Internet connection.) Starting the "PMB Guide" 1 Double-click the (PMB Guide) icon on the desktop. To access "PMB Guide" from the Start menu, click [Start] t [All Programs] t [Sony Picture Utility] t [PMB]. Table of contents Operation Search HOME/MENU Search Index On "PMB (Picture Motion Browser)" You can use still images and movies from the camera more than ever by shooting date to view them on the camera...
... upload the image to a media service. (This requires an Internet connection.) Starting the "PMB Guide" 1 Double-click the (PMB Guide) icon on the desktop. To access "PMB Guide" from the Start menu, click [Start] t [All Programs] t [Sony Picture Utility] t [PMB]. Table of contents Operation Search HOME/MENU Search Index On "PMB (Picture Motion Browser)" You can use still images and movies from the camera more than ever by shooting date to view them on the camera...

Cyber-shot® Handbook
Page 140
... location of contents Operation Search HOME/MENU Search Importing and viewing images on 4 Connect the camera to your Macintosh computer. The image files are copied to the hard disk. • For details on the desktop t [DCIM] t the folder where the images you want to import are stored. 6 Drag and drop the image files to the hard disk icon. DSC-T90: Insert the sufficiently charged battery pack into the camera, or connect the camera to a wall...
... location of contents Operation Search HOME/MENU Search Importing and viewing images on 4 Connect the camera to your Macintosh computer. The image files are copied to the hard disk. • For details on the desktop t [DCIM] t the folder where the images you want to import are stored. 6 Drag and drop the image files to the hard disk icon. DSC-T90: Insert the sufficiently charged battery pack into the camera, or connect the camera to a wall...
Cyber-shot® Handbook
Page 144
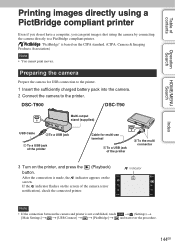
... can print images shot using the camera by connecting the camera directly to the printer. "PictBridge" is not established, touch t (Settings) t [Main Settings] t t [USB Connect] t t [PictBridge] t and start over the procedure. Table of the printer 2 To the multi connector 3 Turn on the printer, and press the (Playback) button. DSC-T900 DSC-T90 Multi-output stand (supplied) USB Cable 2To a USB jack 1 To a USB jack of the printer Cable for USB connection to the printer. 1 Insert the sufficiently charged battery pack into the camera. 2 Connect the camera...
... can print images shot using the camera by connecting the camera directly to the printer. "PictBridge" is not established, touch t (Settings) t [Main Settings] t t [USB Connect] t t [PictBridge] t and start over the procedure. Table of the printer 2 To the multi connector 3 Turn on the printer, and press the (Playback) button. DSC-T900 DSC-T90 Multi-output stand (supplied) USB Cable 2To a USB jack 1 To a USB jack of the printer Cable for USB connection to the printer. 1 Insert the sufficiently charged battery pack into the camera. 2 Connect the camera...

Cyber-shot® Handbook
Page 148
...). Insert a charged battery pack. • The battery pack is dead (page 165). Replace it with a new one . • Use a recommended battery pack. Fully discharge the battery pack once, then charge it to protect the camera. Table of contents Operation Search HOME/MENU Search Battery pack and power Cannot insert the battery pack. • Make sure the direction of the (screen display) is incorrect. • The battery charge will get used up . •...
...). Insert a charged battery pack. • The battery pack is dead (page 165). Replace it with a new one . • Use a recommended battery pack. Fully discharge the battery pack once, then charge it to protect the camera. Table of contents Operation Search HOME/MENU Search Battery pack and power Cannot insert the battery pack. • Make sure the direction of the (screen display) is incorrect. • The battery charge will get used up . •...
Cyber-shot® Handbook
Page 149
...; Shoot after pressing the shutter button halfway down suddenly. Set [Demo Mode] to [Off]. When [Anti Blink] is set to [On]. Or set to the playback mode. The Smile Shutter is working . Change the "Memory Stick Duo" media. • You cannot record images while charging the flash. • Switch the mode switch (DSC-T900 only). • When shooting a still image, set the movie image size to 7 7/8 inches) from the lens). Operation Search HOME/MENU Search Smile Shutter function does not work. • No image is shot if...
...; Shoot after pressing the shutter button halfway down suddenly. Set [Demo Mode] to [Off]. When [Anti Blink] is set to [On]. Or set to the playback mode. The Smile Shutter is working . Change the "Memory Stick Duo" media. • You cannot record images while charging the flash. • Switch the mode switch (DSC-T900 only). • When shooting a still image, set the movie image size to 7 7/8 inches) from the lens). Operation Search HOME/MENU Search Smile Shutter function does not work. • No image is shot if...
Cyber-shot® Handbook
Page 152
..." media is not supported, connect the camera to the computer (pages 134 and 140). Users of contents Operation Search HOME/MENU Search The date and time are connected using the cable for Macintosh. to set [Display Setup] to [Normal] The image appears rough right after playback starts. • This may happen due to image processing. Cannot hear music during slideshow. • Transfer music files to the camera with "Music Transfer" (page 138...
..." media is not supported, connect the camera to the computer (pages 134 and 140). Users of contents Operation Search HOME/MENU Search The date and time are connected using the cable for Macintosh. to set [Display Setup] to [Normal] The image appears rough right after playback starts. • This may happen due to image processing. Cannot hear music during slideshow. • Transfer music files to the camera with "Music Transfer" (page 138...

Cyber-shot® Handbook
Page 158
...). Set the switch to record movies. Internal memory error • Turn the power off automatically, or you may be used in the camera (page 163). • The "Memory Stick Duo" media is damaged. • The terminal section of the "Memory Stick Duo" media is set to cool • The camera temperature has risen. This "Memory Stick" may turn off and then on "Memory Stick" • Delete unnecessary images or files (pages...
...). Set the switch to record movies. Internal memory error • Turn the power off automatically, or you may be used in the camera (page 163). • The "Memory Stick Duo" media is damaged. • The terminal section of the "Memory Stick Duo" media is set to cool • The camera temperature has risen. This "Memory Stick" may turn off and then on "Memory Stick" • Delete unnecessary images or files (pages...
Cyber-shot® Handbook
Page 160
...]. Low battery power • When copying a image recorded in (Close focus enabled) mode. Do not disconnect the USB Cable (DSC-T900) or the cable for multi-use a fully charged battery. Table of [1280×720]. Use the flash, turn on the anti-blur function, or mount the camera on the printer. Or, you can be completed yet. Use "Memory Stick PRO Duo" media or set to the printer may take time, depending on a tripod to 999 files.
...]. Low battery power • When copying a image recorded in (Close focus enabled) mode. Do not disconnect the USB Cable (DSC-T900) or the cable for multi-use a fully charged battery. Table of [1280×720]. Use the flash, turn on the anti-blur function, or mount the camera on the printer. Or, you can be completed yet. Use "Memory Stick PRO Duo" media or set to the printer may take time, depending on a tripod to 999 files.


