Instruction Manual
Page 8
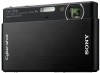
Table of contents IMPORTANT SAFEGUARDS 2 Read this first 4 Notes on using the camera 10 Getting started 11 Checking the accessories supplied 11 Identifying parts 12 Charging the battery pack 13 Inserting the battery pack/a "Memory Stick... Selection) .... 27 Shooting movies 28 Displaying minimum indicators (Easy Shooting 29 Using viewing functions 30 Viewing an enlarged image (Playback zoom 30 Displaying images full-screen (Wide Zoom 30 Rotating a vertical orientation image (Temporarily rotated display)........ 31 Viewing still images with music (Slideshow 31 Searching for an image (...
Table of contents IMPORTANT SAFEGUARDS 2 Read this first 4 Notes on using the camera 10 Getting started 11 Checking the accessories supplied 11 Identifying parts 12 Charging the battery pack 13 Inserting the battery pack/a "Memory Stick... Selection) .... 27 Shooting movies 28 Displaying minimum indicators (Easy Shooting 29 Using viewing functions 30 Viewing an enlarged image (Playback zoom 30 Displaying images full-screen (Wide Zoom 30 Rotating a vertical orientation image (Temporarily rotated display)........ 31 Viewing still images with music (Slideshow 31 Searching for an image (...
Instruction Manual
Page 9
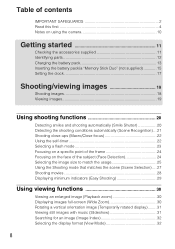
Deleting images 34 Deleting the currently displayed image 34 Deleting multiple images 34 Deleting all images (Format 35 Connecting to other devices 36 Viewing images on a TV 36 Printing still images 37 Using the camera with a computer 38 Changing camera settings 42 Changing the screen display 42 Changing the operation sounds 42 Using the HOME screen 43 Using the MENU items 45 Using functions in Program Auto mode 47 Others 48 Viewing "Cyber-shot Handbook 48 List of icons displayed on the screen 49 Troubleshooting 51 Precautions 53 Specifications 54 9
Deleting images 34 Deleting the currently displayed image 34 Deleting multiple images 34 Deleting all images (Format 35 Connecting to other devices 36 Viewing images on a TV 36 Printing still images 37 Using the camera with a computer 38 Changing camera settings 42 Changing the screen display 42 Changing the operation sounds 42 Using the HOME screen 43 Using the MENU items 45 Using functions in Program Auto mode 47 Others 48 Viewing "Cyber-shot Handbook 48 List of icons displayed on the screen 49 Troubleshooting 51 Precautions 53 Specifications 54 9

Instruction Manual
Page 10
... management file. It may occur. These dots are operational for Camera File system) universal standard established by JEITA (Japan Electronics and Information Technology Industries Association). • Sony does not guarantee that the camera will play back images recorded or edited with other equipment will... play back images. • Using the camera in insufficient light emission. 10 Notes on the LCD ...
... management file. It may occur. These dots are operational for Camera File system) universal standard established by JEITA (Japan Electronics and Information Technology Industries Association). • Sony does not guarantee that the camera will play back images recorded or edited with other equipment will... play back images. • Using the camera in insufficient light emission. 10 Notes on the LCD ...
Instruction Manual
Page 11
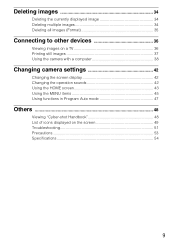
... fall off. • Wrist strap (1) • Station plate F (1) The station plate is used when mounting the camera on Cyber-shot station (not supplied). 11 Cyber-shot application software - "Cyber-shot Handbook" - "Cyber-shot Step-up Guide" • Instruction Manual (this manual) (1)...strap and place your hand through the loop to the wrist strap. • USB, A/V cable for multi-use terminal (1) Note • Do not carry the camera by being dropped. Hook • Rechargeable battery pack NP-BD1 (1)/ Battery case (1) • Paint pen (1) x Using the paint pen The paint pen is...
... fall off. • Wrist strap (1) • Station plate F (1) The station plate is used when mounting the camera on Cyber-shot station (not supplied). 11 Cyber-shot application software - "Cyber-shot Handbook" - "Cyber-shot Step-up Guide" • Instruction Manual (this manual) (1)...strap and place your hand through the loop to the wrist strap. • USB, A/V cable for multi-use terminal (1) Note • Do not carry the camera by being dropped. Hook • Rechargeable battery pack NP-BD1 (1)/ Battery case (1) • Paint pen (1) x Using the paint pen The paint pen is...

Instruction Manual
Page 12
Otherwise, you cannot firmly secure the camera, and damage to the camera may occur. O Battery eject lever P Access lamp Q "Memory Stick Duo" slot R Battery insertion slot S Multi connector 12 Getting started Identifying parts Bottom A Zoom (W/T) lever B Shutter ...
Otherwise, you cannot firmly secure the camera, and damage to the camera may occur. O Battery eject lever P Access lamp Q "Memory Stick Duo" slot R Battery insertion slot S Multi connector 12 Getting started Identifying parts Bottom A Zoom (W/T) lever B Shutter ...

Instruction Manual
Page 14
... as it is based on the CIPA standard. (CIPA: Camera & Imaging Products Association) Note • The battery life and the number of 25°C (77°F). Do not use with compatible Sony batteries. Getting started x Charging time Full charge time Approx. 220 min. Normal charge time Approx. ...160 min. This may take longer depending on the camera settings. of Images Approx. 220 Approx. 4600 • The ...
... as it is based on the CIPA standard. (CIPA: Camera & Imaging Products Association) Note • The battery life and the number of 25°C (77°F). Do not use with compatible Sony batteries. Getting started x Charging time Full charge time Approx. 220 min. Normal charge time Approx. ...160 min. This may take longer depending on the camera settings. of Images Approx. 220 Approx. 4600 • The ...
Instruction Manual
Page 16
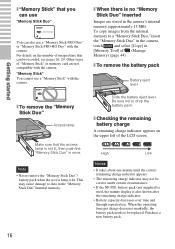
... is used, the minute display is no "Memory Stick Duo" inserted Images are not compatible with the camera. Purchase a new battery pack. 16 "Memory Stick" You cannot use a "Memory Stick" with the camera. To copy images from the internal memory to be replaced. Slide the battery eject lever. x Checking the...For details on the upper left of images/time that can also use a "Memory Stick PRO Duo" or "Memory Stick PRO-HG Duo" with the camera. Be sure not to data in once. High Low Notes • It takes about one minute until the correct remaining charge indicator appears. •...
... is used, the minute display is no "Memory Stick Duo" inserted Images are not compatible with the camera. Purchase a new battery pack. 16 "Memory Stick" You cannot use a "Memory Stick" with the camera. To copy images from the internal memory to be replaced. Slide the battery eject lever. x Checking the...For details on the upper left of images/time that can also use a "Memory Stick PRO Duo" or "Memory Stick PRO-HG Duo" with the camera. Be sure not to data in once. High Low Notes • It takes about one minute until the correct remaining charge indicator appears. •...

Instruction Manual
Page 17
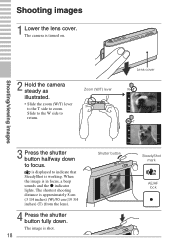
..., and noon as 12:00 PM. 4 Touch [OK]. x Setting the date and time again Touch t (Settings) t [Clock Settings] (page 44). 17 The camera is running on images. Notes • The camera does not have a feature for superimposing dates on and you can print or save images with the date. • If the... camera is turned on. • You can also turn on and allow operation. 2 Touch the desired date display format, then touch . Setting the clock 1 Lower the ...
..., and noon as 12:00 PM. 4 Touch [OK]. x Setting the date and time again Touch t (Settings) t [Clock Settings] (page 44). 17 The camera is running on images. Notes • The camera does not have a feature for superimposing dates on and you can print or save images with the date. • If the... camera is turned on. • You can also turn on and allow operation. 2 Touch the desired date display format, then touch . Setting the clock 1 Lower the ...
Instruction Manual
Page 18
... button SteadyShot mark AE/AF lock Zoom (W/T) lever Lens cover 3 Press the shutter button halfway down . is displayed to return. Shooting/viewing images 2 Hold the camera steady as illustrated. • Slide the zoom (W/T) lever to the T side to focus. When the image is working. The...
... button SteadyShot mark AE/AF lock Zoom (W/T) lever Lens cover 3 Press the shutter button halfway down . is displayed to return. Shooting/viewing images 2 Hold the camera steady as illustrated. • Slide the zoom (W/T) lever to the T side to focus. When the image is working. The...

Instruction Manual
Page 19
... (Playback) button. x Selecting next/previous image Touch (Next)/ (Previous) on this camera, view the images in [Folder View] (page 32). x Turning off the camera Close the lens cover. • You can also turn off the camera by pressing the POWER button. 19 The last image shot is displayed. • When... images on the "Memory Stick Duo" recorded with other cameras cannot be played back on the screen.
... (Playback) button. x Selecting next/previous image Touch (Next)/ (Previous) on this camera, view the images in [Folder View] (page 32). x Turning off the camera Close the lens cover. • You can also turn off the camera by pressing the POWER button. 19 The last image shot is displayed. • When... images on the "Memory Stick Duo" recorded with other cameras cannot be played back on the screen.
Instruction Manual
Page 20
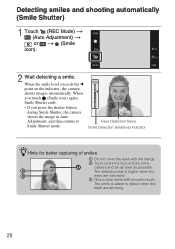
... t (Smile icon). 2 Wait detecting a smile. When you touch (Smile icon) again, Smile Shutter ends. • If you press the shutter button during Smile Shutter, the camera shoots the image in front of the camera and be as level as possible. When the smile level exceeds the b point on the indicator, the... camera shoots images automatically. The detection rate is easier to Smile Shutter mode. The smile is higher when the eyes are narrowed. 3 Give a clear smile with ...
... t (Smile icon). 2 Wait detecting a smile. When you touch (Smile icon) again, Smile Shutter ends. • If you press the shutter button during Smile Shutter, the camera shoots the image in front of the camera and be as level as possible. When the smile level exceeds the b point on the indicator, the... camera shoots images automatically. The detection rate is easier to Smile Shutter mode. The smile is higher when the eyes are narrowed. 3 Give a clear smile with ...

Instruction Manual
Page 21
... Note • Scene Recognition does not operate in (Macro On), (Close focus enabled) or Burst mode. zWhen the camera recognizes the scene When the camera recognizes the scene. (Twilight), (Twilight Portrait), (Twilight using a tripod), (Backlight) or (Backlight Portrait), it switches ...to the optimal settings and shoots the image. (Advanced): When the camera recognizes the scene, it shoots another image. When the camera does not recognize the scene, the image is shot as Scene Recognition [Off]. Detecting the shooting conditions ...
... Note • Scene Recognition does not operate in (Macro On), (Close focus enabled) or Burst mode. zWhen the camera recognizes the scene When the camera recognizes the scene. (Twilight), (Twilight Portrait), (Twilight using a tripod), (Backlight) or (Backlight Portrait), it switches ...to the optimal settings and shoots the image. (Advanced): When the camera recognizes the scene, it shoots another image. When the camera does not recognize the scene, the image is shot as Scene Recognition [Off]. Detecting the shooting conditions ...
Instruction Manual
Page 22
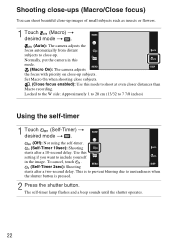
...-ups (Macro/Close focus) You can shoot beautiful close-up images of small subjects such as insects or flowers. 1 Touch (Macro) t desired mode t . (Auto): The camera adjusts the focus automatically from distant subjects to close -up . The self-timer lamp flashes and a beep sounds until the shutter operates. 22 Set Macro... On when shooting close subjects. (Close focus enabled): Use this mode. (Macro On): The camera adjusts the focus with priority on close -up subjects. Normally, put the...
...-ups (Macro/Close focus) You can shoot beautiful close-up images of small subjects such as insects or flowers. 1 Touch (Macro) t desired mode t . (Auto): The camera adjusts the focus automatically from distant subjects to close -up . The self-timer lamp flashes and a beep sounds until the shutter operates. 22 Set Macro... On when shooting close subjects. (Close focus enabled): Use this mode. (Macro On): The camera adjusts the focus with priority on close -up subjects. Normally, put the...
Instruction Manual
Page 24
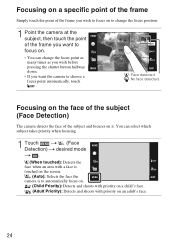
... Detection) t desired mode t . (When touched): Detects the face when an area with a face is touched on the screen. (Auto): Selects the face the camera is to automatically focus on. (Child Priority): Detects and shoots with priority on a child's face. (Adult Priority): Detects and shoots with priority on . •... You can change the focus position. 1 Point the camera at the subject, then touch the point of the subject and focuses on it. Focusing on a specific point of the frame Simply touch the point...
... Detection) t desired mode t . (When touched): Detects the face when an area with a face is touched on the screen. (Auto): Selects the face the camera is to automatically focus on. (Child Priority): Detects and shoots with priority on a child's face. (Adult Priority): Detects and shoots with priority on . •... You can change the focus position. 1 Point the camera at the subject, then touch the point of the subject and focuses on it. Focusing on a specific point of the frame Simply touch the point...
Instruction Manual
Page 26
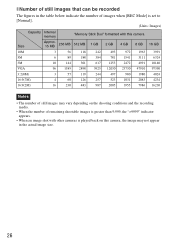
... table below indicate the number of images when [REC Mode] is set to [Normal]. (Units: Images) Capacity Internal memory "Memory Stick Duo" formatted with this camera Size Approx. 15 MB 256 MB 512 MB 1 GB 2 GB 4 GB 8 GB 16 GB 10M 3 56 118 242 493 972 1963 3991 5M 6 89 188... recording media. • When the number of remaining shootable images is greater than 9,999, the ">9999" indicator appears. • When an image shot with other cameras is played back on this camera, the image may not appear in the actual image size. 26
... table below indicate the number of images when [REC Mode] is set to [Normal]. (Units: Images) Capacity Internal memory "Memory Stick Duo" formatted with this camera Size Approx. 15 MB 256 MB 512 MB 1 GB 2 GB 4 GB 8 GB 16 GB 10M 3 56 118 242 493 972 1963 3991 5M 6 89 188... recording media. • When the number of remaining shootable images is greater than 9,999, the ">9999" indicator appears. • When an image shot with other cameras is played back on this camera, the image may not appear in the actual image size. 26

Instruction Manual
Page 29
Continuous shooting is possible for approximately 10 minutes. (Units: hour : minute : second) Capacity Internal memory "Memory Stick Duo" formatted with this camera Size Approx. 15 MB 256 MB 512 MB 1 GB 2 GB 4 GB 8 GB 16 GB 640(Fine) - 0:02:50 0:06:00 0:12:20 0:25:00 0:49:...:52:00 23:57:30 48:41:50 Notes • The recording time may vary depending on a "Memory Stick PRO Duo". • This camera does not support HD recordings or playbacks for all movie files. x Returning to [640(Fine)] can only be recorded on the shooting conditions and the recording media. •...
Continuous shooting is possible for approximately 10 minutes. (Units: hour : minute : second) Capacity Internal memory "Memory Stick Duo" formatted with this camera Size Approx. 15 MB 256 MB 512 MB 1 GB 2 GB 4 GB 8 GB 16 GB 640(Fine) - 0:02:50 0:06:00 0:12:20 0:25:00 0:49:...:52:00 23:57:30 48:41:50 Notes • The recording time may vary depending on a "Memory Stick PRO Duo". • This camera does not support HD recordings or playbacks for all movie files. x Returning to [640(Fine)] can only be recorded on the shooting conditions and the recording media. •...
Instruction Manual
Page 31
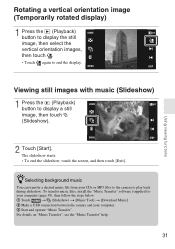
... to play back during slideshow. zSelecting background music You can transfer a desired music file from your CDs or MP3 files to the camera to your computer (page 39), then follow the steps below. 1 Touch t (Slideshow) t [Music Tool] t [Download Music]. 2 Make a USB connection... between the camera and your computer. 3 Start and operate "Music Transfer". Rotating a vertical orientation image (Temporarily rotated display) 1 Press the (Playback) button to display the...
... to play back during slideshow. zSelecting background music You can transfer a desired music file from your CDs or MP3 files to the camera to your computer (page 39), then follow the steps below. 1 Touch t (Slideshow) t [Music Tool] t [Download Music]. 2 Make a USB connection... between the camera and your computer. 3 Start and operate "Music Transfer". Rotating a vertical orientation image (Temporarily rotated display) 1 Press the (Playback) button to display the...
Instruction Manual
Page 33
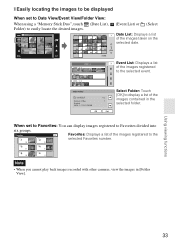
...) or (Select Date List: Displays a list of the images registered to the selected event. Note • When you cannot play back images recorded with other cameras, view the images in the selected folder. Select Folder: Touch [OK] to display a list of the images registered to the selected Favorites number. Favorites: Displays...
...) or (Select Date List: Displays a list of the images registered to the selected event. Note • When you cannot play back images recorded with other cameras, view the images in the selected folder. Select Folder: Touch [OK] to display a list of the images registered to the selected Favorites number. Favorites: Displays...

Instruction Manual
Page 36
...devices Viewing images on the HOME screen. • You cannot view movies output in [Main Settings 2] by selecting (Settings) on a TV 1 Connect the camera to the TV with the cable for multi-use terminal To audio/video input jacks zViewing images on... a HD (High Definition) TV • You can view images recorded on the camera by connecting the camera to an HD (High Definition) TV with the HD Output Adaptor Cable (not supplied) or Cyber-shot station (not supplied). • Set [COMPONENT] to [HD(1080i)] in [HD(1080i)] signal format.
...devices Viewing images on the HOME screen. • You cannot view movies output in [Main Settings 2] by selecting (Settings) on a TV 1 Connect the camera to the TV with the cable for multi-use terminal To audio/video input jacks zViewing images on... a HD (High Definition) TV • You can view images recorded on the camera by connecting the camera to an HD (High Definition) TV with the HD Output Adaptor Cable (not supplied) or Cyber-shot station (not supplied). • Set [COMPONENT] to [HD(1080i)] in [HD(1080i)] signal format.
Instruction Manual
Page 37
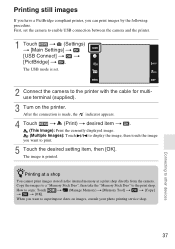
... setting item, then [OK]. Copy the images to a "Memory Stick Duo", then take the "Memory Stick Duo" to enable USB connection between the camera and the printer. 1 Touch t (Settings) t [Main Settings] t [USB Connect] t t [PictBridge] t . Printing still images If you have... a PictBridge compliant printer, you want to copy: Touch t t [OK]. First, set . 2 Connect the camera to other devices 37 Connecting to the printer with the cable for multiuse terminal (supplied). 3 Turn on images, consult your photo printing service shop. The...
... setting item, then [OK]. Copy the images to a "Memory Stick Duo", then take the "Memory Stick Duo" to enable USB connection between the camera and the printer. 1 Touch t (Settings) t [Main Settings] t [USB Connect] t t [PictBridge] t . Printing still images If you have... a PictBridge compliant printer, you want to copy: Touch t t [OK]. First, set . 2 Connect the camera to other devices 37 Connecting to the printer with the cable for multiuse terminal (supplied). 3 Turn on images, consult your photo printing service shop. The...


