Instruction Manual
Page 2
... important operating and maintenance (servicing) instructions in a fire or electric shock. Do not defeat the safety purpose of the polarized plug by forcing it in. [ Overloading Do not overload wall outlets, extension cords or convenience receptacles beyond their capacity, since this product. This symbol is a safety feature. Use [ Power Sources This set . 2 This is intended to alert the user...
... important operating and maintenance (servicing) instructions in a fire or electric shock. Do not defeat the safety purpose of the polarized plug by forcing it in. [ Overloading Do not overload wall outlets, extension cords or convenience receptacles beyond their capacity, since this product. This symbol is a safety feature. Use [ Power Sources This set . 2 This is intended to alert the user...
Instruction Manual
Page 3
... the service technician has used replacement parts specified by the manufacturer. [ Ventilation The slots and openings in the cabinet are specified in cabinet, unless proper ventilation is exposed to direct sunlight. [ Lightning For added protection for this indicates a need for necessary ventilation. Use a cloth lightly dampened with a cloth or other hazards. [ Safety Check Upon completion of other similar surface. - Adjust only those controls...
... the service technician has used replacement parts specified by the manufacturer. [ Ventilation The slots and openings in the cabinet are specified in cabinet, unless proper ventilation is exposed to direct sunlight. [ Lightning For added protection for this indicates a need for necessary ventilation. Use a cloth lightly dampened with a cloth or other hazards. [ Safety Check Upon completion of other similar surface. - Adjust only those controls...
Instruction Manual
Page 5
... installed and used with the instructions, may influence the picture and sound of FCC Rules. Connect the equipment into an outlet on , the user is connected. - GB 5 [ Note: This equipment has been tested and found compliant with the limits set out in order to comply with the limits for help. If this unit. [ Notice If static electricity or electromagnetism causes data transfer...
... installed and used with the instructions, may influence the picture and sound of FCC Rules. Connect the equipment into an outlet on , the user is connected. - GB 5 [ Note: This equipment has been tested and found compliant with the limits set out in order to comply with the limits for help. If this unit. [ Notice If static electricity or electromagnetism causes data transfer...
Instruction Manual
Page 8
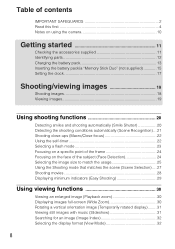
... (Macro/Close focus 22 Using the self-timer 22 Selecting a flash mode 23 Focusing on a specific point of the frame 24 Focusing on the face of the subject (Face Detection 24 Selecting the image size to match the usage 25 Using the Shooting mode that matches the scene (Scene Selection) .... 27 Shooting movies 28 Displaying minimum indicators (Easy Shooting 29 Using viewing functions 30 Viewing an enlarged image (Playback zoom 30 Displaying images full-screen (Wide Zoom 30 Rotating a vertical orientation image (Temporarily rotated display...
... (Macro/Close focus 22 Using the self-timer 22 Selecting a flash mode 23 Focusing on a specific point of the frame 24 Focusing on the face of the subject (Face Detection 24 Selecting the image size to match the usage 25 Using the Shooting mode that matches the scene (Scene Selection) .... 27 Shooting movies 28 Displaying minimum indicators (Easy Shooting 29 Using viewing functions 30 Viewing an enlarged image (Playback zoom 30 Displaying images full-screen (Wide Zoom 30 Rotating a vertical orientation image (Temporarily rotated display...
Instruction Manual
Page 9
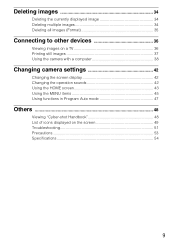
Deleting images 34 Deleting the currently displayed image 34 Deleting multiple images 34 Deleting all images (Format 35 Connecting to other devices 36 Viewing images on a TV 36 Printing still images 37 Using the camera with a computer 38 Changing camera settings 42 Changing the screen display 42 Changing the operation sounds 42 Using the HOME screen 43 Using the MENU items 45 Using functions in Program Auto mode 47 Others 48 Viewing "Cyber-shot Handbook 48 List of icons displayed on the screen 49 Troubleshooting 51 Precautions 53 Specifications 54 9
Deleting images 34 Deleting the currently displayed image 34 Deleting multiple images 34 Deleting all images (Format 35 Connecting to other devices 36 Viewing images on a TV 36 Printing still images 37 Using the camera with a computer 38 Changing camera settings 42 Changing the screen display 42 Changing the operation sounds 42 Using the HOME screen 43 Using the MENU items 45 Using functions in Program Auto mode 47 Others 48 Viewing "Cyber-shot Handbook 48 List of icons displayed on the screen 49 Troubleshooting 51 Precautions 53 Specifications 54 9

Instruction Manual
Page 10
... file. Otherwise, the internal memory data or "Memory Stick Duo" may be repaired. • Do not aim the camera at the sun or other liquids splash on the LCD screen surface can perform the next operation. On management files When you start recording, make a trial recording to make a backup copy to protect your data. In some tiny black and/ or bright dots (white, red, blue or green) may not properly record or play back images recorded with...
... file. Otherwise, the internal memory data or "Memory Stick Duo" may be repaired. • Do not aim the camera at the sun or other liquids splash on the LCD screen surface can perform the next operation. On management files When you start recording, make a trial recording to make a backup copy to protect your data. In some tiny black and/ or bright dots (white, red, blue or green) may not properly record or play back images recorded with...

Instruction Manual
Page 12
... started Identifying parts Bottom A Zoom (W/T) lever B Shutter button C Microphone D POWER button/POWER lamp E Flash F Self-timer lamp/Smile Shutter lamp/ AF illuminator G Lens H Lens cover I LCD screen/Touch panel J (Playback) button K Hook for wrist strap/Grip L Speaker M Battery/"Memory Stick Duo" cover N Tripod receptacle • Use a tripod with a screw less than 5.5 mm (7/32 inch) long. Otherwise, you cannot firmly secure the camera, and damage to the camera may occur. O Battery eject lever P Access lamp Q "Memory...
... started Identifying parts Bottom A Zoom (W/T) lever B Shutter button C Microphone D POWER button/POWER lamp E Flash F Self-timer lamp/Smile Shutter lamp/ AF illuminator G Lens H Lens cover I LCD screen/Touch panel J (Playback) button K Hook for wrist strap/Grip L Speaker M Battery/"Memory Stick Duo" cover N Tripod receptacle • Use a tripod with a screw less than 5.5 mm (7/32 inch) long. Otherwise, you cannot firmly secure the camera, and damage to the camera may occur. O Battery eject lever P Access lamp Q "Memory...

Instruction Manual
Page 14
x Battery life and number of images you can use with compatible Sony batteries. This may take longer depending on the camera settings. Do not use and circumstances. • Connect the battery charger to the wall outlet (wall socket). Getting started x Charging time Full charge time Approx. 220 min. zUsing the camera abroad You can record/view Shooting still images Viewing still images Battery life (min.) Approx. 110 Approx. 230 No. Notes • The table above shows the time required to...
x Battery life and number of images you can use with compatible Sony batteries. This may take longer depending on the camera settings. Do not use and circumstances. • Connect the battery charger to the wall outlet (wall socket). Getting started x Charging time Full charge time Approx. 220 min. zUsing the camera abroad You can record/view Shooting still images Viewing still images Battery life (min.) Approx. 110 Approx. 230 No. Notes • The table above shows the time required to...
Instruction Manual
Page 22
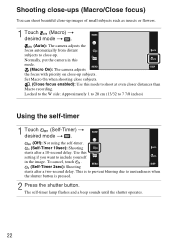
...) Using the self-timer 1 Touch (Self-Timer) t desired mode t . (Off): Not using the self-timer. (Self-Timer 10sec): Shooting starts after a two-second delay. The self-timer lamp flashes and a beep sounds until the shutter operates. 22 Use this mode to shoot at even closer distances than Macro recording. Set Macro On when shooting close subjects. (Close focus enabled): Use this setting if you want to include yourself in this mode. (Macro On): The camera adjusts the focus with priority on close -up subjects. Locked to...
...) Using the self-timer 1 Touch (Self-Timer) t desired mode t . (Off): Not using the self-timer. (Self-Timer 10sec): Shooting starts after a two-second delay. The self-timer lamp flashes and a beep sounds until the shutter operates. 22 Use this mode to shoot at even closer distances than Macro recording. Set Macro On when shooting close subjects. (Close focus enabled): Use this setting if you want to include yourself in this mode. (Macro On): The camera adjusts the focus with priority on close -up subjects. Locked to...

Instruction Manual
Page 29
... minimum number of settings and makes the indicators easier to normal display Touch (REC Mode) t (Auto Adjustment) t . 29 x Maximum recording time The table below shows the approximate maximum recording times. Using shooting functions Action Self-Timer Image Size Flash How to change Select (Self-Timer 10sec) or (Off) with the size set to [640(Fine)] can only be recorded on a "Memory Stick PRO Duo". • This camera does not support HD recordings or playbacks for all movie files. x Returning to see. 1 Touch (REC Mode) t (Easy Shooting) t . Continuous shooting is...
... minimum number of settings and makes the indicators easier to normal display Touch (REC Mode) t (Auto Adjustment) t . 29 x Maximum recording time The table below shows the approximate maximum recording times. Using shooting functions Action Self-Timer Image Size Flash How to change Select (Self-Timer 10sec) or (Off) with the size set to [640(Fine)] can only be recorded on a "Memory Stick PRO Duo". • This camera does not support HD recordings or playbacks for all movie files. x Returning to see. 1 Touch (REC Mode) t (Easy Shooting) t . Continuous shooting is...
Instruction Manual
Page 37
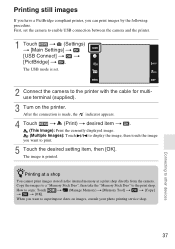
... t (Settings) t [Main Settings] t [USB Connect] t t [PictBridge] t . First, set . 2 Connect the camera to the printer with the cable for multiuse terminal (supplied). 3 Turn on images, consult your photo printing service shop. zPrinting at a shop You cannot print images stored in the internal memory at a print shop directly from the camera. Copy the images to a "Memory Stick Duo", then take the "Memory Stick Duo" to copy: Touch t t [OK]. t (Manage Memory) t [Memory Tool] t t [Copy] When you can print images by the following procedure. The USB mode is set...
... t (Settings) t [Main Settings] t [USB Connect] t t [PictBridge] t . First, set . 2 Connect the camera to the printer with the cable for multiuse terminal (supplied). 3 Turn on images, consult your photo printing service shop. zPrinting at a shop You cannot print images stored in the internal memory at a print shop directly from the camera. Copy the images to a "Memory Stick Duo", then take the "Memory Stick Duo" to copy: Touch t t [OK]. t (Manage Memory) t [Memory Tool] t t [Copy] When you can print images by the following procedure. The USB mode is set...

Instruction Manual
Page 38
... by taking advantage of the software, and "PMB" is not compatible with Macintosh computers. 38 DVD Creating a data disc using the "Memory Stick Duo", exporting images and viewing them. Import to computer Media service Uploading the image to the media service. Calendar Viewing images in addition to those listed below, for enjoying your images. Export to camera When using a CD burner drive or DVD burner drive. Print Printing images with date stamps. For...
... by taking advantage of the software, and "PMB" is not compatible with Macintosh computers. 38 DVD Creating a data disc using the "Memory Stick Duo", exporting images and viewing them. Import to computer Media service Uploading the image to the media service. Calendar Viewing images in addition to those listed below, for enjoying your images. Export to camera When using a CD burner drive or DVD burner drive. Print Printing images with date stamps. For...
Instruction Manual
Page 39
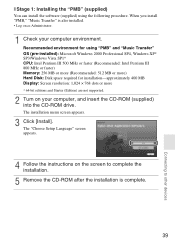
... supported. 2 Turn on as Administrator. 1 Check your computer, and insert the CD-ROM (supplied) into the CD-ROM drive. The installation menu screen appears. 3 Click [Install]. The "Choose Setup Language" screen appears. 4 Follow the instructions on the screen to complete the installation. 5 Remove the CD-ROM after the installation is also installed. • Log on your computer environment. When you install "PMB," "Music Transfer" is complete. 39 Connecting...
... supported. 2 Turn on as Administrator. 1 Check your computer, and insert the CD-ROM (supplied) into the CD-ROM drive. The installation menu screen appears. 3 Click [Install]. The "Choose Setup Language" screen appears. 4 Follow the instructions on the screen to complete the installation. 5 Remove the CD-ROM after the installation is also installed. • Log on your computer environment. When you install "PMB," "Music Transfer" is complete. 39 Connecting...
Instruction Manual
Page 43
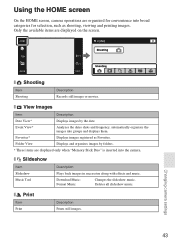
... by the date. Changing camera settings 43 Event View* Analyzes the dates shots and frequency, automatically organizes the images into broad categories for convenience into groups and displays them. Deletes all slideshow music. Using the HOME screen On the HOME screen, camera operations are organized for selection, such as Favorites. x View Images Item Description Date View* Displays images by folders. * These items are displayed on the screen. x Print Item Print Description Prints still images. x Shooting Item Shooting Description Records still images or movies...
... by the date. Changing camera settings 43 Event View* Analyzes the dates shots and frequency, automatically organizes the images into broad categories for convenience into groups and displays them. Deletes all slideshow music. Using the HOME screen On the HOME screen, camera operations are organized for selection, such as Favorites. x View Images Item Description Date View* Displays images by folders. * These items are displayed on the screen. x Print Item Print Description Prints still images. x Shooting Item Shooting Description Records still images or movies...
Instruction Manual
Page 44
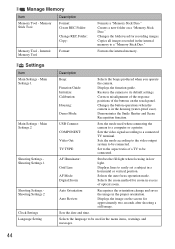
... date and time. AF Illuminator: Grid Line: AF Mode: Digital Zoom: Strobes the fill light when focusing in the menu items, warnings and messages. 44 Selects the auto focus operation mode. Selects the language to a connected TV terminal. Memory Stick Tool Description Format: Create REC.Folder: Change REC.Folder: Copy: Memory Tool - Demonstrates the Smile Shutter and Scene Recognition function. Set to the aspect ratio of a TV to its default settings. Selects the zoom method for recording images. Restores the camera...
... date and time. AF Illuminator: Grid Line: AF Mode: Digital Zoom: Strobes the fill light when focusing in the menu items, warnings and messages. 44 Selects the auto focus operation mode. Selects the language to a connected TV terminal. Memory Stick Tool Description Format: Create REC.Folder: Change REC.Folder: Copy: Memory Tool - Demonstrates the Smile Shutter and Scene Recognition function. Set to the aspect ratio of a TV to its default settings. Selects the zoom method for recording images. Restores the camera...
Instruction Manual
Page 45
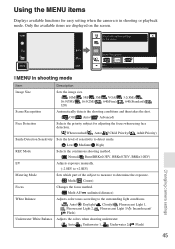
... Mode Sets which part of the subject to measure to determine the exposure. ( Multi/ Center) Focus Changes the focus method. ( Multi AF/ unlimited distance) White Balance Adjusts color tones according to the surrounding light conditions. ( Auto/ Daylight/ Cloudy/ Fluorescent Light 1, Fluorescent Light 2, Fluorescent Light 3/n Incandescent/ Flash) Underwater White Balance Adjusts the colors when shooting underwater. ( Auto/ Underwater 1, Underwater 2/ Flash) Changing camera settings 45 Only the available items are displayed on the screen. x MENU in shooting or playback mode...
... Mode Sets which part of the subject to measure to determine the exposure. ( Multi/ Center) Focus Changes the focus method. ( Multi AF/ unlimited distance) White Balance Adjusts color tones according to the surrounding light conditions. ( Auto/ Daylight/ Cloudy/ Fluorescent Light 1, Fluorescent Light 2, Fluorescent Light 3/n Incandescent/ Flash) Underwater White Balance Adjusts the colors when shooting underwater. ( Auto/ Underwater 1, Underwater 2/ Flash) Changing camera settings 45 Only the available items are displayed on the screen. x MENU in shooting or playback mode...
Instruction Manual
Page 47
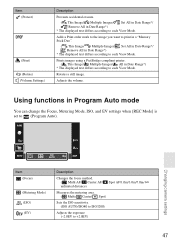
... mark to the image you want to print in a "Memory Stick Duo". ( This Image/ Multiple Images/ Set All in Date Range*/ Remove All in Date Range*) * The displayed text differs according to each View Mode. Rotates a still image. Prints images using a PictBridge compliant printer. ( This Image/ Multiple Images/ All in Date Range*) * The displayed text differs according to each View Mode. Adjusts the volume. Changing camera settings Item (Focus) (Metering Mode) (ISO) (EV) Description Changes the focus method. ( Multi AF/ Center AF/ unlimited distance) Spot...
... mark to the image you want to print in a "Memory Stick Duo". ( This Image/ Multiple Images/ Set All in Date Range*/ Remove All in Date Range*) * The displayed text differs according to each View Mode. Rotates a still image. Prints images using a PictBridge compliant printer. ( This Image/ Multiple Images/ All in Date Range*) * The displayed text differs according to each View Mode. Adjusts the volume. Changing camera settings Item (Focus) (Metering Mode) (ISO) (EV) Description Changes the focus method. ( Multi AF/ Center AF/ unlimited distance) Spot...
Instruction Manual
Page 50
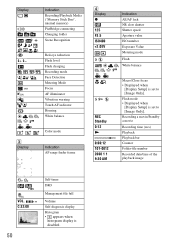
...-file number Recorded date/time of the playback image VOL. Display C Display Indication Recording/Playback Media ("Memory Stick Duo", internal memory) PictBridge connecting Changing folder Scene Recognition Red-eye reduction Flash level Flash charging Recording mode Face Detection Metering Mode Focus AF illuminator Vibration warning Touch AF indicator Housing White balance Color mode Indication AF range finder frame D Display z 125 F3.5 ISO400 +2.0EV REC Standby 0:12 N 0:00:12 101-0012 2008 1 1 9:30 AM Indication AE/AF lock NR slow shutter Shutter speed Aperture value ISO number Exposure...
...-file number Recorded date/time of the playback image VOL. Display C Display Indication Recording/Playback Media ("Memory Stick Duo", internal memory) PictBridge connecting Changing folder Scene Recognition Red-eye reduction Flash level Flash charging Recording mode Face Detection Metering Mode Focus AF illuminator Vibration warning Touch AF indicator Housing White balance Color mode Indication AF range finder frame D Display z 125 F3.5 ISO400 +2.0EV REC Standby 0:12 N 0:00:12 101-0012 2008 1 1 9:30 AM Indication AE/AF lock NR slow shutter Shutter speed Aperture value ISO number Exposure...
Instruction Manual
Page 52
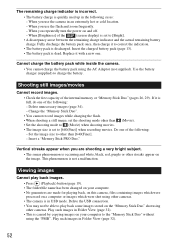
... folder/file name has been changed on your computer to the "Memory Stick Duo" without using the "PMB". When you use the camera in USB mode. Insert the charged battery pack (page 13). • The battery pack is set to [640(Fine)] when recording movies. If it is occurring and white, black, red, purple or other cameras. Delete unnecessary images (page 34). - Viewing images Cannot play back some images stored on the "Memory Stick Duo" shot using other...
... folder/file name has been changed on your computer to the "Memory Stick Duo" without using the "PMB". When you use the camera in USB mode. Insert the charged battery pack (page 13). • The battery pack is set to [640(Fine)] when recording movies. If it is occurring and white, black, red, purple or other cameras. Delete unnecessary images (page 34). - Viewing images Cannot play back some images stored on the "Memory Stick Duo" shot using other...
Instruction Manual
Page 54
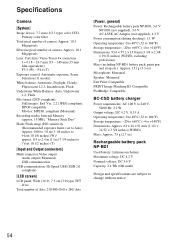
... White Balance: Auto, Underwater 1,2, Flash File format (DCF compliant): Still images: Exif Ver. 2.21 JPEG compliant, DPOF compatible Movies: MPEG1 compliant (Monaural) Recording media: Internal Memory (approx. 15 MB), "Memory Stick Duo" Flash: Flash range (ISO sensitivity (Recommended exposure Index) set to Auto): Approx. 0.08 to 3.0 m (3 1/4 inches to 9 feet 10 1/8 inches) (W)/ approx. 0.5 to 2.4 m (1 feet 7 3/4 inches to 7 feet 10 1/2 inches) (T) [Input and Output connectors] Multi connector:Video output Audio output (Monaural) USB...
... White Balance: Auto, Underwater 1,2, Flash File format (DCF compliant): Still images: Exif Ver. 2.21 JPEG compliant, DPOF compatible Movies: MPEG1 compliant (Monaural) Recording media: Internal Memory (approx. 15 MB), "Memory Stick Duo" Flash: Flash range (ISO sensitivity (Recommended exposure Index) set to Auto): Approx. 0.08 to 3.0 m (3 1/4 inches to 9 feet 10 1/8 inches) (W)/ approx. 0.5 to 2.4 m (1 feet 7 3/4 inches to 7 feet 10 1/2 inches) (T) [Input and Output connectors] Multi connector:Video output Audio output (Monaural) USB...


