
Instruction Manual
Page 5
...again. [ Disposal of this product, please contact your local Civic Office, your authority to operate this product shall not be determined by turning the equipment off and on its packaging indicates that interference will help . Connect the equipment into an outlet on a circuit different from ...energy and, if not installed and used with the equipment in order to comply with the limits for a digital device pursuant to the applicable collection point for a Class B digital device, pursuant to Part 15 of materials will not occur in a particular installation. This equipment generates, uses...
...again. [ Disposal of this product, please contact your local Civic Office, your authority to operate this product shall not be determined by turning the equipment off and on its packaging indicates that interference will help . Connect the equipment into an outlet on a circuit different from ...energy and, if not installed and used with the equipment in order to comply with the limits for a digital device pursuant to the applicable collection point for a Class B digital device, pursuant to Part 15 of materials will not occur in a particular installation. This equipment generates, uses...
Instruction Manual
Page 7
...the menu items 24 Menu items 25 Enjoying your camera 8 Getting started 9 Checking the accessories supplied 9 1 Preparing the battery pack 10 2 Inserting the battery pack/a "Memory Stick Duo" (not supplied) ........ 11 3 Turning the camera on the screen 28 Battery life and memory ... still images/movies 35 Viewing images 35 Precautions 36 Specifications 37 7 Table of contents IMPORTANT SAFEGUARDS 2 Read this first 4 Notes on using your computer 26 Supported Operating Systems for USB connection and application software "Picture Motion Browser" (supplied 26 Viewing "Cyber-shot ...
...the menu items 24 Menu items 25 Enjoying your camera 8 Getting started 9 Checking the accessories supplied 9 1 Preparing the battery pack 10 2 Inserting the battery pack/a "Memory Stick Duo" (not supplied) ........ 11 3 Turning the camera on the screen 28 Battery life and memory ... still images/movies 35 Viewing images 35 Precautions 36 Specifications 37 7 Table of contents IMPORTANT SAFEGUARDS 2 Read this first 4 Notes on using your computer 26 Supported Operating Systems for USB connection and application software "Picture Motion Browser" (supplied 26 Viewing "Cyber-shot ...
Instruction Manual
Page 8
... lighted, as the internal memory data or "Memory Stick Duo" data may be destroyed. Always protect your camera on other equipment and playback of DSC-T200 unless noted otherwise. 8 In addition to malfunctions and an inability to record images, this manual are not guaranteed...can harm the quality and cause a malfunction. [ On image data compatibility • This camera conforms with other equipment on your camera [ Internal memory and "Memory Stick Duo" back up Do not turn off the screen with your data by JEITA (Japan Electronics and Information Technology Industries Association)....
... lighted, as the internal memory data or "Memory Stick Duo" data may be destroyed. Always protect your camera on other equipment and playback of DSC-T200 unless noted otherwise. 8 In addition to malfunctions and an inability to record images, this manual are not guaranteed...can harm the quality and cause a malfunction. [ On image data compatibility • This camera conforms with other equipment on your camera [ Internal memory and "Memory Stick Duo" back up Do not turn off the screen with your data by JEITA (Japan Electronics and Information Technology Industries Association)....

Instruction Manual
Page 10
... 160 min. • Time required to the wall outlet (wall socket). The CHARGE lamp lights up, and charging starts. When the CHARGE lamp turns off the power by . • Even if the CHARGE lamp is not lit, the battery charger is not disconnected from the battery charger. &#...the number of 25°C (77°F). Charging may take longer under certain circumstances or conditions. • See page 32 for use with compatible Sony batteries. 10 If some trouble occurs while using the battery charger, immediately shut off , charging is fully charged), the charge will last slightly longer...
... 160 min. • Time required to the wall outlet (wall socket). The CHARGE lamp lights up, and charging starts. When the CHARGE lamp turns off the power by . • Even if the CHARGE lamp is not lit, the battery charger is not disconnected from the battery charger. &#...the number of 25°C (77°F). Charging may take longer under certain circumstances or conditions. • See page 32 for use with compatible Sony batteries. 10 If some trouble occurs while using the battery charger, immediately shut off , charging is fully charged), the charge will last slightly longer...
Instruction Manual
Page 12
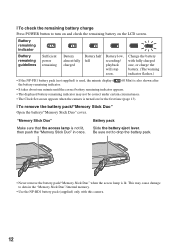
... This may not be correct under certain circumstances. • The Clock Set screen appears when the camera is turned on the LCD screen. [ To check the remaining battery charge Press POWER button to turn on and check the remaining battery on for the first time (page 13). [ To remove the battery pack/"Memory...
... This may not be correct under certain circumstances. • The Clock Set screen appears when the camera is turned on the LCD screen. [ To check the remaining battery charge Press POWER button to turn on and check the remaining battery on for the first time (page 13). [ To remove the battery pack/"Memory...

Instruction Manual
Page 13
... finger. • When the item you touch the top right of the screen while shooting, the icons will make the icons reappear. 13 3 Turning the camera on/setting the clock POWER button Touch panel Lens Lens cover 1 Press the POWER button or slide the lens cover downward. 2 Set the clock... v/V. 3 Touch [OK]. On the touch panel buttons Perform settings on the screen with your finger off the screen will momentarily disappear. To hide this camera by lightly touching the buttons or icons on this guide, touch [?] again. • When you want to set its numeric value by touching [BACK...
... finger. • When the item you touch the top right of the screen while shooting, the icons will make the icons reappear. 13 3 Turning the camera on/setting the clock POWER button Touch panel Lens Lens cover 1 Press the POWER button or slide the lens cover downward. 2 Set the clock... v/V. 3 Touch [OK]. On the touch panel buttons Perform settings on the screen with your finger off the screen will momentarily disappear. To hide this camera by lightly touching the buttons or icons on this guide, touch [?] again. • When you want to set its numeric value by touching [BACK...

Instruction Manual
Page 14
[ To set the date and time again Touch [HOME], then touch (Settings) t [ Clock Settings] (pages 22, 23). [ When you turn on the power • Once the battery is inserted in the camera, it may take time before operation becomes possible. • If the camera is running on battery power and you do not operate the camera for about three minutes, the camera turns off automatically to prevent wearing down the battery pack (Auto power-off function). 14
[ To set the date and time again Touch [HOME], then touch (Settings) t [ Clock Settings] (pages 22, 23). [ When you turn on the power • Once the battery is inserted in the camera, it may take time before operation becomes possible. • If the camera is running on battery power and you do not operate the camera for about three minutes, the camera turns off automatically to prevent wearing down the battery pack (Auto power-off function). 14

Instruction Manual
Page 19
...(previous) / (next) on /off , the camera is displayed to playback mode. The volume control bar disappears. v/V/b/B: Adjusts the position. [BACK]: Cancels playback zoom. : Turns v/V/b/B on the screen to playback a movie. Movie: Touch B to select an image. Viewing/deleting images DSC-T70/T75 (Playback) button Zoom (W/T) lever Speaker Speaker Multi... to zoom 19 If you want to delete, then touch . 2 Touch [OK]. [ To view an enlarged image (playback zoom) Touch a still image while it is turned on automatically and set to enlarge the corresponding area. Touch out.
...(previous) / (next) on /off , the camera is displayed to playback mode. The volume control bar disappears. v/V/b/B: Adjusts the position. [BACK]: Cancels playback zoom. : Turns v/V/b/B on the screen to playback a movie. Movie: Touch B to select an image. Viewing/deleting images DSC-T70/T75 (Playback) button Zoom (W/T) lever Speaker Speaker Multi... to zoom 19 If you want to delete, then touch . 2 Touch [OK]. [ To view an enlarged image (playback zoom) Touch a still image while it is turned on automatically and set to enlarge the corresponding area. Touch out.

Instruction Manual
Page 24
Touch [?] to hide this guide. [MENU] • Different items will become visible depending on the selected mode. 2Touch the desired menu item. • If the desired item is hidden, keep touching v/V until the item appears on the screen. 3Touch the desired setting item. 4Touch [BACK] to display the menu. Using the menu items 1Touch [MENU] to turn off the menu. 24
Touch [?] to hide this guide. [MENU] • Different items will become visible depending on the selected mode. 2Touch the desired menu item. • If the desired item is hidden, keep touching v/V until the item appears on the screen. 3Touch the desired setting item. 4Touch [BACK] to display the menu. Using the menu items 1Touch [MENU] to turn off the menu. 24
Instruction Manual
Page 27
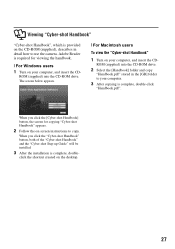
.... [ For Macintosh users To view the "Cyber-shot Handbook" 1 Turn on the desktop. 27 When you click the [Cyber-shot Handbook] button, the screen for viewing the handbook. [ For Windows users 1 Turn on your computer. 3 After copying is complete..., double- ROM (supplied) into the CD-ROM drive. Adobe Reader is required for copying "Cyber-shot Handbook" appears. 2 Follow the on the CD-ROM (supplied), describes in the [GB] folder to use the camera...
.... [ For Macintosh users To view the "Cyber-shot Handbook" 1 Turn on the desktop. 27 When you click the [Cyber-shot Handbook] button, the screen for viewing the handbook. [ For Windows users 1 Turn on your computer. 3 After copying is complete..., double- ROM (supplied) into the CD-ROM drive. Adobe Reader is required for copying "Cyber-shot Handbook" appears. 2 Follow the on the CD-ROM (supplied), describes in the [GB] folder to use the camera...

Instruction Manual
Page 30
Adjusts the volume. Stop Playback Playback zoom Turns v/V/b/B on/off. A Display HOME Indication Displays the HOME screen. Screen indicators Screen indicators 3 to the previous screen. Fast forward/Rewind Changes the screen display. Deletes the image. [ When playing back still images [ When playing back movies B Display BACK x N m M DISP Indication Backs to 5 show . C Display Indication...
Adjusts the volume. Stop Playback Playback zoom Turns v/V/b/B on/off. A Display HOME Indication Displays the HOME screen. Screen indicators Screen indicators 3 to the previous screen. Fast forward/Rewind Changes the screen display. Deletes the image. [ When playing back still images [ When playing back movies B Display BACK x N m M DISP Indication Backs to 5 show . C Display Indication...

Instruction Manual
Page 32
... [SteadyShot] is set to [Shooting]. - of Images DSC-T200 Approx. 125 Approx. 250 DSC-T70/T75 Approx. 135 Approx. 270 • Shooting in the table depending on the battery • Battery capacity decreases as you use . [ When shooting still images Battery life (min.) No. The zoom is low...the "Memory Stick Duo" as necessary. The power turns on the CIPA standard. (CIPA: Camera & Imaging Products Association) • The battery life/number of images does not change, regardless of image size. [ When viewing still images DSC-T200 DSC-T70/T75 Battery life (min.) Approx. 210 Approx. ...
... [SteadyShot] is set to [Shooting]. - of Images DSC-T200 Approx. 125 Approx. 250 DSC-T70/T75 Approx. 135 Approx. 270 • Shooting in the table depending on the battery • Battery capacity decreases as you use . [ When shooting still images Battery life (min.) No. The zoom is low...the "Memory Stick Duo" as necessary. The power turns on the CIPA standard. (CIPA: Camera & Imaging Products Association) • The battery life/number of images does not change, regardless of image size. [ When viewing still images DSC-T200 DSC-T70/T75 Battery life (min.) Approx. 210 Approx. ...
Instruction Manual
Page 34
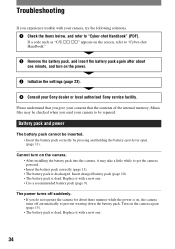
...:ss" appears on the screen, refer to be repaired. The power turns off automatically to "Cyber-shot Handbook" (PDF). Troubleshooting If you experience trouble with your Sony dealer or local authorized Sony service facility. Turn on the power. 3 Initialize the settings (page 23). 4 Consult your camera, try the following solutions. 1 Check the items below, and refer to...
...:ss" appears on the screen, refer to be repaired. The power turns off automatically to "Cyber-shot Handbook" (PDF). Troubleshooting If you experience trouble with your Sony dealer or local authorized Sony service facility. Turn on the power. 3 Initialize the settings (page 23). 4 Consult your camera, try the following solutions. 1 Check the items below, and refer to...
Instruction Manual
Page 36
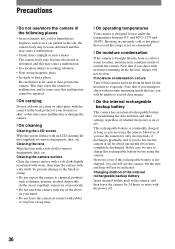
...rechargeable battery is continually charged as long as you can still use the camera, but the date and time will not be sure to evaporate. If moisture condensation occurs Turn off . 36 However, if you use the camera for the moisture to charge this rechargeable battery before ...using the camera. Cleaning the lens Wipe the lens with a dry cloth. Cleaning the camera surface Clean the camera surface with a soft cloth slightly...
...rechargeable battery is continually charged as long as you can still use the camera, but the date and time will not be sure to evaporate. If moisture condensation occurs Turn off . 36 However, if you use the camera for the moisture to charge this rechargeable battery before ...using the camera. Cleaning the lens Wipe the lens with a dry cloth. Cleaning the camera surface Clean the camera surface with a soft cloth slightly...

Cyber-shot® Handbook (Large File - 10.47 MB)
Page 14
...can the "Red-eye phenomenon" be reduced? • Set [Red Eye Reduction] to the lens, can be accentuated by taking the following steps. Camera Eye Retina How can the "White circular spots" be slower under low-light conditions, or in a dark place. The "White circular spots" This ... the subject's eyes are close to [On] (page 52). • Select (High Sensitivity)* mode in Scene Selection (page 44). (The flash is turned off automatically.) * Even though you selected (High Sensitivity) mode in Scene Selection, the shutter speed might be reduced? • Light the room and shoot...
...can the "Red-eye phenomenon" be reduced? • Set [Red Eye Reduction] to the lens, can be accentuated by taking the following steps. Camera Eye Retina How can the "White circular spots" be slower under low-light conditions, or in a dark place. The "White circular spots" This ... the subject's eyes are close to [On] (page 52). • Select (High Sensitivity)* mode in Scene Selection (page 44). (The flash is turned off automatically.) * Even though you selected (High Sensitivity) mode in Scene Selection, the shutter speed might be reduced? • Light the room and shoot...
Cyber-shot® Handbook (Large File - 10.47 MB)
Page 18
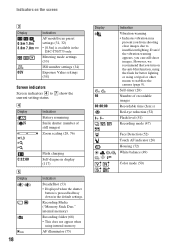
... Vibration warning • Indicates vibration may prevent you turn on the screen C Display 0.5m 1.0m 3.0m 7.0m 0EV Indication AF mode/focus preset settings (31, 32) • [0.5m] is pressed halfway down in the DSC-T70/T75 only. However, we recommend that you from ... Metering mode settings (33) ISO number settings (34) Exposure Value settings (34) Screen indicators Screen indicators 4 to stabilize the camera (page 9). Self-timer (28) Number of still images) Zoom scaling (28, 76) C:32:00 E Display 18 Flash charging Self-diagnosis display (117) Indication SteadyShot (53)...
... Vibration warning • Indicates vibration may prevent you turn on the screen C Display 0.5m 1.0m 3.0m 7.0m 0EV Indication AF mode/focus preset settings (31, 32) • [0.5m] is pressed halfway down in the DSC-T70/T75 only. However, we recommend that you from ... Metering mode settings (33) ISO number settings (34) Exposure Value settings (34) Screen indicators Screen indicators 4 to stabilize the camera (page 9). Self-timer (28) Number of still images) Zoom scaling (28, 76) C:32:00 E Display 18 Flash charging Self-diagnosis display (117) Indication SteadyShot (53)...

Cyber-shot® Handbook (Large File - 10.47 MB)
Page 20
... playback folder. Fast forward/Rewind Changes the screen display. Displays the MENU screen. Adjusts the volume (35). Stop Playback Playback zoom (36) Turns v/V/b/B on the screen When playing back still images When playing back movies B Display BACK x N / m M DISP Indication Backs to the single image screen from the index screen. 20 C:32:00...
... playback folder. Fast forward/Rewind Changes the screen display. Displays the MENU screen. Adjusts the volume (35). Stop Playback Playback zoom (36) Turns v/V/b/B on the screen When playing back still images When playing back movies B Display BACK x N / m M DISP Indication Backs to the single image screen from the index screen. 20 C:32:00...

Cyber-shot® Handbook (Large File - 10.47 MB)
Page 30
...focus mode setting icon Macro Off ( ) Macro On ( ): W side DSC-T200: Approx. 8 cm or farther (3 1/4 inches or farther) DSC-T70/T75: Approx. 8 cm or farther (3 1/4 inches or farther) T side DSC-T200: Approx. 80 cm or farther (31 1/2 inches or farther) DSC-T70/T75: Approx. 25 cm or farther (9 7/8 inches or farther) Close ... the W side and cannot be in the Burst or Bracket mode (page 47). • You cannot use the Face Detection feature when you turn off the power or switch the mode to . A Changing the focus method B Selecting the metering mode C Selecting a luminous sensitivity D Adjusting ...
...focus mode setting icon Macro Off ( ) Macro On ( ): W side DSC-T200: Approx. 8 cm or farther (3 1/4 inches or farther) DSC-T70/T75: Approx. 8 cm or farther (3 1/4 inches or farther) T side DSC-T200: Approx. 80 cm or farther (31 1/2 inches or farther) DSC-T70/T75: Approx. 25 cm or farther (9 7/8 inches or farther) Close ... the W side and cannot be in the Burst or Bracket mode (page 47). • You cannot use the Face Detection feature when you turn off the power or switch the mode to . A Changing the focus method B Selecting the metering mode C Selecting a luminous sensitivity D Adjusting ...

Cyber-shot® Handbook (Large File - 10.47 MB)
Page 32
... (Auto Adjustment mode) 0.5 m (DSC-T70/T75 only) 1.0 m 3.0 m 7.0 m (unlimited distance) Focuses on the subject using a previously set distance to the subject. (Focus preset) • When shooting a subject through a net or through window glass, it is displayed by a dotted line. D Touch where you want to focus the shot. • If you use Digital Zoom or AF.... • AF stands for Auto Focus. • Distance setting information in auto focus mode. In this case, the priority of AF movement is given to turn off the menu. (Program Auto), then touch [BACK]. (Spot AF).
... (Auto Adjustment mode) 0.5 m (DSC-T70/T75 only) 1.0 m 3.0 m 7.0 m (unlimited distance) Focuses on the subject using a previously set distance to the subject. (Focus preset) • When shooting a subject through a net or through window glass, it is displayed by a dotted line. D Touch where you want to focus the shot. • If you use Digital Zoom or AF.... • AF stands for Auto Focus. • Distance setting information in auto focus mode. In this case, the priority of AF movement is given to turn off the menu. (Program Auto), then touch [BACK]. (Spot AF).

Cyber-shot® Handbook (Large File - 10.47 MB)
Page 35
...: Touch , then adjust the volume with / . Basic Operations Viewing images (Playback) button 1 Press (Playback) button. • If you press (Playback) when the camera is powered off, the camera is turned on automatically and set to select an image. To switch to the shooting mode, press (Playback) again. 2 Touch (previous)/ (next) to playback mode.
...: Touch , then adjust the volume with / . Basic Operations Viewing images (Playback) button 1 Press (Playback) button. • If you press (Playback) when the camera is powered off, the camera is turned on automatically and set to select an image. To switch to the shooting mode, press (Playback) again. 2 Touch (previous)/ (next) to playback mode.


