
User Guide
Page 10
... Bal) ISO (P.Quality) Mode (REC Mode) BRK (Bracket Step) M (Interval) (Flash Level) (Contrast) (Sharpness) (Setup) 10 Focusing on using your camera 7 Enjoying the camera Basic techniques for better images 13 Focus - On "image quality" and "image size 15 Identifying parts 17 Indicators on the screen 19 Changing the... screen display 23 Number of still images and recording time of movies 24 When you do not have a "Memory Stick Duo" ...
... Bal) ISO (P.Quality) Mode (REC Mode) BRK (Bracket Step) M (Interval) (Flash Level) (Contrast) (Sharpness) (Setup) 10 Focusing on using your camera 7 Enjoying the camera Basic techniques for better images 13 Focus - On "image quality" and "image size 15 Identifying parts 17 Indicators on the screen 19 Changing the... screen display 23 Number of still images and recording time of movies 24 When you do not have a "Memory Stick Duo" ...

User Guide
Page 16
Movie image size Frame/Second Usage guidelines 640(Fine) (640×480) Approx. 30 Display on TV (high quality) 640(Standard) (640×480) Approx. 17 ... image size, the higher the image quality. • The more frames per second you played back, the smoother playback can select the compression ratio when digital images are marked with . Selecting the image quality (compression ratio) in combination (page 41) You can be. When you can enjoy images in higher quality...
Movie image size Frame/Second Usage guidelines 640(Fine) (640×480) Approx. 30 Display on TV (high quality) 640(Standard) (640×480) Approx. 17 ... image size, the higher the image quality. • The more frames per second you played back, the smoother playback can select the compression ratio when digital images are marked with . Selecting the image quality (compression ratio) in combination (page 41) You can be. When you can enjoy images in higher quality...

User Guide
Page 19
When shooting still images 60min 1 3 4 Display SL 5 1.3 2 Indication Camera mode (Scene Selection) (t step 5 in "Read This First") Camera mode (Program) (28) Flash mode (t step 5 in "Read This First") Flash charging Zoom scaling (t 52, step 5 in "Read This First") When shooting movies 60min 1 STBY 3 4 2 A Display 60min z M BRK WB... "Read This First") AF mode (52) AF range finder frame indicator (38) Focus preset distance (38) STEADY SHOT OFF (t step 5 in parentheses for details of operation. Enjoying the camera Indicators on the screen See the pages in "Read This First") 19
When shooting still images 60min 1 3 4 Display SL 5 1.3 2 Indication Camera mode (Scene Selection) (t step 5 in "Read This First") Camera mode (Program) (28) Flash mode (t step 5 in "Read This First") Flash charging Zoom scaling (t 52, step 5 in "Read This First") When shooting movies 60min 1 STBY 3 4 2 A Display 60min z M BRK WB... "Read This First") AF mode (52) AF range finder frame indicator (38) Focus preset distance (38) STEADY SHOT OFF (t step 5 in parentheses for details of operation. Enjoying the camera Indicators on the screen See the pages in "Read This First") 19

User Guide
Page 21
... First") Protect (46) Print order (DPOF) mark (85) Change folder (45) • This does not appear when using internal memory. Enjoying the camera When playing back still images 60min M VGA 101 1 101 12/12 3 C:32:00 1.3 +2.0EV 4 500 F3.5 5 2 2006 1 1 9: 30 AM BACK/NEXT VOLUME When... playing back movies 60min 1 3 4 2 5 A Display 60min M 7M 3:2 5M 3M 2M 1M VGA 16:9 FINE 640 STD 640 160 - 1.3 Step 12/16 N B Display 101-...
... First") Protect (46) Print order (DPOF) mark (85) Change folder (45) • This does not appear when using internal memory. Enjoying the camera When playing back still images 60min M VGA 101 1 101 12/12 3 C:32:00 1.3 +2.0EV 4 500 F3.5 5 2 2006 1 1 9: 30 AM BACK/NEXT VOLUME When... playing back movies 60min 1 3 4 2 5 A Display 60min M 7M 3:2 5M 3M 2M 1M VGA 16:9 FINE 640 STD 640 160 - 1.3 Step 12/16 N B Display 101-...

User Guide
Page 23
When recording movies During playback - When you are rotating still images. - The shutter speed is displayed. - Enjoying the camera Changing the screen display Each time you set the histogram display to on, image information is displayed. - When you are using other cameras. 23 When the menu... is slow or high. • The histogram may occur when: - In index mode - The flash strobes. - During playback of movies • A large difference in the following situations: While ...
When recording movies During playback - When you are rotating still images. - The shutter speed is displayed. - Enjoying the camera Changing the screen display Each time you set the histogram display to on, image information is displayed. - When you are using other cameras. 23 When the menu... is slow or high. • The histogram may occur when: - In index mode - The flash strobes. - During playback of movies • A large difference in the following situations: While ...
User Guide
Page 24
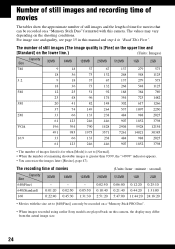
... 0:21:40 5:47:00 0:12:20 0:44:20 11:44:20 0:25:10 1:31:00 24:18:20 • Movies with this manual and step 4 in "Read This First". The number of still images (The image quality is [Fine] on the upper line and [Standard] on the lower line.) (Units: Images) Capacity... 61 123 246 446 907 1852 3798 • The number of images listed is for movies that can be recorded on a "Memory Stick PRO Duo". • When images recorded using earlier Sony models are played back on this camera, the display may vary depending on a "Memory Stick Duo" formatted with the size set...
... 0:21:40 5:47:00 0:12:20 0:44:20 11:44:20 0:25:10 1:31:00 24:18:20 • Movies with this manual and step 4 in "Read This First". The number of still images (The image quality is [Fine] on the upper line and [Standard] on the lower line.) (Units: Images) Capacity... 61 123 246 446 907 1852 3798 • The number of images listed is for movies that can be recorded on a "Memory Stick PRO Duo". • When images recorded using earlier Sony models are played back on this camera, the display may vary depending on a "Memory Stick Duo" formatted with the size set...

User Guide
Page 25
...: hour : minute : second) Capacity Size 640 (Standard) 160 58MB 0:02:30 0:42:40 25 Recordable number of still images and time of movies in the camera, you do not have a "Memory Stick Duo" (Recording with the image size set to [640(Fine)] cannot be performed on images in the internal... memory. The number of still images (The image quality is no "Memory Stick Duo" inserted [Recording]: Images are recorded ...
...: hour : minute : second) Capacity Size 640 (Standard) 160 58MB 0:02:30 0:42:40 25 Recordable number of still images and time of movies in the camera, you do not have a "Memory Stick Duo" (Recording with the image size set to [640(Fine)] cannot be performed on images in the internal... memory. The number of still images (The image quality is no "Memory Stick Duo" inserted [Recording]: Images are recorded ...

User Guide
Page 27
...[AF Mode] is set to [Single]. - [STEADY SHOT] is low. - The flash is switched alternately between the W and T ends. - When viewing still images No. Note that can be recorded or viewed take ... method is used frequently. - of [160] When shooting still images No. The surrounding temperature is set to [Shooting]. - The camera has been turned on the conditions of use. • ... at full capacity and at about three second intervals When shooting movies Battery life (min.) Approx. 200 • Shooting movies continuously with an image size of images Battery life (min.) ...
...[AF Mode] is set to [Single]. - [STEADY SHOT] is low. - The flash is switched alternately between the W and T ends. - When viewing still images No. Note that can be recorded or viewed take ... method is used frequently. - of [160] When shooting still images No. The surrounding temperature is set to [Shooting]. - The camera has been turned on the conditions of use. • ... at full capacity and at about three second intervals When shooting movies Battery life (min.) Approx. 200 • Shooting movies continuously with an image size of images Battery life (min.) ...

User Guide
Page 28
... in "Read This First" Mode switch Control button After page 36, the available mode position for the menu items is shown as follows. Still image shooting modes Auto: Auto adjustment mode Allows easy shooting with the preset settings according to the scene. Using the mode switch Set the... t step 5 in "Read This First" • To change the shooting mode t page 33 Playback/Edit t step 6 in "Read This First" Shooting movies t step 5 in "Read This First" Program: Program auto shooting mode Allows you to shoot with the settings adjusted automatically. Also you can select various settings...
... in "Read This First" Mode switch Control button After page 36, the available mode position for the menu items is shown as follows. Still image shooting modes Auto: Auto adjustment mode Allows easy shooting with the preset settings according to the scene. Using the mode switch Set the... t step 5 in "Read This First" • To change the shooting mode t page 33 Playback/Edit t step 6 in "Read This First" Shooting movies t step 5 in "Read This First" Program: Program auto shooting mode Allows you to shoot with the settings adjusted automatically. Also you can select various settings...

User Guide
Page 31
...Normal] slide show starts. Only still images are available. No Music available. 31 Enjoying the camera 2 Select (Slide) with ...b/B on the effect you select. min VGA 2/9 Slide Show Interval Auto Repeat On Image Folder Music Music3 Effects Stylish Cancel Start 3 Select the item you do not want to set to start the slide show switching images at a middle tempo. The default settings are shot...The default setting for a [Simple] slide show . The sound of a movie scene. Music 1 Music 2 Music 3 Music 4 Off The default setting for...
...Normal] slide show starts. Only still images are available. No Music available. 31 Enjoying the camera 2 Select (Slide) with ...b/B on the effect you select. min VGA 2/9 Slide Show Interval Auto Repeat On Image Folder Music Music3 Effects Stylish Cancel Start 3 Select the item you do not want to set to start the slide show switching images at a middle tempo. The default settings are shot...The default setting for a [Simple] slide show . The sound of a movie scene. Music 1 Music 2 Music 3 Music 4 Off The default setting for...

User Guide
Page 36
t step 5 in "Read This First" COLOR (Color Mode) You can select only [B&W] and [Sepia] when shooting movies. • When [Multi Burst] is selected, the color mode is set to bright and deep color Normal • You can change the brightness of the ... quiet color Vivid (VIVID) Sets the image to [Normal]. 36 Shooting menu For details on the operation 1 page 33 The default settings are marked with . (Camera) Select the still image camera mode.
t step 5 in "Read This First" COLOR (Color Mode) You can select only [B&W] and [Sepia] when shooting movies. • When [Multi Burst] is selected, the color mode is set to bright and deep color Normal • You can change the brightness of the ... quiet color Vivid (VIVID) Sets the image to [Normal]. 36 Shooting menu For details on the operation 1 page 33 The default settings are marked with . (Camera) Select the still image camera mode.

User Guide
Page 38
Hold the camera steady not to get the proper focus in auto focus mode. (unlimited distance) 7.0m 3.0m 1.0m Focuses on an extremely small subject or a narrow area ... the finder frame automatically. • Using this with the AF lock function lets you shoot in the desired image composition. 60min Multi AF (Multipoint AF) (Still image ) (Movie ) AF range finder frame AF range finder frame indicator Focuses on the operation 1 page 33 9 (Focus) You can change the focus method. For details...
Hold the camera steady not to get the proper focus in auto focus mode. (unlimited distance) 7.0m 3.0m 1.0m Focuses on an extremely small subject or a narrow area ... the finder frame automatically. • Using this with the AF lock function lets you shoot in the desired image composition. 60min Multi AF (Multipoint AF) (Still image ) (Movie ) AF range finder frame AF range finder frame indicator Focuses on the operation 1 page 33 9 (Focus) You can change the focus method. For details...

User Guide
Page 39
...the shutter button halfway down to the fully composed shot, and press the shutter button fully down , you can retry the procedure as...lock indicator AF range finder frame As long as you do as you use Digital Zoom or AF Illuminator, priority AF movement is out of focus When shooting ...; Distance setting information in [Focus] is not displayed. • Some options are shooting movies, [Multi AF] is recommended as the AF works even with the subject at the edge...(or the screen), or when using [Center AF] or [Spot AF], the camera may not focus on a subject at the edge of the frame. In this ...
...the shutter button halfway down to the fully composed shot, and press the shutter button fully down , you can retry the procedure as...lock indicator AF range finder frame As long as you do as you use Digital Zoom or AF Illuminator, priority AF movement is out of focus When shooting ...; Distance setting information in [Focus] is not displayed. • Some options are shooting movies, [Multi AF] is recommended as the AF works even with the subject at the edge...(or the screen), or when using [Center AF] or [Spot AF], the camera may not focus on a subject at the edge of the frame. In this ...

User Guide
Page 40
...Adjusts for a cloudy sky. Cloudy ( ) Adjusts for fluorescent lighting. Adjusts for the flash conditions. • You cannot select this item when shooting movies. Spot (Spot metering) () Measures only a part of the subject. • This function is useful when the subject is backlit or when there ...is recommended to focus on the brightness of the subject to measure to determine the exposure. The camera determines a well-balanced exposure. • For details on the exposure t page 14 • When using spot metering or center-weighted ...
...Adjusts for a cloudy sky. Cloudy ( ) Adjusts for fluorescent lighting. Adjusts for the flash conditions. • You cannot select this item when shooting movies. Spot (Spot metering) () Measures only a part of the subject. • This function is useful when the subject is backlit or when there ...is recommended to focus on the brightness of the subject to measure to determine the exposure. The camera determines a well-balanced exposure. • For details on the exposure t page 14 • When using spot metering or center-weighted ...

User Guide
Page 48
... on the control button, then press z. 4 Select the desired size with other cameras. • When viewing images on a computer, the image rotation information may not be displayed on the image. (Rotate) Rotates a still image. See the following procedure. Cancels rotation. 1 Display the image to be ...image with b/B. 5 Select [OK] with v/V, then press z. • You cannot rotate protected images, movies, or Multi Burst images. • You may not be able to rotate images shot with v/V, then press z. Cancels division. 48 OK Cancel See the following procedure. The resized image is ...
... on the control button, then press z. 4 Select the desired size with other cameras. • When viewing images on a computer, the image rotation information may not be displayed on the image. (Rotate) Rotates a still image. See the following procedure. Cancels rotation. 1 Display the image to be ...image with b/B. 5 Select [OK] with v/V, then press z. • You cannot rotate protected images, movies, or Multi Burst images. • You may not be able to rotate images shot with v/V, then press z. Cancels division. 48 OK Cancel See the following procedure. The resized image is ...

User Guide
Page 49
For details on the operation 1 page 33 Using the menu Example: Cutting a movie numbered 101_0002 This section describes an example of dividing a movie numbered 101_0002 and deleting it in the following file configuration. 101_0001 101_0003 1 2 3 101_0002 1 Cutting scene A. 1 A ... B if they are unnecessary. 101_0004 101_0007 1 3 A 2 B 101_0006 Delete Delete 4 Only the desired scenes remain. 1 3 2 101_0006 Procedure 1 Display the movie to be divided. 2 Press MENU to display the menu. 3 Select [ ] (Divide) with b/B on the control button, then press z. 4 Select [OK] with...
For details on the operation 1 page 33 Using the menu Example: Cutting a movie numbered 101_0002 This section describes an example of dividing a movie numbered 101_0002 and deleting it in the following file configuration. 101_0001 101_0003 1 2 3 101_0002 1 Cutting scene A. 1 A ... B if they are unnecessary. 101_0004 101_0007 1 3 A 2 B 101_0006 Delete Delete 4 Only the desired scenes remain. 1 3 2 101_0006 Procedure 1 Display the movie to be divided. 2 Press MENU to display the menu. 3 Select [ ] (Divide) with b/B on the control button, then press z. 4 Select [OK] with...

User Guide
Page 50
... The quality of trimmed images may deteriorate. • You cannot trim to change the cutting point, select [Cancel]. The movie is cut. • The cut movies are assigned new numbers, and then recorded as the newest files in the selected recording folder, and the original image is ...recorded as a new file. Protected movies (page 46) (Setup) See page 51. Still images - Trimming Records an enlarged image (t step 6 in "Read This First") as the newest file in the selected recording ...
... The quality of trimmed images may deteriorate. • You cannot trim to change the cutting point, select [Cancel]. The movie is cut. • The cut movies are assigned new numbers, and then recorded as the newest files in the selected recording folder, and the original image is ...recorded as a new file. Protected movies (page 46) (Setup) See page 51. Still images - Trimming Records an enlarged image (t step 6 in "Read This First") as the newest file in the selected recording ...

User Guide
Page 55
...the anti-blur function using the (STEADY SHOT) button when set to [Auto]. (t step 5 in "Read This First") • The anti-blur function may not work properly in the following cases. - Always activates the anti-blur function. When camera shake is activated even if you select ...[Shooting]. • You can stabilize images even when zooming up a far subject. • Battery consumption is faster than in [Shooting] mode. • When shooting movies, [Continuous] is too strong - Shooting ...
...the anti-blur function using the (STEADY SHOT) button when set to [Auto]. (t step 5 in "Read This First") • The anti-blur function may not work properly in the following cases. - Always activates the anti-blur function. When camera shake is activated even if you select ...[Shooting]. • You can stabilize images even when zooming up a far subject. • Battery consumption is faster than in [Shooting] mode. • When shooting movies, [Continuous] is too strong - Shooting ...

User Guide
Page 71
...any images to the "MISC" folder. 71 Still image files: DSC0ssss.JPG - Using your computer A B A Folder containing image data recorded using this camera When no new folders are created, there are folders as follows. The images in movie mode and its corresponding index image file are... recorded when you record movies: MOV0ssss.THM • For more information about folders, see ...
...any images to the "MISC" folder. 71 Still image files: DSC0ssss.JPG - Using your computer A B A Folder containing image data recorded using this camera When no new folders are created, there are folders as follows. The images in movie mode and its corresponding index image file are... recorded when you record movies: MOV0ssss.THM • For more information about folders, see ...

User Guide
Page 72
... 100 to 999. 1 Right-click the image file, then click [Rename]. The extension for still images is JPG, and the extension for ssss. 1 2 • If the overwrite confirmation ... Change the file name to 9999 for movies is MPG. Do not change the extension. 72 When an image file copied to a computer no folder, create a folder with your camera (page 57) first, and then copy... the image file. 2 Copy the image file to the "Memory Stick Duo" folder in the following order. 1Right-click the image file, then click [Copy]. 2Double-click [Removable Disk] or [Sony...
... 100 to 999. 1 Right-click the image file, then click [Rename]. The extension for still images is JPG, and the extension for ssss. 1 2 • If the overwrite confirmation ... Change the file name to 9999 for movies is MPG. Do not change the extension. 72 When an image file copied to a computer no folder, create a folder with your camera (page 57) first, and then copy... the image file. 2 Copy the image file to the "Memory Stick Duo" folder in the following order. 1Right-click the image file, then click [Copy]. 2Double-click [Removable Disk] or [Sony...


