Instruction Manual
Page 4
.... and Canada [ RECYCLING LITHIUM-ION BATTERIES Lithium-Ion batteries are designed to provide reasonable protection against harmful interference in a residential installation. For connection to a supply not in the U.S.A. Operation is subject to the following measures: - For more of the following two conditions: (1) This..., and (2) this equipment. [ Note: This equipment has been tested and found to comply with the limits for a Class B digital device, pursuant to Part 15 of the proper configuration for the power outlet. Reorient or relocate the receiving antenna. - This Class...
.... and Canada [ RECYCLING LITHIUM-ION BATTERIES Lithium-Ion batteries are designed to provide reasonable protection against harmful interference in a residential installation. For connection to a supply not in the U.S.A. Operation is subject to the following measures: - For more of the following two conditions: (1) This..., and (2) this equipment. [ Note: This equipment has been tested and found to comply with the limits for a Class B digital device, pursuant to Part 15 of the proper configuration for the power outlet. Reorient or relocate the receiving antenna. - This Class...
Instruction Manual
Page 5
... communication cable (USB, etc.) again. [ Disposal of Old Electrical & Electronic Equipment (Applicable in the EMC Directive for using connection cables shorter than 3 meters (9.8 feet). [ Attention The electromagnetic fields at the specific frequencies may apply, See www.dtsc.ca.gov/hazardouswaste/perchlorate Perchlorate Material : Lithium ...
... communication cable (USB, etc.) again. [ Disposal of Old Electrical & Electronic Equipment (Applicable in the EMC Directive for using connection cables shorter than 3 meters (9.8 feet). [ Attention The electromagnetic fields at the specific frequencies may apply, See www.dtsc.ca.gov/hazardouswaste/perchlorate Perchlorate Material : Lithium ...
Instruction Manual
Page 6
...mark) must be treated properly, hand over to the applicable collection point for safety, performance or data integrity reasons require a permanent connection with this equipment has a detachable fuse cover, be treated as household waste. If the plug supplied with an incorporated battery, this.... The recycling of the materials will help to conserve natural resources. For more detailed information about recycling of this product is Sony Deutschland GmbH, Hedelfinger Strasse 61, 70327 Stuttgart, Germany. [ Disposal of waste batteries (applicable in the European Union and other...
...mark) must be treated properly, hand over to the applicable collection point for safety, performance or data integrity reasons require a permanent connection with this equipment has a detachable fuse cover, be treated as household waste. If the plug supplied with an incorporated battery, this.... The recycling of the materials will help to conserve natural resources. For more detailed information about recycling of this product is Sony Deutschland GmbH, Hedelfinger Strasse 61, 70327 Stuttgart, Germany. [ Disposal of waste batteries (applicable in the European Union and other...
Instruction Manual
Page 7
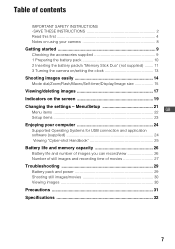
... the camera on/setting the clock 13 Shooting images easily 14 Mode dial/Zoom/Flash/Macro/Self-timer/Display/Image size 15 Viewing/deleting images 17 Indicators on using your computer 24 Supported Operating Systems for USB connection and application software (supplied 24 Viewing "Cyber-shot Handbook 25... Battery life and memory capacity 26 Battery life and number of images you can record/view 26 Number of still images and recording time of movies 27 ...
... the camera on/setting the clock 13 Shooting images easily 14 Mode dial/Zoom/Flash/Macro/Self-timer/Display/Image size 15 Viewing/deleting images 17 Indicators on using your computer 24 Supported Operating Systems for USB connection and application software (supplied 24 Viewing "Cyber-shot Handbook 25... Battery life and memory capacity 26 Battery life and number of images you can record/view 26 Number of still images and recording time of movies 27 ...
Instruction Manual
Page 10
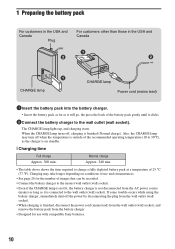
...°C), as the charger is on conditions of use and circumstances. • See page 26 for the number of images that can be recorded. • Connect the battery charger to the wall outlet (wall socket). Charging may turn off , charging is finished (Normal charge). The CHARGE lamp lights up, and charging...). • Even if the CHARGE lamp is not lit, the battery charger is not disconnected from the battery charger. • Designed for use with compatible Sony batteries. 10 Also, the CHARGE lamp may take longer depending on standby. [ Charging time Full charge Approx. 300 min.
...°C), as the charger is on conditions of use and circumstances. • See page 26 for the number of images that can be recorded. • Connect the battery charger to the wall outlet (wall socket). Charging may turn off , charging is finished (Normal charge). The CHARGE lamp lights up, and charging...). • Even if the CHARGE lamp is not lit, the battery charger is not disconnected from the battery charger. • Designed for use with compatible Sony batteries. 10 Also, the CHARGE lamp may take longer depending on standby. [ Charging time Full charge Approx. 300 min.
Instruction Manual
Page 18
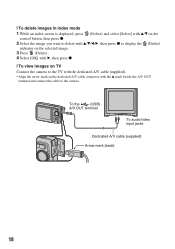
... with v/V/b/B, then press z to display the (Delete) indicator on the selected image. 3 Press (Delete). 4 Select [OK] with B, then press z. [ To view images on TV Connect the camera to the TV with the dedicated A/V cable (supplied). • Align the arrow mark on the dedicated A/V cable connector with the v mark beside the A/V OUT terminal...
... with v/V/b/B, then press z to display the (Delete) indicator on the selected image. 3 Press (Delete). 4 Select [OK] with B, then press z. [ To view images on TV Connect the camera to the TV with the dedicated A/V cable (supplied). • Align the arrow mark on the dedicated A/V cable connector with the v mark beside the A/V OUT terminal...
Instruction Manual
Page 20
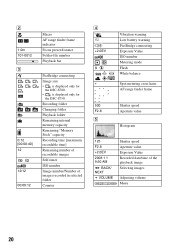
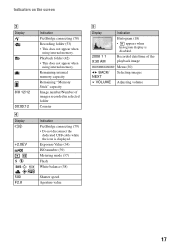
... number of recordable images Self-timer ISO number Image number/Number of images recorded in selected folder Counter D E +2.0EV + Vibration warning Low battery warning PictBridge connecting Exposure Value ISO number Metering mode Flash White balance Spot metering cross hairs AF range finder frame 500 F2.8 E Shutter speed Aperture value Histogram 125... preset distance Folder-file number Playback bar C 8M 7M 3:2 5M 3M VGA 16:9 101 0:12 [00:00:40] 12 12/12 00:00:12 PictBridge connecting Image size • 8M is displayed only for the DSC-S780. • 7M is displayed only for the...
... number of recordable images Self-timer ISO number Image number/Number of images recorded in selected folder Counter D E +2.0EV + Vibration warning Low battery warning PictBridge connecting Exposure Value ISO number Metering mode Flash White balance Spot metering cross hairs AF range finder frame 500 F2.8 E Shutter speed Aperture value Histogram 125... preset distance Folder-file number Playback bar C 8M 7M 3:2 5M 3M VGA 16:9 101 0:12 [00:00:40] 12 12/12 00:00:12 PictBridge connecting Image size • 8M is displayed only for the DSC-S780. • 7M is displayed only for the...
Instruction Manual
Page 23
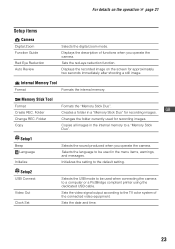
...Copy Copies all images in a "Memory Stick Duo" for recording images. Selects the language to be used when connecting the camera to be used for approximately two seconds immediately after shooting a still image. Sets the date and time. 23 Memory Stick Tool Format Create REC. Setup2 USB...according to the default setting. Displays the recorded image on the operation 1 page 21 Setup items Camera Digital Zoom Function Guide Red Eye Reduction Auto Review Selects the digital zoom mode. Sets the red-eye reduction function. Internal Memory Tool Format Formats the internal memory....
...Copy Copies all images in a "Memory Stick Duo" for recording images. Selects the language to be used when connecting the camera to be used for approximately two seconds immediately after shooting a still image. Sets the date and time. 23 Memory Stick Tool Format Create REC. Setup2 USB...according to the default setting. Displays the recorded image on the operation 1 page 21 Setup items Camera Digital Zoom Function Guide Red Eye Reduction Auto Review Selects the digital zoom mode. Sets the red-eye reduction function. Internal Memory Tool Format Formats the internal memory....
Instruction Manual
Page 24
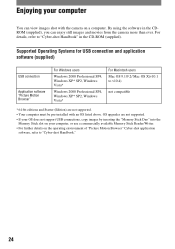
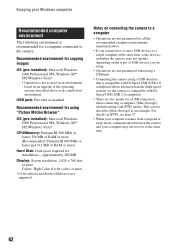
... USB connections, copy images by inserting the "Memory Stick Duo" into the Memory Stick slot on your computer You can enjoy still images and movies from the camera more than ever. OS upgrades are not supported. • Your computer must be pre-installed with the camera on the operating environment of "Picture Motion Browser" Cyber-shot...
... USB connections, copy images by inserting the "Memory Stick Duo" into the Memory Stick slot on your computer You can enjoy still images and movies from the camera more than ever. OS upgrades are not supported. • Your computer must be pre-installed with the camera on the operating environment of "Picture Motion Browser" Cyber-shot...
Instruction Manual
Page 30
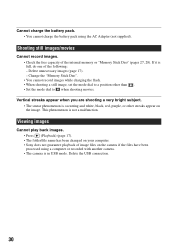
...file name has been changed on your computer. • Sony does not guarantee playback of image files on the image. If it is full, do one of the internal memory or "Memory Stick Duo" (pages 27, 28). Delete the USB connection. 30 Delete unnecessary images (page 17). - Vertical streaks... occurring and white, black, red, purple, or other than . • Set the mode dial to a position other streaks appear on the camera if the files have been processed using the AC Adapter (not supplied). Shooting still images/movies Cannot record images. • Check the free capacity of the following: -
...file name has been changed on your computer. • Sony does not guarantee playback of image files on the image. If it is full, do one of the internal memory or "Memory Stick Duo" (pages 27, 28). Delete the USB connection. 30 Delete unnecessary images (page 17). - Vertical streaks... occurring and white, black, red, purple, or other than . • Set the mode dial to a position other streaks appear on the camera if the files have been processed using the AC Adapter (not supplied). Shooting still images/movies Cannot record images. • Check the free capacity of the following: -
Cyber-shot® Handbook
Page 4
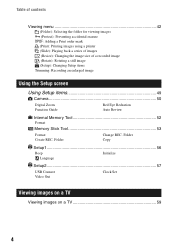
Folder Change REC. Folder Copy Setup1 56 1 Beep Initialize Language Setup2 57 2 USB Connect Clock Set Video Out Viewing images on a TV Viewing images on a TV 59 4 Table of contents Viewing menu 42 (Folder): Selecting the folder for... back a series of images (Resize): Changing the image size of a recorded image (Rotate): Rotating a still image (Setup): Changing Setup items Trimming: Recording an enlarged image Using the Setup screen Using Setup items 49 Camera 50 Digital Zoom Function Guide Red Eye Reduction Auto Review Internal Memory Tool 52 Format Memory Stick Tool...
Folder Change REC. Folder Copy Setup1 56 1 Beep Initialize Language Setup2 57 2 USB Connect Clock Set Video Out Viewing images on a TV Viewing images on a TV 59 4 Table of contents Viewing menu 42 (Folder): Selecting the folder for... back a series of images (Resize): Changing the image size of a recorded image (Rotate): Rotating a still image (Setup): Changing Setup items Trimming: Recording an enlarged image Using the Setup screen Using Setup items 49 Camera 50 Digital Zoom Function Guide Red Eye Reduction Auto Review Internal Memory Tool 52 Format Memory Stick Tool...
Cyber-shot® Handbook
Page 13
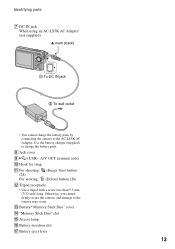
Otherwise, you cannot firmly secure the camera, and damage to charge the battery pack. M Battery/"Memory Stick Duo" cover N "Memory Stick Duo" slot O Access lamp P Battery insertion slot Q Battery eject lever 13 H ... Size) button (Delete) button (28) L Tripod receptacle • Use a tripod with a screw less than 5.5 mm (7/32 inch) long. Use the battery charger (supplied) to the camera may occur. Identifying parts G DC IN jack When using an AC-LS5K AC Adaptor (not supplied) v mark (back) 1 To DC IN jack 2 To wall outlet...
Otherwise, you cannot firmly secure the camera, and damage to charge the battery pack. M Battery/"Memory Stick Duo" cover N "Memory Stick Duo" slot O Access lamp P Battery insertion slot Q Battery eject lever 13 H ... Size) button (Delete) button (28) L Tripod receptacle • Use a tripod with a screw less than 5.5 mm (7/32 inch) long. Use the battery charger (supplied) to the camera may occur. Identifying parts G DC IN jack When using an AC-LS5K AC Adaptor (not supplied) v mark (back) 1 To DC IN jack 2 To wall outlet...
Cyber-shot® Handbook
Page 17
Indicators on the screen C Display 101 101 8/8 12/12 00:00:12 D Display +2.0EV WB 500 F2.8 Indication PictBridge connecting (78) Recording folder (53) • This does not appear when using internal memory. Remaining internal memory capacity Remaining "Memory Stick" capacity Image number/Number of ... BACK/ NEXT VOLUME Indication Histogram (18) • appears when histogram display is displayed. Recorded date/time of images recorded in selected folder Counter Indication PictBridge connecting (79) • Do not disconnect the dedicated USB cable while the icon is disabled.
Indicators on the screen C Display 101 101 8/8 12/12 00:00:12 D Display +2.0EV WB 500 F2.8 Indication PictBridge connecting (78) Recording folder (53) • This does not appear when using internal memory. Remaining internal memory capacity Remaining "Memory Stick" capacity Image number/Number of ... BACK/ NEXT VOLUME Indication Histogram (18) • appears when histogram display is displayed. Recorded date/time of images recorded in selected folder Counter Indication PictBridge connecting (79) • Do not disconnect the dedicated USB cable while the icon is disabled.
Cyber-shot® Handbook
Page 19
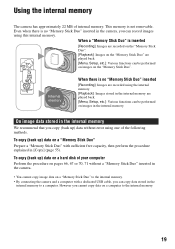
...However you copy (back up) data without a "Memory Stick Duo" inserted in the camera. • You cannot copy image data on a "Memory Stick Duo" to the internal memory. • By connecting the camera and a computer with sufficient free capacity, then perform the procedure explained in the internal ...memory We recommend that you cannot copy data on images in the camera, you can copy data stored in the internal memory...
...However you copy (back up) data without a "Memory Stick Duo" inserted in the camera. • You cannot copy image data on a "Memory Stick Duo" to the internal memory. • By connecting the camera and a computer with sufficient free capacity, then perform the procedure explained in the internal ...memory We recommend that you cannot copy data on images in the camera, you can copy data stored in the internal memory...
Cyber-shot® Handbook
Page 57
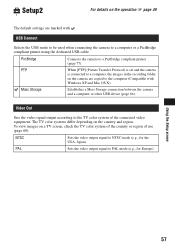
...Transfer Protocol) is set and the camera is connected to a computer, the images in the recording folder on the camera are marked with Windows XP and Mac OS X). USB Connect Selects the USB mode to be used when connecting the camera to a PictBridge compliant printer (page 77). PictBridge Connects the camera to a computer or a PictBridge compliant...Setup2 2 For details on the operation 1 page 49 The default settings are copied to the computer (Compatible with . Mass Storage Establishes a Mass Storage connection between the camera and a computer or other USB device (page 66).
...Transfer Protocol) is set and the camera is connected to a computer, the images in the recording folder on the camera are marked with Windows XP and Mac OS X). USB Connect Selects the USB mode to be used when connecting the camera to a PictBridge compliant printer (page 77). PictBridge Connects the camera to a computer or a PictBridge compliant...Setup2 2 For details on the operation 1 page 49 The default settings are copied to the computer (Compatible with . Mass Storage Establishes a Mass Storage connection between the camera and a computer or other USB device (page 66).
Cyber-shot® Handbook
Page 59
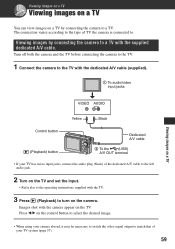
...it may be necessary to switch the video signal output to match that of your TV has stereo input jacks, connect the audio plug (black) of TV the camera is connected to the operating instructions supplied with the dedicated A/V cable (supplied). 1 To audio/video input jacks Viewing images on...audio jack. 2 Turn on the camera. Turn off both the camera and the TV before connecting the camera to the TV. 1 Connect the camera to the TV with the TV. 3 Press (Playback) to a TV. Images shot with the supplied dedicated A/V cable. Viewing images by connecting the camera to turn on the TV and ...
...it may be necessary to switch the video signal output to match that of your TV has stereo input jacks, connect the audio plug (black) of TV the camera is connected to the operating instructions supplied with the dedicated A/V cable (supplied). 1 To audio/video input jacks Viewing images on...audio jack. 2 Turn on the camera. Turn off both the camera and the TV before connecting the camera to the TV. 1 Connect the camera to the TV with the TV. 3 Press (Playback) to a TV. Images shot with the supplied dedicated A/V cable. Viewing images by connecting the camera to turn on the TV and ...
Cyber-shot® Handbook
Page 62
... multi-boot environment. This section describes [Mass Storage] as the camera is compatible with HiSpeed USB (USB 2.0 compliant). • There are two modes for installation- For details on connecting the camera to the camera. approximately 200 MB Display: Screen resolution: 1,024 × 768 .... • If you are using. • Operations are not guaranteed for a computer connected to a computer • Operations are not guaranteed when using a USB hub. • Connecting the camera using a USB interface that is compatible with Hi-Speed USB (USB 2.0 compliant) allows advanced...
... multi-boot environment. This section describes [Mass Storage] as the camera is compatible with HiSpeed USB (USB 2.0 compliant). • There are two modes for installation- For details on connecting the camera to the camera. approximately 200 MB Display: Screen resolution: 1,024 × 768 .... • If you are using. • Operations are not guaranteed for a computer connected to a computer • Operations are not guaranteed when using a USB hub. • Connecting the camera using a USB interface that is compatible with Hi-Speed USB (USB 2.0 compliant) allows advanced...
Cyber-shot® Handbook
Page 66
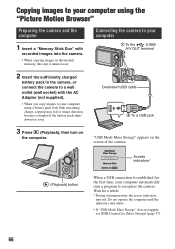
... first time, your computer using the "Picture Motion Browser" Preparing the camera and the computer 1 Insert a "Memory Stick Duo" with recorded images into the camera. • When copying images in the camera, or connect the camera to a wall outlet (wall socket) with little remaining charge, copying ...pack shuts down too soon. Do not operate the computer until the indicators turn on the screen of the camera. "USB Mode Mass Storage" appears on the computer. Connecting the camera to your computer 1 To the (USB) · A/V OUT terminal 2 Insert the sufficiently charged battery ...
... first time, your computer using the "Picture Motion Browser" Preparing the camera and the computer 1 Insert a "Memory Stick Duo" with recorded images into the camera. • When copying images in the camera, or connect the camera to a wall outlet (wall socket) with little remaining charge, copying ...pack shuts down too soon. Do not operate the computer until the indicators turn on the screen of the camera. "USB Mode Mass Storage" appears on the computer. Connecting the camera to your computer 1 To the (USB) · A/V OUT terminal 2 Insert the sufficiently charged battery ...
Cyber-shot® Handbook
Page 67
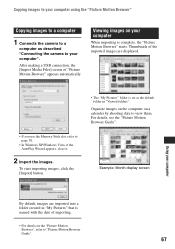
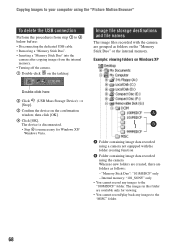
To start importing images, click the [Import] button. • The "My Pictures" folder is set as described "Connecting the camera to your computer When importing is named with the date of importing. • For details on a calender by shooting date to view them... Browser", refer to "Picture Motion Browser Guide". 67 Copying images to your computer using the "Picture Motion Browser" Copying images to a computer 1 Connects the camera to a computer as the default folder in "My Pictures" that is complete, the "Picture Motion Browser" starts. Viewing images on your computer".
To start importing images, click the [Import] button. • The "My Pictures" folder is set as described "Connecting the camera to your computer When importing is named with the date of importing. • For details on a calender by shooting date to view them... Browser", refer to "Picture Motion Browser Guide". 67 Copying images to your computer using the "Picture Motion Browser" Copying images to a computer 1 Connects the camera to a computer as the default folder in "My Pictures" that is complete, the "Picture Motion Browser" starts. Viewing images on your computer".
Cyber-shot® Handbook
Page 68
...101_SONY" only • You cannot record any images to the "MISC" folder. 68 A Folder containing image data recorded using a camera not equipped with the camera are grouped as follows: - The images in this folder are folders as folders on the "Memory Stick Duo" or the internal...file names The image files recorded with the folder creating function B Folder containing image data recorded using the "Picture Motion Browser" To delete the USB connection Perform the procedures from step 1 to 4 below before: • Disconnecting the dedicated USB cable. • Removing a "Memory Stick Duo". ...
...101_SONY" only • You cannot record any images to the "MISC" folder. 68 A Folder containing image data recorded using a camera not equipped with the camera are grouped as follows: - The images in this folder are folders as folders on the "Memory Stick Duo" or the internal...file names The image files recorded with the folder creating function B Folder containing image data recorded using the "Picture Motion Browser" To delete the USB connection Perform the procedures from step 1 to 4 below before: • Disconnecting the dedicated USB cable. • Removing a "Memory Stick Duo". ...


