Instruction Manual
Page 3
... of time, unplug it is damaged or frayed. - this set during a lightning storm, or when it from the wall outlet and disconnect the antenna or cable system. The set on a bed, sofa, rug, or other hazards. [ Safety Check Upon completion of the set, and to the plugs, receptacles, and the point...
... of time, unplug it is damaged or frayed. - this set during a lightning storm, or when it from the wall outlet and disconnect the antenna or cable system. The set on a bed, sofa, rug, or other hazards. [ Safety Check Upon completion of the set, and to the plugs, receptacles, and the point...
Instruction Manual
Page 4
...uses, and can help . Read this equipment. [ Note: This equipment has been tested and found to comply with the limits for a digital device pursuant to Subpart B of Part 15 of FCC Rules. 4 However, there is no guarantee that to which the receiver is encouraged to... complies with the limits for a Class B digital device, pursuant to the collection and recycling location nearest you. Increase the separation between the equipment and receiver. - The supplied interface cable must accept any changes or modifications not expressly approved in this equipment does cause harmful ...
...uses, and can help . Read this equipment. [ Note: This equipment has been tested and found to comply with the limits for a digital device pursuant to Subpart B of Part 15 of FCC Rules. 4 However, there is no guarantee that to which the receiver is encouraged to... complies with the limits for a Class B digital device, pursuant to the collection and recycling location nearest you. Increase the separation between the equipment and receiver. - The supplied interface cable must accept any changes or modifications not expressly approved in this equipment does cause harmful ...
Instruction Manual
Page 5
... as household waste. For more detailed information about recycling of this product shall not be handed over to the applicable collection point for using connection cables shorter than 3 meters (9.8 feet). [ Attention The electromagnetic fields at the specific frequencies may apply, See www.dtsc.ca.gov/hazardouswaste/perchlorate Perchlorate ... EMC Directive for the recycling of materials will help to discontinue midway (fail), restart the application or disconnect and connect the communication cable (USB, etc.) again. [ Disposal of California, USA only Perchlorate Material -
... as household waste. For more detailed information about recycling of this product shall not be handed over to the applicable collection point for using connection cables shorter than 3 meters (9.8 feet). [ Attention The electromagnetic fields at the specific frequencies may apply, See www.dtsc.ca.gov/hazardouswaste/perchlorate Perchlorate ... EMC Directive for the recycling of materials will help to discontinue midway (fail), restart the application or disconnect and connect the communication cable (USB, etc.) again. [ Disposal of California, USA only Perchlorate Material -
Instruction Manual
Page 9
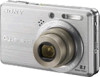
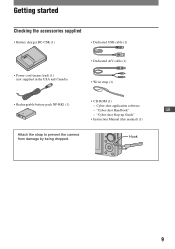
"Cyber-shot Step-up Guide" • Instruction Manual (this manual) (1) Attach the strap to prevent the camera from damage by being dropped. Getting started Checking the accessories supplied • Battery charger BC-CSK (1) • Dedicated USB cable (1) • Power cord (mains lead) (1) (not supplied in the USA and Canada) • Dedicated A/V cable (1) • Wrist strap (1) • CD-ROM (1) • Rechargeable battery pack NP-BK1 (1) - Cyber-shot application software - Hook 9 "Cyber-shot Handbook" GB -
"Cyber-shot Step-up Guide" • Instruction Manual (this manual) (1) Attach the strap to prevent the camera from damage by being dropped. Getting started Checking the accessories supplied • Battery charger BC-CSK (1) • Dedicated USB cable (1) • Power cord (mains lead) (1) (not supplied in the USA and Canada) • Dedicated A/V cable (1) • Wrist strap (1) • CD-ROM (1) • Rechargeable battery pack NP-BK1 (1) - Cyber-shot application software - Hook 9 "Cyber-shot Handbook" GB -
Instruction Manual
Page 18
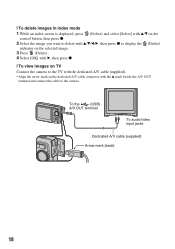
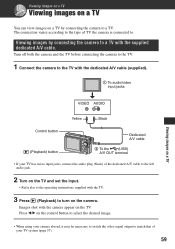
... [OK] with B, then press z. [ To view images on TV Connect the camera to the TV with the dedicated A/V cable (supplied). • Align the arrow mark on the dedicated A/V cable connector with the v mark beside the A/V OUT terminal and connect the cable to the camera. To the (USB) · A/V OUT terminal To audio/video input jacks...
... [OK] with B, then press z. [ To view images on TV Connect the camera to the TV with the dedicated A/V cable (supplied). • Align the arrow mark on the dedicated A/V cable connector with the v mark beside the A/V OUT terminal and connect the cable to the camera. To the (USB) · A/V OUT terminal To audio/video input jacks...
Instruction Manual
Page 23
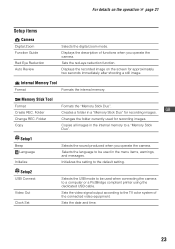
... USB cable. For details on the screen for recording images. Folder Changes the folder currently used when connecting the camera to the TV color system of functions when you operate the camera. Initializes the setting to be used for approximately two seconds immediately after shooting a still image.... Sets the date and time. 23 GB Creates a folder in the internal memory to be used in the menu items, warnings, and messages. Displays the recorded image on the operation 1 page 21 Setup items Camera Digital Zoom Function Guide Red ...
... USB cable. For details on the screen for recording images. Folder Changes the folder currently used when connecting the camera to the TV color system of functions when you operate the camera. Initializes the setting to be used for approximately two seconds immediately after shooting a still image.... Sets the date and time. 23 GB Creates a folder in the internal memory to be used in the menu items, warnings, and messages. Displays the recorded image on the operation 1 page 21 Setup items Camera Digital Zoom Function Guide Red ...
Cyber-shot® Handbook
Page 17
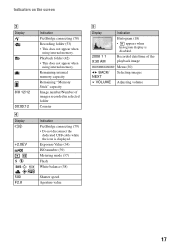
Recorded date/time of images recorded in selected folder Counter Indication PictBridge connecting (79) • Do not disconnect the dedicated USB cable while the icon is disabled. Playback folder (42) • This does not appear when using internal memory. Exposure Value (34) ISO number (39) Metering mode (...
Recorded date/time of images recorded in selected folder Counter Indication PictBridge connecting (79) • Do not disconnect the dedicated USB cable while the icon is disabled. Playback folder (42) • This does not appear when using internal memory. Exposure Value (34) ISO number (39) Metering mode (...
Cyber-shot® Handbook
Page 19
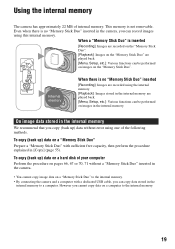
...are played back. [Menu, Setup, etc.]: Various functions can copy data stored in the internal memory to the internal memory. • By connecting the camera and a computer with sufficient free capacity, then perform the procedure explained in [Copy] (page 55). To copy (back up) data on pages 66... your computer Perform the procedure on a "Memory Stick Duo" Prepare a "Memory Stick Duo" with a dedicated USB cable, you copy (back up) data without a "Memory Stick Duo" inserted in the camera. • You cannot copy image data on the "Memory Stick Duo". This memory is no "Memory Stick Duo"...
...are played back. [Menu, Setup, etc.]: Various functions can copy data stored in the internal memory to the internal memory. • By connecting the camera and a computer with sufficient free capacity, then perform the procedure explained in [Copy] (page 55). To copy (back up) data on pages 66... your computer Perform the procedure on a "Memory Stick Duo" Prepare a "Memory Stick Duo" with a dedicated USB cable, you copy (back up) data without a "Memory Stick Duo" inserted in the camera. • You cannot copy image data on the "Memory Stick Duo". This memory is no "Memory Stick Duo"...
Cyber-shot® Handbook
Page 57
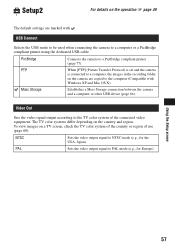
...details on the country and region. PictBridge Connects the camera to a computer or a PictBridge compliant printer using the dedicated USB cable. Video Out Sets the video signal output according to the TV color system of use (page 60). To view images on the camera are marked with Windows XP and Mac OS X). ...check the TV color system of the country or region of the connected video equipment. PTP When [PTP] (Picture Transfer Protocol) is set and the camera is connected to the computer (Compatible with . USB Connect Selects the USB mode to be used when connecting the...
...details on the country and region. PictBridge Connects the camera to a computer or a PictBridge compliant printer using the dedicated USB cable. Video Out Sets the video signal output according to the TV color system of use (page 60). To view images on the camera are marked with Windows XP and Mac OS X). ...check the TV color system of the country or region of the connected video equipment. PTP When [PTP] (Picture Transfer Protocol) is set and the camera is connected to the computer (Compatible with . USB Connect Selects the USB mode to be used when connecting the...
Cyber-shot® Handbook
Page 59
Images shot with the supplied dedicated A/V cable. Press b/B on the control button to select the desired image. • When using your TV system (page 57). 59 Turn off both the camera and the TV before connecting the camera to the TV. 1 Connect the camera to the TV with the dedicated A/V cable (supplied). 1 To audio/video input jacks...
Images shot with the supplied dedicated A/V cable. Press b/B on the control button to select the desired image. • When using your TV system (page 57). 59 Turn off both the camera and the TV before connecting the camera to the TV. 1 Connect the camera to the TV with the dedicated A/V cable (supplied). 1 To audio/video input jacks...
Cyber-shot® Handbook
Page 60
The color system of the TV must match that of the country or region where the camera is used. PAL system Australia, Austria, Belgium, China, Czech Republic, Denmark, Finland, Germany, Holland, Hong Kong, Hungary, Italy, Kuwait, Malaysia, New Zealand, Norway, Poland, Portugal... etc. Check the following lists for the TV color system of your digital still camera. Viewing images on a TV On TV color systems If you want to view images on a TV screen, you need a TV with a video input jack and the dedicated A/V cable. PAL-M system Brazil PAL-N system Argentina, Paraguay, Uruguay SECAM system ...
The color system of the TV must match that of the country or region where the camera is used. PAL system Australia, Austria, Belgium, China, Czech Republic, Denmark, Finland, Germany, Holland, Hong Kong, Hungary, Italy, Kuwait, Malaysia, New Zealand, Norway, Poland, Portugal... etc. Check the following lists for the TV color system of your digital still camera. Viewing images on a TV On TV color systems If you want to view images on a TV screen, you need a TV with a video input jack and the dedicated A/V cable. PAL-M system Brazil PAL-N system Argentina, Paraguay, Uruguay SECAM system ...
Cyber-shot® Handbook
Page 66
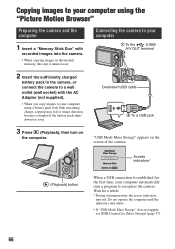
...When a USB connection is unnecessary. "USB Mode Mass Storage" appears on the computer. Dedicated USB cable 2 To a USB jack 3 Press (Playback), then turn on the screen of the camera. Connecting the camera to your computer 1 To the (USB) · A/V OUT terminal 2 Insert the sufficiently charged...time, your computer using the "Picture Motion Browser" Preparing the camera and the computer 1 Insert a "Memory Stick Duo" with recorded images into the camera. • When copying images in the camera, or connect the camera to a wall outlet (wall socket) with little remaining charge,...
...When a USB connection is unnecessary. "USB Mode Mass Storage" appears on the computer. Dedicated USB cable 2 To a USB jack 3 Press (Playback), then turn on the screen of the camera. Connecting the camera to your computer 1 To the (USB) · A/V OUT terminal 2 Insert the sufficiently charged...time, your computer using the "Picture Motion Browser" Preparing the camera and the computer 1 Insert a "Memory Stick Duo" with recorded images into the camera. • When copying images in the camera, or connect the camera to a wall outlet (wall socket) with little remaining charge,...
Cyber-shot® Handbook
Page 68
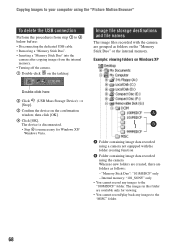
... from step 1 to 4 below before: • Disconnecting the dedicated USB cable. • Removing a "Memory Stick Duo". • Inserting a "Memory Stick Duo" into the camera after copying images from the internal memory. • Turning off the camera. 1 Double-click on the confirmation window, then click [OK]. 4 Click...cannot record any images to the "MISC" folder. 68 "Memory Stick Duo": "101MSDCF" only - Copying images to your computer using the camera When no new folders are created, there are folders as folders on the "Memory Stick Duo" or the internal memory. A Folder containing image...
... from step 1 to 4 below before: • Disconnecting the dedicated USB cable. • Removing a "Memory Stick Duo". • Inserting a "Memory Stick Duo" into the camera after copying images from the internal memory. • Turning off the camera. 1 Double-click on the confirmation window, then click [OK]. 4 Click...cannot record any images to the "MISC" folder. 68 "Memory Stick Duo": "101MSDCF" only - Copying images to your computer using the camera When no new folders are created, there are folders as folders on the "Memory Stick Duo" or the internal memory. A Folder containing image...
Cyber-shot® Handbook
Page 70
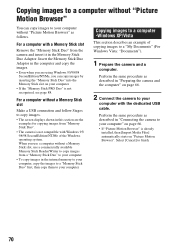
...NT/Me, you use a computer without "Picture Motion Browser" as described in "Preparing the camera and the computer" on page 66. 2 Connect the camera to your computer with the dedicated USB cable. Copying images to a computer without "Picture Motion Browser" You can copy images by inserting...section describes an example of the Windows operating system. Select [Cancel] to a "My Documents" (For Windows Vista: "Documents"). 1 Prepare the camera and a computer. Perform the same procedure as described in the Memory Stick Duo Adaptor. When you can copy images to your computer without a ...
...NT/Me, you use a computer without "Picture Motion Browser" as described in "Preparing the camera and the computer" on page 66. 2 Connect the camera to your computer with the dedicated USB cable. Copying images to a computer without "Picture Motion Browser" You can copy images by inserting...section describes an example of the Windows operating system. Select [Cancel] to a "My Documents" (For Windows Vista: "Documents"). 1 Prepare the camera and a computer. Perform the same procedure as described in the Memory Stick Duo Adaptor. When you can copy images to your computer without a ...
Cyber-shot® Handbook
Page 73
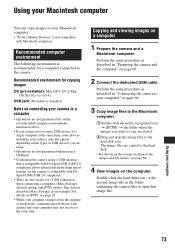
... Storage] (default setting) and [PTP] modes. Perform the same procedure as described in "Preparing the camera and the computer" on a computer 1 Prepare the camera and a Macintosh computer. Copying and viewing images on page 66. 2 Connect the dedicated USB cable. Recommended environment for copying images OS (pre-installed): Mac OS 9.1/9.2/ Mac OS X(v10.1 to...
... Storage] (default setting) and [PTP] modes. Perform the same procedure as described in "Preparing the camera and the computer" on a computer 1 Prepare the camera and a Macintosh computer. Copying and viewing images on page 66. 2 Connect the dedicated USB cable. Recommended environment for copying images OS (pre-installed): Mac OS 9.1/9.2/ Mac OS X(v10.1 to...
Cyber-shot® Handbook
Page 74
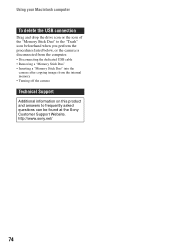
...the procedures listed below, or the camera is disconnected from the computer. • Disconnecting the dedicated USB cable • Removing a "Memory Stick Duo" • Inserting a "Memory Stick Duo" into the camera after copying images from the internal ...memory • Turning off the camera Technical Support Additional information on this product and answers to frequently asked questions can be found at the Sony Customer Support Website. http://www.sony...
...the procedures listed below, or the camera is disconnected from the computer. • Disconnecting the dedicated USB cable • Removing a "Memory Stick Duo" • Inserting a "Memory Stick Duo" into the camera after copying images from the internal ...memory • Turning off the camera Technical Support Additional information on this product and answers to frequently asked questions can be found at the Sony Customer Support Website. http://www.sony...

Cyber-shot® Handbook
Page 77
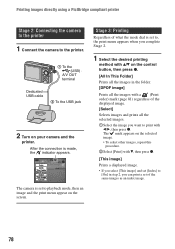
...Select (Setup2) with V, then 2 select [USB Connect] with v/V/B. 4 Select [PictBridge] with the dedicated USB cable. Printing still images 77 Stage 1: Preparing the camera Prepare the camera to connect it to the printer with B/v, then press z. • An index print function may not be provided...either the same images (1) or different images (2). 1 2 2 Press B on a printing sheet. You can print images shot using your camera by connecting the camera directly to display the menu. Printing images directly using a PictBridge compliant printer Even if you do not have a computer, you...
...Select (Setup2) with V, then 2 select [USB Connect] with v/V/B. 4 Select [PictBridge] with the dedicated USB cable. Printing still images 77 Stage 1: Preparing the camera Prepare the camera to connect it to the printer with B/v, then press z. • An index print function may not be provided...either the same images (1) or different images (2). 1 2 2 Press B on a printing sheet. You can print images shot using your camera by connecting the camera directly to display the menu. Printing images directly using a PictBridge compliant printer Even if you do not have a computer, you...
Cyber-shot® Handbook
Page 78
... 3: Printing Regardless of the same images as an index image. 78 Printing images directly using a PictBridge compliant printer Stage 2: Connecting the camera to the printer 1 Connect the camera to , the print menu appears when you complete Stage 2. 1 Select the desired printing method with v/V on the control button, then press... selected images. 1Select the image you can print a set to playback mode, then an image and the print menu appear on the screen. The camera is made, the indicator appears. After the connection is set of what the mode dial is set to the printer. 1 To the (USB)...
... 3: Printing Regardless of the same images as an index image. 78 Printing images directly using a PictBridge compliant printer Stage 2: Connecting the camera to the printer 1 Connect the camera to , the print menu appears when you complete Stage 2. 1 Select the desired printing method with v/V on the control button, then press... selected images. 1Select the image you can print a set to playback mode, then an image and the print menu appear on the screen. The camera is made, the indicator appears. After the connection is set of what the mode dial is set to the printer. 1 To the (USB)...
Cyber-shot® Handbook
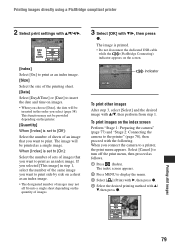
Page 79
...on the printer. [Quantity] When [Index] is printed. • Do not disconnect the dedicated USB cable while the (PictBridge Connecting) indicator appears on the screen. When you connect the camera to turn off the print menu, then proceed as follows. 1 Press (Index). This function may not...select (page 58). Select [Cancel] to a printer, the print menu appears. Printing still images 79 To print images on the index screen Perform "Stage 1: Preparing the camera" (page 77) and "Stage 2: Connecting the camera to the printer" (page 78), then proceed with v/V, then perform from step 1. The...
...on the printer. [Quantity] When [Index] is printed. • Do not disconnect the dedicated USB cable while the (PictBridge Connecting) indicator appears on the screen. When you connect the camera to turn off the print menu, then proceed as follows. 1 Press (Index). This function may not...select (page 58). Select [Cancel] to a printer, the print menu appears. Printing still images 79 To print images on the index screen Perform "Stage 1: Preparing the camera" (page 77) and "Stage 2: Connecting the camera to the printer" (page 78), then proceed with v/V, then perform from step 1. The...
Cyber-shot® Handbook
Page 88
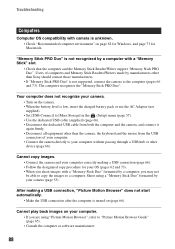
... keyboard and the mouse from the USB connectors of your computer. • Connect the camera directly to your computer without passing through a USB hub or other than Sony should contact those manufacturers. • If "Memory Stick PRO Duo" is low, insert the charged battery pack or use ...; When the battery level is not supported, connect the camera to [Mass Storage] in the (Setup) menu (page 57). • Use the dedicated USB cable (supplied) (page 66). • Disconnect the dedicated USB cable from both the computer and the camera, and connect it again firmly. • Disconnect all ...
... keyboard and the mouse from the USB connectors of your computer. • Connect the camera directly to your computer without passing through a USB hub or other than Sony should contact those manufacturers. • If "Memory Stick PRO Duo" is low, insert the charged battery pack or use ...; When the battery level is not supported, connect the camera to [Mass Storage] in the (Setup) menu (page 57). • Use the dedicated USB cable (supplied) (page 66). • Disconnect the dedicated USB cable from both the computer and the camera, and connect it again firmly. • Disconnect all ...


