Operating Instructions (primary manual)
Page 3
...approved by returning your nearest Sony service station. Should the fuse in the plug supplied need to be sure to attach the fuse cover after you change the fuse. Never use the plug without the fuse cover. "Memory Stick" N50 For the Customers... in the EMC Directive for using connection cables shorter than 3 meters (9.8 feet). and Canada THIS CLASS B DIGITAL DEVICE COMPLIES WITH PART 15 OF THE FCC RULES ...BS 1363 is fitted to this product. If the plug supplied with this digital camera. If you .
...approved by returning your nearest Sony service station. Should the fuse in the plug supplied need to be sure to attach the fuse cover after you change the fuse. Never use the plug without the fuse cover. "Memory Stick" N50 For the Customers... in the EMC Directive for using connection cables shorter than 3 meters (9.8 feet). and Canada THIS CLASS B DIGITAL DEVICE COMPLIES WITH PART 15 OF THE FCC RULES ...BS 1363 is fitted to this product. If the plug supplied with this digital camera. If you .
Operating Instructions (primary manual)
Page 4
.... 4 Do not shake or strike the camera In addition to malfunctions and inability to direct sunlight for if recording or playback is not a malfunction. Exposing the LCD screen, the finder or the lens to record images, this may render the "Memory Stick" unusable or image data breakdown, damage or... loss may cause irrecoverable damage to record or play back properly. • Do not use the camera near a TV, radio, or tuner. No compensation for contents of the ...
.... 4 Do not shake or strike the camera In addition to malfunctions and inability to direct sunlight for if recording or playback is not a malfunction. Exposing the LCD screen, the finder or the lens to record images, this may render the "Memory Stick" unusable or image data breakdown, damage or... loss may cause irrecoverable damage to record or play back properly. • Do not use the camera near a TV, radio, or tuner. No compensation for contents of the ...
Operating Instructions (primary manual)
Page 5
... this camera. The pictures used in this manual The photographs used as examples of pictures in this manual are reproduced images, and are not actual images shot using this manual. 5 Trademarks • "Memory Stick," , and "MagicGate Memory Stick" are trademarks of Sony Corporation. • "Memory Stick Duo" and are trademarks of Sony Corporation. • "Memory Stick PRO" and are trademarks of Sony Corporation...
... this camera. The pictures used in this manual The photographs used as examples of pictures in this manual are reproduced images, and are not actual images shot using this manual. 5 Trademarks • "Memory Stick," , and "MagicGate Memory Stick" are trademarks of Sony Corporation. • "Memory Stick Duo" and are trademarks of Sony Corporation. • "Memory Stick PRO" and are trademarks of Sony Corporation...

Operating Instructions (primary manual)
Page 6
... an external power source 15 Using your camera abroad 15 Turning your camera on a TV screen 34 Deleting still images Deleting images 36 Formatting a "Memory Stick 40 Before advanced operations How to setup and operate your camera 32 Viewing images on /off 16 How...still image quality 42 Creating or selecting a folder 42 Creating a new folder 43 Selecting the recording folder 43 Advanced still image shooting Choosing a focus method 44 Setting the distance to scene conditions 54 Adding special effects - Table of contents Before using auto mode 22 Checking the last image shot...
... an external power source 15 Using your camera abroad 15 Turning your camera on a TV screen 34 Deleting still images Deleting images 36 Formatting a "Memory Stick 40 Before advanced operations How to setup and operate your camera 32 Viewing images on /off 16 How...still image quality 42 Creating or selecting a folder 42 Creating a new folder 43 Selecting the recording folder 43 Advanced still image shooting Choosing a focus method 44 Setting the distance to scene conditions 54 Adding special effects - Table of contents Before using auto mode 22 Checking the last image shot...
Operating Instructions (primary manual)
Page 7
...users 74 Installing the USB driver 75 Installing "Image Transfer 76 Installing "ImageMixer 77 Connecting the camera to your computer 78 Copying images using "Image Transfer" 79 Changing "Image Transfer" settings ...saved/ shooting time 97 Menu items 98 SET UP items 102 Precautions 104 The "Memory Stick 105 The nickel-metal hydride batteries ........106 The battery charger 107 Specifications 107 The...94 Self-diagnosis display - Jog playback 61 Still image editing Protecting images - Playing back images shot in Multi Burst mode 61 Playing back continuously 61 Playing back frame...
...users 74 Installing the USB driver 75 Installing "Image Transfer 76 Installing "ImageMixer 77 Connecting the camera to your computer 78 Copying images using "Image Transfer" 79 Changing "Image Transfer" settings ...saved/ shooting time 97 Menu items 98 SET UP items 102 Precautions 104 The "Memory Stick 105 The nickel-metal hydride batteries ........106 The battery charger 107 Specifications 107 The...94 Self-diagnosis display - Jog playback 61 Still image editing Protecting images - Playing back images shot in Multi Burst mode 61 Playing back continuously 61 Playing back frame...

Operating Instructions (primary manual)
Page 8
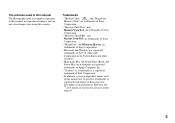
Identifying the parts 1 7 2 8 3 9 4 q; 5 qa 6 A POWER button (16) B Shutter button (22) C Flash (28) D Microphone E Self-timer lamp (27)/ AF illuminator (29) F Tripod receptacle (bottom surface) G POWER lamp (16) H Finder window I Lens 8 J Access lamp (19) K "Memory Stick" cover (19) • Use a tripod with a screw length of less than 5.5 mm (7/32 inch). You will be unable to firmly secure the camera to tripods having longer screws, and may damage the camera.
Identifying the parts 1 7 2 8 3 9 4 q; 5 qa 6 A POWER button (16) B Shutter button (22) C Flash (28) D Microphone E Self-timer lamp (27)/ AF illuminator (29) F Tripod receptacle (bottom surface) G POWER lamp (16) H Finder window I Lens 8 J Access lamp (19) K "Memory Stick" cover (19) • Use a tripod with a screw length of less than 5.5 mm (7/32 inch). You will be unable to firmly secure the camera to tripods having longer screws, and may damage the camera.
Operating Instructions (primary manual)
Page 14
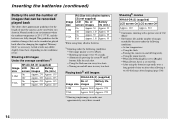
... shot. - of use. Using the flash. - Using the zoom heavily - Using the flash once in order, one image every 30 seconds. - Playing back2) still images NH-AA-DA (2) (supplied) No. Turning the camera ...Approx. 270 VGA Approx. 5400 Approx. 270 2) Showing single images in every two shots. - At low temperatures. - After using Sony alkaline batteries 1) Shooting under the following conditions: - Shooting one approximately every three seconds... changing the supplied "Memory Stick" as necessary. Actual results may differ slightly from these, depending on and off frequently. -
... shot. - of use. Using the flash. - Using the zoom heavily - Using the flash once in order, one image every 30 seconds. - Playing back2) still images NH-AA-DA (2) (supplied) No. Turning the camera ...Approx. 270 VGA Approx. 5400 Approx. 270 2) Showing single images in every two shots. - At low temperatures. - After using Sony alkaline batteries 1) Shooting under the following conditions: - Shooting one approximately every three seconds... changing the supplied "Memory Stick" as necessary. Actual results may differ slightly from these, depending on and off frequently. -

Operating Instructions (primary manual)
Page 19
...lamp is lit, the camera is recording or reading out an image. To remove the "Memory Stick" Open the "Memory Stick" cover, then push the "Memory Stick" to pop it can go. Insert the "Memory Stick" all the way in...Memory Stick" cover. Never remove the "Memory Stick" or turn off the power at this time. The data may not be corrupted. 19 If you insert a "Memory Stick," push it as far as shown in the direction of the arrow. • For more information about the "Memory Stick," see page 105. 2 , Insert the "Memory Stick." Shooting still images Inserting and removing a "Memory Stick...
...lamp is lit, the camera is recording or reading out an image. To remove the "Memory Stick" Open the "Memory Stick" cover, then push the "Memory Stick" to pop it can go. Insert the "Memory Stick" all the way in...Memory Stick" cover. Never remove the "Memory Stick" or turn off the power at this time. The data may not be corrupted. 19 If you insert a "Memory Stick," push it as far as shown in the direction of the arrow. • For more information about the "Memory Stick," see page 105. 2 , Insert the "Memory Stick." Shooting still images Inserting and removing a "Memory Stick...
Operating Instructions (primary manual)
Page 21
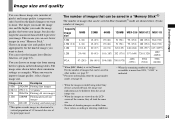
...remaining number of the print paper used. Image size and quality Shooting still images You can save fewer images in your "Memory Stick." The larger you make the image size and the higher you want... to match the size of images recordable is more than 9999, ">9999" is indicated. • When the images recorded using other Sony... (number of pixels) and image quality (compression ratio) based on the LCD screen of the camera, they all look the same size. • Number of shooting images can be saved in other...
...remaining number of the print paper used. Image size and quality Shooting still images You can save fewer images in your "Memory Stick." The larger you make the image size and the higher you want... to match the size of images recordable is more than 9999, ">9999" is indicated. • When the images recorded using other Sony... (number of pixels) and image quality (compression ratio) based on the LCD screen of the camera, they all look the same size. • Number of shooting images can be saved in other...
Operating Instructions (primary manual)
Page 22
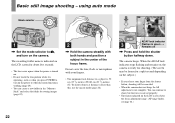
Basic still image shooting - AE/AF lock indicator 3 Flashes in the center of the focus frame. To shoot subjects at distances closer than this, use the macro mode (page 26). You can create a new folder in the "Memory Stick" and select the folder for a split second depending on the subject.) &#...8226; If you press POWER to turn on the camera. The camera beeps. When the AE/AF lock indicator stops flashing and remains on the LCD ...
Basic still image shooting - AE/AF lock indicator 3 Flashes in the center of the focus frame. To shoot subjects at distances closer than this, use the macro mode (page 26). You can create a new folder in the "Memory Stick" and select the folder for a split second depending on the subject.) &#...8226; If you press POWER to turn on the camera. The camera beeps. When the AE/AF lock indicator stops flashing and remains on the LCD ...
Operating Instructions (primary manual)
Page 23
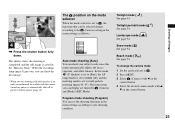
... on the mode selector When the mode selector is set the shooting functions in the menu settings according to the (Camera) setting in the "Memory Stick." Twilight mode [ ] See page 54. Snow mode [ ] See page 54. When the recording lamp (page 9) goes out, you can shoot your ... [Auto] You can display are performed for a while with v/ V on the control button. 23 Shooting still images The menu items you can be selected change the camera mode 1 Set the mode selector to (Camera) and [Mode] (REC Mode). VGA 101 97 4 , Press the shutter button fully down. The shutter...
... on the mode selector When the mode selector is set the shooting functions in the menu settings according to the (Camera) setting in the "Memory Stick." Twilight mode [ ] See page 54. Snow mode [ ] See page 54. When the recording lamp (page 9) goes out, you can shoot your ... [Auto] You can display are performed for a while with v/ V on the control button. 23 Shooting still images The menu items you can be selected change the camera mode 1 Set the mode selector to (Camera) and [Mode] (REC Mode). VGA 101 97 4 , Press the shutter button fully down. The shutter...

Operating Instructions (primary manual)
Page 36
...to delete with b/ B on the control button, then press z. Next, select [Delete] with V on the camera. To cancel the deletion Select [Exit] with v on the control button. Deleting images Deleting still images VGA 101 2/9 VGA 101 2/9 VGA 101 2/9 101-0002 2003 7 4 10:30PM BACK/NEXT VOLUME 1... Select [Delete] with b/B on the control button, then press z. Select the image you want to delete with v on the control button. "Memory Stick access" appears on the screen. When this point. • You cannot delete protected images (page 63). The image has not yet been deleted ...
...to delete with b/ B on the control button, then press z. Next, select [Delete] with V on the camera. To cancel the deletion Select [Exit] with v on the control button. Deleting images Deleting still images VGA 101 2/9 VGA 101 2/9 VGA 101 2/9 101-0002 2003 7 4 10:30PM BACK/NEXT VOLUME 1... Select [Delete] with b/B on the control button, then press z. Select the image you want to delete with v on the control button. "Memory Stick access" appears on the screen. When this point. • You cannot delete protected images (page 63). The image has not yet been deleted ...

Operating Instructions (primary manual)
Page 38
"Memory Stick access" appears on the control button. 2 , Press (Delete). To cancel the deletion Select [Exit] with b on the control button, then press z. 1 , While an Index (triple-...
"Memory Stick access" appears on the control button. 2 , Press (Delete). To cancel the deletion Select [Exit] with b on the control button, then press z. 1 , While an Index (triple-...

Operating Instructions (primary manual)
Page 39
When this message disappears, the image has been deleted. Deleting still images Delete Exit 101-0002 2003 7 4 10:30PM OK BACK/NEXT 3 , Select [Delete] with V on the control button, then press z. To cancel the deletion Select [Exit] with v on the control button, then press z. 39 "Memory Stick access" appears on the screen.
When this message disappears, the image has been deleted. Deleting still images Delete Exit 101-0002 2003 7 4 10:30PM OK BACK/NEXT 3 , Select [Delete] with V on the control button, then press z. To cancel the deletion Select [Exit] with v on the control button, then press z. 39 "Memory Stick access" appears on the screen.

Operating Instructions (primary manual)
Page 40
...: Change REC. To cancel the formatting Select [Cancel] with V on the control button, then press z. 3 , Select [OK] with v/V on the camera. • The term "formatting" means preparing a "Memory Stick" to format into the camera. The "Formatting" message appears on the control button, then press z. Set the mode selector to SET UP, and turn on...
...: Change REC. To cancel the formatting Select [Cancel] with V on the control button, then press z. 3 , Select [OK] with v/V on the camera. • The term "formatting" means preparing a "Memory Stick" to format into the camera. The "Formatting" message appears on the control button, then press z. Set the mode selector to SET UP, and turn on...

Operating Instructions (primary manual)
Page 42
...quality value selected here is preserved even when the camera is turned off. • You can be stored in the menu settings (page 23). Deciding the still image quality Mode selector: You can create multiple folders within a "Memory Stick." When not creating a new folder, "101MSDCF..." folder is automatically created. Before operation Set (Camera) to (Multi Burst) (page 51). Control button MENU ...
...quality value selected here is preserved even when the camera is turned off. • You can be stored in the menu settings (page 23). Deciding the still image quality Mode selector: You can create multiple folders within a "Memory Stick." When not creating a new folder, "101MSDCF..." folder is automatically created. Before operation Set (Camera) to (Multi Burst) (page 51). Control button MENU ...

Operating Instructions (primary manual)
Page 43
... Folder] with B/v/V, and [OK] with v/V, [Create REC. b Select (Memory Stick Tool) with B/v , then press z. folder 102MSDCF Ready? A new folder is created with the camera. • The image is created folders using the camera. or selected. 43 Selecting the recording folder a Set the mode selector to ...SET UP. To cancel folder creation Select [Cancel] in the "Memory Stick," and the folder becomes the ...
... Folder] with B/v/V, and [OK] with v/V, [Create REC. b Select (Memory Stick Tool) with B/v , then press z. folder 102MSDCF Ready? A new folder is created with the camera. • The image is created folders using the camera. or selected. 43 Selecting the recording folder a Set the mode selector to ...SET UP. To cancel folder creation Select [Cancel] in the "Memory Stick," and the folder becomes the ...

Operating Instructions (primary manual)
Page 50
...Shot images will be displayed correctly on other cameras may not be played back in Step 2, repeat Steps 1 to 3 to shoot the next frame, then repeat this camera. • For the number of shooting 1 In Steps 4 or 5, press b (7). If you do not complete Step 6, all the images will be saved in the "Memory Stick... the actual image recorded. • GIF files made on this operation until you have shot the desired number of frames. b Press (Image Size). All of the frames will not be saved in the "Memory Stick." • In Clip Motion, the date and time cannot be inserted. • When...
...Shot images will be displayed correctly on other cameras may not be played back in Step 2, repeat Steps 1 to 3 to shoot the next frame, then repeat this camera. • For the number of shooting 1 In Steps 4 or 5, press b (7). If you do not complete Step 6, all the images will be saved in the "Memory Stick... the actual image recorded. • GIF files made on this operation until you have shot the desired number of frames. b Press (Image Size). All of the frames will not be saved in the "Memory Stick." • In Clip Motion, the date and time cannot be inserted. • When...

Operating Instructions (primary manual)
Page 57
... that images you want to play back images from a last-shot one without selecting the folder. 101-0009 2003 7 4 10:30PM BACK/NEXT VOLUME 57 Advanced still image viewing When multiple folders are created in the "Memory Stick" When the first or last image in this folder" appears.... e Select [OK] with v , then press z. To cancel the selection In step 5, select [Cancel]. On the single screen VGA 101 9/9 Advanced still image viewing On the Index (nine-image) screen SINGLE DISPLAY MOVE On the Index (triple-image) screen Aperture Value: F2.8 Shutter Speed: 1/30 Exposure ...
... that images you want to play back images from a last-shot one without selecting the folder. 101-0009 2003 7 4 10:30PM BACK/NEXT VOLUME 57 Advanced still image viewing When multiple folders are created in the "Memory Stick" When the first or last image in this folder" appears.... e Select [OK] with v , then press z. To cancel the selection In step 5, select [Cancel]. On the single screen VGA 101 9/9 Advanced still image viewing On the Index (nine-image) screen SINGLE DISPLAY MOVE On the Index (triple-image) screen Aperture Value: F2.8 Shutter Speed: 1/30 Exposure ...

Operating Instructions (primary manual)
Page 59
... the mode selector to the size it was before enlargement. • The trimmed image is recorded in the "Memory Stick." Repeat On:Plays the images back repeatedly. To cancel the slide show begins. Advanced still image viewing 59 Recording an enlarged image - Playing back successive images - Slide show playback Press z, select [Exit] with...
... the mode selector to the size it was before enlargement. • The trimmed image is recorded in the "Memory Stick." Repeat On:Plays the images back repeatedly. To cancel the slide show begins. Advanced still image viewing 59 Recording an enlarged image - Playing back successive images - Slide show playback Press z, select [Exit] with...


