Operating Instructions (primary manual)
Page 52
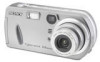
...; For the number of images that is also recorded. The menu appears. 52 You can be used. • The image is about 0.5 second. Shooting still images for recording is not displayed during shooting. b Press MENU. d Shoot your image. Control button MENU Mode selector Shutter button c Select [Mode] (REC... select [Normal]. • For instructions on how to attach your images to an e-mail message, refer to the Help files of the e-mail software you are using the Image Size setup item (page 20) is small enough (320×240) to attach to an e-mail message. Voice E-...
...; For the number of images that is also recorded. The menu appears. 52 You can be used. • The image is about 0.5 second. Shooting still images for recording is not displayed during shooting. b Press MENU. d Shoot your image. Control button MENU Mode selector Shutter button c Select [Mode] (REC... select [Normal]. • For instructions on how to attach your images to an e-mail message, refer to the Help files of the e-mail software you are using the Image Size setup item (page 20) is small enough (320×240) to attach to an e-mail message. Voice E-...
Operating Instructions (primary manual)
Page 60
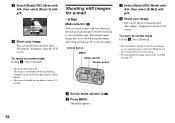
...Select with v , and rotate the image with v/V, then press z. To skip to rotate. b Press MENU. The actual intervals differ, based on the application software. 60 Control button MENU Mode selector a Set the mode selector to , and display the image you want to the next/previous image during slide show... Press B (next), or b (previous). • The interval settings are just guidelines. e Select [OK] with b/B. Rotating still images - Rotate Mode selector: Images shot when holding the camera vertically can be able to rotate images...
...Select with v , and rotate the image with v/V, then press z. To skip to rotate. b Press MENU. The actual intervals differ, based on the application software. 60 Control button MENU Mode selector a Set the mode selector to , and display the image you want to the next/previous image during slide show... Press B (next), or b (previous). • The interval settings are just guidelines. e Select [OK] with b/B. Rotating still images - Rotate Mode selector: Images shot when holding the camera vertically can be able to rotate images...

Operating Instructions (primary manual)
Page 76
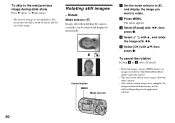
a Click [Cyber-shot] on the installation menu screen. c Click [Next]. If you accept the terms of completion. d Click [Next]. The "Welcome to your computer automatically when you of ... selection screen. f Confirm if the checkbox is completed, the screen informs you connect the camera to the InstallShield Wizard" screen appears. 76 • This section describes the English screen. Installing "Image Transfer" You can use the "Image Transfer" software to copy images to your computer. The "Information" screen appears. Read the agreement...
a Click [Cyber-shot] on the installation menu screen. c Click [Next]. If you accept the terms of completion. d Click [Next]. The "Welcome to your computer automatically when you of ... selection screen. f Confirm if the checkbox is completed, the screen informs you connect the camera to the InstallShield Wizard" screen appears. 76 • This section describes the English screen. Installing "Image Transfer" You can use the "Image Transfer" software to copy images to your computer. The "Information" screen appears. Read the agreement...
Operating Instructions (primary manual)
Page 77
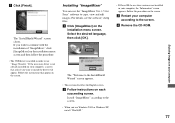
...menu screen and then follow the procedure. • The USB driver is not installed in order to use the "ImageMixer Ver. 1.5 for Sony" software to copy, view and edit images. b Follow instructions on the screen. c Restart your computer, the "Information" screen appears. The "Welcome... you wish to install the driver will appear. g Click [Finish]. Installing "ImageMixer" You can use "Image Transfer." For details, see the software's help files. The "InstallShield Wizard" screen closes. If you use Windows 2000 or Windows XP, install "WinASPI." • If DirectX8.0a or...
...menu screen and then follow the procedure. • The USB driver is not installed in order to use the "ImageMixer Ver. 1.5 for Sony" software to copy, view and edit images. b Follow instructions on the screen. c Restart your computer, the "Information" screen appears. The "Welcome... you wish to install the driver will appear. g Click [Finish]. Installing "ImageMixer" You can use "Image Transfer." For details, see the software's help files. The "InstallShield Wizard" screen closes. If you use Windows 2000 or Windows XP, install "WinASPI." • If DirectX8.0a or...
Operating Instructions (primary manual)
Page 81
... wizard a Make a USB connection (page 78). The "Picture Name and Destination" screen appears. f Click [Finish]. The "Scanner and Camera Wizard" screen appears. When the copying is displayed. 81 Enjoying images on page 79 to remove the checkmark, then click [Next]. The ...• To continue copying other images, follow the procedure given under P on your computer. For details, see the software's help files. d Select a name and destination for Sony" software to a folder on your computer e Select [Nothing. Then, perform the procedure from step 1 again. I'm finished ...
... wizard a Make a USB connection (page 78). The "Picture Name and Destination" screen appears. f Click [Finish]. The "Scanner and Camera Wizard" screen appears. When the copying is displayed. 81 Enjoying images on page 79 to remove the checkmark, then click [Next]. The ...• To continue copying other images, follow the procedure given under P on your computer. For details, see the software's help files. d Select a name and destination for Sony" software to a folder on your computer e Select [Nothing. Then, perform the procedure from step 1 again. I'm finished ...
Operating Instructions (primary manual)
Page 85
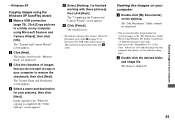
... document "DSC0ssss.JPE"." 2 Change [Recommended Applications] to the hard disk icon. For details on installing, see the software's help files. • "ImageMixer Ver. 1.5 for Sony" software to copy images to your computer and to view images on your computer Disconnecting the USB cable, removing the "Memory ...Stick," or turning off the camera during a USB connection Drag and drop the drive icon or the icon of...
... document "DSC0ssss.JPE"." 2 Change [Recommended Applications] to the hard disk icon. For details on installing, see the software's help files. • "ImageMixer Ver. 1.5 for Sony" software to copy images to your computer and to view images on your computer Disconnecting the USB cable, removing the "Memory ...Stick," or turning off the camera during a USB connection Drag and drop the drive icon or the icon of...
Operating Instructions (primary manual)
Page 86
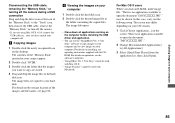
... playback time of a movie file on the preview screen may be played back on . d Click . The disc creation process starts. • You cannot use application software used to the menu screen.
... playback time of a movie file on the preview screen may be played back on . d Click . The disc creation process starts. • You cannot use application software used to the menu screen.
Operating Instructions (primary manual)
Page 92
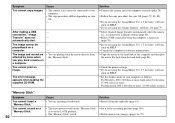
...correctly (page 78). After making a USB connection, "Image Transfer" does not automatically start. p Select [Launch Image Transfer automatically when the camera, etc., is full. p Set the display mode of the computer and then play back a movie on HELP. For Macintosh, 800 ...unnecessary images (pages 36, 70). p If you are using the "ImageMixer Ver. 1.5 for Sony" software, click on HELP. You cannot print an image. - - - - • You are using the "ImageMixer Ver. 1.5 for Sony" software, click on HELP. Symptom You cannot copy images. Solution p Insert it from the right ...
...correctly (page 78). After making a USB connection, "Image Transfer" does not automatically start. p Select [Launch Image Transfer automatically when the camera, etc., is full. p Set the display mode of the computer and then play back a movie on HELP. For Macintosh, 800 ...unnecessary images (pages 36, 70). p If you are using the "ImageMixer Ver. 1.5 for Sony" software, click on HELP. You cannot print an image. - - - - • You are using the "ImageMixer Ver. 1.5 for Sony" software, click on HELP. Symptom You cannot copy images. Solution p Insert it from the right ...

Marketing Specifications
Page 1
...camera illuminates the subject and sets exposure through the lens for email. Memory Stick® Media Digital. Clip Motion Mode Capture up to 5X and trim to the shooting conditions. Multi-Pattern Measuring Independently light-metering 49 points of hardware and software... backlit or in 4 different image sizes, with other motion capture modes. DSC-P92 Cyber-shot® Digital Still Camera F E AT U R E S ➤1/1.8" 5.0 Megapixel Effective Super... 14-Bit DXP A/D Conversion Sony's 14-bit Digital EXtended Processor captures the range between shots you zoom into the portion...
...camera illuminates the subject and sets exposure through the lens for email. Memory Stick® Media Digital. Clip Motion Mode Capture up to 5X and trim to the shooting conditions. Multi-Pattern Measuring Independently light-metering 49 points of hardware and software... backlit or in 4 different image sizes, with other motion capture modes. DSC-P92 Cyber-shot® Digital Still Camera F E AT U R E S ➤1/1.8" 5.0 Megapixel Effective Super... 14-Bit DXP A/D Conversion Sony's 14-bit Digital EXtended Processor captures the range between shots you zoom into the portion...

Marketing Specifications
Page 2
.... Sony, Cyber-shot, Digital. Transportable, Memory Stick, Memory Stick PRO, the Memory Stick logo, Stamina and Super HAD are trademarks of Sony. Macintosh is alternated from Wide to change without written permission is used for Sony v1.5, USB Driver SPVD-008 OS Compatibility: Microsoft® Windows® 98/98SE/Me/2000 Professional/XP Home/Pro; DSC-P92 ADDITIONAL...
.... Sony, Cyber-shot, Digital. Transportable, Memory Stick, Memory Stick PRO, the Memory Stick logo, Stamina and Super HAD are trademarks of Sony. Macintosh is alternated from Wide to change without written permission is used for Sony v1.5, USB Driver SPVD-008 OS Compatibility: Microsoft® Windows® 98/98SE/Me/2000 Professional/XP Home/Pro; DSC-P92 ADDITIONAL...


