Operating Instructions (primary manual)
Page 7
... 109 Index Index 112 7 For Windows users 74 Installing the USB driver 75 Installing "Image Transfer 76 Installing "ImageMixer 77 Connecting the camera to your computer 78 Copying images using "Image Transfer" 79 Changing ... 81 Image file storage destinations and file names 82 Copying images to print - Jog playback 61 Still image editing Protecting images - Resize 65 Choosing images to your computer - Protect 63 On the...messages 94 Self-diagnosis display - Playing back images shot in Multi Burst mode 61 Playing back continuously 61 Playing back frame by frame -
... 109 Index Index 112 7 For Windows users 74 Installing the USB driver 75 Installing "Image Transfer 76 Installing "ImageMixer 77 Connecting the camera to your computer 78 Copying images using "Image Transfer" 79 Changing ... 81 Image file storage destinations and file names 82 Copying images to print - Jog playback 61 Still image editing Protecting images - Resize 65 Choosing images to your computer - Protect 63 On the...messages 94 Self-diagnosis display - Playing back images shot in Multi Burst mode 61 Playing back continuously 61 Playing back frame by frame -
Operating Instructions (primary manual)
Page 74
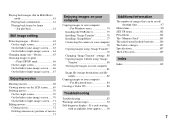
...should be installed at the same time. Communication with Windows XP. See the Sony Website for a USB connection, [Normal] and [PTP]* modes. When connected to a computer, only the data in the folder selected by the camera is needed in a multi-boot environment. x ImageMixer This application is the ...is used to easily transfer images from the suspend or sleep mode, communication between your camera and your camera, may not operate depending on the type of the CD-ROM x USB Driver This driver is copied to the computer. To select the folder, follow the procedure on your ...
...should be installed at the same time. Communication with Windows XP. See the Sony Website for a USB connection, [Normal] and [PTP]* modes. When connected to a computer, only the data in the folder selected by the camera is needed in a multi-boot environment. x ImageMixer This application is the ...is used to easily transfer images from the suspend or sleep mode, communication between your camera and your camera, may not operate depending on the type of the CD-ROM x USB Driver This driver is copied to the computer. To select the folder, follow the procedure on your ...
Operating Instructions (primary manual)
Page 75
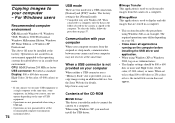
...Click [Cyber-shot] on your camera to restart my computer now], then click [Finish]. When the "Information" screen appears, click [Next]. Enjoying images on the title screen. Do not connect your computer, and insert the supplied CD-ROM into the CD-ROM drive. c Click [USB Driver] on .... e Click [Yes, I want to your computer The installation menu screen appears. The USB driver installation starts. When the installation is installed, you can establish USB connection. Installing the USB driver When using Windows XP, you of completion. 75 If it does not appear, double-click (...
...Click [Cyber-shot] on your camera to restart my computer now], then click [Finish]. When the "Information" screen appears, click [Next]. Enjoying images on the title screen. Do not connect your computer, and insert the supplied CD-ROM into the CD-ROM drive. c Click [USB Driver] on .... e Click [Yes, I want to your computer The installation menu screen appears. The USB driver installation starts. When the installation is installed, you can establish USB connection. Installing the USB driver When using Windows XP, you of completion. 75 If it does not appear, double-click (...
Operating Instructions (primary manual)
Page 77
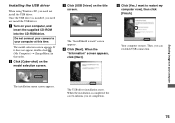
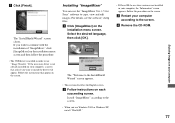
The "InstallShield Wizard" screen closes. Installing "ImageMixer" You can use the "ImageMixer Ver. 1.5 for Sony" software to the InstallShield Wizard" screen appears. • This section describes the English screen. a Click [ImageMixer] on each succeeding screen. Install "ImageMixer" ...on your computer, a screen that appear on the installation menu screen and then follow the procedure. • The USB driver is needed in your computer according to install the driver will appear. If you want to the screen. The "Welcome to copy, view and edit images. Follow the instructions ...
The "InstallShield Wizard" screen closes. Installing "ImageMixer" You can use the "ImageMixer Ver. 1.5 for Sony" software to the InstallShield Wizard" screen appears. • This section describes the English screen. a Click [ImageMixer] on each succeeding screen. Install "ImageMixer" ...on your computer, a screen that appear on the installation menu screen and then follow the procedure. • The USB driver is needed in your computer according to install the driver will appear. If you want to the screen. The "Welcome to copy, view and edit images. Follow the instructions ...
Operating Instructions (primary manual)
Page 80
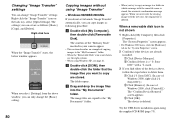
...the above , follow the steps below window appears. c Drag and drop the image files into the "My Documents" folder. Try the USB driver installation again using Windows XP, see page 81. The contents of the "Memory Stick" inserted in which an image with a mark. 3... in your camera appear. • This section describes an example of Windows 2000, click [Uninstall].) The "Confirm Device Removal" screen appears. 3 Click [OK]. Right-click here When the "Image Transfer" starts, the below to delete them. 1 Click [ Sony DSC]. (In case of Windows 2000, right-click [ Sony DSC].) 2 Click...
...the above , follow the steps below window appears. c Drag and drop the image files into the "My Documents" folder. Try the USB driver installation again using Windows XP, see page 81. The contents of the "Memory Stick" inserted in which an image with a mark. 3... in your camera appear. • This section describes an example of Windows 2000, click [Uninstall].) The "Confirm Device Removal" screen appears. 3 Click [OK]. Right-click here When the "Image Transfer" starts, the below to delete them. 1 Click [ Sony DSC]. (In case of Windows 2000, right-click [ Sony DSC].) 2 Click...

Operating Instructions (primary manual)
Page 84
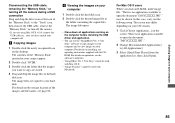
...opened in step 3 into the CD-ROM drive. The model selection screen appears. 2 Click [Cyber-shot] on the model selection screen. iMac with the Mac OS 8.6 installed at the same time, some equipment, including your camera, may not recover at the same time. iBook or Power Mac G4 with Mac OS 8.6 ... on your computer, and set the supplied CD-ROM into the System Folder icon in the screen opened in step 4. • Sony USB Driver • Sony USB Shim 6 When the message for all the recommended computer environments mentioned above OS must be installed at the factory, and a slot loading ...
...opened in step 3 into the CD-ROM drive. The model selection screen appears. 2 Click [Cyber-shot] on the model selection screen. iMac with the Mac OS 8.6 installed at the same time, some equipment, including your camera, may not recover at the same time. iBook or Power Mac G4 with Mac OS 8.6 ... on your computer, and set the supplied CD-ROM into the System Folder icon in the screen opened in step 4. • Sony USB Driver • Sony USB Shim 6 When the message for all the recommended computer environments mentioned above OS must be installed at the factory, and a slot loading ...
Operating Instructions (primary manual)
Page 85
...DSC0ssss.JPE"." The image file opens. • Close down all applications running on the computer before installing the USB driver and application. • You can use the "ImageMixer Ver. 1.5 for Sony" cannot be used with Mac OS X. • "Image Transfer" cannot be shown. For details on your computer...In this case, carry out the follwing setup. may differ depending on your OS version. 1 Click [Choose Application...] on your computer off the camera during a USB connection Drag and drop the drive icon or the icon of the images and file names, see the software's help files. &#...
...DSC0ssss.JPE"." The image file opens. • Close down all applications running on the computer before installing the USB driver and application. • You can use the "ImageMixer Ver. 1.5 for Sony" cannot be used with Mac OS X. • "Image Transfer" cannot be shown. For details on your computer...In this case, carry out the follwing setup. may differ depending on your OS version. 1 Click [Choose Application...] on your computer off the camera during a USB connection Drag and drop the drive icon or the icon of the images and file names, see the software's help files. &#...
Operating Instructions (primary manual)
Page 91
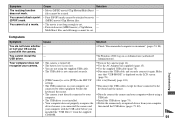
...does not work. You cannot attach a print (DPOF) mark. Multi Burst files and still images cannot be used with the USB cable before you connected the camera and then install the USB driver (pages 75, 80). USB driver. p Use the AC Adaptor (not supplied) (page 15). • You are p...be resized. • Print (DPOF) marks cannot be attached to your p Directly connect the camera and your computer with the camera. Your computer does not recognize your computer, device because you installed the "USB Driver" from the supplied CD-ROM. 91 p Use the supplied USB cable (page 78). &#...
...does not work. You cannot attach a print (DPOF) mark. Multi Burst files and still images cannot be used with the USB cable before you connected the camera and then install the USB driver (pages 75, 80). USB driver. p Use the AC Adaptor (not supplied) (page 15). • You are p...be resized. • Print (DPOF) marks cannot be attached to your p Directly connect the camera and your computer with the camera. Your computer does not recognize your computer, device because you installed the "USB Driver" from the supplied CD-ROM. 91 p Use the supplied USB cable (page 78). &#...

Operating Instructions (primary manual)
Page 108
...-MH Battery charger (1) • Power cord (mains lead) (1) • USB cable (1) • A/V connecting cable (1) • Wrist strap (1) • "Memory Stick" (16MB) (1) • CD-ROM (USB driver: SPVD-010) (1) • Operating Instructions (1) Design and specifications are subject to change without notice. 108
...-MH Battery charger (1) • Power cord (mains lead) (1) • USB cable (1) • A/V connecting cable (1) • Wrist strap (1) • "Memory Stick" (16MB) (1) • CD-ROM (USB driver: SPVD-010) (1) • Operating Instructions (1) Design and specifications are subject to change without notice. 108

Operating Instructions (primary manual)
Page 112
... recording folder 43 Charging Charging the battery 10 Charging time 11 Cleaning 104 Computer Copying images to your computer ........ 74, 84 USB cable 78 USB driver 75, 84 Control button 16 Creating a new folder 43 112 D Date and time 17, 31 DC plug 15 Deleting images 36, 70 Divide 72 E Editing... still images Print (DPOF) mark 66 Protect 63 Resize 65 E-Mail 52 EV adjustment 46 Exposure EV adjustment 46 F File File names 83 Image file storage ...
... recording folder 43 Charging Charging the battery 10 Charging time 11 Cleaning 104 Computer Copying images to your computer ........ 74, 84 USB cable 78 USB driver 75, 84 Control button 16 Creating a new folder 43 112 D Date and time 17, 31 DC plug 15 Deleting images 36, 70 Divide 72 E Editing... still images Print (DPOF) mark 66 Protect 63 Resize 65 E-Mail 52 EV adjustment 46 Exposure EV adjustment 46 F File File names 83 Image file storage ...
Operating Instructions (primary manual)
Page 113
... mode 22 Shooting according to scene conditions ..... 54 Shooting in Multi Burst mode 51 Voice 53 Shooting with the date and time inserted ........ 31 Still image playback Index (nine or triple-image) screen 32 Playback zoom 58 Quick Review 24 Rotate 60 Slide show 59 Viewing images on a TV ...22 Using the self-timer 27 White balance 48 T Trimming 59 U USB Cancel the USB connection 79, 85 Installing the USB driver 75, 84 USB connection 78, 84 Using your camera abroad 15 V Viewing on the single-image screen 32 Voice 53 W Warnings and messages 94 White balance 48 Z Zoom Playback ...
... mode 22 Shooting according to scene conditions ..... 54 Shooting in Multi Burst mode 51 Voice 53 Shooting with the date and time inserted ........ 31 Still image playback Index (nine or triple-image) screen 32 Playback zoom 58 Quick Review 24 Rotate 60 Slide show 59 Viewing images on a TV ...22 Using the self-timer 27 White balance 48 T Trimming 59 U USB Cancel the USB connection 79, 85 Installing the USB driver 75, 84 USB connection 78, 84 Using your camera abroad 15 V Viewing on the single-image screen 32 Voice 53 W Warnings and messages 94 White balance 48 Z Zoom Playback ...
Marketing Specifications
Page 2
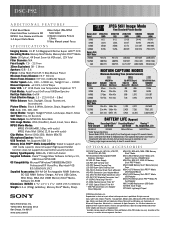
...DSC-P92 ADDITIONAL FEATURES 2 Shot Burst Mode Clear Color/Clear Luminance NR MPEG1 Cue, Review and Divide 3:2 Aspect Ratio Mode Video Output (PAL/NTSC Selectable) 4 Mode In-Camera... Video Output: Yes NTSC/PAL Selectable Still Image Modes: JPEG (Fine/Std.), ...Sony v1.5, USB Driver SPVD-008 OS Compatibility: Microsoft® Windows® 98/98SE/Me/2000 Professional/XP Home/Pro; does not support Access Control security function Battery Type/Capacity: NiMH AA, 2100 mAh Rated Supplied Software: Pixela™ Image Mixer Software for data management functions. Sony, Cyber-shot, Digital...
...DSC-P92 ADDITIONAL FEATURES 2 Shot Burst Mode Clear Color/Clear Luminance NR MPEG1 Cue, Review and Divide 3:2 Aspect Ratio Mode Video Output (PAL/NTSC Selectable) 4 Mode In-Camera... Video Output: Yes NTSC/PAL Selectable Still Image Modes: JPEG (Fine/Std.), ...Sony v1.5, USB Driver SPVD-008 OS Compatibility: Microsoft® Windows® 98/98SE/Me/2000 Professional/XP Home/Pro; does not support Access Control security function Battery Type/Capacity: NiMH AA, 2100 mAh Rated Supplied Software: Pixela™ Image Mixer Software for data management functions. Sony, Cyber-shot, Digital...


