Operating Instructions
Page 1
... Enjoying movies Enjoying images on the bottom. Owner's Record The model and serial numbers are located on your Sony dealer regarding this manual thoroughly, and retain it for future reference. DSC-P8/P10/P12 Serial No. Record the serial number in the space provided below. Digital Still Camera Operating Instructions Before operating the unit, please read this product.
... Enjoying movies Enjoying images on the bottom. Owner's Record The model and serial numbers are located on your Sony dealer regarding this manual thoroughly, and retain it for future reference. DSC-P8/P10/P12 Serial No. Record the serial number in the space provided below. Digital Still Camera Operating Instructions Before operating the unit, please read this product.
Operating Instructions
Page 6
... multiple frames - Scene Selection 55 Adding special effects - Exposure Bracket (DSC-P10/P12 only 48 Adjusting color tones - White Balance 49 Adjusting the flash level - Burst 3 (DSC-P10/P12)/ Burst 2 (DSC-P8 53 Shooting still images for e-mail - Picture Effect 57 AF range finder 42 Choosing ...camera 14 How to use the control button 14 Setting the date and time 15 Shooting still images Inserting and removing a "Memory Stick 17 Setting the still image size 18 Image size and quality 19 Basic still image shooting (using auto adjustment mode 21 Checking the last image you shot...
... multiple frames - Scene Selection 55 Adding special effects - Exposure Bracket (DSC-P10/P12 only 48 Adjusting color tones - White Balance 49 Adjusting the flash level - Burst 3 (DSC-P10/P12)/ Burst 2 (DSC-P8 53 Shooting still images for e-mail - Picture Effect 57 AF range finder 42 Choosing ...camera 14 How to use the control button 14 Setting the date and time 15 Shooting still images Inserting and removing a "Memory Stick 17 Setting the still image size 18 Image size and quality 19 Basic still image shooting (using auto adjustment mode 21 Checking the last image you shot...
Operating Instructions
Page 12
... once every two times - The surrounding temperature is complete, the lamp goes out and the LCD screen turns on. The camera has been turned on and off many times - Viewing still images2) NP-FC11 (supplied) Image size No. Set the mode dial to SET UP, and set [Power Save] in... (Setup 1) to [Fine] - After the charging is low - The power turns on and off once every ten times. of images Battery life (min.) DSC-P10/P12 5.0M Approx. 3600 Approx. 180 VGA DSC-P8 ...
... once every two times - The surrounding temperature is complete, the lamp goes out and the LCD screen turns on. The camera has been turned on and off many times - Viewing still images2) NP-FC11 (supplied) Image size No. Set the mode dial to SET UP, and set [Power Save] in... (Setup 1) to [Fine] - After the charging is low - The power turns on and off once every ten times. of images Battery life (min.) DSC-P10/P12 5.0M Approx. 3600 Approx. 180 VGA DSC-P8 ...
Operating Instructions
Page 18
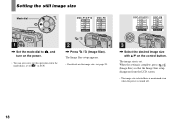
... also carry out this operation when the mode dial is set . Setting the still image size Mode dial DSC-P10/P12 5.0M 4.5M(3:2) 3.1M 1.2M VGA Image Size DSC-P8 3.1M 2.8M(3:2) 2.0M 1.2M VGA Image Size DSC-P10/P12 5.0M 4.5M(3:2) 3.1M 1.2M VGA Image Size DSC-P8 3.1M 2.8M(3:2) 2.0M 1.2M VGA Image Size 1 , Set the mode dial to...
... also carry out this operation when the mode dial is set . Setting the still image size Mode dial DSC-P10/P12 5.0M 4.5M(3:2) 3.1M 1.2M VGA Image Size DSC-P8 3.1M 2.8M(3:2) 2.0M 1.2M VGA Image Size DSC-P10/P12 5.0M 4.5M(3:2) 3.1M 1.2M VGA Image Size DSC-P8 3.1M 2.8M(3:2) 2.0M 1.2M VGA Image Size 1 , Set the mode dial to...
Operating Instructions
Page 19
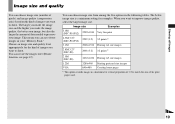
...still images Image size and quality You can choose image size (number of pixels) and image quality (compression ratio) based on the kind of images you want to preserve your image. The larger you make the image quality, the better your "Memory Stick." Image size Examples 5.0M (DSC-P10/P12...) 2592×1944 Very fine print 4.5M(3:2)1) 2592 (3:2) 3:2 prints1) (DSC-P10/P12) 3.1M 2048×1536 Printing A4 size images 2.8M(3:2)1) (DSC-P8) 2048 (3:2) 3:2 prints1) 2.0M (DSC-P8) 1632×1224 Printing A5 size images 1.2M ...
...still images Image size and quality You can choose image size (number of pixels) and image quality (compression ratio) based on the kind of images you want to preserve your image. The larger you make the image quality, the better your "Memory Stick." Image size Examples 5.0M (DSC-P10/P12...) 2592×1944 Very fine print 4.5M(3:2)1) 2592 (3:2) 3:2 prints1) (DSC-P10/P12) 3.1M 2048×1536 Printing A4 size images 2.8M(3:2)1) (DSC-P8) 2048 (3:2) 3:2 prints1) 2.0M (DSC-P8) 1632×1224 Printing A5 size images 1.2M ...
Operating Instructions
Page 20
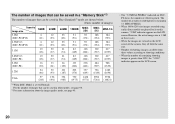
... of actually recorded pixels is maximum 3.1 MEGA PIXELS. • When 1600×1200 size images recorded using earlier Sony models are viewed on the LCD screen of the camera, they all look the same size. • Number of shooting images can be saved in these values according to... can be saved in Fine (Standard)3) mode are shown below. (Units: number of images) Capacity 16MB Image size 5.0M 6 (DSC-P10/P12) (11) 4.5M(3:2) 6 (DSC-P10/P12) (11) 3.1M 10 (18) 2.8M(3:2) 10 (DSC-P8) (18) 2.0M 16 (DSC-P8) (30) 1.2M 24 (46) VGA 97 (243) 32MB 12 (23) 12 (23) 20 (37) 20 (37) ...
... of actually recorded pixels is maximum 3.1 MEGA PIXELS. • When 1600×1200 size images recorded using earlier Sony models are viewed on the LCD screen of the camera, they all look the same size. • Number of shooting images can be saved in these values according to... can be saved in Fine (Standard)3) mode are shown below. (Units: number of images) Capacity 16MB Image size 5.0M 6 (DSC-P10/P12) (11) 4.5M(3:2) 6 (DSC-P10/P12) (11) 3.1M 10 (18) 2.8M(3:2) 10 (DSC-P8) (18) 2.0M 16 (DSC-P8) (30) 1.2M 24 (46) VGA 97 (243) 32MB 12 (23) 12 (23) 20 (37) 20 (37) ...
Operating Instructions
Page 21
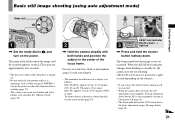
... it is operating, such as follows: DSC-P10/P12: Approx.50 cm (19 3/4 inches) (W)/ 60 cm (23 5/8 inches) (T) or more DSC-P8: Approx. 50 cm (19 3/4 inches) (W/T) or more To shoot subjects at distances closer than this, use the macro mode (page 24). Basic still image shooting (using auto adjustment mode)... (page 8) with your fingers. • The minimum focal distance to be stored in the "Memory Stick" (page 40). 2 , Hold the camera steadily with both hands and position the subject in Continuous AF, page 43). • The frame indicated on the power. You can create new folders...
... it is operating, such as follows: DSC-P10/P12: Approx.50 cm (19 3/4 inches) (W)/ 60 cm (23 5/8 inches) (T) or more DSC-P8: Approx. 50 cm (19 3/4 inches) (W/T) or more To shoot subjects at distances closer than this, use the macro mode (page 24). Basic still image shooting (using auto adjustment mode)... (page 8) with your fingers. • The minimum focal distance to be stored in the "Memory Stick" (page 40). 2 , Hold the camera steadily with both hands and position the subject in Continuous AF, page 43). • The frame indicated on the power. You can create new folders...
Operating Instructions
Page 23
Shooting still images Checking the last image you zoom in the SET UP settings (page 104). To delete the image displayed on the screen 1 Press (Delete). 2 Select [Delete] with v on the control button. Smart zoom Digital processing lets you shot - Zoom scaling indicator The T side of this ...VGA 101 96 S AF 60min x5.0 VGA 101 96 S AF , Press the zoom buttons to the subject DSC-P10/P12: Approx. 50 cm (19 3/4 inches) (W)/60 cm (23 5/8 inches) (T) from the lens surface DSC-P8: Approx. 50 cm (19 3/4 inches) (W/T) from the lens surface • The lens portion moves during zoom...
Shooting still images Checking the last image you zoom in the SET UP settings (page 104). To delete the image displayed on the screen 1 Press (Delete). 2 Select [Delete] with v on the control button. Smart zoom Digital processing lets you shot - Zoom scaling indicator The T side of this ...VGA 101 96 S AF 60min x5.0 VGA 101 96 S AF , Press the zoom buttons to the subject DSC-P10/P12: Approx. 50 cm (19 3/4 inches) (W)/60 cm (23 5/8 inches) (T) from the lens surface DSC-P8: Approx. 50 cm (19 3/4 inches) (W/T) from the lens surface • The lens portion moves during zoom...

Operating Instructions
Page 24
... when zooming up to , and press B ( ) on the recorded image. • AF range finder is [5.0M] or [4.5M(3:2)] (DSC-P10/P12)/[3.1M] or [2.8M(3:2)] (DSC-P8), the smart zoom does not work. • You cannot confirm the image with the finder when using the smart zoom function. • When...; If the menu is currently displayed, press MENU first so that the menu disappears. • You can shoot close -ups - DSC-P10/P12 [3.1M]: 3.8× [1.2M]: 6.1× [VGA]: 12× DSC-P8 [2.0M]: 3.8× [1.2M]: 4.8× [VGA]: 9.6× When the image size is not shown when using the smart zoom,...
... when zooming up to , and press B ( ) on the recorded image. • AF range finder is [5.0M] or [4.5M(3:2)] (DSC-P10/P12)/[3.1M] or [2.8M(3:2)] (DSC-P8), the smart zoom does not work. • You cannot confirm the image with the finder when using the smart zoom function. • When...; If the menu is currently displayed, press MENU first so that the menu disappears. • You can shoot close -ups - DSC-P10/P12 [3.1M]: 3.8× [1.2M]: 6.1× [VGA]: 12× DSC-P8 [2.0M]: 3.8× [1.2M]: 4.8× [VGA]: 9.6× When the image size is not shown when using the smart zoom,...
Operating Instructions
Page 26
... synchro). The shutter speed is slow in a dark place, so you press v ( ), the indicator changes as follows: DSC-P10/P12: Approx. 0.5 m to 3.5 m (19 3/4 inches to 11 feet 5 3/16 inches) (W)/0.6 m to 2.5 m (23 5/8 inches to 8 feet 2 7/16 inches) (T) DSC-P8: Approx. 0.5 m to 3.5 m (19 3/4 inches to 11 feet 5 3/16 inches) (W)/0.5 m to 2.5 m (19 3/4 inches to 8 feet 2 7/16 inches) (T) •...
... synchro). The shutter speed is slow in a dark place, so you press v ( ), the indicator changes as follows: DSC-P10/P12: Approx. 0.5 m to 3.5 m (19 3/4 inches to 11 feet 5 3/16 inches) (W)/0.6 m to 2.5 m (23 5/8 inches to 8 feet 2 7/16 inches) (T) DSC-P8: Approx. 0.5 m to 3.5 m (19 3/4 inches to 11 feet 5 3/16 inches) (W)/0.5 m to 2.5 m (19 3/4 inches to 8 feet 2 7/16 inches) (T) •...
Operating Instructions
Page 29
...SCN. • This setting is maintained even when the power is displayed as and (page 104). 1 2 2 , Select 1 (Camera1) (DSC-P10/ P12) or (Camera) (DSC-P8) with the date and time superimposed, the date and time cannot be removed later. • The date and time do not appear on the control...press z. Date: Superimposes the year, month and day onto the image. The SET UP screen appears. • When images are shot with v on a still image Shooting still images Camera Moving Image: AF Mode: 1 Smart Zoom: Date/Time: 2 Red Eye Reduction: AF Illuminator: MPEG Movie Single On Off Off ...
...SCN. • This setting is maintained even when the power is displayed as and (page 104). 1 2 2 , Select 1 (Camera1) (DSC-P10/ P12) or (Camera) (DSC-P8) with the date and time superimposed, the date and time cannot be removed later. • The date and time do not appear on the control...press z. Date: Superimposes the year, month and day onto the image. The SET UP screen appears. • When images are shot with v on a still image Shooting still images Camera Moving Image: AF Mode: 1 Smart Zoom: Date/Time: 2 Red Eye Reduction: AF Illuminator: MPEG Movie Single On Off Off ...
Operating Instructions
Page 37
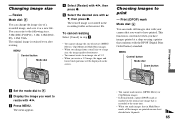
...2 37 Select [OK] with B, then press B. The "Memory Stick" provided with V on the control button. Formatting a "Memory Stick" Deleting still images Delete Exit 101-0002 2003 7 4 10:30PM OK BACK/NEXT Memory Stick Tool Format: OK File Number: Cancel 1 Create REC. Select [...is recommended to format into the camera. To cancel the formatting Select [Cancel] with v/V on the control button, then press z. 1 , Insert the "Memory Stick" you want to prevent the power from turning off partway through formatting. • On DSC-P10/P12, item is also called "initialization...
...2 37 Select [OK] with B, then press B. The "Memory Stick" provided with V on the control button. Formatting a "Memory Stick" Deleting still images Delete Exit 101-0002 2003 7 4 10:30PM OK BACK/NEXT Memory Stick Tool Format: OK File Number: Cancel 1 Create REC. Select [...is recommended to format into the camera. To cancel the formatting Select [Cancel] with v/V on the control button, then press z. 1 , Insert the "Memory Stick" you want to prevent the power from turning off partway through formatting. • On DSC-P10/P12, item is also called "initialization...

Operating Instructions
Page 39
... to select the desired setting. To turn off the SET UP screen display Set the mode dial to anything other than SET UP. • On DSC-P10/P12, item is displayed as and (page 104). 1 2 39 Before advanced operations The menu appears. 0EV 0EV EV WB ISO b Press b/B on the control button to... item you want to set . The frame of the selected setting turns yellow, and the setting is described below. How to setup and operate your camera The usage of the menus and SET UP screen items that are most frequently used for "Advanced operations" is entered. To turn off the menu...
... to select the desired setting. To turn off the SET UP screen display Set the mode dial to anything other than SET UP. • On DSC-P10/P12, item is displayed as and (page 104). 1 2 39 Before advanced operations The menu appears. 0EV 0EV EV WB ISO b Press b/B on the control button to... item you want to set . The frame of the selected setting turns yellow, and the setting is described below. How to setup and operate your camera The usage of the menus and SET UP screen items that are most frequently used for "Advanced operations" is entered. To turn off the menu...
Operating Instructions
Page 43
...• There is no lock sound when the focus is adjusted. • When shooting with the LCD screen off, the camera operates in Single AF mode. • On DSC-P10/P12, item is completed in Single AF mode. When shooting in order to focus accurately on close subjects. The focus is not ...is useful for focusing. a Set the mode dial to adjust the focus even after the lock is displayed as and (page 104). 1 2 Advanced still image shooting 43 When you compose images with B/v/V. For quicker shooting, using the finder with the self-timer, press the shutter button fully down , and...
...• There is no lock sound when the focus is adjusted. • When shooting with the LCD screen off, the camera operates in Single AF mode. • On DSC-P10/P12, item is completed in Single AF mode. When shooting in order to focus accurately on close subjects. The focus is not ...is useful for focusing. a Set the mode dial to adjust the focus even after the lock is displayed as and (page 104). 1 2 Advanced still image shooting 43 When you compose images with B/v/V. For quicker shooting, using the finder with the self-timer, press the shutter button fully down , and...
Operating Instructions
Page 45
.... To reactivate auto exposure Return the exposure adjustment value to -2.0EV in extremely bright or dark conditions, or the flash is being shot in steps of 1/3EV. Advanced still image shooting 45 You can select values ranging from the following distance settings. 0.5m, 1.0m, 3.0m, 7.0m, ∞...• If the focus preset indicator flashes while [0.5m] is selected, press the zoom W button until the indicator stops flashing (DSC-P10/P12 only). Adjusting the exposure - c Select 9 (Focus) with b/B, then select the distance to or . , SCN b Press MENU. The menu appears.
.... To reactivate auto exposure Return the exposure adjustment value to -2.0EV in extremely bright or dark conditions, or the flash is being shot in steps of 1/3EV. Advanced still image shooting 45 You can select values ranging from the following distance settings. 0.5m, 1.0m, 3.0m, 7.0m, ∞...• If the focus preset indicator flashes while [0.5m] is selected, press the zoom W button until the indicator stops flashing (DSC-P10/P12 only). Adjusting the exposure - c Select 9 (Focus) with b/B, then select the distance to or . , SCN b Press MENU. The menu appears.
Operating Instructions
Page 46
...against a white (e.g. You can also display a histogram during Quick Review (page 23). • The histogram does not appear in Exposure Bracket mode (DSC-P10/P12 only) - side shifts the histogram to When the mode dial is set to the left side, and a medium brightness image when centered. During ...Quick Review of pixels. Shooting techniques Normally, the camera automatically adjusts the exposure. When using playback zoom - side. If the image is too dark or too bright as shown below, we ...
...against a white (e.g. You can also display a histogram during Quick Review (page 23). • The histogram does not appear in Exposure Bracket mode (DSC-P10/P12 only) - side shifts the histogram to When the mode dial is set to the left side, and a medium brightness image when centered. During ...Quick Review of pixels. Shooting techniques Normally, the camera automatically adjusts the exposure. When using playback zoom - side. If the image is too dark or too bright as shown below, we ...
Operating Instructions
Page 48
... 0.3EV. g Shoot the image. The menu appears. MENU Control button Mode dial Shutter a Set the mode dial to , or SCN. Exposure Bracket (DSC-P10/ P12 only) Mode dial: / /SCN The camera records three images in succession, each with the exposure shifted - d Set the mode dial to SET UP. To return to normal mode Select...
... 0.3EV. g Shoot the image. The menu appears. MENU Control button Mode dial Shutter a Set the mode dial to , or SCN. Exposure Bracket (DSC-P10/ P12 only) Mode dial: / /SCN The camera records three images in succession, each with the exposure shifted - d Set the mode dial to SET UP. To return to normal mode Select...

Operating Instructions
Page 53
... appears. 53 The menu appears. Shooting still images for the normal still image sizes.) MENU Control button Mode dial Shutter Advanced still image shooting a Set the mode dial to , or SCN. a Set the mode dial to , or SCN. Burst 3 (DSC-P10/P12)/ Burst 2 (DSC-P8) Mode dial: / /SCN This mode...with b/B, then select [Burst 3] (DSC-P10/P12)/[Burst 2] (DSCP8) with v/V. To return to normal mode Select [Normal] in step 3. • You cannot use the flash in this mode. • During shooting in this mode, the camera records three (DSCP10/P12) or two (DSC-P8) images in this mode, the ...
... appears. 53 The menu appears. Shooting still images for the normal still image sizes.) MENU Control button Mode dial Shutter Advanced still image shooting a Set the mode dial to , or SCN. a Set the mode dial to , or SCN. Burst 3 (DSC-P10/P12)/ Burst 2 (DSC-P8) Mode dial: / /SCN This mode...with b/B, then select [Burst 3] (DSC-P10/P12)/[Burst 2] (DSCP8) with v/V. To return to normal mode Select [Normal] in step 3. • You cannot use the flash in this mode. • During shooting in this mode, the camera records three (DSCP10/P12) or two (DSC-P8) images in this mode, the ...
Operating Instructions
Page 56
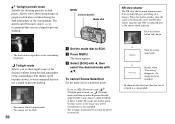
... shutter speed becomes slower, so we recommend that you to prevent shaking. • You cannot shoot in Exposure Bracket (DSC-P10/P12 only), Burst 3 (DSC-P10/P12) or Burst 2 (DSC-P8) mode, the shutter speed becomes faster, so the image may not be recorded just as you to shoot night scenes at... Set the mode dial to prevent shaking. c Select [SCN] with b, then select the desired mode with v/V. When the shutter speed is slow, the camera automatically enters the NR slow shutter function and "NR" is indicated next to a different mode. • If you set (Fireworks mode), (Twilight portrait ...
... shutter speed becomes slower, so we recommend that you to prevent shaking. • You cannot shoot in Exposure Bracket (DSC-P10/P12 only), Burst 3 (DSC-P10/P12) or Burst 2 (DSC-P8) mode, the shutter speed becomes faster, so the image may not be recorded just as you to shoot night scenes at... Set the mode dial to prevent shaking. c Select [SCN] with b, then select the desired mode with v/V. When the shutter speed is slow, the camera automatically enters the NR slow shutter function and "NR" is indicated next to a different mode. • If you set (Fireworks mode), (Twilight portrait ...
Operating Instructions
Page 65
...Still image editing a Set the mode dial to have images printed at the same time. • When you want to . Resize Mode dial: You can change from a small size to a large size, the image quality deteriorates. • You cannot resize to the following sizes. 5.0M (DSC-P10/P12...the newest file. c Press MENU. You can mark still images shot with your camera that you resize a 3:2 image, the upper and...function is retained even after resizing. Choosing images to resize with the DPOF (Digital Print Order Format) standard. The menu appears. • You cannot mark movies...
...Still image editing a Set the mode dial to have images printed at the same time. • When you want to . Resize Mode dial: You can change from a small size to a large size, the image quality deteriorates. • You cannot resize to the following sizes. 5.0M (DSC-P10/P12...the newest file. c Press MENU. You can mark still images shot with your camera that you resize a 3:2 image, the upper and...function is retained even after resizing. Choosing images to resize with the DPOF (Digital Print Order Format) standard. The menu appears. • You cannot mark movies...