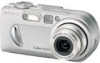
Operating Instructions
Page 2
...about this device must be of sufficient magnitude to provide reasonable protection against harmful interference in the U.S.A. Operation is for a digital device pursuant to the presence of FCC Rules. Reorient or relocate the receiving antenna. - Consult the dealer or an ...for help. Increase the separation between the equipment and receiver. - Never expose the battery pack to Part 15 of Conformity Trade Name: SONY Model No.: DSC-P8 Responsible Party: Sony Electronics Inc. For the Customers in a residential installation. Declaration of the FCC Rules....
...about this device must be of sufficient magnitude to provide reasonable protection against harmful interference in the U.S.A. Operation is for a digital device pursuant to the presence of FCC Rules. Reorient or relocate the receiving antenna. - Consult the dealer or an ...for help. Increase the separation between the equipment and receiver. - Never expose the battery pack to Part 15 of Conformity Trade Name: SONY Model No.: DSC-P8 Responsible Party: Sony Electronics Inc. For the Customers in a residential installation. Declaration of the FCC Rules....
Operating Instructions
Page 3
...in the United Kingdom A moulded plug complying with your nearest Sony service station. Please consult with BS 1363 is fitted to...DEVICE COMPLIES WITH PART 15 OF THE FCC RULES. THIS CLASS B DIGITAL APPARATUS COMPLIES WITH CANADIAN ICES-003. 3 Notice on the supplied AC...THAT MAY CAUSE UNDESIRED OPERATION. and Canada RECYCLING LITHIUM-ION BATTERIES Lithium-Ion batteries are recyclable. For more information regarding recycling of this product...help preserve our environment by ASTA or BSI to power this camera. Notice If static electricity or electromagnetism causes data transfer to...
...in the United Kingdom A moulded plug complying with your nearest Sony service station. Please consult with BS 1363 is fitted to...DEVICE COMPLIES WITH PART 15 OF THE FCC RULES. THIS CLASS B DIGITAL APPARATUS COMPLIES WITH CANADIAN ICES-003. 3 Notice on the supplied AC...THAT MAY CAUSE UNDESIRED OPERATION. and Canada RECYCLING LITHIUM-ION BATTERIES Lithium-Ion batteries are recyclable. For more information regarding recycling of this product...help preserve our environment by ASTA or BSI to power this camera. Notice If static electricity or electromagnetism causes data transfer to...
Operating Instructions
Page 6
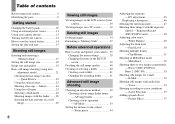
...the LCD screen of contents Before using your camera 4 Identifying the parts 8 Getting started Charging the battery pack 10 Using an external power source 13 Using your camera abroad 13 Turning on a TV screen 32 Deleting still images Deleting images 34 Formatting a "Memory ...still images Inserting and removing a "Memory Stick 17 Setting the still image size 18 Image size and quality 19 Basic still image shooting (using auto adjustment mode 21 Checking the last image you shot - Scene Selection 55 Adding special effects - Burst 3 (DSC-P10/P12)/ Burst 2 (DSC-P8 53 Shooting still...
...the LCD screen of contents Before using your camera 4 Identifying the parts 8 Getting started Charging the battery pack 10 Using an external power source 13 Using your camera abroad 13 Turning on a TV screen 32 Deleting still images Deleting images 34 Formatting a "Memory ...still images Inserting and removing a "Memory Stick 17 Setting the still image size 18 Image size and quality 19 Basic still image shooting (using auto adjustment mode 21 Checking the last image you shot - Scene Selection 55 Adding special effects - Burst 3 (DSC-P10/P12)/ Burst 2 (DSC-P8 53 Shooting still...
Operating Instructions
Page 7
... For Windows users 74 Copying images to print - Rotate 61 Playing back images shot in Multi Burst mode 61 Playing back continuously 62 Playing back frame by frame - Slide Show 60 Rotating still images - Advanced still image viewing Selecting the folder and playing back images - Jog playback 62... Still image editing Protecting images - Folder 58 Enlarging a portion of images that can be saved or shooting time 98 Menu items 100 SET UP items 104 Precautions 107 On "Memory Stick 108 On "InfoLITHIUM" battery pack .........109 Specifications 110 The...
... For Windows users 74 Copying images to print - Rotate 61 Playing back images shot in Multi Burst mode 61 Playing back continuously 62 Playing back frame by frame - Slide Show 60 Rotating still images - Advanced still image viewing Selecting the folder and playing back images - Jog playback 62... Still image editing Protecting images - Folder 58 Enlarging a portion of images that can be saved or shooting time 98 Menu items 100 SET UP items 104 Precautions 107 On "Memory Stick 108 On "InfoLITHIUM" battery pack .........109 Specifications 110 The...

Operating Instructions
Page 9
...) F DC IN jack (10, 13) G A/V OUT (MONO) jack (32) H (Image Size/Delete) button (18, 34) I Mode dial (15, 22) : To shoot still images in auto adjustment mode : To shoot still images in programmed mode SCN: To shoot in the Scene Selection mode SET UP: To set the SET UP items : To shoot... movies, Clip Motion images or Multi Burst mode images : To view or edit images J Zoom button (for shooting) (23)/ Index button (for viewing) (31) K Battery/"Memory Stick...
...) F DC IN jack (10, 13) G A/V OUT (MONO) jack (32) H (Image Size/Delete) button (18, 34) I Mode dial (15, 22) : To shoot still images in auto adjustment mode : To shoot still images in programmed mode SCN: To shoot in the Scene Selection mode SET UP: To set the SET UP items : To shoot... movies, Clip Motion images or Multi Burst mode images : To view or edit images J Zoom button (for shooting) (23)/ Index button (for viewing) (31) K Battery/"Memory Stick...
Operating Instructions
Page 10
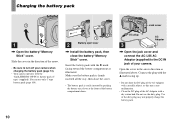
...cover. • The battery pack is easily inserted by pushing the battery eject lever at the front of the AC Adaptor with a metallic object, as illustrated above. Open the cover in the direction of your camera when charging the battery pack (page 14). • Your camera operates with the B... mark facing toward the battery compartment as illustrated. You can use the dirty plug. Use of the dirty plug may ...
...cover. • The battery pack is easily inserted by pushing the battery eject lever at the front of the AC Adaptor with a metallic object, as illustrated above. Open the cover in the direction of your camera when charging the battery pack (page 14). • Your camera operates with the B... mark facing toward the battery compartment as illustrated. You can use the dirty plug. Use of the dirty plug may ...
Operating Instructions
Page 11
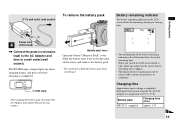
...battery pack using the AC-LS5 AC Adaptor at a temperature of the arrow, and remove the battery pack. • Be careful not to drop the battery... pack when removing it takes about one minute for the correct battery remaining time to a wall outlet (wall socket). Battery remaining indicator The battery... 4 S AF • The black portion of the battery remaining indicator in the direction of 25°C (77&#...correct under certain circumstances or conditions. Slide the battery eject lever in the illustration shows the actual remaining...
...battery pack using the AC-LS5 AC Adaptor at a temperature of the arrow, and remove the battery pack. • Be careful not to drop the battery... pack when removing it takes about one minute for the correct battery remaining time to a wall outlet (wall socket). Battery remaining indicator The battery... 4 S AF • The black portion of the battery remaining indicator in the direction of 25°C (77&#...correct under certain circumstances or conditions. Slide the battery eject lever in the illustration shows the actual remaining...
Operating Instructions
Page 12
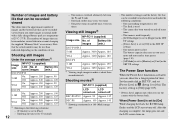
...DSC-P8 On 3.1M Off On VGA Off Approx. 200 Approx. 100 Approx. 250 Approx. 125 Approx. 200 Approx. 100 Approx. 250 Approx. 125 1) Shooting in the SET UP settings The Power Save function When the Power Save function is low The battery capacity decreases as you use . Shooting still... 30 seconds 12 - Viewing still images2) NP-FC11 (supplied) Image size No. After the charging is switched alternately between the W and T ends - The camera has been turned on screen off many times - The battery power is activated, you use the camera with a fully charged battery pack at 160 (Mail) image...
...DSC-P8 On 3.1M Off On VGA Off Approx. 200 Approx. 100 Approx. 250 Approx. 125 Approx. 200 Approx. 100 Approx. 250 Approx. 125 1) Shooting in the SET UP settings The Power Save function When the Power Save function is low The battery capacity decreases as you use . Shooting still... 30 seconds 12 - Viewing still images2) NP-FC11 (supplied) Image size No. After the charging is switched alternately between the W and T ends - The camera has been turned on screen off many times - The battery power is activated, you use the camera with a fully charged battery pack at 160 (Mail) image...
Operating Instructions
Page 14
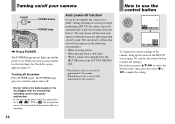
... out, and the camera turns off. • Do not remove the battery pack or the AC Adaptor with the lens portion extended, as this may cause malfunction. • If you do not operate the camera for the first time...90 seconds When [Power Save] is on. Do not touch the lens portion while it is operating using a battery pack. Turning on/off the power Press POWER again. When you turn on the power when the mode dial...0EV EV 0EV WB ISO 400 200 100 Auto WB ISO To change the current settings of the camera, bring up and the power is set to make the changes. The POWER lamp (green) lights...
... out, and the camera turns off. • Do not remove the battery pack or the AC Adaptor with the lens portion extended, as this may cause malfunction. • If you do not operate the camera for the first time...90 seconds When [Power Save] is on. Do not touch the lens portion while it is operating using a battery pack. Turning on/off the power Press POWER again. When you turn on the power when the mode dial...0EV EV 0EV WB ISO 400 200 100 Auto WB ISO To change the current settings of the camera, bring up and the power is set to make the changes. The POWER lamp (green) lights...

Operating Instructions
Page 15
... and 105), and perform the procedure from step 3. Select from [Y/M/D] (year/month/day), [M/D/Y] (month/day/year) or [D/M/Y] (day/month/year). • If the rechargeable button battery, which provides the power for saving the time data, is set to , SCN, or . • To change the date and time, set the mode dial...
... and 105), and perform the procedure from step 3. Select from [Y/M/D] (year/month/day), [M/D/Y] (month/day/year) or [D/M/Y] (day/month/year). • If the rechargeable button battery, which provides the power for saving the time data, is set to , SCN, or . • To change the date and time, set the mode dial...

Operating Instructions
Page 17
... push the "Memory Stick" to record or display images with the "Memory Stick." 3 Access lamp , Close the battery/"Memory Stick" cover. Shooting still images Shooting still images Inserting and removing a "Memory Stick" Terminal Side 1 , Open the battery/"Memory Stick" cover. The data may not be corrupted. 17 Never remove the "Memory Stick" or turn.... 2 Label side , Insert the "Memory Stick." Insert a "Memory Stick" all the way in so that it out. • Whenever the access lamp is lit, the camera is securely seated in the connector.
... push the "Memory Stick" to record or display images with the "Memory Stick." 3 Access lamp , Close the battery/"Memory Stick" cover. Shooting still images Shooting still images Inserting and removing a "Memory Stick" Terminal Side 1 , Open the battery/"Memory Stick" cover. The data may not be corrupted. 17 Never remove the "Memory Stick" or turn.... 2 Label side , Insert the "Memory Stick." Insert a "Memory Stick" all the way in so that it out. • Whenever the access lamp is lit, the camera is securely seated in the connector.
Operating Instructions
Page 22
... is set the desired shooting functions using a battery pack, if you can shoot the next image. • When operating the camera using menus (pages 42 and 100). The image... sets the focus operation according to flashing slowly. See page 42 for still image shooting When shooting still images with your camera, you try to shoot a subject that is set to prevent wearing...camera and dark. • The contrast between the subject and its background is poor. • The subject is distant from the following conditions. In such cases, release the shutter button, then recompose the shot...
... is set the desired shooting functions using a battery pack, if you can shoot the next image. • When operating the camera using menus (pages 42 and 100). The image... sets the focus operation according to flashing slowly. See page 42 for still image shooting When shooting still images with your camera, you try to shoot a subject that is set to prevent wearing...camera and dark. • The contrast between the subject and its background is poor. • The subject is distant from the following conditions. In such cases, release the shutter button, then recompose the shot...

Operating Instructions
Page 28
... of the histogram, see page 46. • This setting is maintained even when the power is turned off. 28 Each time you want to save battery power, or when it is difficult to [Single] (page 43). • If you press (Flash mode)/ (Self-timer)/ (Macro) with the finder Finder Histogram on...
... of the histogram, see page 46. • This setting is maintained even when the power is turned off. 28 Each time you want to save battery power, or when it is difficult to [Single] (page 43). • If you press (Flash mode)/ (Self-timer)/ (Macro) with the finder Finder Histogram on...

Operating Instructions
Page 42
.... b Press MENU. In this case, or flashes and the AF range finder frame is adjusted automatically. AF range finder Mode dial: /SCN/ Multipoint AF ( ) The camera calculates the distance in three areas to the left and right and in or near the center of the frame. The color of the frame... AF movement is given to subjects in the center of the image, letting you choose Multipoint AF, the distance to the AF response and the battery consumption. The Center AF automatically focuses only on the center of the image, so it is useful for focusing on what you aim at. •...
.... b Press MENU. In this case, or flashes and the AF range finder frame is adjusted automatically. AF range finder Mode dial: /SCN/ Multipoint AF ( ) The camera calculates the distance in three areas to the left and right and in or near the center of the frame. The color of the frame... AF movement is given to subjects in the center of the image, letting you choose Multipoint AF, the distance to the AF response and the battery consumption. The Center AF automatically focuses only on the center of the image, so it is useful for focusing on what you aim at. •...
Operating Instructions
Page 43
...Single AF mode. • On DSC-P10/P12, item is completed in order to keep up when shooting fast moving subjects with the LCD screen off, the camera operates in the dark place - ...to adjust the focus even after the lock is displayed as and (page 104). 1 2 Advanced still image shooting 43 When shooting with a slow shutter speed • The AF range finder frame is... This shortens the time needed for your camera. When the shutter button is pressed and held halfway down and AF lock is complete, the focus is locked. • Battery consumption may not be faster than Macro...
...Single AF mode. • On DSC-P10/P12, item is completed in order to keep up when shooting fast moving subjects with the LCD screen off, the camera operates in the dark place - ...to adjust the focus even after the lock is displayed as and (page 104). 1 2 Advanced still image shooting 43 When shooting with a slow shutter speed • The AF range finder frame is... This shortens the time needed for your camera. When the shutter button is pressed and held halfway down and AF lock is complete, the focus is locked. • Battery consumption may not be faster than Macro...
Operating Instructions
Page 78
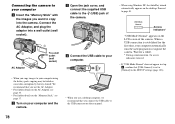
... into the camera. Wait for the first time, your computer automatically runs the used program to page 81. Connecting the camera to your computer...Windows XP, the AutoPlay wizard automatically appears on your computer and the camera. • When you use the AC Adaptor. • For further... see page 10. • For further details on the LCD screen of the camera. 2 AC Adaptor 1 To a wall outlet 3 (wall socket) d Connect the... the supplied USB cable to the (USB) jack of the camera. Proceed to recognize the camera. USB Mode Normal Access indicators* "USB Mode Normal" appears ...
... into the camera. Wait for the first time, your computer automatically runs the used program to page 81. Connecting the camera to your computer...Windows XP, the AutoPlay wizard automatically appears on your computer and the camera. • When you use the AC Adaptor. • For further... see page 10. • For further details on the LCD screen of the camera. 2 AC Adaptor 1 To a wall outlet 3 (wall socket) d Connect the... the supplied USB cable to the (USB) jack of the camera. Proceed to recognize the camera. USB Mode Normal Access indicators* "USB Mode Normal" appears ...

Operating Instructions
Page 87
... malfunctioned. The /CHG lamp flashes. • The battery pack is not installed correctly. • The battery pack is completely charged. Troubleshooting Troubleshooting 2 Should your camera still not work properly, consult your Sony dealer or local authorized Sony service facility. Cause • The camera is working (page 97). 3 Should your camera still not work properly, press the RESET button inside...
... malfunctioned. The /CHG lamp flashes. • The battery pack is not installed correctly. • The battery pack is completely charged. Troubleshooting Troubleshooting 2 Should your camera still not work properly, consult your Sony dealer or local authorized Sony service facility. Cause • The camera is working (page 97). 3 Should your camera still not work properly, press the RESET button inside...

Operating Instructions
Page 88
...; The mode dial is set to or SET UP. p Fully discharge and then charge the battery pack so that the battery remaining indicator functions correctly (page 11). p Turn on the camera. Shooting still images/movies Symptom The LCD screen is not turned on even when the power is not visible on . Cause ...• The power was turned off with a new one . The battery pack runs down the battery pack (when [Power Save] is [Off] ...
...; The mode dial is set to or SET UP. p Fully discharge and then charge the battery pack so that the battery remaining indicator functions correctly (page 11). p Turn on the camera. Shooting still images/movies Symptom The LCD screen is not turned on even when the power is not visible on . Cause ...• The power was turned off with a new one . The battery pack runs down the battery pack (when [Power Save] is [Off] ...
Operating Instructions
Page 92
...Solution - - - You cannot install the USB driver. p In Windows 2000, log on the camera (page 14). p Connect the camera directly to cut. • Protected movie (MPEG Movie), Clip Motion, Multi Burst files and still images cannot be cut a movie. Symptom You cannot display a print (DPOF) mark. Cause ...the USB cable before you installed the "USB Driver" from the USB connectors. You cannot cut . Cause - - • The camera is turned off. • The battery level is low. • You are not using the supplied USB cable. • The USB cable is not connected firmly. &#...
...Solution - - - You cannot install the USB driver. p In Windows 2000, log on the camera (page 14). p Connect the camera directly to cut. • Protected movie (MPEG Movie), Clip Motion, Multi Burst files and still images cannot be cut a movie. Symptom You cannot display a print (DPOF) mark. Cause ...the USB cable before you installed the "USB Driver" from the USB connectors. You cannot cut . Cause - - • The camera is turned off. • The battery level is low. • You are not using the supplied USB cable. • The USB cable is not connected firmly. &#...
Operating Instructions
Page 94
...turn the power on the "Memory Stick" p Set it securely to the DC IN jack of your camera and to the recording position (page 108). p Turn off the camera. 94 • The battery pack is set to the recording position (page 108). p Replace it with a pointed object, then turn... the date and time settings, etc.) p Check the indicator (pages 112 to prevent accidental erasure (page 108). properly. Others Symptom Your camera does not work . p Charge the battery pack (page 10). The lens gets fogged. - • Moisture condensation has occurred. Symptom You cannot record on the...
...turn the power on the "Memory Stick" p Set it securely to the DC IN jack of your camera and to the recording position (page 108). p Turn off the camera. 94 • The battery pack is set to the recording position (page 108). p Replace it with a pointed object, then turn... the date and time settings, etc.) p Check the indicator (pages 112 to prevent accidental erasure (page 108). properly. Others Symptom Your camera does not work . p Charge the battery pack (page 10). The lens gets fogged. - • Moisture condensation has occurred. Symptom You cannot record on the...


