
Operating Instructions (primary manual)
Page 4
and Canada THIS CLASS B DIGITAL DEVICE COMPLIES WITH PART 15 OF THE FCC RULES AND THE CANADIAN ICES-003 OPERATION IS SUBJECT TO THE FOLLOWING TWO CONDITIONS: (1) THIS DEVICE MAY NOT CAUSE HARMFUL INTERFERENCE, AND (2) THIS DEVICE MUST ACCEPT ANY INTERFERENCE RECEIVED, INCLUDING INTERFERENCE THAT MAY CAUSE UNDESIRED OPERATION. 4 "Memory Stick" N50 For the...
and Canada THIS CLASS B DIGITAL DEVICE COMPLIES WITH PART 15 OF THE FCC RULES AND THE CANADIAN ICES-003 OPERATION IS SUBJECT TO THE FOLLOWING TWO CONDITIONS: (1) THIS DEVICE MAY NOT CAUSE HARMFUL INTERFERENCE, AND (2) THIS DEVICE MUST ACCEPT ANY INTERFERENCE RECEIVED, INCLUDING INTERFERENCE THAT MAY CAUSE UNDESIRED OPERATION. 4 "Memory Stick" N50 For the...

Operating Instructions (primary manual)
Page 6
...may render the "Memory Stick" unusable or image data breakdown, damage or loss may occur. However, there may cause malfunctions. LCD screen, LCD finder (only models with a finder) and lens • The LCD screen and the LCD finder are manufactured using the camera. 6 Do not get the camera wet When taking...be some tiny black points and/or bright points (white, red, blue or green in any way. • Be careful when placing the camera near a window or outdoors. These points are operational for long periods may be careful not to remove it before using extremely highprecision technology so...
...may render the "Memory Stick" unusable or image data breakdown, damage or loss may occur. However, there may cause malfunctions. LCD screen, LCD finder (only models with a finder) and lens • The LCD screen and the LCD finder are manufactured using the camera. 6 Do not get the camera wet When taking...be some tiny black points and/or bright points (white, red, blue or green in any way. • Be careful when placing the camera near a window or outdoors. These points are operational for long periods may be careful not to remove it before using extremely highprecision technology so...

Operating Instructions (primary manual)
Page 7
...lens, and be careful not to apply force to it. Trademarks • "Memory Stick," , "MagicGate Memory Stick," and , are trademarks of Sony Corporation. • is equipped with an auto zoom lens. However, the ... used in all cases in this manual are reproduced images, and are not actual images shot using this camera. On illustrations Illustrations used in this manual are, in this manual. 7 Microsoft Corporation ...The auto zoom lens (for the DSC-P71 only) This camera is a trademark of Sony Corporation. • Microsoft and Windows are registered trademarks of the U.S.
...lens, and be careful not to apply force to it. Trademarks • "Memory Stick," , "MagicGate Memory Stick," and , are trademarks of Sony Corporation. • is equipped with an auto zoom lens. However, the ... used in all cases in this manual are reproduced images, and are not actual images shot using this camera. On illustrations Illustrations used in this manual are, in this manual. 7 Microsoft Corporation ...The auto zoom lens (for the DSC-P71 only) This camera is a trademark of Sony Corporation. • Microsoft and Windows are registered trademarks of the U.S.
Operating Instructions (primary manual)
Page 8
... Shooting still images Inserting and removing a "Memory Stick 23 Deciding the still image size and image quality 24 Basic still image shooting (using auto adjustment mode 26 Checking the last shot image (Quick Review 27 Using the zoom feature 28 Shooting close-ups (Macro) (DSC-P71 only...40 Deleting on the Index (3 images) screen 41 Formatting a "Memory Stick 43 Copying still images to your computer Copying still images to your computer ...44 1 Installing the USB driver 45 2 Preparing your camera 46 3 Connecting your camera to your computer 47 4 Copying images 48 When a removable disk...
... Shooting still images Inserting and removing a "Memory Stick 23 Deciding the still image size and image quality 24 Basic still image shooting (using auto adjustment mode 26 Checking the last shot image (Quick Review 27 Using the zoom feature 28 Shooting close-ups (Macro) (DSC-P71 only...40 Deleting on the Index (3 images) screen 41 Formatting a "Memory Stick 43 Copying still images to your computer Copying still images to your computer ...44 1 Installing the USB driver 45 2 Preparing your camera 46 3 Connecting your camera to your computer 47 4 Copying images 48 When a removable disk...
Operating Instructions (primary manual)
Page 9
... an image - Playback zoom 66 Recording an enlarged image - Trimming 67 Playing back successive images (SLIDE 67 Rotating still images (ROTATE 68 Still image editting Protecting images (PROTECT 69 For single images 69 For Index (9 images) screen 69 For Index (3 images...camera ...55 Changing menu settings 55 Changing items in Multi Burst mode (MULTI BURST 64 Shooting still images for e-mail (E-MAIL 65 Advanced still image viewing Enlarging a portion of images that can be saved/ shooting time 91 Additional information Menu items 92 SET UP items 97 Precautions 99 The "Memory Stick...
... an image - Playback zoom 66 Recording an enlarged image - Trimming 67 Playing back successive images (SLIDE 67 Rotating still images (ROTATE 68 Still image editting Protecting images (PROTECT 69 For single images 69 For Index (9 images) screen 69 For Index (3 images...camera ...55 Changing menu settings 55 Changing items in Multi Burst mode (MULTI BURST 64 Shooting still images for e-mail (E-MAIL 65 Advanced still image viewing Enlarging a portion of images that can be saved/ shooting time 91 Additional information Menu items 92 SET UP items 97 Precautions 99 The "Memory Stick...

Operating Instructions (primary manual)
Page 11
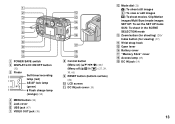
... shoot still images : To view or edit images : To shoot movies /Clip Motion images/Multi Burst mode images SET UP: To set the SET UP items SCN: To shoot in the SCENE SELECTION mode M Zoom button (for shooting) (28)/ Index button (for viewing) (37) N Wrist strap hook O Open lever P Battery cover Q "Memory Stick...
... shoot still images : To view or edit images : To shoot movies /Clip Motion images/Multi Burst mode images SET UP: To set the SET UP items SCN: To shoot in the SCENE SELECTION mode M Zoom button (for shooting) (28)/ Index button (for viewing) (37) N Wrist strap hook O Open lever P Battery cover Q "Memory Stick...
Operating Instructions (primary manual)
Page 13
... shoot still images : To view or edit images : To shoot movies /Clip Motion images/Multi Burst mode images SET UP: To set the SET UP items SCN: To shoot in the SCENE SELECTION mode M Zoom button (for shooting) (28)/ Index button (for viewing) (37) N Wrist strap hook O Open lever P Battery cover Q "Memory Stick...
... shoot still images : To view or edit images : To shoot movies /Clip Motion images/Multi Burst mode images SET UP: To set the SET UP items SCN: To shoot in the SCENE SELECTION mode M Zoom button (for shooting) (28)/ Index button (for viewing) (37) N Wrist strap hook O Open lever P Battery cover Q "Memory Stick...
Operating Instructions (primary manual)
Page 18
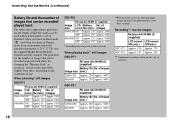
When shooting* still images DSC-P71 R6 (size AA) Ni-MH (2) (supplied) Image LCD Battery No. The guidelines for the number of images that can be recorded/ played back The tables show approximate guidelines for the length of time the camera can be used when picture quality is 25°...image every three seconds When playing back** still images DSC-P71 R6 (size AA) Ni-MH (2) (supplied) Battery life No. Inserting the batteries (continued) Battery life and the number of images that can be recorded or played back allow for changing the "Memory Stick" as necessary. of images Image size ...
When shooting* still images DSC-P71 R6 (size AA) Ni-MH (2) (supplied) Image LCD Battery No. The guidelines for the number of images that can be recorded/ played back The tables show approximate guidelines for the length of time the camera can be used when picture quality is 25°...image every three seconds When playing back** still images DSC-P71 R6 (size AA) Ni-MH (2) (supplied) Battery life No. Inserting the batteries (continued) Battery life and the number of images that can be recorded or played back allow for changing the "Memory Stick" as necessary. of images Image size ...
Operating Instructions (primary manual)
Page 23
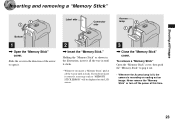
... it . 2 , Insert the "Memory Stick." To remove a "Memory Stick" Open the "Memory Stick" cover, then push the "Memory Stick" to open it clicks. Never remove the "Memory Stick" or turn off the power at this time. 23 Holding the "Memory Stick" as "MEMORY STICK ERROR" will be displayed on the LCD screen. 3 , Close the "Memory Stick" cover. Shooting still images Inserting and removing a "Memory Stick" Shooting still images Label side...
... it . 2 , Insert the "Memory Stick." To remove a "Memory Stick" Open the "Memory Stick" cover, then push the "Memory Stick" to open it clicks. Never remove the "Memory Stick" or turn off the power at this time. 23 Holding the "Memory Stick" as "MEMORY STICK ERROR" will be displayed on the LCD screen. 3 , Close the "Memory Stick" cover. Shooting still images Inserting and removing a "Memory Stick" Shooting still images Label side...
Operating Instructions (primary manual)
Page 25
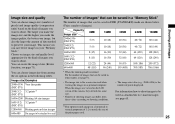
...the camera, they all look the same size. • Number of data needed to shoot. Image size Examples 2048×1536 Very fine prints (DSC-P71) 2048(3:2) 3:2 prints 1) (DSC-P71) 1600×1200 Printing A4 size images 1600 (3:2) 3:2 prints 1) (DSC-...P31) 1280×960 Printing postcard size images 640×480 For images to be attached to e-mail The number of images* that can be saved in a "Memory Stick... 2048×1536) is the screen size used . 25 Shooting still images
...the camera, they all look the same size. • Number of data needed to shoot. Image size Examples 2048×1536 Very fine prints (DSC-P71) 2048(3:2) 3:2 prints 1) (DSC-P71) 1600×1200 Printing A4 size images 1600 (3:2) 3:2 prints 1) (DSC-...P31) 1280×960 Printing postcard size images 640×480 For images to be attached to e-mail The number of images* that can be saved in a "Memory Stick... 2048×1536) is the screen size used . 25 Shooting still images

Operating Instructions (primary manual)
Page 27
... About Auto Focus When you are shooting with the battery, if no tasks are performed for a while* with in the "Memory Stick." A beeping sound is heard, the shooting is completed, and the still image is a luminous body and a lustrous subject • A flashing subject. In such cases, release the shutter, then try...When the Recording lamp goes out, you can shoot the next image. • When you try to recompose the shot and focus again. • The subject is distant from the camera and dark • The contrast of the subject and its background is poor • The subject is seen through ...
... About Auto Focus When you are shooting with the battery, if no tasks are performed for a while* with in the "Memory Stick." A beeping sound is heard, the shooting is completed, and the still image is a luminous body and a lustrous subject • A flashing subject. In such cases, release the shutter, then try...When the Recording lamp goes out, you can shoot the next image. • When you try to recompose the shot and focus again. • The subject is distant from the camera and dark • The contrast of the subject and its background is poor • The subject is seen through ...

Operating Instructions (primary manual)
Page 40
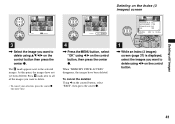
When this message disappears, the image has been deleted. Select "OK" again, and press the center z. "MEMORY STICK ACCESS" is displayed, press the MENU button, select "DELETE" using b/B on the control button, choose "CANCEL", then press the center z. DELETE CANCEL SELECT ALL 2 , Select "...
When this message disappears, the image has been deleted. Select "OK" again, and press the center z. "MEMORY STICK ACCESS" is displayed, press the MENU button, select "DELETE" using b/B on the control button, choose "CANCEL", then press the center z. DELETE CANCEL SELECT ALL 2 , Select "...
Operating Instructions (primary manual)
Page 41
..., select the images you want to delete using v/V/b/B on the control button then press the center z. At this point, the images have been deleted. Deleting still images Deleting on the Index (3 images) screen • SET MENU TO NEXT DELETE EXIT OK APERTURE VALUE : F2.2 SHUTTER SPEED : 1/125 EXPOSURE VALUE ... the center z one more time. 4 , Press the MENU button, select "OK" using b/B on the control button, then press the center z. When "MEMORY STICK ACCESS" disappears, the images have not yet been deleted. Put a mark next to all of the images you want to the selected images.
..., select the images you want to delete using v/V/b/B on the control button then press the center z. At this point, the images have been deleted. Deleting still images Deleting on the Index (3 images) screen • SET MENU TO NEXT DELETE EXIT OK APERTURE VALUE : F2.2 SHUTTER SPEED : 1/125 EXPOSURE VALUE ... the center z one more time. 4 , Press the MENU button, select "OK" using b/B on the control button, then press the center z. When "MEMORY STICK ACCESS" disappears, the images have not yet been deleted. Put a mark next to all of the images you want to the selected images.
Operating Instructions (primary manual)
Page 42
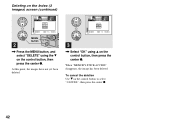
At this point, the images have not yet been deleted. Deleting on the Index (3 images) screen (continued) PRINT PROTECT DELETE 100-0028 2002 7 4 10:30PM • OK MENU button 2 , Press the MENU button, and select "DELETE" using v on the control button, then press the center z. DELETE OK CANCEL 100-0028 2002 7 4 10:30PM • OK 3 , Select "OK" using the V on the control button to select "CANCEL", then press the center z. 42 To cancel the deletion Use V on the control button, then press the center z. When "MEMORY STICK ACCESS" disappears, the image has been deleted.
At this point, the images have not yet been deleted. Deleting on the Index (3 images) screen (continued) PRINT PROTECT DELETE 100-0028 2002 7 4 10:30PM • OK MENU button 2 , Press the MENU button, and select "DELETE" using v on the control button, then press the center z. DELETE OK CANCEL 100-0028 2002 7 4 10:30PM • OK 3 , Select "OK" using the V on the control button to select "CANCEL", then press the center z. 42 To cancel the deletion Use V on the control button, then press the center z. When "MEMORY STICK ACCESS" disappears, the image has been deleted.
Operating Instructions (primary manual)
Page 43
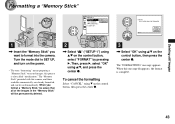
Deleting still images Formatting a "Memory Stick" SETUP 1 FORMAT : FILE NUMBER : /LANGUAGE : CLOCK SET : OK CANCEL OK FORMAT ALL DATA WILL BE ERASED READY? The "Memory Stick" provided with this message disappears, the format is also called "initialization." When you want to format into the camera. When this camera, and those available commercially, are already formatted, and can be...
Deleting still images Formatting a "Memory Stick" SETUP 1 FORMAT : FILE NUMBER : /LANGUAGE : CLOCK SET : OK CANCEL OK FORMAT ALL DATA WILL BE ERASED READY? The "Memory Stick" provided with this message disappears, the format is also called "initialization." When you want to format into the camera. When this camera, and those available commercially, are already formatted, and can be...

Operating Instructions (primary manual)
Page 44
... is not provided on your computer When neither a USB connector nor a "Memory Stick" slot is unnecessary. We cannot guarantee operations for details. See the Sony Website for operating systems not listed above . iBook or Power Mac G4 with...your computer Copying still images to your computer Follow the steps below to copy the images you connect two or more USB devices to your computer at one time, some devices, including your camera, may be unnecessary... MHz or faster USB connector: Provided as standard equipment • If you shot to your OS to Mac OS 9.0 or 9.1. -
... is not provided on your computer When neither a USB connector nor a "Memory Stick" slot is unnecessary. We cannot guarantee operations for details. See the Sony Website for operating systems not listed above . iBook or Power Mac G4 with...your computer Copying still images to your computer Follow the steps below to copy the images you connect two or more USB devices to your computer at one time, some devices, including your camera, may be unnecessary... MHz or faster USB connector: Provided as standard equipment • If you shot to your OS to Mac OS 9.0 or 9.1. -
Operating Instructions (primary manual)
Page 46
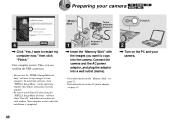
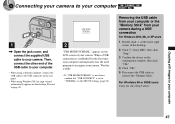
..., then follow instructions on the PC and your camera. 46 AC power 2 1 adaptor , Insert the "Memory Stick" with the images you can establish the USB connection. • You can use the "PIXELA ImageMixer for Sony" software to copy images to install DirectX when using... the "PIXELA ImageMixer for Sony" software. Your computer restarts when the installation is completed. 2 Preparing your camera "Memory Stick" To the wall outlet (mains) 3 1 3 4 , Click ...
..., then follow instructions on the PC and your camera. 46 AC power 2 1 adaptor , Insert the "Memory Stick" with the images you can establish the USB connection. • You can use the "PIXELA ImageMixer for Sony" software to copy images to install DirectX when using... the "PIXELA ImageMixer for Sony" software. Your computer restarts when the installation is completed. 2 Preparing your camera "Memory Stick" To the wall outlet (mains) 3 1 3 4 , Click ...
Operating Instructions (primary manual)
Page 47
... USB cable or remove the "Memory Stick." Removing the USB cable from your computer or the "Memory Stick" from your camera during a USB connection For Windows 2000, Me, or XP users 1 Double-click at the lower-right corner of the desktop. 2 Click (Sony DSC), then click "Stop." 3 Confirm... the device on the LCD screen of the USB cable to your computer 47 Wait for a while. • If "USB MODE NORMAL" is not shown, confirm that "USB CONNECT" is established for the first time, your computer automatically runs the used program to your camera. Copying still...
... USB cable or remove the "Memory Stick." Removing the USB cable from your computer or the "Memory Stick" from your camera during a USB connection For Windows 2000, Me, or XP users 1 Double-click at the lower-right corner of the desktop. 2 Click (Sony DSC), then click "Stop." 3 Confirm... the device on the LCD screen of the USB cable to your computer 47 Wait for a while. • If "USB MODE NORMAL" is not shown, confirm that "USB CONNECT" is established for the first time, your computer automatically runs the used program to your camera. Copying still...
Operating Instructions (primary manual)
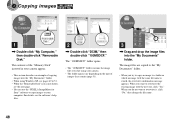
Page 48
... is not shown, see the next page. • You can use the "PIXELA ImageMixer for Sony" software to copy images to overwrite it, click "No," then change the file name. 48 ...When you do not want to the "My Documents" folder. • When you shot using Windows XP, see the software's help files. 2 , Double-click "DCIM," then double-click "100MSDCF." The...," then double-click "Removable Disk." When you want to your camera. • The folder names vary depending on the type of the "Memory Stick" inserted in which an image with the new one, click "Yes."
... is not shown, see the next page. • You can use the "PIXELA ImageMixer for Sony" software to copy images to overwrite it, click "No," then change the file name. 48 ...When you do not want to the "My Documents" folder. • When you shot using Windows XP, see the software's help files. 2 , Double-click "DCIM," then double-click "100MSDCF." The...," then double-click "Removable Disk." When you want to your camera. • The folder names vary depending on the type of the "Memory Stick" inserted in which an image with the new one, click "Yes."

Operating Instructions (primary manual)
Page 49
..." appears. • When following the steps on page 47, the copy wizard appears on my computer using Microsoft Scanner and Camera Wizard, " then click "OK." The "System Property" window appears. 2 Confirm if other devices are displayed. 49 The "Device... your computer. 2 , Click "Next." Copying still images to delete them. 1 Click " Sony DSC" or " Sony Handycam." 2 Click "Delete." The images stored in the "Memory Stick" are already installed. 1 Click "Device Manager." 2 Double-click " Other Devices." 3 Confirm if there is a " Sony DSC" or " Sony Handycam" with a mark. 3 If you find...
..." appears. • When following the steps on page 47, the copy wizard appears on my computer using Microsoft Scanner and Camera Wizard, " then click "OK." The "System Property" window appears. 2 Confirm if other devices are displayed. 49 The "Device... your computer. 2 , Click "Next." Copying still images to delete them. 1 Click " Sony DSC" or " Sony Handycam." 2 Click "Delete." The images stored in the "Memory Stick" are already installed. 1 Click "Device Manager." 2 Double-click " Other Devices." 3 Confirm if there is a " Sony DSC" or " Sony Handycam" with a mark. 3 If you find...


