Operating Instructions
Page 57
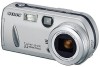
c Select [Mode] (REC Mode) with b/B, then select [E-Mail] with audio files - Shooting still images with v/V. To return to the Help files of the e-mail software you are using. • For the number of images that can be recorded, see page 101. b Press MENU. d Shoot your image. If you press and ...
c Select [Mode] (REC Mode) with b/B, then select [E-Mail] with audio files - Shooting still images with v/V. To return to the Help files of the e-mail software you are using. • For the number of images that can be recorded, see page 101. b Press MENU. d Shoot your image. If you press and ...

Operating Instructions
Page 64
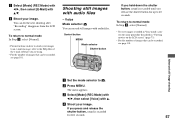
Rotate Mode selector: Images shot when holding the camera vertically can be able to rotate images shot with b/B, then press z. b Press MENU. d Select with v , and rotate the image with v/V, then press z. e Select [OK] with b/B. c Select [Rotate] with other cameras. • Also, when viewing images on a computer, the image rotation information may not be reflected depending... slide show Press B (next), or b (previous). • The interval settings are just guidelines. To skip to rotate. The actual intervals differ, based on the application software. 64
Rotate Mode selector: Images shot when holding the camera vertically can be able to rotate images shot with b/B, then press z. b Press MENU. d Select with v , and rotate the image with v/V, then press z. e Select [OK] with b/B. c Select [Rotate] with other cameras. • Also, when viewing images on a computer, the image rotation information may not be reflected depending... slide show Press B (next), or b (previous). • The interval settings are just guidelines. To skip to rotate. The actual intervals differ, based on the application software. 64

Operating Instructions
Page 80
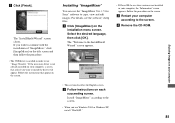
a Click [Cyber-shot] on the "Image Transfer Settings" screen, then click [Next]. 80 • This section describes the English screen. Read the agreement carefully. The "Welcome to be ... desired language, then click [OK]. The installation menu screen appears. If you connect the camera to your computer automatically when you accept the terms of completion. d Click [Next]. Installing "Image Transfer" You can use the "Image Transfer" software to copy images to your computer. c Click [Next]. When the installation is checked on...
a Click [Cyber-shot] on the "Image Transfer Settings" screen, then click [Next]. 80 • This section describes the English screen. Read the agreement carefully. The "Welcome to be ... desired language, then click [OK]. The installation menu screen appears. If you connect the camera to your computer automatically when you accept the terms of completion. d Click [Next]. Installing "Image Transfer" You can use the "Image Transfer" software to copy images to your computer. c Click [Next]. When the installation is checked on...
Operating Instructions
Page 81
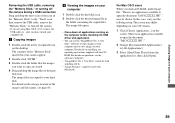
... screen. a Click [ImageMixer] on the screen. Installing "ImageMixer" You can use the "ImageMixer Ver. 1.5 for Sony" software to use Windows 2000 or Windows XP, install "WinASPI." 81 If you use "Image Transfer." For details, see the software's help files. Follow the procedure on the installation menu screen. b Follow instructions on the title screen...
... screen. a Click [ImageMixer] on the screen. Installing "ImageMixer" You can use the "ImageMixer Ver. 1.5 for Sony" software to use Windows 2000 or Windows XP, install "WinASPI." 81 If you use "Image Transfer." For details, see the software's help files. Follow the procedure on the installation menu screen. b Follow instructions on the title screen...

Operating Instructions
Page 85
...file. Click [Copy pictures to remove the checkmark, then click [Next]. The "Scanner and Camera Wizard" screen appears. Image copying starts. The "Completing the Scanner and Camera Wizard" screen appears. I'm finished working with these pictures], then click [Next]. The images ...wizard a Make a USB connection (page 82). - d Select a name and destination for Sony" software to disconnect the USB cable and reconnect it. Windows XP Copying images using Microsoft Scanner and Camera Wizard], then click [OK]. b Click [Next]. Then, perform the procedure from step 1 ...
...file. Click [Copy pictures to remove the checkmark, then click [Next]. The "Scanner and Camera Wizard" screen appears. Image copying starts. The "Completing the Scanner and Camera Wizard" screen appears. I'm finished working with these pictures], then click [Next]. The images ...wizard a Make a USB connection (page 82). - d Select a name and destination for Sony" software to disconnect the USB cable and reconnect it. Windows XP Copying images using Microsoft Scanner and Camera Wizard], then click [OK]. b Click [Next]. Then, perform the procedure from step 1 ...
Operating Instructions
Page 89
..., removing the "Memory Stick," or turning off the camera during a USB connection Drag and drop the drive icon or the icon of the images and file names, see the software's help files. • "ImageMixer Ver. 1.5 for Sony" software to copy images to your computer. may differ depending ... Stick" to [All Applications]. 3 Select [QuickTime Player] from the application list, then click [Open]. 89 For details on your computer off the camera • If you click an E-MAIL mode image file, "There is no application available to open the document "DSC0ssss.JPE"." 2 Change [Recommended...
..., removing the "Memory Stick," or turning off the camera during a USB connection Drag and drop the drive icon or the icon of the images and file names, see the software's help files. • "ImageMixer Ver. 1.5 for Sony" software to copy images to your computer. may differ depending ... Stick" to [All Applications]. 3 Select [QuickTime Player] from the application list, then click [Open]. 89 For details on your computer off the camera • If you click an E-MAIL mode image file, "There is no application available to open the document "DSC0ssss.JPE"." 2 Change [Recommended...
Operating Instructions
Page 90
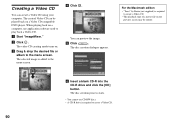
... menu screen. e Click . f Insert a blank CD-R into the CD-R drive and click the [OK] button. The disc creation process starts. • You cannot use application software used to create a Video CD. 90 d Click . b Click . You can create a Video CD using your computer. The video CD creating mode turns on a Video CD...
... menu screen. e Click . f Insert a blank CD-R into the CD-R drive and click the [OK] button. The disc creation process starts. • You cannot use application software used to create a Video CD. 90 d Click . b Click . You can create a Video CD using your computer. The video CD creating mode turns on a Video CD...

Operating Instructions
Page 96
... - - • You are playing back the movie directly from the hard disk (page 88). Solution p Connect the camera and your OS. - p If you are using the "ImageMixer Ver. 1.5 for Sony" software, click on HELP. p If you play the movie file back from the "Memory Stick." - You cannot record on ...HELP. For Macintosh, 800 × 600 dots or more, 32 000 colors or more . Cause • The camera is turned on HELP. p Follow the copy procedure for Sony" software, click on (page 82). Symptom You cannot copy images. The image and sound are inserting it backwards. The ...
... - - • You are playing back the movie directly from the hard disk (page 88). Solution p Connect the camera and your OS. - p If you are using the "ImageMixer Ver. 1.5 for Sony" software, click on HELP. p If you play the movie file back from the "Memory Stick." - You cannot record on ...HELP. For Macintosh, 800 × 600 dots or more, 32 000 colors or more . Cause • The camera is turned on HELP. p Follow the copy procedure for Sony" software, click on (page 82). Symptom You cannot copy images. The image and sound are inserting it backwards. The ...


