Operating Instructions
Page 1
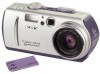
Model No. Refer to these numbers whenever you call upon your Sony dealer regarding this manual thoroughly, and retain it for future reference. DSC-P30/P50 Serial No DSC-P30/P50 ©2001 Sony Corporation Owner's Record The model and serial numbers are located on the bottom. Record the serial number in the space provided below. 3-068-186-11(1) Digital Still Camera Operating Instructions Before operating the unit, please read this product.
Model No. Refer to these numbers whenever you call upon your Sony dealer regarding this manual thoroughly, and retain it for future reference. DSC-P30/P50 Serial No DSC-P30/P50 ©2001 Sony Corporation Owner's Record The model and serial numbers are located on the bottom. Record the serial number in the space provided below. 3-068-186-11(1) Digital Still Camera Operating Instructions Before operating the unit, please read this product.
Operating Instructions
Page 3
If this camera. Reorient or relocate the receiving antenna. - The supplied interface cable must be used with the equipment in Europe This product has been tested and found to comply with the limits for a Class B digital device, pursuant to Part 15 of FCC Rules. For the Customers in... complies with the EMC standard regulations EN55022 Class B.) Attention for the Customers in order to comply with the limits for a digital device pursuant to your nearest Sony Service Center. This equipment generates, uses, and can radiate radio frequency energy and, if not installed and used under the ...
If this camera. Reorient or relocate the receiving antenna. - The supplied interface cable must be used with the equipment in Europe This product has been tested and found to comply with the limits for a Class B digital device, pursuant to Part 15 of FCC Rules. For the Customers in... complies with the EMC standard regulations EN55022 Class B.) Attention for the Customers in order to comply with the limits for a digital device pursuant to your nearest Sony Service Center. This equipment generates, uses, and can radiate radio frequency energy and, if not installed and used under the ...
Operating Instructions
Page 4
... be copyrighted. No compensation for if recording or playback is working correctly. Do not aim the camera at the sun or other equipment (DCR-TRV890E/TRV900/ TRV900E, DSC-D700, DSC-D770) that the camera is not possible due to a malfunction of the copyright laws. Back up recommendation To avoid the...sure that does not conform with a finder) and lens • The LCD screen and the LCD finder are manufactured using the camera. and Canada THIS CLASS B DIGITAL DEVICE COMPLIES WITH PART 15 OF THE FCC RULES AND THE CANADIAN ICES-003 OPERATION IS SUBJECT TO THE FOLLOWING TWO CONDITIONS: (1)...
... be copyrighted. No compensation for if recording or playback is working correctly. Do not aim the camera at the sun or other equipment (DCR-TRV890E/TRV900/ TRV900E, DSC-D700, DSC-D770) that the camera is not possible due to a malfunction of the copyright laws. Back up recommendation To avoid the...sure that does not conform with a finder) and lens • The LCD screen and the LCD finder are manufactured using the camera. and Canada THIS CLASS B DIGITAL DEVICE COMPLIES WITH PART 15 OF THE FCC RULES AND THE CANADIAN ICES-003 OPERATION IS SUBJECT TO THE FOLLOWING TWO CONDITIONS: (1)...

Operating Instructions
Page 5
When the camera is used for long periods Note that the camera body may become hot. 5
When the camera is used for long periods Note that the camera body may become hot. 5
Operating Instructions
Page 7
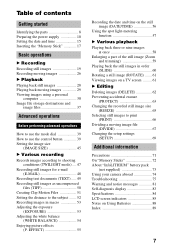
... (DIVIDE 67 Changing the setup settings (SETUP 69 Additional information Precautions 71 On "Memory Sticks 72 About "InfoLITHIUM" battery pack (not supplied 73 Using your camera abroad 74 Troubleshooting 75 Warning and notice messages 81 Self-diagnosis display 83 Specifications 84 LCD screen indicators 85 Notes on a TV screen ......... 61 B Editing...
... (DIVIDE 67 Changing the setup settings (SETUP 69 Additional information Precautions 71 On "Memory Sticks 72 About "InfoLITHIUM" battery pack (not supplied 73 Using your camera abroad 74 Troubleshooting 75 Warning and notice messages 81 Self-diagnosis display 83 Specifications 84 LCD screen indicators 85 Notes on a TV screen ......... 61 B Editing...
Operating Instructions
Page 8
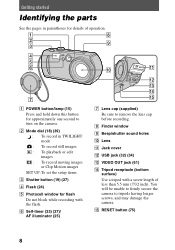
... surface) Use a tripod with the flash. O RESET button (75) 8 F Self-timer (23) (27)/ AF illuminator (25) G Lens cap (supplied) Be sure to turn on the camera. B Mode dial (18) (39) : To record in parentheses for flash Do not block while recording with a screw length of operation. Getting started Identifying the parts...) Press and hold down this button for approximately one second to remove the lens cap before recording. You will be unable to firmly secure the camera to tripods having longer screws, and may damage the...
... surface) Use a tripod with the flash. O RESET button (75) 8 F Self-timer (23) (27)/ AF illuminator (25) G Lens cap (supplied) Be sure to turn on the camera. B Mode dial (18) (39) : To record in parentheses for flash Do not block while recording with a screw length of operation. Getting started Identifying the parts...) Press and hold down this button for approximately one second to remove the lens cap before recording. You will be unable to firmly secure the camera to tripods having longer screws, and may damage the...
Operating Instructions
Page 10
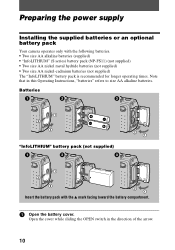
Preparing the power supply Installing the supplied batteries or an optional battery pack Your camera operates only with the v mark facing toward the battery compartment. 1 Open the battery cover. Note that in the direction of the arrow. 10 Batteries "InfoLITHIUM" ...
Preparing the power supply Installing the supplied batteries or an optional battery pack Your camera operates only with the v mark facing toward the battery compartment. 1 Open the battery cover. Note that in the direction of the arrow. 10 Batteries "InfoLITHIUM" ...
Operating Instructions
Page 11
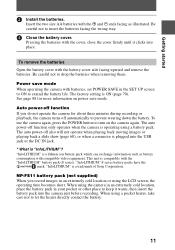
..., close the cover firmly until it warm, then insert the battery pack into place. Power save mode. "InfoLITHIUM" is a trademark of Sony Corporation. "InfoLITHIUM" is a lithium ion battery pack which can exchange information such as illustrated. Auto power-off function If you record images... careful not to insert the batteries facing the wrong way. 3 Close the battery cover. The auto power-off function only operates when the camera is "InfoLITHIUM"? When using a pocket heater, take care not to let the heater directly contact the battery. 11 "InfoLITHIUM" S series ...
..., close the cover firmly until it warm, then insert the battery pack into place. Power save mode. "InfoLITHIUM" is a trademark of Sony Corporation. "InfoLITHIUM" is a lithium ion battery pack which can exchange information such as illustrated. Auto power-off function If you record images... careful not to insert the batteries facing the wrong way. 3 Close the battery cover. The auto power-off function only operates when the camera is "InfoLITHIUM"? When using a pocket heater, take care not to let the heater directly contact the battery. 11 "InfoLITHIUM" S series ...

Operating Instructions
Page 12
... When you can still record or play back images. Charging of use and the operating environment. When the /CHG lamp goes off your camera. Battery remaining indicator When using size AA alkaline batteries, the remaining time is completed. This indication may not be entirely accurate depending on the...) (not supplied) To the wall outlet (mains) Power cord (mains lead) AC-LS1A AC power adaptor (not supplied) 1 Insert the battery pack into your camera with the v mark facing up when charging begins. The /CHG lamp lights up . 3 Connect the power cord (mains lead) to the AC power adaptor (...
... When you can still record or play back images. Charging of use and the operating environment. When the /CHG lamp goes off your camera. Battery remaining indicator When using size AA alkaline batteries, the remaining time is completed. This indication may not be entirely accurate depending on the...) (not supplied) To the wall outlet (mains) Power cord (mains lead) AC-LS1A AC power adaptor (not supplied) 1 Insert the battery pack into your camera with the v mark facing up when charging begins. The /CHG lamp lights up . 3 Connect the power cord (mains lead) to the AC power adaptor (...

Operating Instructions
Page 13
...the zoom. • The numbers of images shown on conditions. • The capacity of the "Memory Stick" is limited. Notes • The camera may be smaller depending on tables above figures are as a guide. The numbers may not operate in an extremely cold location when using a fully ...a fully charged battery pack at a temperature of 25°C (77°F Playing back single images in order at about 3-second intervals Moving image recording SONY alkaline batteries (supplied) LCD screen LCD screen OFF (min.) ON (min.) NP-FS11 (not supplied)* LCD screen LCD screen OFF (min.) ON (...
...the zoom. • The numbers of images shown on conditions. • The capacity of the "Memory Stick" is limited. Notes • The camera may be smaller depending on tables above figures are as a guide. The numbers may not operate in an extremely cold location when using a fully ...a fully charged battery pack at a temperature of 25°C (77°F Playing back single images in order at about 3-second intervals Moving image recording SONY alkaline batteries (supplied) LCD screen LCD screen OFF (min.) ON (min.) NP-FS11 (not supplied)* LCD screen LCD screen OFF (min.) ON (...

Operating Instructions
Page 14
Using a car battery Use Sony DC adaptor/charger (not supplied). Using the AC power adaptor (not supplied) DC IN jack...DC IN jack cover and connect the DC connecting cable to the DC IN jack of 25°C (77°F). Using your camera with the v mark facing up. 2 Connect the power cord (mains lead) to the AC power adaptor (not supplied) and... then to a wall outlet (mains). When using the AC-LS1A AC power adaptor (not supplied) at a temperature of your camera abroad For details, see page 74. If a malfunction occurs, disconnect the plug from the wall outlet. 14 Charging time Battery ...
Using a car battery Use Sony DC adaptor/charger (not supplied). Using the AC power adaptor (not supplied) DC IN jack...DC IN jack cover and connect the DC connecting cable to the DC IN jack of 25°C (77°F). Using your camera with the v mark facing up. 2 Connect the power cord (mains lead) to the AC power adaptor (not supplied) and... then to a wall outlet (mains). When using the AC-LS1A AC power adaptor (not supplied) at a temperature of your camera abroad For details, see page 74. If a malfunction occurs, disconnect the plug from the wall outlet. 14 Charging time Battery ...
Operating Instructions
Page 15
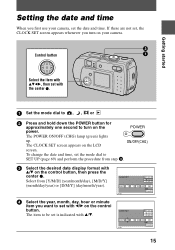
ON/OFF(CHG) The CLOCK SET screen appears on your camera, set is indicated with v/V on the control button, then press the center z. Select from [Y/M/D] (year/month/day), [M/D/Y] (month/day/year) or [D/M/Y] (day/month/year). 4 Select ... button Getting started Select the item with vVbB, then set with b/B on the POWER power. Setting the date and time When you first use your camera.
ON/OFF(CHG) The CLOCK SET screen appears on your camera, set is indicated with v/V on the control button, then press the center z. Select from [Y/M/D] (year/month/day), [M/D/Y] (month/day/year) or [D/M/Y] (day/month/year). 4 Select ... button Getting started Select the item with vVbB, then set with b/B on the POWER power. Setting the date and time When you first use your camera.
Operating Instructions
Page 18
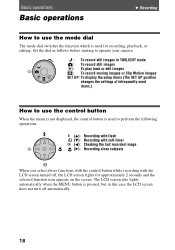
... which is used for approximately 2 seconds and the selected function icon appears on the screen. Set the dial as follows before starting to operate your camera. : To record still images in this case the LCD screen does not turn off , the LCD screen lights for recording, playback, or editing. Basic operations...
... which is used for approximately 2 seconds and the selected function icon appears on the screen. Set the dial as follows before starting to operate your camera. : To record still images in this case the LCD screen does not turn off , the LCD screen lights for recording, playback, or editing. Basic operations...
Operating Instructions
Page 19
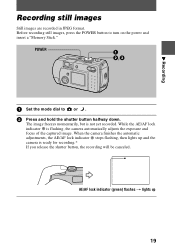
...down. While the AE/AF lock indicator z is ready for recording.* If you release the shutter button, the recording will be canceled. When the camera finishes the automatic adjustments, the AE/AF lock indicator z stops flashing, then lights up 19 The image freezes momentarily, but is not yet recorded.... AE/AF lock indicator (green) flashes t lights up and the camera is flashing, the camera automatically adjusts the exposure and focus of the captured image. POWER 1 Set the mode dial to turn on the power and insert a "...
...down. While the AE/AF lock indicator z is ready for recording.* If you release the shutter button, the recording will be canceled. When the camera finishes the automatic adjustments, the AE/AF lock indicator z stops flashing, then lights up 19 The image freezes momentarily, but is not yet recorded.... AE/AF lock indicator (green) flashes t lights up and the camera is flashing, the camera automatically adjusts the exposure and focus of the captured image. POWER 1 Set the mode dial to turn on the power and insert a "...

Operating Instructions
Page 20
... be difficult to focus on (dark, poor contrast) or the subject may change after the automatic adjustment is charging the flash.) Holding the camera correctly Hold the camera so that your fingers do not block the flash and do not touch the lens portion when recording images. 20 3 Press the shutter button...
... be difficult to focus on (dark, poor contrast) or the subject may change after the automatic adjustment is charging the flash.) Holding the camera correctly Hold the camera so that your fingers do not block the flash and do not touch the lens portion when recording images. 20 3 Press the shutter button...
Operating Instructions
Page 23
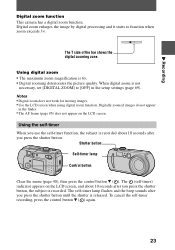
... button V ( ). The self-timer lamp flashes and the beep sounds after you press the shutter button, the subject is recorded. Digital zoom enlarges the image by digital processing and it starts to [OFF] in the finder. • The AF frame (page 85) does not appear on the LCD... 3×. To cancel the self-timer recording, press the control button V ( ) again. 23 Digitally zoomed images do not appear in the setup settings (page 69). B Recording Digital zoom function This camera has a digital zoom function. Using the self-timer When you press the shutter button. The T side of the ...
... button V ( ). The self-timer lamp flashes and the beep sounds after you press the shutter button, the subject is recorded. Digital zoom enlarges the image by digital processing and it starts to [OFF] in the finder. • The AF frame (page 85) does not appear on the LCD... 3×. To cancel the self-timer recording, press the control button V ( ) again. 23 Digitally zoomed images do not appear in the setup settings (page 69). B Recording Digital zoom function This camera has a digital zoom function. Using the self-timer When you press the shutter button. The T side of the ...
Operating Instructions
Page 24
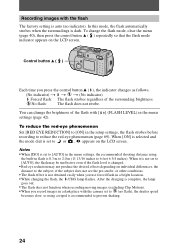
... you press the control button v ( ), the indicator changes as follows. (No indicator) t t t (No indicator) Forced flash: The flash strobes regardless of the flash with the camera set to reduce the red-eye phenomenon (page 69). When it is not set to [AUTO] in the menu settings, the recommended shooting distance using...
... you press the control button v ( ), the indicator changes as follows. (No indicator) t t t (No indicator) Forced flash: The flash strobes regardless of the flash with the camera set to reduce the red-eye phenomenon (page 69). When it is not set to [AUTO] in the menu settings, the recommended shooting distance using...
Operating Instructions
Page 26
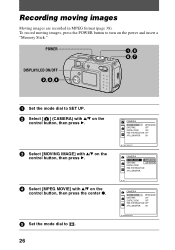
...: OFF RED EYE REDUCTION: OFF AF ILLUMINATOR: ON PAGE SELECT CAMERA MOVING IMAGE: MPEG MOVIE DATE/TIME: CLIP MOTION DIGITAL ZOOM: RED EYE REDUCTION: AF ILLUMINATOR: OK CAMERA MOVING IMAGE: MPEG MOVIE DATE/TIME: OFF DIGITAL ZOOM: OFF RED EYE REDUCTION: OFF AF ILLUMINATOR: ON PAGE SELECT ...Recording moving images, press the POWER button to turn on the control button, then press the center z. 5 Set the mode dial to SET UP. 2 Select [ ] (CAMERA) with v/V on the control ...
...: OFF RED EYE REDUCTION: OFF AF ILLUMINATOR: ON PAGE SELECT CAMERA MOVING IMAGE: MPEG MOVIE DATE/TIME: CLIP MOTION DIGITAL ZOOM: RED EYE REDUCTION: AF ILLUMINATOR: OK CAMERA MOVING IMAGE: MPEG MOVIE DATE/TIME: OFF DIGITAL ZOOM: OFF RED EYE REDUCTION: OFF AF ILLUMINATOR: ON PAGE SELECT ...Recording moving images, press the POWER button to turn on the control button, then press the center z. 5 Set the mode dial to SET UP. 2 Select [ ] (CAMERA) with v/V on the control ...
Operating Instructions
Page 27
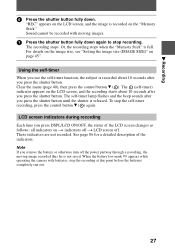
... screen indicators during recording Each time you press the shutter button until the shutter is full. When the battery low mark E appears while operating the camera with moving image recorded thus far is recorded on t indicators off t LCD screen off the power partway through a recording, the moving images. 7 Press the shutter...
... screen indicators during recording Each time you press the shutter button until the shutter is full. When the battery low mark E appears while operating the camera with moving image recorded thus far is recorded on t indicators off t LCD screen off the power partway through a recording, the moving images. 7 Press the shutter...
Operating Instructions
Page 28
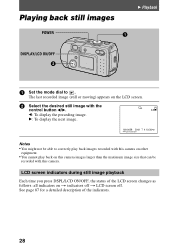
... POWER DISPLAY/LCD ON/OFF B Playback 1 Set the mode dial to correctly play back images recorded with this camera on other equipment. • You cannot play back on this camera. See page 87 for a detailed description of the LCD screen changes as follows: all indicators on the LCD screen.... 2 Select the desired still image with this camera images larger than the maximum image size that can be recorded with the control button b/B. B: To display the next image. 640 6/8 100-0028 2001...
... POWER DISPLAY/LCD ON/OFF B Playback 1 Set the mode dial to correctly play back images recorded with this camera on other equipment. • You cannot play back on this camera. See page 87 for a detailed description of the LCD screen changes as follows: all indicators on the LCD screen.... 2 Select the desired still image with this camera images larger than the maximum image size that can be recorded with the control button b/B. B: To display the next image. 640 6/8 100-0028 2001...


