Operating Instructions
Page 3
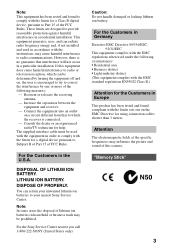
..., which the receiver is connected. - DISPOSAL OF LITHIUM ION BATTERY. LITHIUM ION BATTERY. "Memory Stick" N50 3 The supplied interface cable must be prohibited. DISPOSE OF PROPERLY. For the Customers in...to comply with the limits for help. If this camera. Consult the dealer or an experienced radio/TV technician for a Class B digital device, pursuant to Part 15 of FCC Rules....Note: In some areas the disposal of the following measures: - For the Sony Service Center nearest you call 1-800-222-SONY (United States only) Caution: Do not handle damaged or leaking lithium ion...
..., which the receiver is connected. - DISPOSAL OF LITHIUM ION BATTERY. LITHIUM ION BATTERY. "Memory Stick" N50 3 The supplied interface cable must be prohibited. DISPOSE OF PROPERLY. For the Customers in...to comply with the limits for help. If this camera. Consult the dealer or an experienced radio/TV technician for a Class B digital device, pursuant to Part 15 of FCC Rules....Note: In some areas the disposal of the following measures: - For the Sony Service Center nearest you call 1-800-222-SONY (United States only) Caution: Do not handle damaged or leaking lithium ion...
Operating Instructions
Page 4
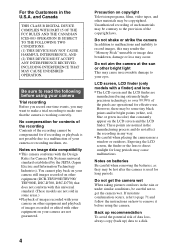
...constantly appear on batteries Be careful when removing the batteries, as they may be careful not to your camera or recording medium, etc. and Canada THIS CLASS B DIGITAL DEVICE COMPLIES WITH PART 15 OF THE FCC RULES AND THE CANADIAN ICES-003 OPERATION IS SUBJECT TO THE... materials may be some areas.) • Playback of images recorded with your camera still images recorded on other equipment (DCR-TRV890E/TRV900/ TRV900E, DSC-D700, DSC-D770) that does not conform with this may render the "Memory Stick" unusable or image data breakdown, damage or loss may cause malfunctions. Do...
...constantly appear on batteries Be careful when removing the batteries, as they may be careful not to your camera or recording medium, etc. and Canada THIS CLASS B DIGITAL DEVICE COMPLIES WITH PART 15 OF THE FCC RULES AND THE CANADIAN ICES-003 OPERATION IS SUBJECT TO THE... materials may be some areas.) • Playback of images recorded with your camera still images recorded on other equipment (DCR-TRV890E/TRV900/ TRV900E, DSC-D700, DSC-D770) that does not conform with this may render the "Memory Stick" unusable or image data breakdown, damage or loss may cause malfunctions. Do...
Operating Instructions
Page 7
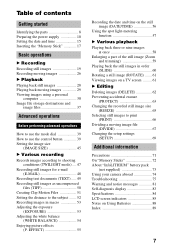
...image file (DIVIDE 67 Changing the setup settings (SETUP 69 Additional information Precautions 71 On "Memory Sticks 72 About "InfoLITHIUM" battery pack (not supplied 73 Using your camera abroad 74 Troubleshooting 75 Warning and notice messages 81 Self-diagnosis display 83 Specifications 84 LCD screen...part of contents Getting started Identifying the parts 8 Preparing the power supply 10 Setting the date and time 15 Inserting the "Memory Stick 17 Basic operations B Recording Recording still images 19 Recording moving images 26 B Playback Playing back still images 28 Playing back...
...image file (DIVIDE 67 Changing the setup settings (SETUP 69 Additional information Precautions 71 On "Memory Sticks 72 About "InfoLITHIUM" battery pack (not supplied 73 Using your camera abroad 74 Troubleshooting 75 Warning and notice messages 81 Self-diagnosis display 83 Specifications 84 LCD screen...part of contents Getting started Identifying the parts 8 Preparing the power supply 10 Setting the date and time 15 Inserting the "Memory Stick 17 Basic operations B Recording Recording still images 19 Recording moving images 26 B Playback Playing back still images 28 Playing back...
Operating Instructions
Page 9
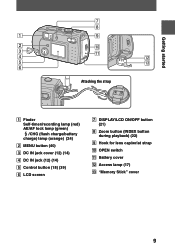
Getting started Attaching the strap A Finder Self-timer/recording lamp (red) AE/AF lock lamp (green) /CHG (flash charge/battery charge) lamp (orange) (24) B MENU button (40) C DC IN jack cover (12) (14) D DC IN jack (12) (14) E Control button (18) (39) F LCD screen G DISPLAY/LCD ON/OFF button (21) H Zoom button (INDEX button during playback) (22) I Hook for lens cap/wrist strap J OPEN switch K Battery cover L Access lamp (17) M "Memory Stick" cover 9
Getting started Attaching the strap A Finder Self-timer/recording lamp (red) AE/AF lock lamp (green) /CHG (flash charge/battery charge) lamp (orange) (24) B MENU button (40) C DC IN jack cover (12) (14) D DC IN jack (12) (14) E Control button (18) (39) F LCD screen G DISPLAY/LCD ON/OFF button (21) H Zoom button (INDEX button during playback) (22) I Hook for lens cap/wrist strap J OPEN switch K Battery cover L Access lamp (17) M "Memory Stick" cover 9

Operating Instructions
Page 13
.... • The numbers of images shown on tables above figures are as a guide. Notes • The camera may be decreased if you continuously record/play back while replacing the "Memory Stick." • When LCD BACKLIGHT is limited. Even when using an "InfoLITHIUM" battery pack (not supplied), the... fully charged battery pack at a temperature of 25°C (77°F Playing back single images in order at about 3-second intervals Moving image recording SONY alkaline batteries (supplied) LCD screen LCD screen OFF (min.) ON (min.) NP-FS11 (not supplied)* LCD screen LCD screen OFF (min.) ON...
.... • The numbers of images shown on tables above figures are as a guide. Notes • The camera may be decreased if you continuously record/play back while replacing the "Memory Stick." • When LCD BACKLIGHT is limited. Even when using an "InfoLITHIUM" battery pack (not supplied), the... fully charged battery pack at a temperature of 25°C (77°F Playing back single images in order at about 3-second intervals Moving image recording SONY alkaline batteries (supplied) LCD screen LCD screen OFF (min.) ON (min.) NP-FS11 (not supplied)* LCD screen LCD screen OFF (min.) ON...

Operating Instructions
Page 17
... and shape of "Memory Stick" used. 17 Removing the "Memory Stick" Open the "Memory Stick" cover, then press the "Memory Stick" once lightly. Getting started Inserting the "Memory Stick" Access lamp 1 Open the "Memory Stick" cover. 2 Insert the "Memory Stick." Notes • Insert the "Memory Stick" firmly until it clicks, otherwise a message such as illustrated until it clicks. 3 Close the "Memory Stick" cover. Insert the "Memory Stick" with the B mark...
... and shape of "Memory Stick" used. 17 Removing the "Memory Stick" Open the "Memory Stick" cover, then press the "Memory Stick" once lightly. Getting started Inserting the "Memory Stick" Access lamp 1 Open the "Memory Stick" cover. 2 Insert the "Memory Stick." Notes • Insert the "Memory Stick" firmly until it clicks, otherwise a message such as illustrated until it clicks. 3 Close the "Memory Stick" cover. Insert the "Memory Stick" with the B mark...
Operating Instructions
Page 19
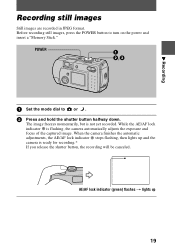
...yet recorded. POWER 1 Set the mode dial to turn on the power and insert a "Memory Stick." B Recording Recording still images Still images are recorded in JPEG format. The image freezes momentarily, but is flashing, the camera automatically adjusts the exposure and focus of the captured image. When the... camera finishes the automatic adjustments, the AE/AF lock indicator z stops flashing, then lights up 19 AE...
...yet recorded. POWER 1 Set the mode dial to turn on the power and insert a "Memory Stick." B Recording Recording still images Still images are recorded in JPEG format. The image freezes momentarily, but is flashing, the camera automatically adjusts the exposure and focus of the captured image. When the... camera finishes the automatic adjustments, the AE/AF lock indicator z stops flashing, then lights up 19 AE...

Operating Instructions
Page 20
...camera correctly Hold the camera so that your fingers do not block the flash and do not touch the lens portion when recording images. 20 The shutter sounds. Release the shutter button, then focus again. However, the recording cannot be recorded on the "Memory Stick." When "RECORDING" disappears, you can record on a "Memory Stick... close. "RECORDING" appears on (dark, poor contrast) or the subject may change after AE/AF lock, but this time, the camera is complete. RCORI ∗ If the flashing AE/AF lock indicator changes to flashing slowly, the subject may be difficult to 52....
...camera correctly Hold the camera so that your fingers do not block the flash and do not touch the lens portion when recording images. 20 The shutter sounds. Release the shutter button, then focus again. However, the recording cannot be recorded on the "Memory Stick." When "RECORDING" disappears, you can record on a "Memory Stick... close. "RECORDING" appears on (dark, poor contrast) or the subject may change after AE/AF lock, but this time, the camera is complete. RCORI ∗ If the flashing AE/AF lock indicator changes to flashing slowly, the subject may be difficult to 52....
Operating Instructions
Page 26
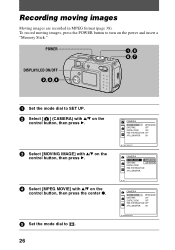
...OFF RED EYE REDUCTION: OFF AF ILLUMINATOR: ON PAGE SELECT CAMERA MOVING IMAGE: MPEG MOVIE DATE/TIME: CLIP MOTION DIGITAL ZOOM: RED EYE REDUCTION: AF ILLUMINATOR: OK CAMERA MOVING IMAGE: MPEG MOVIE DATE/TIME: OFF DIGITAL ZOOM: OFF RED EYE REDUCTION: OFF AF ILLUMINATOR: ON ...the mode dial to SET UP. 2 Select [ ] (CAMERA) with v/V on the control button, then press B. 3 Select [MOVING IMAGE] with v/V on the control button, then press B. 4 Select [MPEG MOVIE] with v/V on the power and insert a "Memory Stick." To record moving images Moving images are recorded in MPEG format...
...OFF RED EYE REDUCTION: OFF AF ILLUMINATOR: ON PAGE SELECT CAMERA MOVING IMAGE: MPEG MOVIE DATE/TIME: CLIP MOTION DIGITAL ZOOM: RED EYE REDUCTION: AF ILLUMINATOR: OK CAMERA MOVING IMAGE: MPEG MOVIE DATE/TIME: OFF DIGITAL ZOOM: OFF RED EYE REDUCTION: OFF AF ILLUMINATOR: ON ...the mode dial to SET UP. 2 Select [ ] (CAMERA) with v/V on the control button, then press B. 3 Select [MOVING IMAGE] with v/V on the control button, then press B. 4 Select [MPEG MOVIE] with v/V on the power and insert a "Memory Stick." To record moving images Moving images are recorded in MPEG format...
Operating Instructions
Page 27
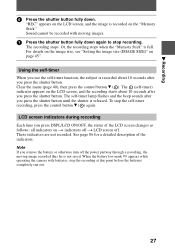
... starts about 10 seconds after you remove the battery or otherwise turn off . The recording stops. Or, the recording stops when the "Memory Stick" is released. LCD screen indicators during recording Each time you press the shutter button. The (self-timer) indicator appears on the... detailed description of the LCD screen changes as follows: all indicators on page 45". When the battery low mark E appears while operating the camera with moving image recorded thus far is not saved. To stop the recording at this point before the batteries completely run out. 27 Sound ...
... starts about 10 seconds after you remove the battery or otherwise turn off . The recording stops. Or, the recording stops when the "Memory Stick" is released. LCD screen indicators during recording Each time you press the shutter button. The (self-timer) indicator appears on the... detailed description of the LCD screen changes as follows: all indicators on page 45". When the battery low mark E appears while operating the camera with moving image recorded thus far is not saved. To stop the recording at this point before the batteries completely run out. 27 Sound ...

Operating Instructions
Page 30
...pack (not supplied) or the AC power adapter (not supplied). Here describes the way using the [NORMAL] setting. Notes • Data recorded with your camera is [NORMAL]. The factory setting of the Clip Motion file may increase when you open the image. • Depending on a personal computer using the supplied...Communications with your computer (for your personal computer and the application software. Viewing images using a personal computer You can view data recorded with your camera on image files recorded in a "Memory Stick" from the personal computer. Moving images: MPEG format -
...pack (not supplied) or the AC power adapter (not supplied). Here describes the way using the [NORMAL] setting. Notes • Data recorded with your camera is [NORMAL]. The factory setting of the Clip Motion file may increase when you open the image. • Depending on a personal computer using the supplied...Communications with your computer (for your personal computer and the application software. Viewing images using a personal computer You can view data recorded with your camera on image files recorded in a "Memory Stick" from the personal computer. Moving images: MPEG format -
Operating Instructions
Page 32
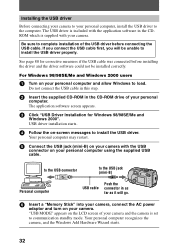
...of your personal computer, install the USB driver to the computer. If you connect the USB cable first, you will go. 6 Insert a "Memory Stick" into your camera, connect the AC power adaptor and turn on -screen messages to load. Installing the USB driver Before connecting your... Installation for corrective measures if the USB cable was connected before connecting the USB cable. USB driver installation starts. 4 Follow the on your camera. For Windows 98/98SE/Me and Windows 2000 users 1 Turn on your personal computer and allow Windows to install the USB driver. Your personal...
...of your personal computer, install the USB driver to the computer. If you connect the USB cable first, you will go. 6 Insert a "Memory Stick" into your camera, connect the AC power adaptor and turn on -screen messages to load. Installing the USB driver Before connecting your... Installation for corrective measures if the USB cable was connected before connecting the USB cable. USB driver installation starts. 4 Follow the on your camera. For Windows 98/98SE/Me and Windows 2000 users 1 Turn on your personal computer and allow Windows to install the USB driver. Your personal...
Operating Instructions
Page 33
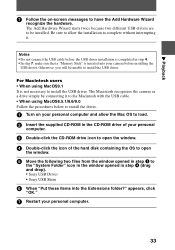
...the USB cable before the USB driver installation is completed in step 4 (drag and drop). • Sony USB Driver • Sony USB Shim 6 When "Put these items into your camera before installing the USB driver. For Macintosh users • When using MacOS8.5.1/8.6/9.0 Follow the procedures below to...window opened in step 3 to the "System Folder" icon in the window opened in step 4. • In step 7, make sure that a "Memory Stick" is inserted into the Extensions folder?" Otherwise, you will be installed. B Playback 7 Follow the on your personal computer and allow the installation to...
...the USB cable before the USB driver installation is completed in step 4 (drag and drop). • Sony USB Driver • Sony USB Shim 6 When "Put these items into your camera before installing the USB driver. For Macintosh users • When using MacOS8.5.1/8.6/9.0 Follow the procedures below to...window opened in step 3 to the "System Folder" icon in the window opened in step 4. • In step 7, make sure that a "Memory Stick" is inserted into the Extensions folder?" Otherwise, you will be installed. B Playback 7 Follow the on your personal computer and allow the installation to...

Operating Instructions
Page 34
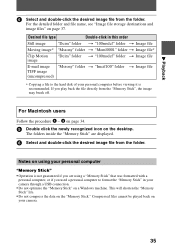
...Disk (E:)") The folders inside the "Memory Stick" are displayed. to the USB connector to the USB jack (mini-B) Personal computer Push the USB cable connector in as far as it will go. 3 Insert a "Memory Stick" into your camera, and connect the AC power adaptor to your camera and then to load. 2 ...Connect the USB jack (mini-B) on the camera with the USB connector on your camera. "USB MODE" appears on the LCD screen of the camera. When viewing moving image playback...
...Disk (E:)") The folders inside the "Memory Stick" are displayed. to the USB connector to the USB jack (mini-B) Personal computer Push the USB cable connector in as far as it will go. 3 Insert a "Memory Stick" into your camera, and connect the AC power adaptor to your camera and then to load. 2 ...Connect the USB jack (mini-B) on the camera with the USB connector on your camera. "USB MODE" appears on the LCD screen of the camera. When viewing moving image playback...
Operating Instructions
Page 35
... Macintosh users Follow the procedure 1 - 4 on page 34. 5 Double click the newly recognized icon on page 37. The folders inside the "Memory Stick" are using your camera through a USB connection. • Do not optimize the "Memory Stick" on your personal computer before viewing it is not guaranteed if you used a personal computer to format the...
... Macintosh users Follow the procedure 1 - 4 on page 34. 5 Double click the newly recognized icon on page 37. The folders inside the "Memory Stick" are using your camera through a USB connection. • Do not optimize the "Memory Stick" on your personal computer before viewing it is not guaranteed if you used a personal computer to format the...
Operating Instructions
Page 36
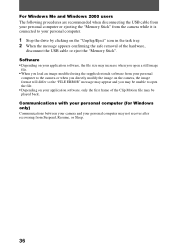
...Windows Me and Windows 2000 users The following procedures are recommended when disconnecting the USB cable from your personal computer or ejecting the "Memory Stick" from the camera while it is connected to open a still image file. • When you load an image modified using the supplied retouch ... with your personal computer (for Windows only) Communications between your camera and your personal computer may not recover after recovering from your personal computer to the camera or when you directly modify the image on the camera, the image format will differ so the "FILE ERROR" message...
...Windows Me and Windows 2000 users The following procedures are recommended when disconnecting the USB cable from your personal computer or ejecting the "Memory Stick" from the camera while it is connected to open a still image file. • When you load an image modified using the supplied retouch ... with your personal computer (for Windows only) Communications between your camera and your personal computer may not recover after recovering from your personal computer to the camera or when you directly modify the image on the camera, the image format will differ so the "FILE ERROR" message...
Operating Instructions
Page 46
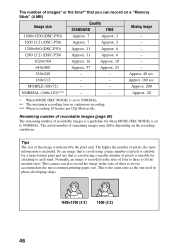
... depending on a "Memory Stick" (4 MB) Image size Quality STANDARD FINE Moving image 1600×1200 (DSC-P50) Approx. 7 Approx. 3 - 1600 (3:2) (DSC-P50) Approx. 7 Approx. 3 - 1280×960 (DSC-P30) Approx. 11 Approx. 6 - 1280 (3:2) (DSC-P30) Approx. 11 Approx. 6 - 1024×768 Approx. 16 Approx. 10 - 640×480 Approx. 57 Approx. 23 - 320×240 - - This camera can record...
... depending on a "Memory Stick" (4 MB) Image size Quality STANDARD FINE Moving image 1600×1200 (DSC-P50) Approx. 7 Approx. 3 - 1600 (3:2) (DSC-P50) Approx. 7 Approx. 3 - 1280×960 (DSC-P30) Approx. 11 Approx. 6 - 1280 (3:2) (DSC-P30) Approx. 11 Approx. 6 - 1024×768 Approx. 16 Approx. 10 - 640×480 Approx. 57 Approx. 23 - 320×240 - - This camera can record...
Operating Instructions
Page 48
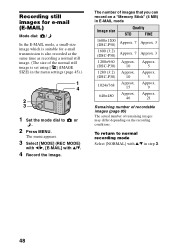
...×480 Approx. 46 Approx. 21 Remaining number of recordable images (page 85) The actual number of remaining images may differ depending on a "Memory Stick" (4 MB) in step 3. 48 Approx. (DSC-P30) 10 5 1280 (3:2) Approx. The menu appears. 3 Select [MODE] (REC MODE) with b/B, [E-MAIL] with v/V in E-MAIL mode Image size Quality STD FINE 1600...
...×480 Approx. 46 Approx. 21 Remaining number of recordable images (page 85) The actual number of remaining images may differ depending on a "Memory Stick" (4 MB) in step 3. 48 Approx. (DSC-P30) 10 5 1280 (3:2) Approx. The menu appears. 3 Select [MODE] (REC MODE) with b/B, [E-MAIL] with v/V in E-MAIL mode Image size Quality STD FINE 1600...
Operating Instructions
Page 49
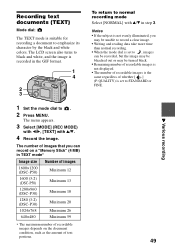
...appears. 3 Select [MODE] (REC MODE) with b/B, [TEXT] with v/V in TEXT mode* Image size Number of images 1600×1200 (DSC-P50) 1600 (3:2) (DSC-P50) 1280×960 (DSC-P30) 1280 (3:2) (DSC-P30) 1024×768 640×480 Minimum 12 Minimum 13 Minimum 18 Minimum 20 Minimum 26 Minimum 59 ∗ The maximum number.... • Writing and reading data take more time than normal recording. • When the mode dial is set to , images can record on a "Memory Stick" (4 MB) in step 3. The LCD screen also turns to black and white, and the image is the same regardless of text portions.
...appears. 3 Select [MODE] (REC MODE) with b/B, [TEXT] with v/V in TEXT mode* Image size Number of images 1600×1200 (DSC-P50) 1600 (3:2) (DSC-P50) 1280×960 (DSC-P30) 1280 (3:2) (DSC-P30) 1024×768 640×480 Minimum 12 Minimum 13 Minimum 18 Minimum 20 Minimum 26 Minimum 59 ∗ The maximum number.... • Writing and reading data take more time than normal recording. • When the mode dial is set to , images can record on a "Memory Stick" (4 MB) in step 3. The LCD screen also turns to black and white, and the image is the same regardless of text portions.
Operating Instructions
Page 50
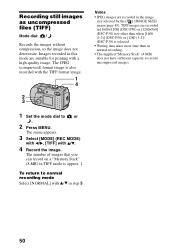
... more time than when [1600 (3:2)] (DSC-P50) or [1280 (3:2)] (DSC-P30) is also recorded with a high-quality image. TIFF images are suitable for printing with the TIFF format image. 1 4 2 3 Notes • JPEG images are recorded in normal recording. • The supplied "Memory Stick" (4 MB) does not have sufficient capacity...recorded in [1600×1200] (DSC-P50) or [1280×960] (DSC-P30) size other than in the image size selected by the [ ] (IMAGE SIZE) menu (page 45). To return to or . 2 Press MENU. The number of images that you can record on a "Memory Stick" (8 MB) in step 3. ...
... more time than when [1600 (3:2)] (DSC-P50) or [1280 (3:2)] (DSC-P30) is also recorded with a high-quality image. TIFF images are suitable for printing with the TIFF format image. 1 4 2 3 Notes • JPEG images are recorded in normal recording. • The supplied "Memory Stick" (4 MB) does not have sufficient capacity...recorded in [1600×1200] (DSC-P50) or [1280×960] (DSC-P30) size other than in the image size selected by the [ ] (IMAGE SIZE) menu (page 45). To return to or . 2 Press MENU. The number of images that you can record on a "Memory Stick" (8 MB) in step 3. ...


