Operating Instructions
Page 8
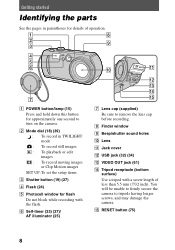
B Mode dial (18) (39) : To record in parentheses for details of less than 5.5 mm (7/32 inch). You will be unable to firmly secure the camera to remove the lens cap before recording. H Finder window I Beep/shutter sound holes J Lens K Jack cover L USB jack (32) (34) M VIDEO OUT jack (61)... N Tripod receptacle (bottom surface) Use a tripod with the flash. O RESET button (75) 8 F Self-timer (23) (27)/ AF illuminator (25) G Lens cap (supplied) Be sure to tripods having longer screws, and may damage the...
B Mode dial (18) (39) : To record in parentheses for details of less than 5.5 mm (7/32 inch). You will be unable to firmly secure the camera to remove the lens cap before recording. H Finder window I Beep/shutter sound holes J Lens K Jack cover L USB jack (32) (34) M VIDEO OUT jack (61)... N Tripod receptacle (bottom surface) Use a tripod with the flash. O RESET button (75) 8 F Self-timer (23) (27)/ AF illuminator (25) G Lens cap (supplied) Be sure to tripods having longer screws, and may damage the...
Operating Instructions
Page 16
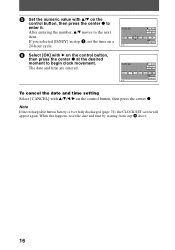
... a 24-hour cycle. 6 Select [OK] with B on the control button, then press the center z at the desired moment to the next item. When this happens, reset the date and time by starting from step 3 above. 16 Note If the rechargeable button battery is ever fully discharged (page 72), the CLOCK SET...
... a 24-hour cycle. 6 Select [OK] with B on the control button, then press the center z at the desired moment to the next item. When this happens, reset the date and time by starting from step 3 above. 16 Note If the rechargeable button battery is ever fully discharged (page 72), the CLOCK SET...
Operating Instructions
Page 69
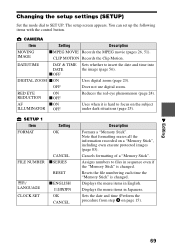
...the menu items in Japanese. You can set up the following items with the control button. CAMERA Item Setting Description MOVING IMAGE x MPEG MOVIE Records the MPEG movie (pages 26, 51)....all the information recorded on a "Memory Stick", including even erasure protected images (page 83). Resets the file numbering each time the "Memory Stick" is changed . Displays the menu items in... & TIME Sets whether to SET UP. Cancels formatting of a "Memory Stick". x OFF DIGITAL ZOOM x ON Uses digital zoom (page 23). B Editing 69 Assigns numbers to focus on page 15). RED EYE ...
...the menu items in Japanese. You can set up the following items with the control button. CAMERA Item Setting Description MOVING IMAGE x MPEG MOVIE Records the MPEG movie (pages 26, 51)....all the information recorded on a "Memory Stick", including even erasure protected images (page 83). Resets the file numbering each time the "Memory Stick" is changed . Displays the menu items in... & TIME Sets whether to SET UP. Cancels formatting of a "Memory Stick". x OFF DIGITAL ZOOM x ON Uses digital zoom (page 23). B Editing 69 Assigns numbers to focus on page 15). RED EYE ...
Operating Instructions
Page 75
... screen does not light when the power is cleared.) Should your camera still not operate properly, consult your Sony dealer or local authorized Sony service facility. t Set it to the recording position. •...on if you turn the power on the "Memory Stick" is still set to the DC IN jack of your camera. If code displays (C:ss:ss) appear on the LCD screen, the self-diagnosis ...reset button located on the bottom. (If you press the reset button, the date and time setting is turned on. t Insert a "Memory Stick" (page 17). • The write-protect tab on and check that the camera...
... screen does not light when the power is cleared.) Should your camera still not operate properly, consult your Sony dealer or local authorized Sony service facility. t Set it to the recording position. •...on if you turn the power on the "Memory Stick" is still set to the DC IN jack of your camera. If code displays (C:ss:ss) appear on the LCD screen, the self-diagnosis ...reset button located on the bottom. (If you press the reset button, the date and time setting is turned on. t Insert a "Memory Stick" (page 17). • The write-protect tab on and check that the camera...
Operating Instructions
Page 79
...cable, and connect it to [NORMAL] (page 70). • Since the camera is connected to other equipment besides the keyboard, the mouse, and your camera. t Set it again firmly. If the function still do not work, press the reset button located on page 80. t Install the USB driver (page 32). &#...8226; [USB CONNECT] is set to the keyboard, the mouse, and your camera. For details, see the procedure on the bottom using a sharp-pointed object. (If you press the reset button, the date and time setting is cleared.) Additional information 79 t Turn on your personal computer ...
...cable, and connect it to [NORMAL] (page 70). • Since the camera is connected to other equipment besides the keyboard, the mouse, and your camera. t Set it again firmly. If the function still do not work, press the reset button located on page 80. t Install the USB driver (page 32). &#...8226; [USB CONNECT] is set to the keyboard, the mouse, and your camera. For details, see the procedure on the bottom using a sharp-pointed object. (If you press the reset button, the date and time setting is cleared.) Additional information 79 t Turn on your personal computer ...
Operating Instructions
Page 83
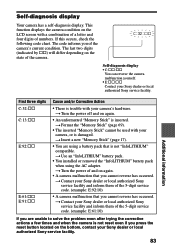
... with your camera's hardware. t Use an "InfoLITHIUM" battery pack. • You installed or removed the "InfoLITHIUM" battery pack when using a battery pack that you press the reset button located on the bottom, contact your Sony dealer or local authorized Sony service facility. If this occurs, check the following code chart. The last two digits (indicated...
... with your camera's hardware. t Use an "InfoLITHIUM" battery pack. • You installed or removed the "InfoLITHIUM" battery pack when using a battery pack that you press the reset button located on the bottom, contact your Sony dealer or local authorized Sony service facility. If this occurs, check the following code chart. The last two digits (indicated...


